How to create Conan the Barbarian with ZBrush
Artist Giorgio Palombi shares his creative workflow for creating his take on Conan the Barbarian.
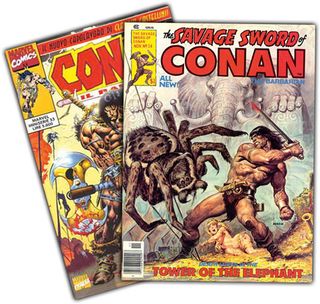
Games artist Giorgio Palombi believes inspiration comes from diversity and seeking the unexpected, which often means he's drawn to mix what he knows and loves with new experiences and ideas.
"That's why I often test new techniques while I'm working on famous characters that I love," he says. For this test, a ZBrush entry for Comic-Con, Giorgio chose pulp fantasy hero Conan: "I found it exciting doing one of my favourite characters, trying to resemble the look of a 1970s comic cover," Giorgio explains. "It's always a pleasure for me to revamp characters and styles from the past using state of the art technology."
For this illustration Giorgio used ZBrush for sculpting, hair and texturing while Photoshop was used for the detailed texturing and final composition. "I also used 3ds Max for mesh refining, UV mapping and a basic skinning to pose the character," he says. The rendering was done using Marmoset Toolbag 2, "a popular real-time engine for game assets."
- You can download Giorgio’s step screens here
01. Using references
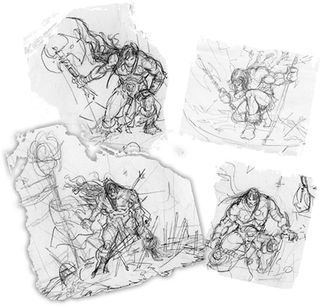
First I collect some reference images and then I do some random sketches until I find my confidence and can start drawing the subject with no restrictions.
If you have to create a brand-new character more drawings are required; if you plan to do an existing hero, like Conan, this can be faster and I usually start from the best existing artwork as guide for my 2D concepts. During this process I start to think about the final composition and possible poses.
02. Planning the pose
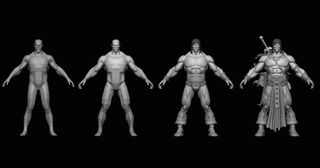
I jump into the 3D world by sketching rough shapes in ZBrush and take care of the overall proportions and silhouette. It's important to focus on simplified masses and to plan the work for the next steps.
03. Adding skin, scratches and other important details
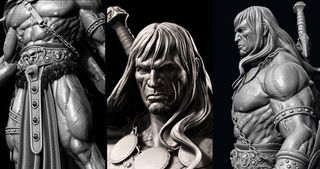
I use a custom skin brush to get a good feel for Conan, to get him the way I want before moving on. I use some custom alphas in ZBrush to create skin pores and flesh variety; Slash Brush and Trim Dynamic are really useful to add scratches and bumps on the overall model.
04. Setting the topology
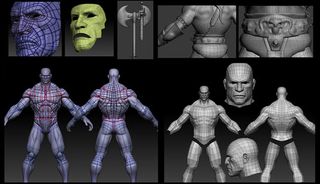
Now it's time to build a good topology using ZBrush retopology tools. I often use 3ds Max to edit and adapt the new topology. I also start to create and arrange UVs. Often I sketch the new edge flows using PolyPaint in ZBrush and then I use the retopology tools to place the vertices following the lines.
05. Creating the hair
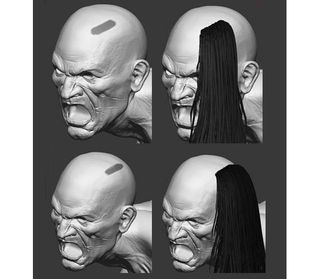
I use the FiberMesh tool in ZBrush to build fur geometry for a game asset, I find it faster than arranging them in 3ds Max. I first choose a template from Lightbox, then I craft small groups of fibres following the shape of the head. Each group is set as a Subtool, so I can move, transpose and modify each strand – I found Groom Hair Toss useful.
06. Creating the maps
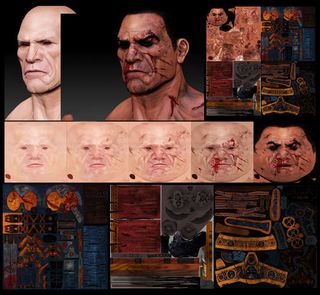
Once I finish the new low-poly mesh I use xNormal to bake textures from the high-poly one. I usually collect normals, polypaint, cavity, AO maps and use Photoshop to manipulate them.
07. Texturing and lighting
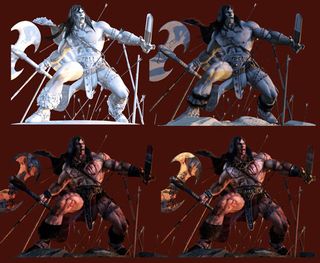
I use the viewport to get feedback during the texturing process done in Photoshop. Once I'm happy with the diffuse map, I create speculars, gloss, additional normal maps and fuzz maps. I create a scene in Marmoset Toolbag. I add lights and an environment map; and tweak the shaders.
08. Setting the render
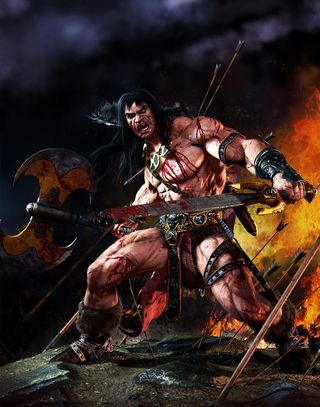
When I have some renders from various angles and a light setup chosen, I select the one that best shows the iconic details and the character, then I use Photoshop to add a background, do some fixes and create the final image.
09. Designing the cover
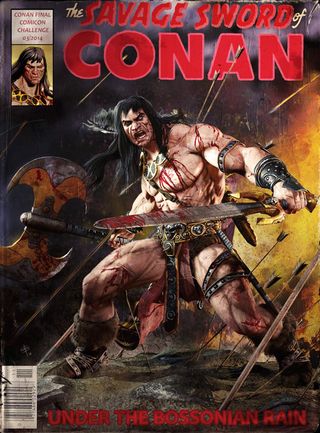
I export an image with an Alpha channel from Marmoset then use Photoshop to add a background, mixing various images from the internet. In the last passes I add writing and dirt, then apply photo filters to wash-out a little of the image in an attempt to make it resemble an old comic book cover.
Words: Giorgio Palombi
Giorgio is an Italian freelance artist who creates game assets and sculptures for 3D printing. He has worked in advertising and has created models for industrial animations. This article appeared in 3D World issue 184.
Like this? Read these!
- Did ZBrush just become the 3D artists' complete package?
- 3 top animation tips from Star Wars rebels creators
- Free 3D software to download today

Thank you for reading 5 articles this month* Join now for unlimited access
Enjoy your first month for just £1 / $1 / €1
*Read 5 free articles per month without a subscription

Join now for unlimited access
Try first month for just £1 / $1 / €1
Get the Creative Bloq Newsletter
Daily design news, reviews, how-tos and more, as picked by the editors.
The Creative Bloq team is made up of a group of design fans, and has changed and evolved since Creative Bloq began back in 2012. The current website team consists of eight full-time members of staff: Editor Georgia Coggan, Deputy Editor Rosie Hilder, Ecommerce Editor Beren Neale, Senior News Editor Daniel Piper, Editor, Digital Art and 3D Ian Dean, Tech Reviews Editor Erlingur Einarsson, Ecommerce Writer Beth Nicholls and Staff Writer Natalie Fear, as well as a roster of freelancers from around the world. The ImagineFX magazine team also pitch in, ensuring that content from leading digital art publication ImagineFX is represented on Creative Bloq.
