How to create a 3D print-ready model
Artist Aiman Akhtar celebrated his friends' wedding by 3D printing a wedding figure, why not try it yourself?
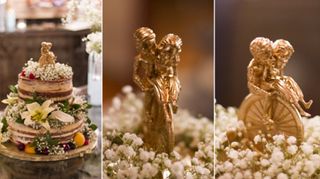
When the friends of 3D artist Aiman Akhtar announced they were getting married, he decided to do what he does best and make them some art. To celebrate their special day, Akhtar created and printed, with the assistance of Tristan Hummel, this brilliant wedding cake topper. Here he reveals the process behind this special project.
01. Block-in the pose and proportions
Tell a story with the sculpt. The idea for this cake topper was to have Tristan whisk his fiancee away on a Penny-Farthing bicycle. I used Zmannequins to block out my proportions and define the pose. A lot can be told by the way two characters interact with each other.
02. Use references
Gather reference of your subjects! I like having at least a front, side and 3/4 photos of my smiling subject. At this stage of the sculpt, I focus on likeness first and add emotion later. Remember to enlarge detail so that it reads well when printed.
03. Sculpt the hair
My favorite part about sculpting for 3D print is the freedom to focus on form and shape, since topology is not a concern. However, there are a few notable restrictions on modelling for fused deposit 3D printing - no spaces between parts, connect and support everything, that means no overhangs, no pockets of empty space, no holes in the mesh, no thin free standing tubes, and everything should be sculpted from thick to thin, avoid deep crevices.
The hair was sculpted directly on the model mostly using the Dam_Standard brush with the large soft alpha 39. No wide ridges or deep crevices, everything sculpted from thick to thin, like a pyramid.
04. Use Inflate for 3D printing
Tristan modeled the original bicycle and in order to make it more print-friendly, I selected various polygroups one at a time, hid the rest and ran inflate under the deformations tab to close any small gaps between objects. Feel free to intersect the various models because we will dynamesh at the end of the sculpting stage.
05. Add the base tabs
I added circular tabs around the base in order to ground it fully to the base of the printer with more surface area, as well as to prevent the edges of the base plastic from warping. These were intentionally very thin so they could easily snap off.
Get the Creative Bloq Newsletter
Daily design news, reviews, how-tos and more, as picked by the editors.
06. Intersect Subtools
Intersect subtools whenever possible to insure a good dynamesh. Here, you can see how the bride and groom's bodies are intersecting together and the groom's leg is intersecting the side of the bike all the way down.
07. The final sculpt
Once finished with the final sculpt, I send the bride and groom a ZBrush render of the cake topper for approval. After a few minor tweaks it was ready to dynamesh at a high resolution.
08. Using the Slice key
It's difficult to be able to print a complex model completely in one piece so now that it has been dynameshed and is all one model, it is time to slice it up for printing. The SliceCurve brush wasn't ideal for this since I wanted my seam to run down the natural border over the bike and under the seated couple.
I used SelectLasso to hide half the model and polygrouped visible. Then I duplicated the subtool, hid half the corresponding model in each subtool and simply deleted it. Then I used the close holes button and sculpted the models to key together by having two depressions and bumps on each end to help lock them in place once printed.
09. Decimate and export
The dynameshed subtools were very highpoly so I used the decimation master plugin under the Zplugin tab to decimate the models to a more manageable size. 130,000 polys for the top and bottom each and exported the two models as .obj files.
10. Scale the files in Modo
I load the .obj files into Modo and scale them down to the size we want, around 5-inch square. This step is great to ensure accuracy, which doesn't matter as much with cake toppers, but makes all the difference when printing for jewellery and other applications. I then exported the resized models out as .stl files.
11. Netfabb upload
Within a few short minutes Netfabb repairs the meshes and we can download new fixed .stl files.
13. Create a watertight mesh
AccuTrans3D is a Windows-only 3D object conversion package recommended by Shapeways.com to double check that your meshes are 'watertight', since any holes in the mesh would cause the print to fail right away.
Click File>Open to bring in your .stl file and then click on the Tools_3 tab and select 'Check for Watertight Meshes'. This is a redundant step since Netfabb has fixed any holes for us, but good to double check. Then under the Tools_1 tab, select 'Extrude Pseudo 2D Surface' a step that helps the print succeed, and again export the models as .stl files.
14. Replicator G: Part 1
Tristan and I take the models into Replicator G, a software that creates a 'tool path', a file used to relay instructions to the 3D printer. Step 1 is to orient the meshes in a manner most likely to succeed. We chose to print the top part of the cake topper with the couple on their backs to reduce the need for unnecessary support structures.
15. Replicator G: Part 2
The next step is to generate a GCode, the format that the tool path instructions are saved. Detailed instructions on this step can be found online at Replicator G's help section.
16. Replicator G: Part 3
Generating the GCode can take some time, but basically it splices up the model into 1mm thin layers, as defined in our settings, and allows us to interface with our 3D printer, the Makerbot 2.0, in setting the nozzle temperature and flow speed for the plastic extruder.
17. Replicator G: Part 4
After the GCode was generated, we saved the toolpath file and transferred it onto an SD card to plug into the Makerbot 2.0. Newer printers allow for instructions to be read on USB sticks as well.
18. Print and present the final model

After a few failed attempts deciding the best flow rate and temperature, we had our finished print. We removed the scaffolding support structure and glued the two pieces together and voila! Now to apply the paint, Tristan chose to spray paint it gold! Place your cake topper on top of your wedding cake and enjoy the adulation of your friends and family!
Words: Aiman Akhtar
Aiman Akhtar is a freelance character artist, specialising in the use of Maya, Modo, Zbrush, Photoshop and After Effects.

Thank you for reading 5 articles this month* Join now for unlimited access
Enjoy your first month for just £1 / $1 / €1
*Read 5 free articles per month without a subscription

Join now for unlimited access
Try first month for just £1 / $1 / €1
The Creative Bloq team is made up of a group of design fans, and has changed and evolved since Creative Bloq began back in 2012. The current website team consists of eight full-time members of staff: Editor Georgia Coggan, Deputy Editor Rosie Hilder, Ecommerce Editor Beren Neale, Senior News Editor Daniel Piper, Editor, Digital Art and 3D Ian Dean, Tech Reviews Editor Erlingur Einarsson and Ecommerce Writer Beth Nicholls and Staff Writer Natalie Fear, as well as a roster of freelancers from around the world. The 3D World and ImagineFX magazine teams also pitch in, ensuring that content from 3D World and ImagineFX is represented on Creative Bloq.

