Work with raster effects in Illustrator
Steven Bonner shows you how to make the most of Illustrator’s raster options
Scroll down to watch the accompanying video tutorial.
Adobe introduced the ability to use raster effects Illustrator CS2 and it’s been improving ever since. Used sparingly, raster effects can help you achieve results in your Illustrator vectors that you’d normally have to cross over to Photoshop to get. If you experiment with them, they can add a dramatic difference and new dimension to your images – and so long as you take care not to overdo it, they can speed up your workflow.
Be careful, though – if you use effects too heavily they’ll slow down the application and the processing time will drive you crazy, so if you’re looking to produce heavily layered raster work, Photoshop is still the place to do it. In this tutorial, I’ll show you the basics of how to use raster effects to transform your vectors.
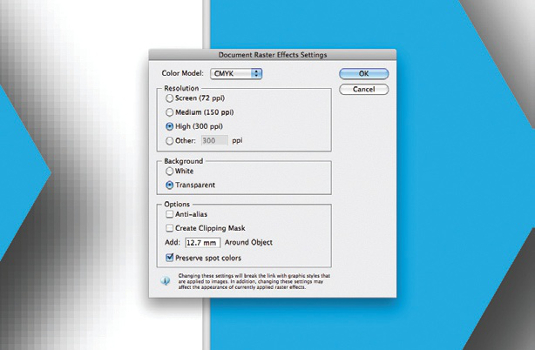
01 The bedrock of creating clean raster effects in Illustrator is the Document Raster Effects Settings dialog, found under the Effect menu. The default setting is 72dpi, but in almost every situation you’ll want to set this to at least 300dpi to ensure that the effects you add appear smooth and avoid that coarse, pixelated look you can get.
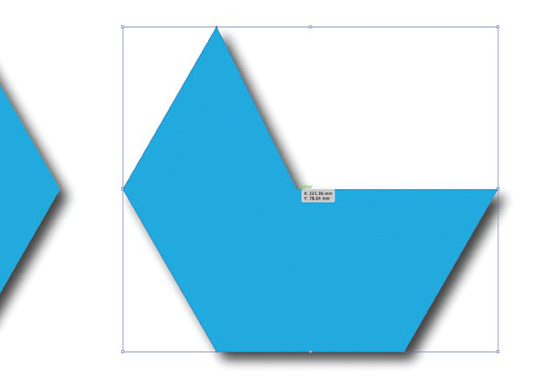
02 Raster effects in Illustrator work in a similar fashion to using Smart Objects in Photoshop, and all elements remain editable when effects are applied. This means elements on the page will still behave like standard vector objects and you can select and control individual points to tweak your pieces – the raster effect will conform to the new shape dynamically.
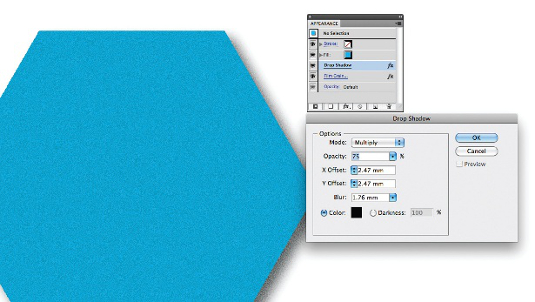
03 Illustrator has built-in raster options in the Effect>Stylise menu that work like the Layer Styles options within Photoshop. As well as vector-based settings like Rounded Corners and Scribble, you have the option to apply drop shadows, feather your edges or add inner and outer glows to your objects. As with other effects, these can be applied and will update automatically if you alter the shape. Note, however, that the effects will be lost if you use the Pathfinder to combine shapes. If you apply an effect and later want to adjust it, bring up the Appearance palette (Window>Appearance) and click on the one you need to alter to view its dialog box. From here you can edit the applied effect. If you try to do this via the original Effect menu, you’ll add a new effect rather than editing the existing one.
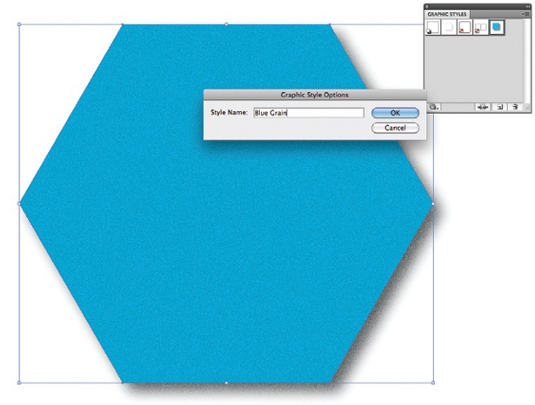
04 When you’re planning your piece, sometimes you’ll know which effects will be needed throughout the process, and will want to reapply certain effects or combinations of them several times over. To make this easy for you, raster effects can be applied as graphic styles in the same way as vector styles. Simply create a shape and apply the styles you want to use, then drag and drop it onto the Graphic Styles palette (Window>Graphic Styles). It will now be saved as a style. When you draw a new shape, keep it highlighted and then click on your style to apply it.
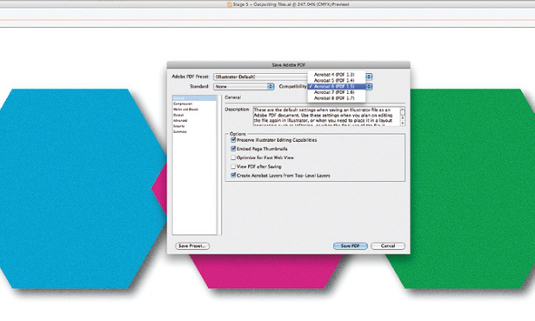
05 Lastly, a quick word about outputting. If you do use raster effects in your images, make sure you output your final files so they’re compatible with PDF versions 1.4 and above. In theory, they should be okay regardless, but it’s been known for things to go awry in the conversion process. If you’re using a new version of CS this won’t be an issue, but in legacy versions, options to save as earlier file types may throw you off.
Get the Creative Bloq Newsletter
Daily design news, reviews, how-tos and more, as picked by the editors.

Steven Bonner
Stirling-based Steven is a multi-disciplined designer and illustrator, working for clients such as Harper Collins, Cadbury and Diesel. A love of type is a recurring feature of his work.
www.stevenbonner.com

Thank you for reading 5 articles this month* Join now for unlimited access
Enjoy your first month for just £1 / $1 / €1
*Read 5 free articles per month without a subscription

Join now for unlimited access
Try first month for just £1 / $1 / €1

The Creative Bloq team is made up of a group of art and design enthusiasts, and has changed and evolved since Creative Bloq began back in 2012. The current website team consists of eight full-time members of staff: Editor Georgia Coggan, Deputy Editor Rosie Hilder, Ecommerce Editor Beren Neale, Senior News Editor Daniel Piper, Editor, Digital Art and 3D Ian Dean, Tech Reviews Editor Erlingur Einarsson, Ecommerce Writer Beth Nicholls and Staff Writer Natalie Fear, as well as a roster of freelancers from around the world. The ImagineFX magazine team also pitch in, ensuring that content from leading digital art publication ImagineFX is represented on Creative Bloq.
