Create a WordPress custom post type
Web developer, software engineer and part-time entrepreneur Gilbert Pellegrom explains what a WordPress custom post type is and how to use them. In his example Gilbert builds a book database, which you can control via your WordPress admin area and which displays books on your site.
- Knowledge needed: PHP, experience with WordPress
- Requires: WordPress v3.1+
- Project Time: 20 minutes
- Support file
Custom post types were introduced in WordPress v3.0 to allow developers to easily add different types of content to their plug-ins and themes, allowing you to easily extend WordPress and make it more like a CMS.
In this tutorial we will see exactly what a WordPress custom post type is, and how to use them in your plug-ins and themes straight away.
01. What's a WordPress custom post types?
In its simplest form a WordPress custom post type is a representation of a type of content. Don’t be confused by the fact that it has “post” in its title. It can literally represent anything you want. So for example, WordPress has several default post types built in:
- Posts
- Pages
- Attachments
- Revisions
- Nav Menus
Try to think of WordPress custom post type as a way to manipulate content in the same way that you would a blog post, but with far more control as to how it's displayed. As a word of warning though, if you’re simply looking to categorise your content in different ways, consider using categories, tags or custom taxonomies before jumping into creating custom post types.
02. How do I create a WordPress custom post type?
Creating a WordPress custom post type is actually incredibly simple, and when you see how much work WordPress does for you, you’ll begin to understand how powerful they can be. In your theme’s functions.php file, insert the following code:
add_action( 'init', 'create_post_type' );
function create_post_type() {
register_post_type( 'book',
array(
'labels' => array(
'name' => __( 'Books' ),
'singular_name' => __( 'Book' )
),
'public' => true,
'has_archive' => true
)
);
}
That is literally all you need to create a WordPress custom post type. In the example above we are creating a custom post type called “book”, which we will use to create a book database. We give it some labels, set a few options, and we're good to go.
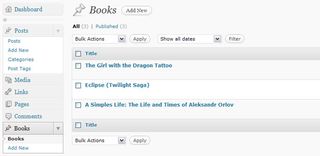
The example above is extremely simple but demonstrates the simplicity of creating custom post types. Now if you go to your WordPress admin panel, you should see a new menu item called “Books”. Go ahead and play around with the new “Books” section. Because we set “public => true”, all of the admin interface is generated for us by WordPress, making our lives much simpler.
03. Creating a book database
In our last example we created a very basic WordPress custom post type, but we were only scraping the surface of what's possible with custom post types. Let’s get our hands dirty and create a full-blown custom post type.
Get the Creative Bloq Newsletter
Daily design news, reviews, how-tos and more, as picked by the editors.
// Create out post type
add_action( 'init', 'create_post_type' );
function create_post_type() {
$args = array(
'labels' => post_type_labels( 'Book' ),
'public' => true,
'publicly_queryable' => true,
'show_ui' => true,
'show_in_menu' => true,
'query_var' => true,
'rewrite' => true,
'capability_type' => 'post',
'has_archive' => true,
'hierarchical' => false,
'menu_position' => null,
'supports' => array('title',
'editor',
'author',
'thumbnail',
'excerpt',
'comments'
)
);
register_post_type( 'book', $args );
}
// A helper function for generating the labels
function post_type_labels( $singular, $plural = '' )
{
if( $plural == '') $plural = $singular .'s';
return array(
'name' => _x( $plural, 'post type general name' ),
'singular_name' => _x( $singular, 'post type singular name' ),
'add_new' => __( 'Add New' ),
'add_new_item' => __( 'Add New '. $singular ),
'edit_item' => __( 'Edit '. $singular ),
'new_item' => __( 'New '. $singular ),
'view_item' => __( 'View '. $singular ),
'search_items' => __( 'Search '. $plural ),
'not_found' => __( 'No '. $plural .' found' ),
'not_found_in_trash' => __( 'No '. $plural .' found in Trash' ),
'parent_item_colon' => ''
);
}
//add filter to ensure the text Book, or book, is displayed when user updates a book
add_filter('post_updated_messages', 'post_type_updated_messages');
function post_type_updated_messages( $messages ) {
global $post, $post_ID;
$messages['book'] = array(
0 => '', // Unused. Messages start at index 1.
1 => sprintf( __('Book updated. <a href="%s">View book</a>'), esc_url( get_permalink($post_ID) ) ),
2 => __('Custom field updated.'),
3 => __('Custom field deleted.'),
4 => __('Book updated.'),
/* translators: %s: date and time of the revision */
5 => isset($_GET['revision']) ? sprintf( __('Book restored to revision from %s'), wp_post_revision_title( (int) $_GET['revision'], false ) ) : false,
6 => sprintf( __('Book published. <a href="%s">View book</a>'), esc_url( get_permalink($post_ID) ) ),
7 => __('Book saved.'),
8 => sprintf( __('Book submitted. <a target="_blank" href="%s">Preview book</a>'), esc_url( add_query_arg( 'preview', 'true', get_permalink($post_ID) ) ) ),
9 => sprintf( __('Book scheduled for: <strong>%1$s</strong>. <a target="_blank" href="%2$s">Preview book</a>'),
// translators: Publish box date format, see php.net/date
date_i18n( __( 'M j, Y @ G:i' ), strtotime( $post->post_date ) ), esc_url( get_permalink($post_ID) ) ),
10 => sprintf( __('Book draft updated. <a target="_blank" href="%s">Preview book</a>'), esc_url( add_query_arg( 'preview', 'true', get_permalink($post_ID) ) ) ),
);
return $messages;
}
So what's going on here? Well, first off we're creating our custom post type and setting most of the available options with it. I’m not going to explain what all these options do here because the WordPress Codex explains them very well.
The second function you see is simply a helper function that makes it easy to generate the labels that will be used in the WordPress admin for the custom post type. You can manually set the $labels array if you wish, but I find this cleaner and easier.
Finally we're adding a filter to change the updated messages. So now whenever WordPress shows an update message for this custom post type, it will show right labels (rather than just using “post” all the time).
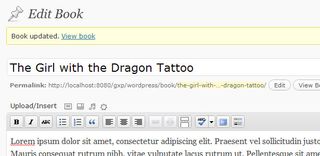
04. Viewing our books
So now we have this awesome custom post type that we can manage in the WordPress admin. But what about actually displaying books on your site? Well, WordPress has you covered.
There are several templates that can be used in your themes to automatically display our custom post type content:
- single-{posttype}.php - In the same way that posts are shown on their own page with single.php, custom post types will use single-{posttype}.php if it's available. So in our example above we could create a single-book.php file and the product posts would be shown using that template.
- archive-{posttype}.php - As of WordPress v3.1 you can also use an archive-type-template. In the same way that posts are shown on their own archive with archive.php, custom post types will use archive-{posttype}.php if it's available.
Now, having these template files at our disposal is great, but sometimes you need to get a bit more complicated and use a custom query for some fine-grained control. Thankfully, WP_Query has us covered by allowing us to specify a “post_type” parameter.
$args = array( 'post_type' => 'book', 'posts_per_page' => 10 );
$loop = new WP_Query( $args );
while ( $loop->have_posts() ) : $loop->the_post();
the_title();
echo '<div class="entry-content">';
the_content();
echo '</div>';
endwhile;
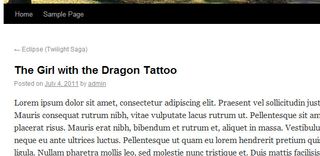
05. Conclusion
You now have a fully functioning book database, which you can control via your WordPress admin area, enabling you display books on your WordPress site. This tutorial only serves as an introduction to what can be achieved with custom post types. They are an incredibly powerful feature of WordPress, so use them carefully, but don’t be afraid to stretch your imagination: there are so many things that you can easily achieve using custom post types.
06. Further notes
Before we finish there are a few extra points that are worth mentioning:
- When creating custom post types it is considered best practice to prefix the post type with a unique “namespace” to avoid conflicts with other themes and plug-ins. Although be careful that the total length of your custom post type name isn’t greater than 20 characters, otherwise strange things will happen.
- Don’t use “wp_” as your namespace prefix as it is reserved for internal WordPress names.
- If you get 404 pages when you first try to see your custom post types, don’t panic. Simply visit the Settings > Permalinks page and this will flush your rewrite rules. If you're a plug-in author, make sure your flush the rewrite rules on your plug-in activation.
Liked this? Read these!
- Brilliant Wordpress tutorial selection
- Create a perfect mood board with these pro tips
- The ultimate guide to logo design
- Our favourite web fonts - and they don't cost a penny

Thank you for reading 5 articles this month* Join now for unlimited access
Enjoy your first month for just £1 / $1 / €1
*Read 5 free articles per month without a subscription

Join now for unlimited access
Try first month for just £1 / $1 / €1
The Creative Bloq team is made up of a group of design fans, and has changed and evolved since Creative Bloq began back in 2012. The current website team consists of eight full-time members of staff: Editor Georgia Coggan, Deputy Editor Rosie Hilder, Ecommerce Editor Beren Neale, Senior News Editor Daniel Piper, Editor, Digital Art and 3D Ian Dean, Tech Reviews Editor Erlingur Einarsson and Ecommerce Writer Beth Nicholls and Staff Writer Natalie Fear, as well as a roster of freelancers from around the world. The 3D World and ImagineFX magazine teams also pitch in, ensuring that content from 3D World and ImagineFX is represented on Creative Bloq.
