How to create a custom user interface
Matt Keas looks at how to develop custom, cross-platform UI controls to create unique, interactive experiences on the web.
Custom UI controls are notoriously difficult to implement and can behave inconsistently on different devices. Executing custom designs requires pretty intimate knowledge of layout and positioning with CSS, browser support and a strong grasp of JavaScript.
Wrapping all this up in an edgy user interface can be tiresome, tedious and taxing. In this article, I will demonstrate a UI approach for an interactive web documentary, establish a 'DIY' code ethic for this UI, and hopefully demonstrate how JS, CSS and HTML can be combined to create an original interface.
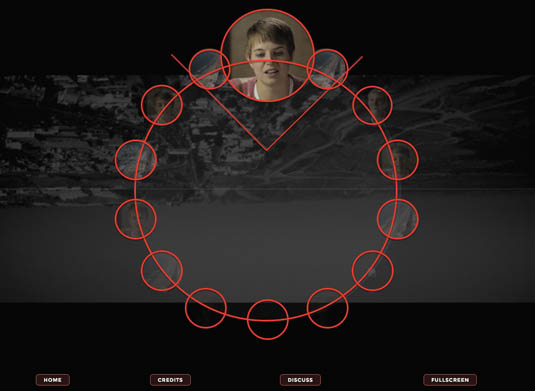
As my example, I will use an original interface I developed for a web documentary called Facing North. The main interaction of Facing North involves a rotating menu, which fades in when the screen is touched or the mouse is moved during video playback, and fades out again after a few seconds. Facing North consists of 18 videos, which can be viewed by dragging the compass in either direction via mouse or touch. The compass will track with the cursor or finger, enabling the user to select the video they want to play.
The approach: HTML and CSS
Creating custom UI controls requires intimate knowledge of CSS layouts and positioning. Focusing on layout, animations and pseudo-classes produces effective, responsive UIs. Here is the HTML for the Facing North compass menu:
<div class="container">
        <div class="compass">
                 <!--
18 of these will be created by JavaScript:
<img class="orbiter" src="...">
            -->
            <div class="north-indicator"></div>
        </div>
    </div>
The .container element adds the transparent black overlay and can be sized using vh and vw. Safari on iOS currently has some support issues, so it's best to recalculate the CSS with JavaScript onresize or use % widths. The design includes a horizontal 'range' across the middle screen, which can be accomplished with a CSS pseudo-element.
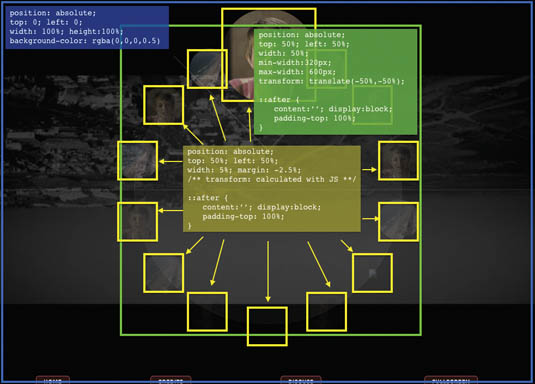
The .compass element is highlighted by a white, circular border. The .compass must be small enough to fit on the screen, it must sit absolutely centred on the .container, and it must be perfectly circular. It's possible to maintain a square box model by using an ::after pseudo-element that has padding-top:100%.


The .orbiter elements are simply <img> tags that 'orbit' around the compass. These will be created in our JavaScript, and using some maths we can ensure any number of orbiters will distribute evenly. The .north-indicator element is positioned at the top of the compass, denoting north. The primary problem in the UI is the transforms applied to each .orbiter element. This is handled in the JavaScript.
The Glue: JavaScript
There are a few major components of the JavaScript for Facing North's compass UI:
- A prototype (JavaScript 'class') to handle logic for the entire compass UI
- A prototype (JavaScript 'class') to handle logic for each orbiter
- Polyfills (to help support older browsers)
The JavaScript initialises onload with:
window.onload = app;
    function app() {
        rAFPolyfill();
        window.vendorPrefix = getVendorPrefix();
        var compass = new Compass(18, document.querySelector('.compass'));
    }
In app(), there is a polyfill added for requestAnimation Frame(), we create a new instance of the Compass 'class', and getVendorPrefix() is called to retrieve CSS prefixes of the browser – for example -webkit-, -ms or -moz-. The rest of the JavaScript is run through the constructor new Compass(), which takes num orbiters to create and distribute around the compass UI, and a reference to the compass UI DOM element.
The compass constructor is quite simple:
function Compass(num, compassElement) {
    this.rotation = 0;
    this.orbiters = this.addOrbiters(num, compassElement);
    this.compassElement = compassElement;
    this.rotate();
    this.handleInteractionEvents();
}
Most of the animation and interaction is handled by handleInteractionEvents(). addOrbiters() just creates num Orbiter() objects and stores them in an array:
Compass.prototype.addOrbiters = function(num, compass) {
    var i = num,
        orbiters = [];

    while (typeof i === "number" && i--) {
        orbiters.push(new Orbiter(compass, i));
    }

    return orbiters;
}
The Orbiter() constructor in the live version pulls JSON data from a server; the following is just a contrived example created for this article, which creates <img> tags with JavaScript:
function Orbiter(compass, index) {
    var img = document.createElement('img');
    img.className = "orbiter";
    img.src = "./images/screen" + (index % 4 + 1) + ".png";
    this.img = img;
    compass.appendChild(img);
}
Compass.rotate() is the function used to animate the position of each Orbiter() during interaction:
Compass.prototype.rotate = function(delta) {
    var self = this;
    for (var i = 0, len = self.orbiters.length; i < len; i++) {
        self.orbiters[i].setTransform(i, self.compassElement.offsetWidth, delta || 0, ~~(360 / self.orbiters.length));
    }
}
Orbiter.rotate() has a few things worth noting here:
- i: the spot in place (an integer between 0 to 17 if there are 18 Orbiter() objects)
- self.compassElement.offsetWidth: the diameter of the compass, in pixels
- delta || 0: the current rotation (in degrees, between 0 and 359) to set each Orbiter(). Orbiter()s with an i greater than 0 will be rotated around further to ensure even distribution
- ~~(360 / self.orbiters.length): the degrees by which to spread out each Orbiter(). For example, for 18 orbiters, this will be 360/18, or 20°. ~~ rounds a decimal number to the nearest integer
The Orbiter.setTransform() code can be found online at the GitHub repo.
The rest of the Compass() constructor involves initialising touch and mouse event handlers:
Compass.prototype.handleInteractionEvents = function() {
    var self = this;

    function onTouchAndMouseStart(e) { ... }
    function onTouchAndMouseEnd(e) { ... }
    function handleDrag(e) { ... }

    $.on('mousedown touchstart', onTouchAndMouseStart, this.compassElement);
    $.on('mouseup touchend', onTouchAndMouseEnd, window);
}
Notice the three functions for handling touch and mouse events:
- onTouchAndMouseStart(): triggered on mousedown or touchstart when the interaction with the compass UI starts
- onTouchAndMouseEnd() : triggered on mouseup or touchend when interaction has stopped and stops animating the compass UI
- handleDrag(): triggered on mousemove or touchmove when the compass UI is 'dragged' and animates the compass UI to 'track' with the user's mouse or finger
The code for these handlers, onTouchAndMouseStart(), handleDrag() and onTouchAndMouseEnd() can be found online at the Github repo.
Final thoughts
Through a strategic approach, we have created a reusable interface pattern. It didn't take much extra code to handle two separate event types (mouse and touch). Doing as much animation as possible via CSS helped optimise rendering, and the 'drag' events were handled only when the 'start' events took place, to optimise CPU resources. For an in-depth look, visit the GitHub repo.
The final product benefits from a DIY code ethic. Without researching, exploring and prototyping the 'hard parts' (read: the maths and UI approaches), I would not have been able to make this work as smoothly as I did. The maths was both the most difficult and most rewarding part of the UI.
Words: Matt Keas
This article originally appeared in issue 262 of net magazine.
Like this? Read these!
- 5 innovative examples of user interface design
- The best collage maker tools – and most are free!
- How to build an app: try these great tutorials

Thank you for reading 5 articles this month* Join now for unlimited access
Enjoy your first month for just £1 / $1 / €1
*Read 5 free articles per month without a subscription

Join now for unlimited access
Try first month for just £1 / $1 / €1
Get the Creative Bloq Newsletter
Daily design news, reviews, how-tos and more, as picked by the editors.

The Creative Bloq team is made up of a group of design fans, and has changed and evolved since Creative Bloq began back in 2012. The current website team consists of eight full-time members of staff: Editor Georgia Coggan, Deputy Editor Rosie Hilder, Ecommerce Editor Beren Neale, Senior News Editor Daniel Piper, Editor, Digital Art and 3D Ian Dean, Tech Reviews Editor Erlingur Einarsson, Ecommerce Writer Beth Nicholls and Staff Writer Natalie Fear, as well as a roster of freelancers from around the world. The ImagineFX magazine team also pitch in, ensuring that content from leading digital art publication ImagineFX is represented on Creative Bloq.
