Build an interactive photo viewer prototype
Austin Bales walks through how to create an interactive photo viewer prototype using Quartz Composer and Origami.
Quartz Composer is a powerful motion graphics tool from Apple, originally used for everything from broadcast graphics to screensavers. It's a non-linear, visual tool – it works by connecting dots and ideas, rather than writing code or defining fixed keyframes.
Although it wasn't originally created for interaction design work, its flexibility and speed make it an ideal environment for designers.
Build your own site with these 60 brilliant WordPress tutorials
Origami is a toolkit for QC, developed by Facebook, that makes prototyping easier by encapsulating common patterns and concepts used by interaction designers.
Prototyping with QC is fast: you can change a composition (edit values, make new connections between patches, swap in a new image) on the fly, without having to recompile or wait for that result to take effect in your prototype.
Make your protoype
This makes QC much faster than a code environment that depends on reloading, or a video-based tool that requires re-rendering.
Although this tutorial walks you through to a final prototype in a straightforward manner, its much more common for designers to play around in QC, transitioning different ports with different values. Building skills in QC takes time.
Get the Creative Bloq Newsletter
Daily design news, reviews, how-tos and more, as picked by the editors.
This tutorial is meant to introduce you to this powerful tool, give you a starting point for future exploration, and lay a foundation for building and practicing.
We'll cover the basis of creating compositions: working with images, transitions, animations, switches and the most simple of interactions. To get started, you'll need to get both QC and Origami by following the instructions at origami.facebook.com.
01. Tools and views
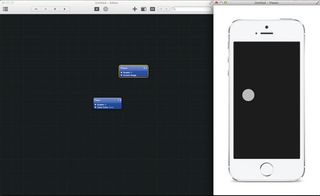
When you create a new Quartz Composer (QC) composition, you'll be presented with an Editor and a Viewer window. The Editor is a grid view that holds patches – for now, just a Clear.
The Viewer will be blank, since all that's in our document is a Clear field of black. As you insert more patches into the Editor, you'll see the Viewer update in real time.
02. Make it mobile
Inserting Origami's Phone patch is the first step in any mobile QC composition. To insert a patch, press cmd+Enter to bring up the Library window. Type ‘Phone' into the typeahead and press the Enter key to insert the patch into the Editor. You'll see a white iPhone appear in the Viewer. Follow the same steps to insert the Layer Group and Phone Dimensions patches.
03. It's made from patches
Patches are representations of functionality, data or images. They receive input and provide output through 'noodles' connected to labeled 'ports'. Data flows through these ports from left to right.
Connect the Pixels Wide port on Phone Dimensions to the corresponding port on Layer Group by clicking the dot on the first patch, and then clicking on the dot on the second (you can also drag between ports to connect them). Then you can connect Layer Group's Image port to Phone's Screen Image port.
04. Layer Group
Layer Group is a macro patch that flattens the layers and contents inside it into a single image – think of it like a Smart Object in Photoshop. All of our subsequent work will take place inside this patch. Double-click the patch to open it. You can get back up in your heirarchy at any time by pressing the Edit Parent button in your toolbar.
05. Making connections
Now that we're in our Layer Group , drag the file PhotoGrid.png into the Editor window. You'll see both an Image and Layer patch appear in the Editor, and see the image itself appear inside the Viewer. You'll notice that the Image and Layer patches are connected via their Image ports.
It may sound complicated, but it actually makes a lot of sense. Individual images in QC might be connected to multiple layers, or you may decide to run them through filters or other patches before connecting them to a Layer.
06. Build your familarity
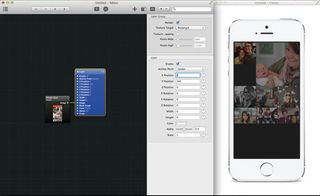
To get familiar with the way Layers work in Quartz Composer, select the Layer patch from the previous step and press cmd+T to view the patch's parameters. Play around with the X Position , Y Position and Opacity ports a bit to get a sense of how layers on screen move and behave.
You'll notice that QC works on a coordinate plane system with 0 being at the centre of the screen, and that Opacity works on a decimal system, running from 0 to 1.0. When you're done playing, set positions back to 0 and Opacity back to 1.
07. Rename you layer
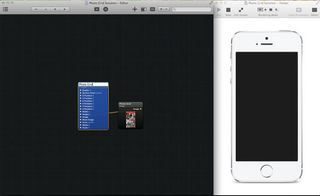
Rename your layer by double-clicking on the title. Rename it 'Photo Grid'.
08. Shifting opacity
Insert two Transition patches and connect their output Progress ports to your Photo Grid layer's Opacity and Alpha ports respectively. We'll use Transition patches to shift the Opacity and Alpha values of the photo grid, as seen in the final output.
Next page: more on how to build a prototype with Quartz Composer

Thank you for reading 5 articles this month* Join now for unlimited access
Enjoy your first month for just £1 / $1 / €1
*Read 5 free articles per month without a subscription

Join now for unlimited access
Try first month for just £1 / $1 / €1
The Creative Bloq team is made up of a group of design fans, and has changed and evolved since Creative Bloq began back in 2012. The current website team consists of eight full-time members of staff: Editor Georgia Coggan, Deputy Editor Rosie Hilder, Ecommerce Editor Beren Neale, Senior News Editor Daniel Piper, Editor, Digital Art and 3D Ian Dean, Tech Reviews Editor Erlingur Einarsson and Ecommerce Writer Beth Nicholls and Staff Writer Natalie Fear, as well as a roster of freelancers from around the world. The 3D World and ImagineFX magazine teams also pitch in, ensuring that content from 3D World and ImagineFX is represented on Creative Bloq.
