How to build cool stuff for the Internet of Things
Laser king Seb Lee-Delisle gives the low-down on building stuff that talks to the internet.

Digital artist Seb Lee-Delisle will deliver the opening keynote at Generate London on 21 September. The two-day conference will also feature Anton & Irene, Zell Liew, Jaime Levy, Steve Fisher and many more excellent speakers. Get your ticket today!
Over the last few years, the maker community has grown exponentially. As such, it's a really great time to start experimenting with electronics. The more our shiny gadgets are locked down and proprietary, the more we want to find out what strange magic is happening inside.
As a direct response, the open-source hardware community has grown, and new prototyping platforms are constantly emerging. It's never been cheaper or easier to get hardware for your own hacking projects.
Exploring electronics
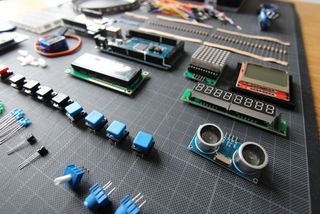
My journey with electronics started when I was a kid. My dad would often bring home electronic components from work for me to play with. I learned about breadboards, making simple circuits and soldering. I still love bright, confectionary-coloured LEDs. Fast-forward to a few years ago, when I was told that you could use an Arduino to attach large knobs and buttons to your games and projects.
So I bought one. And it dawned on me that this wasn't merely a hardware interface for my computer, it was an independent device that could process logic and run code by itself. In effect, it was a tiny self-contained computer. I got hold of an 8x8 LED matrix, made a simple particle system, and I was hooked. Over the last few years, I have been integrating hardware into my digital art projects more and more. These electronic devices let you get out of the computer and into the real world.
If you want to get into hardware projects, you're probably a little daunted by all your options. Two of the biggest platforms in this arena are the Arduino and Raspberry Pi. Each has different strengths and capabilities.

Arduino
The Arduino is a prototyping circuit board comprising a central chip and several GPIO (General Purpose Input/Output) pins that you can connect stuff to. You can program each GPIO to be either an input (to read data) or an output (to control things like lights and motors).
Get the Creative Bloq Newsletter
Daily design news, reviews, how-tos and more, as picked by the editors.
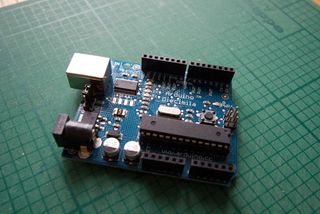
But don't just buy an Arduino – it's much better to buy some kind of starter kit. Look for one with a variety of components, jumper wires and a breadboard, along with a good guide book with exercises to get you started.
There are many kits available, including one made by Arduino. My personal favourite is the Sparkfun Inventor's Kit, which comes with a nice case to keep your projects in while you're working on them. It has a great manual with clear diagrams and 16 example projects to get you started.
There is an incredible variety of Arduino code libraries, resources and add-ons available, including 'shields' that sit on top of the board and give you extra powers, like driving motors, controlling LED screens, playing music or sending out MIDI information. Here are a few of the many Arduino-compatible boards that I particularly like:
- Adafruit's Trinket – This is tiny and cheap, with five GPIO pins. If you need more pins and memory, try the Trinket Pro or the Arduino Nano.
- Teensy 3.1 – The Teensy 3.1 is very fast and powerful, and still very small. It uses 3.3V instead of the standard 5V, so sometimes you need to convert voltages to work with some components. These are the brains of my Laser Light Synths, and they're very good at controlling thousands of addressable LEDs.
- Arduino Mega – This is much bulkier than the Trinket and Teensy (although that's not saying much). But if you need a lot of pins and memory, the Arduino Mega is for you. It has the added benefit of being a genuine Arduino, so you know your money is going to support the people that created the project in the first place. What's more, it's compatible with most Arduino shields.
Build your own Arduino
The incredible benefit of open-source hardware is that you can easily move from a one-off experiment to something you can bring to production. You can take the circuit layout of the Arduino, add your own components and manufacture your own products. This may not seem important when you're first starting out, but if you get the bug, you'll be designing and manufacturing your own printed circuit boards (PCBs) before you know it.
Programming the Arduino

The Arduino comes with its own IDE and programming language based on C, but if you're used to JavaScript it should look fairly familiar. The main differences are that it's strongly typed, so you have to specify what type of data the variables and functions use. Working with strings and text can be a pain too – it's certainly more involved than using JavaScript. Code is compiled inside the IDE and then programmed directly onto the Arduino's chip via a USB cable.
JavaScript options
What? You only want to program in JavaScript? Call me old-fashioned but I think that working in multiple different programming languages is good for your brain. But I can understand why JS programmers might be hesitant to invest time learning a new language just for a bit of tinkering.
The good news is you can control an Arduino entirely in JavaScript with a library called Johnny-Five. You access all the Arduino inputs and outputs entirely from within a Node.js app on your computer. There is a catch – the code runs on your computer, and sends data to and from the Arduino, so it has to be tethered to your computer to work. However, it's still a nice, easy way to dip your toe in the water.
There are two emerging platforms that genuinely run JavaScript on the microprocessor: Tessel and Espruino. They both have their own lightweight JavaScript interpreter, and although they don't have the availability and ubiquity of Arduino, I'm confident that the community will grow quickly.
Raspberry Pi
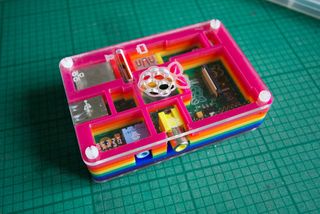
The Raspberry Pi is a cheap Linux computer that also has a bank of GPIO pins, making it a great platform for electronic prototyping. It's only been around for a few short years, yet already it has revolutionised low-cost computing.
A strong and vibrant community of makers has grown and there is a vast range of cases, peripherals and learning resources available. The brand new Pi 2 is faster and has more memory than the previous models, with backwards compatibility and the same form factor as the previous B+ model.
Unlike Arduino, the Raspberry Pi can easily drive HDMI screens and play large audio files. If you're already familiar with Linux and Python or Node, it'll be very easy for you to get started. You don't even need to attach a keyboard or screen to the Pi, you can ssh in from your computer to program it. And of course the whole thing is connected to the internet via the ethernet port or a Wi-Fi USB adaptor.
Just like the Arduino has 'shields', the Pi has 'hats' that sit on top of it and provide special extra powers. My favourite is Pimoroni's Unicorn hat – an array of super-bright LEDs that sit on top of the Pi. In fact, Pimoroni is an amazing UK success story with a wonderful stock of Pi cases and components.
ST4I (formerly IoT)
You can't have missed the hype about IoT, or the 'Internet of Things'. It's so ridiculous that I hate even using the term. The fact that corporations like Microsoft have a 'Director of the Internet of Things' makes me throw up in my mouth a little. I prefer using my own term: Stuff that Talks to the Internet, (STTTTi or ST4I for short). It's equally ridiculous, but at least it's my ridiculous.
I'll let you into a little secret about the IoT: no one has really figured out what it's for. Sure we can control our thermostats and the colour of our lamp with our mobile phone, but we're still flailing our arms around in the dark trying to get a grip on how exactly it's going to work. We all know it's going to be big, we're just not quite sure what its killer app will be.
But here's the thing about technologies on the verge of finding their use: they're really fun to play with. Like really fun. It's the perfect time to be imaginative, creative and just play with this stuff. That's why I put together my ST4I workshop – it's two days of experimenting and learning, and it comes with a kit full of stuff including a Wi-Fi enabled Arduino. Check out st4i.com if to find out more.
How to turn an Arduino into an ST4i device
A Raspberry Pi is already networked, but an Arduino needs extra hardware (and code) in order to connect. I like the Adafruit CC3000 Wi-Fi shield – it sits on top of your Arduino and connects to your Wi-Fi, and there are lots of code examples to help you read data from the internet.
Arduinos with built-in internet
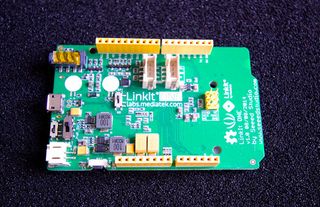
There are Arduino-compatible boards that are already internet-capable. My favourite is the Linkit One, which has a Wi-Fi chip built in. But that's not all. It also has Bluetooth and GSM. Stick a SIM card in and it'll get mobile data straight off that. If that wasn't enough, it comes with GPS, and an audio interface. You could make your own low-tech smartphone with this board. I really have no idea why you would do that, but for some reason the idea excites me.
The server side
Connecting to a public API is relatively easy, and if you just want to set up a data logging device you can use services like Xively and data.sparkfun.com. If you want your Arduino device to respond to things on the internet, the easiest way is to poll a data API at regular intervals (say every one to five minutes).
But if you want it to respond instantly to something, you can set up a permanent socket connection to the server. This is a bit trickier, but I've been working on Node.js code to do this. It's all open source so you can keep an eye on my GitHub to see how it matures.
The future
With GSM mobile data modules dramatically dropping in price, it will only be a couple of years until everything has its own internet connection. The concept of adding Wi-Fi to a gadget will seem really old fashioned.
I've long delighted in attaching lights, buttons and tactile interfaces to my projects, and with the growth of the hackerspace network and maker community, there are so many opportunities to learn how to make stuff. It's time to take the work we've been doing inside the computer out into the real world.
This article originally appeared in issue 266 (May 2015) of net magazine.
Generate London will be preceded by a day of workshops, covering UX strategy, running design and content sprints, and building scalable responsive component. They'll also look at how to quickly come up with a concept and solution to a client brief, and create a convincing presentation that sells your idea either to your internal team or client within just a couple of hours.
If you buy a combined workshop and conference pass, you will save £95!
Liked this? Read these!
- How the Internet of Things will change your job
- The best photo editors
- The designer's guide to working from home

Thank you for reading 5 articles this month* Join now for unlimited access
Enjoy your first month for just £1 / $1 / €1
*Read 5 free articles per month without a subscription

Join now for unlimited access
Try first month for just £1 / $1 / €1


