Create custom tables with WebGrid
ASP.NET MVC has made the task of creating an interactive table straightforward. Michael Schmalz demonstrates a neat technique for styling it any way you wish
If you are building data tables with paging and sorting from scratch when using ASP.NET MVC, you are missing out on one of the easiest-to-use helpers. WebGrid gives you built-in support for clickable headers for sorting and paging in the footer. But there is a lot of misinformation about what you can and cannot do with the WebGrid.
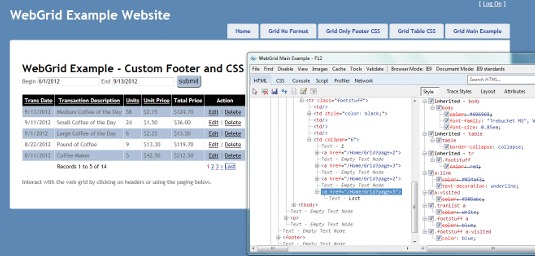
This article covers creating a fully formatted table with a strongly typed view using the WebGrid helper. The full code for this project includes views that show the WebGrid with no formatting, with footer CSS formatting alone, with table formatting, and our main topic – customising the footer with paging and other information.
The data for this project is an enumerable list created in the controller; I would typically use SQL Server and access the data with Entity Framework. I created the data in the controller to keep it short enough for an article. You will be using a data model in this example, like you would with Entity Framework, but you won’t be storing or accessing the data in a database.
Understanding the model
The WebGrid helper returns a regular HTML table. You can apply CSS styles to format it as you would any other table. First, you’ll build the grid and see how to format the columns, rows and footer. Next, you'll see how to customise the paging footer with extra information, via a nice technique I've developed. For this example, you will use data in a model called Transaction – it’s simply: public class Transaction
public class Transaction
{ public int TransactionID { get; set; }
public DateTime TranDate { get; set; }
public string Description { get; set; }
public int Units { get; set; }
public double UnitPrice { get; set; }
public double Total { get; set; } }
This should be in the Models folder in the supporting download for the tutorial with the name Transaction.cs. In the controller, you will populate this model with the following code (to save space, this is just a sample of three records):
public IEnumerable<Transaction> GetList()
{var tr = new List<Transaction>() {
new Transaction { TransactionID = 1, Description = "Large Latte",
TranDate = System.DateTime.Parse("6/1/2012"), Units = 5, UnitPrice = 3.5 },
new Transaction { TransactionID = 2, Description = "Skinny Latte",
TranDate = System.DateTime.Parse("6/5/2012"), Units = 7, UnitPrice = 3.25 },
………
new Transaction { TransactionID = 14, Description = "Medium Coffee of the Day", TranDate = System.DateTime.Parse("9/13/2012"), Units = 58, UnitPrice = 2.15 }};
return tr;}
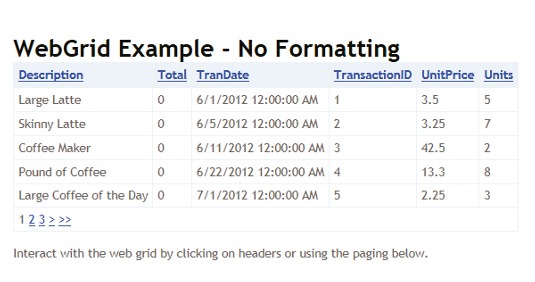
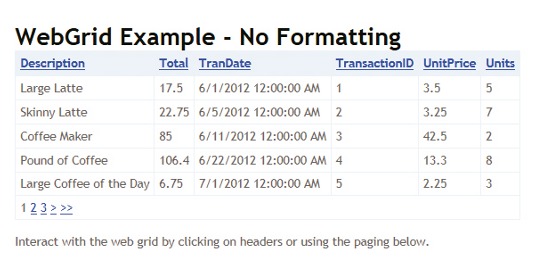
In the full project code, I call this method from all of the views to populate the data to send to the view. Also, you may have noticed that the model has a Total field that is not being populated; I decided not to populate that in the controller so that I can show you how to have a calculated field in a WebGrid. In the full project code I have two where it is calculated in the controller.
The controller code for the view is only a few lines, because the paging and sorting is handled by the WebGrid helper. As the view includes a form to filter the data, there are two ActionResult procedures in the controller for this view.
The HttpPost ActionResult just does a redirect, and includes the parameters for the date range. If you did it this way, the date range would be embedded in the clickable headers automatically by the WebGrid helper; if you just returned the filtered view, when you clicked the header it would remove the filter.
public ActionResult Grid(DateTime? Begin, DateTime? End)
{var tr = GetList();
if (Begin != null && End != null)
{ DateTime begindt = Convert.ToDateTime(Begin);
DateTime enddt = Convert.ToDateTime(End).AddDays(1);
var tr2 = tr.Where(a => a.TranDate >= begindt && a.TranDate < enddt);
return View(tr2);}
return View(tr);}
[HttpPost]
public ActionResult Grid(FormCollection fc)
{return RedirectToAction("Grid", new { Begin = fc["begin"], End = fc["end"] });}
The first ActionResult has two optional parameters (designated by the question mark after the data type) and it works fairly straightforwardly. First, the list is retrieved with the code shown earlier.
If both the Begin and End parameters are not null, they are converted to work with the query. Since the DateTime field can include the time portion, the end date is going to have one day added and the filter is set for less than the End parameter plus one day.
The filtering is being done using lambda expressions, which are very useful when working with data.
The next ActionResult takes the FormCollection and the Begin and End parameters are returned to the main action. If you compare this to trying to put all of the paging and sorting in the controller, you will see that this is very compact code. Now you are ready to work on the view. The first line of code on the view sets it up to be a strongly-typed view. That reads:
@model IEnumerable<WebGridExample.Models.Transaction>
This means that the view expects the controller to pass an enumerable collection of the model Transaction to the view. This is the data that is being passed to the WebGrid helper. The next section of code is the style block that includes the CSS classes that you will be using in the WebGrid.
<style type="text/css">
.tranlist tr:nth-child(odd) { background-colour: #afc1d9; }
.tranlist tr:nth-child(even) { background-colour: white; }
.tranlist th { background-colour: Black; colour: White; }
.tranlist a { colour: White; }
.smallcolumn {min-width:20px;}
.medcolumn {min-width: 50px;}.bigcolumn{min-width:100px; }
.linkcolumn { min-width: 90px; text-align: center; } .linkcolumn a { colour: Black;
} .linkcolumn a:hover { colour: Blue; }
.footstuff { background-colour: White; colour: Red; }
.footstuff a:visited { colour: Blue; } .footstuff a { colour: Blue;}
.footstuff td { background-colour: White; border-colour: White; }
.headerstyle th {text-transform: capitalize; text-align: center;}
</style>
These styles are doing the following: setting different background colours for alternating rows, setting the table header black with white text, setting minimum widths and styles for certain columns, and setting the style for the footer. The actual styles here aren’t that important; what is important is how you tell the WebGrid how to use those styles, which we'll look at soon.
Get the Creative Bloq Newsletter
Daily design news, reviews, how-tos and more, as picked by the editors.
Creating a WebGrid
The next section of code creates a WebGrid with the model and sets up page variables to hold the values from the query string if they exist.
@{ var grid = new WebGrid(Model, defaultSort: "TransactionID", rowsPerPage: 5);
if (Request.QueryString[grid.SortDirectionFieldName].IsEmpty())
{grid.SortDirection = SortDirection.Descending;}
DateTime beg = System.DateTime.Now; DateTime end = System.DateTime.
Now;
if (Model.Count() != 0) {beg = Model.Min(a => a.TranDate);
end = Model.Max(b => b.TranDate);} }
This just creates the grid object, passes in the data from the model, sets the sort field to TransactionID, and sets up the paging for five rows per page. You need to call a different method to return HTML to the browser. The other code sets an initial sort direction of descending to show the newest transactions first, and gets the dates for the newest and oldest transactions. If you have more than one grid on the page, use grid.SortDirectionFieldName instead of the default of sortdir so that the field name can be changed. The next section of code creates the form so that you can implement filtering by date range.
<form id="daterange">
Begin <input name="begin" id="begin" type="date" value="@beg.
ToShortDateString()" />
End <input name="end" id="end" type="date" value="@end.
ToShortDateString()" />
<input style="background-colour: #afc1d9; border-radius: 8px; cursor: pointer;"
type="submit" value="submit" />
</form>
The date range will show the current date if the data set is empty, and the first and last date in the data set if there are records. There is minimal formatting on the submit button. Next, we are ready for the code that creates the grid:
@grid.GetHtml(mode: WebGridPagerModes.All, tableStyle: "tranlist",
headerStyle: "headerstyle", firstText: "First", lastText: "Last",
columns: grid.Columns( grid.Column("TranDate", header: "Trans Date", format:
@<text>@item.TranDate.ToShortDateString()</text>),
grid.Column("Description", header: "Transaction Description", style:
"bigcolumn"), grid.Column("Units", header: "Units", style: "smallcolumn"),
grid.Column("UnitPrice", header: "Unit Price", format: @<text>@item.UnitPrice.
ToString("$0.00")</text>, style: "medcolumn"),
grid.Column("Total", canSort: false, header: "Total Price", format: @<text>@
{double q = (item.Units * item.UnitPrice);} @q.ToString("$0.00")</text>, style:
"medcolumn"),
grid.Column("TransactionID", header: "Action", style: "linkcolumn", canSort:
false,
format: @<text> @Html.ActionLink("Edit", "Edit", new { id = item.TransactionID })
| @Html.ActionLink("Delete", "Delete", new { id = item.TransactionID })</text>)))
Creating a custom paging footer
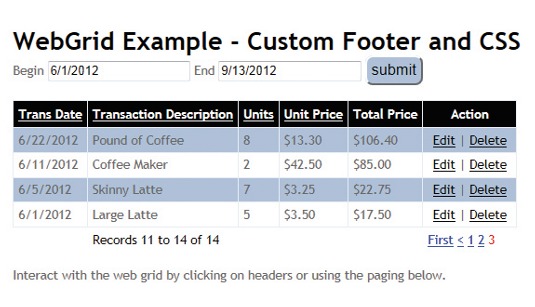
The preceding code will give you the view with normal paging in the footer. Next we'll customise the paging footer, putting the paging in the last column and the total record count in the second, by editing the HTML produced by the WebGrid helper. If you take this view in the browser and hit View Source, you will see that the paging is inside the tags <tfoot><tr><td>. We can pass the table from the WebGrid helper to a string and use the C# Replace method to edit the footer:
.ToString().Replace("<tfoot><tr><td","<tfoot><tr class='footstuff'><td></td><td>
Total Record Count " + grid.TotalRowCount + "</td><td></td><td></td>
<td><td><td")
This applies the footstuff class to the footer, creates both an empty column and one with the text we wanted to add, then puts in three more blank columns, and ends with the final <td partial tag that will be followed by the paging information. The next problem you have is that if you just return the string it will show as the markup text and won’t be shown as HTML. We fix this by wrapping all of this code in @MvcHtmlString.Create(...code goes here...). This takes the string you are returning and displays it as HTML. If you used grid.Rows.Count, it would show how many rows are on that particular page. You could use all of this data to show something like Records X to Y of XX. Right after the code that sets up the grid, you would write:
@{ int firstRecord = (grid.PageIndex * grid.RowsPerPage) + 1;
int lastRecord = (grid.PageIndex * grid.RowsPerPage) + grid.Rows.Count();
}
This creates two page variables that hold values for the first and last records shown on the current page. The PageIndex property is a zero-based index of the current page, so you don’t need to subtract one before you multiply by the RowsPerPage to get the last record on the previous page. Then you add one to get the first record and add the number of rows on the current page to get the last record on the page. In the footer, you would use the following code in place of the code where the current code for Total Record Count is:
<td>Records " + firstRecord + " to " + lastRecord + " of " + grid.TotalRowCount + "</td>
If you wanted the text for the record count to be in a different colour, you could apply a different class or even just use a style tag like the line below.
<td style='colour: black;'>Records " ...</td>
Wrap up
The WebGrid helper makes paging and sorting easy, and you have great flexibility using the C# Replace method on the WebGrid helper’s result string. If there is something that you can do with a table using regular HTML, there is no reason you shouldn’t be able to do the same thing with WebGrid – and you’ll benefit from the paging and sorting features built into the helper.
Words: Michael Schmaltz
This article originally appeared in .net magazine issue 237
Liked this? Read these!
- How to build an app: try these great tutorials
- Brilliant Wordpress tutorial selection
- Fantastic examples of UI design
Any questions? Fire away in the comments below.

Thank you for reading 5 articles this month* Join now for unlimited access
Enjoy your first month for just £1 / $1 / €1
*Read 5 free articles per month without a subscription

Join now for unlimited access
Try first month for just £1 / $1 / €1

The Creative Bloq team is made up of a group of art and design enthusiasts, and has changed and evolved since Creative Bloq began back in 2012. The current website team consists of eight full-time members of staff: Editor Georgia Coggan, Deputy Editor Rosie Hilder, Ecommerce Editor Beren Neale, Senior News Editor Daniel Piper, Editor, Digital Art and 3D Ian Dean, Tech Reviews Editor Erlingur Einarsson, Ecommerce Writer Beth Nicholls and Staff Writer Natalie Fear, as well as a roster of freelancers from around the world. The ImagineFX magazine team also pitch in, ensuring that content from leading digital art publication ImagineFX is represented on Creative Bloq.
