Build modular content systems in WordPress
Mark Llobrera walks through how to use Advanced Custom Fields to create a WordPress CMS that is flexible and structurally sound.
Daily design news, reviews, how-tos and more, as picked by the editors.
You are now subscribed
Your newsletter sign-up was successful
Want to add more newsletters?

Five times a week
CreativeBloq
Your daily dose of creative inspiration: unmissable art, design and tech news, reviews, expert commentary and buying advice.

Once a week
By Design
The design newsletter from Creative Bloq, bringing you the latest news and inspiration from the worlds of graphic design, branding, typography and more.

Once a week
State of the Art
Our digital art newsletter is your go-to source for the latest news, trends, and inspiration from the worlds of art, illustration, 3D modelling, game design, animation, and beyond.

Seasonal (around events)
Brand Impact Awards
Make an impression. Sign up to learn more about this prestigious award scheme, which celebrates the best of branding.
Fields explained
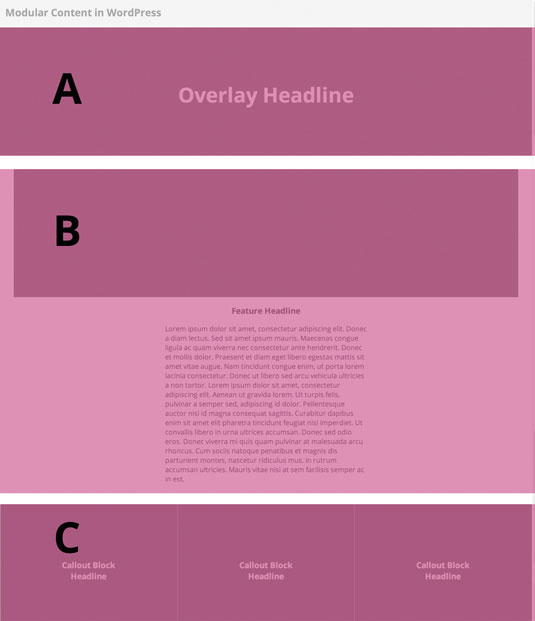
There are our three layouts. If the process of creating field groups and fields is a little confusing, the ACF website has very detailed documentation and videos showing how to create them.
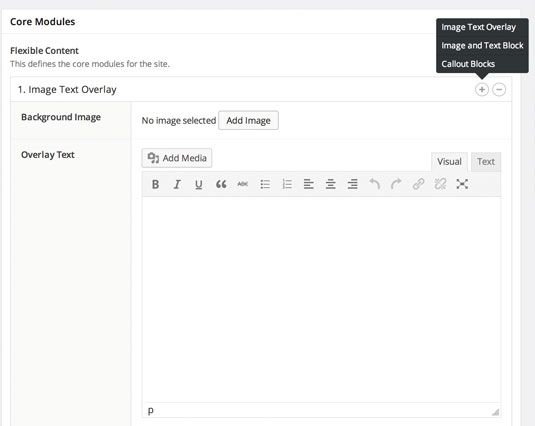
The modules are all pretty similar: they contain an Image field, and a Text or Wysiwyg field for entering text. The only wrinkle is that the last module ontains a Repeater field with sub fields, so that we can create multiple field collections within one larger layout.
You may be wondering, why create separate layouts when each layout contains very similar fields? Well, each layout maps to a module in our design system, and this allows us to craft markup in our template that is specific to each layout.
But even more important than the ability to break our markup into separate pieces in our template is the flexibility that layouts provide. Each different layout can be created any number of times.
Furthermore, each layout can be dragged in the display order to give your content author the flexibility to decide the best arrangement for the content that makes up each page. Some pages might only use one or two of the layouts, depending on what content is available for the page.

By default ACF will attach your Field Group to the default Post type. If you are creating a big CMS, it's very likely that you'll attach it to a custom post type of your making. Now let's take a look at it in action.
Note the option to create any one of the three layouts by hovering over the '+' symbol. Once your layout has been created, you can also drag your fields to put them them into any desired order.
Daily design news, reviews, how-tos and more, as picked by the editors.
Crafting our template

So now that you have your content structured into these modular layouts, how do you create a template to display them? Well, it turns out that the PHP template is quite simple. In it you will check for rows in our Core Module 's Flexible Content Field .
For each row, it can then check the layout type and render the appropriate markup. For rendering the fields themselves we will use the handy ACF methods the_sub_field() and get_ sub_field().
I like to generate my themes using underscores.me. Your theme should have a content- single.php file already present – if not, you can create one. Delete everything in the file and replace it with this code:
<?php ?>
	<article id="post-<?php the_ID(); ?>" <?php post_class(); ?>>
		<div class="entry-content">
	    <?php
	      if( have_rows('flexible_content') ):
 while ( have_rows('flexible_content') ) : the_row();
	              if ( get_row_layout() == 'image_text_overlay' ): ?>
	              <section class="text-overlay">
	                <h1><?php the_sub_field('overlay_text'); ?></h1>
	                <?php $background_image = get_sub_field('background_image'); ?>
	                <img src="<?php echo $background_image['url']; ?>">
	              </section>
	            <?php elseif (get_row_layout() == 'image_and_text_block' ): ?>
	              <section class="text-centered">
	                <?php $featured_image = get_sub_field('featured_image'); ?>
	                <img src="<?php echo $featured_image['url']; ?>">
	                <section class="text-block">
	                  <?php the_sub_field('description_text'); ?>
	                </section>
	              </section>
	            <?php elseif (get_row_layout() == 'callout_blocks' ): ?>
	              <?php if( have_rows('block_collection') ): ?>
	                <section class="text-callout">
	                  <?php while( have_rows('block_collection') ): the_row(); ?>
	                    <?php $block_image = get_sub_field('block_image'); ?>
	                    <section class="text-callout-block"><h1><?php the_sub_field('block_text'); ?></h1><img src="<?php echo $block_image['url']; ?>"></section>
	                  <?php endwhile; ?> <!-- block collection while -->
	                </section>
	              <?php endif; ?> <!-- block collection if -->
	            <?php endif; ?>
	          <?php endwhile; ?>
	        <?php endif; ?>
		</div><!-- .entry-content -->
</article><!-- #post-## -->
This template begins by checking if the field flexible_ content has any rows. If it does, then it loops through each row of the field. Each time through, it checks the Row Layout using the get_row_layout() method.
You can see that the three names it is checking are the ones you specified for the three layouts: image_ text_overlay , image_and_text_block , and callout blocks .
Each of those layouts gets its own (modular) piece of markup. In each markup block you then call the_sub_ field() (or get_sub_field() , in the case of images that you'll need to set to a variable for printing later).
Now you have a template to render the correct markup for each of your modules, you can style the results with CSS. In many cases I prefer to work out the CSS for each module in a frontend style guide or static HTML mockup, so this step normally involves copying, pasting and testing into the WordPress theme CSS file.
The CSS I have used is included in the tutorial files. It is fluid (to an extent) but not responsive – you are encouraged to play with it and come up with your own markup/CSS patterns once you understand how the ACF layouts and fields are rendered.
The final (flexible) result
The end result is a page template that supports a flexible design system, on both the authoring side and the rendering side. Content authors are given intuitive tools to create layouts and drag and drop them into the desired order. The result will be well-crafted, consistent markup, ultimately giving the site's users a better experience.
All the files you need for this tutorial are avaible on GitHub.
Words: Mark Llobrera
Mark Llobrera is a senior developer at Bluecadet and an expert in HTML, JavaScript, WordPress and Drupal. Follow him on Twitter at @dirtystylus. This article appeared first in issue 261 of net magazine.
Like this? Read this!
- Google releases 1,000th Chrome Experiment
- The designer's guide to working from home
- How to build an app: try these great tutorials

The Creative Bloq team is made up of a group of art and design enthusiasts, and has changed and evolved since Creative Bloq began back in 2012. The current website team consists of eight full-time members of staff: Editor Georgia Coggan, Deputy Editor Rosie Hilder, Ecommerce Editor Beren Neale, Senior News Editor Daniel Piper, Editor, Digital Art and 3D Ian Dean, Tech Reviews Editor Erlingur Einarsson, Ecommerce Writer Beth Nicholls and Staff Writer Natalie Fear, as well as a roster of freelancers from around the world. The ImagineFX magazine team also pitch in, ensuring that content from leading digital art publication ImagineFX is represented on Creative Bloq.
