How to prototype websites on paper
Jerry Cao of UXPin explores the pros and cons of the non-digital method of prototyping websites.
Previously we explained 3 ways to build a website prototype digitally. But there's more than one way to skin a cat.
Prototyping on paper trades fidelity and functionality for speed, which can be useful in the early stages of design. Plus, in the age of modern technology, it can sometimes be refreshing getting back to the tools we used in kindergarten.
Win clients & work smarter with our FREE ebook: get it now!
Paper, scissors, glue, coloring utensils — what we once used to make unicorn collages can now be co-opted for creating useful yet quick prototypes. Let's explore the benefits, disadvantages, and methods for paper prototyping.
01. The pros
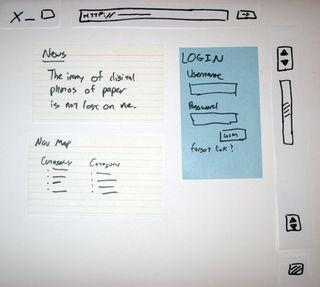
The benefits of paper prototyping are quite straightforward: they're cheap, fast to make, and easy to collaborate with.
Shawn Medero, UX lead at the University of Washington, believes that starting on paper can be a surprisingly helpful tactic as interfaces become more complex and development schedules become shorter. Here are a few reasons why:
- Rapid iteration — Which would you rather throw away, 2-hours worth of coding or a sketch that took 20 minutes? Due to the highly dynamic nature of the prototyping phase, you're always going to create some waste, so sometimes it doesn't make sense to spend a lot of time on any one design.
- Low budget — Paper prototypes can be built with supplies already in your office. All you need is paper, pencil or pen, scissors, and some creativity. If you want to get fancier, grab some index cards or Post-Its.
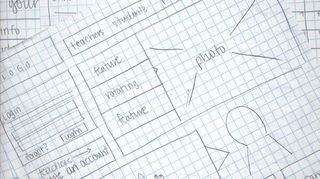
- Fun collaboration — It's hard not to bond when a group of people are given art supplies and asked to create. The casual nature of paper invites more participation and feedback, which you should encourage as much as possible during early product stages.
- Easy documentation — Past versions of the prototype are right there in front of you, allowing for part of the design to be the documentation. Additionally, technical notes can be written right on the prototypes themselves.
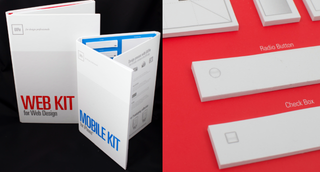
Moreover, a quick session of paper prototyping can help brainstorm solutions if you're currently stuck with your digital prototype. Like we discussed in The Guide to Prototyping, paper and digital prototyping aren't exclusive — they can complement each other well if you play on each's strengths.
Get the Creative Bloq Newsletter
Daily design news, reviews, how-tos and more, as picked by the editors.
Interestingly enough, UXPin actually launched in 2011 as a paper prototyping tool. Once we transitioned into a cloud app, we still complemented the paper process by letting people scan and upload paper prototypes into UXPin.
02. The cons
Paper prototyping isn't for everyone. Jake Knapps, the designer behind Google Hangouts, claims that it is a waste of time. And while we think it has its time and place, these are some of its glaring disadvantages:
- They can generate false positives — While paper prototyping can be useful for individual processes, you need to explain the context. Otherwise, you might get feedback based on your efforts (“How creative!”), not based on your actual product (“The navigation is confusing.”).
- No gut reactions — Research should be based on your users' reactions, as those come naturally without thought. Because paper prototypes require the user to imagine what the final product will be like, you're getting feedback on a deliverable instead of reactions to something that resembles the product.
- Can be slower than prototyping tools — Given the wide selection of prototyping tools out there like UXPin, Invision, Omnigraffle, and others, you can get prototyping quite quickly (and less messier) with the added benefit of collaborative features. It all depends on your preferences.
In our experience, paper prototyping can be an excellent way of exploring ideas (as long as you know its limits). In fact, our CEO even wrote a piece for UXMag, where he explained how you get the most out of paper prototyping when you treat it more as an informal concepting exercise.
Draw out sketches for the sake of exploring your own ideas, then run a quick hallway usability test with 3-5 people. Afterwards, you can move to a digital platform for wireframing and higher-fidelity prototyping.
03. Nailing the process
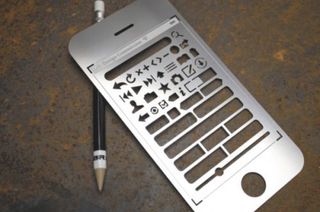
Don't let the scissors and the pretty colours fool you — paper prototyping isn't just fun and games. Whether you're creating one for your team, for usability testing, or for a stakeholder presentation, your paper props should be both professional and functional.
The first thing to know about paper prototyping is that someone has to play the role of the “human computer.” In his list of prototyping tips, Jim Ross, Senior UX Architect for Infragistics, suggests that one member's main and only part should be shuffling around the right screens at the right time. This isn't easy, but it's needed to best maintain the illusion.
Though the technique has been around since the 1980s and has had different variations, there are some standard practices to follow. Justin Mifsud, UI Designer and Owner of UsabilityGeek, explains these steps in a post for his site:
- Sketch each screen — Each screen's sketch should be creative — for example, a pull down menu can be folded underneath the paper at first — but also individual and separate from the rest.
- Create user scenarios — As recommended in The Guide to UX Design Process & Documentation, create a realistic scenario to run through, either to demonstrate for a presentation, or for your test-takers to try to figure out.
- Rehearsal — Run through the different scenarios until the “human computer” works like a real machine.
- Presentation/Test — Now you're ready for the presentation or usability test. For presentations, just run through the scenario as rehearsed. For usability tests, stay on your toes and adjust the screens accordingly.
If you'd like to learn more, check out this video showing how you might explain a paper prototype to stakeholders.
Then, get started with these printable templates.
Takeaways
In our experience, we've found paper prototyping works well for quickly validating concepts, but becomes less effective as your need for fidelity and functionality increases.
Just remember to prototype smarter, not harder. Don't undercut the quality of the final product by avoiding an option that might have a higher learning curve, but don't push yourself into biting off more than you can prototype either.
For more practical advice on low or high fidelity prototyping, download the free The Guide to Prototyping. Learn how and when to use different prototyping tools and tactics, with best practices from Zurb, Google Ventures, IDEO, and many more.
Words: Jerry Cao
Jerry Cao is a content strategist at UXPin — the wireframing and prototyping app — where he develops in-app and online content for the wireframing and prototyping platform. To learn how to use mockups of all types and fidelities, check out The Guide to Mockups.
Like this? Read these!
- Create an app prototype with Pixate
- How to build an app: try these great tutorials
- Free graphic design software available to you right now!

Thank you for reading 5 articles this month* Join now for unlimited access
Enjoy your first month for just £1 / $1 / €1
*Read 5 free articles per month without a subscription

Join now for unlimited access
Try first month for just £1 / $1 / €1
The Creative Bloq team is made up of a group of design fans, and has changed and evolved since Creative Bloq began back in 2012. The current website team consists of eight full-time members of staff: Editor Georgia Coggan, Deputy Editor Rosie Hilder, Ecommerce Editor Beren Neale, Senior News Editor Daniel Piper, Editor, Digital Art and 3D Ian Dean, Tech Reviews Editor Erlingur Einarsson and Ecommerce Writer Beth Nicholls and Staff Writer Natalie Fear, as well as a roster of freelancers from around the world. The 3D World and ImagineFX magazine teams also pitch in, ensuring that content from 3D World and ImagineFX is represented on Creative Bloq.
