Remove light and shadow using Photoshop
Want to use a photo as a texture but the lighting isn’t right? Richard Tilbury’s here to help make things better.
At some point, most 3D artists will probably discover what they feel is the perfect reference that best suits their texturing requirements, barring one major exception – the lighting conditions in the photo do not match the environmental criteria.
Many artists carry a camera with them while they’re on the move so that they can add to their library of textures should they happen across an interesting subject or surface. Inevitably, though, many of these shots will include undesirable highlights and shadows. Being able to remove these will prove necessary when converting a raw image into a usable texture, be it tileable or not.
As with many tasks, there is more than one approach (and very rarely can these be fully automated), but there are a few tools that can certainly speed up the process and save time.
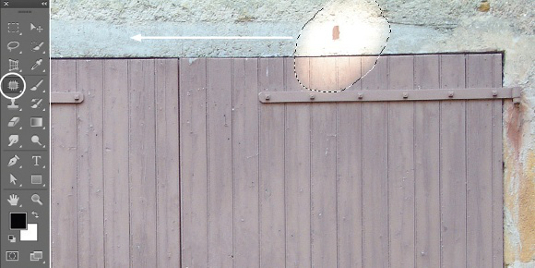
The first of these is Photoshop CS6’s Content Aware Patch, found in the Tools palette adjacent to the Brush tool. (Hold down the left mouse button to see the sub-menu.) If you have an isolated highlight or shadow, then this is the best tool for the job: it removes unwanted content and automatically fills in the area by sampling a source area.
Start by selecting the Content Aware Patch and then draw a region around the culprit area. Now move your cursor to an area of the image that you wish to replace it with, and which you think would blend in. Think of it like searching for the missing piece in a jigsaw puzzle. As you move your mouse you will see the selection area match the location of your cursor.
This works best with a randomised pattern, but is nevertheless a swift way of removing a conspicuous highlight or shadow. Once you release the mouse button, Photoshop will blend in the edges. If the results are not perfect, you can try changing the Adaptation settings in the Options bar below the menu bar. These range from Very Strict to Very Loose, and can have a significant bearing on disguising seams.
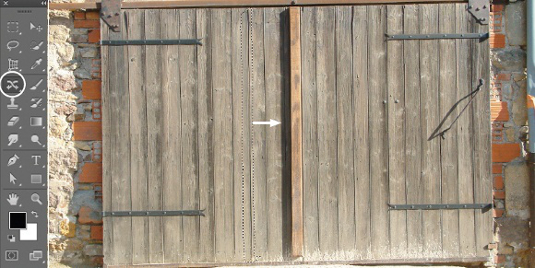
Another method involves using the Content Aware Move tool, which essentially moves one selection area to another, then blends in the newly moved region and seamlessly fills in the original selection area. The way to approach this is not by directly moving the shadow or highlight, but by first selecting the unwanted section using the Magic Wand or Quick Selection tool.
Get the Creative Bloq Newsletter
Daily design news, reviews, how-tos and more, as picked by the editors.
You then need to switch to the Marquee tool and move the selection area to a part of the image you wish to replace it with. With the selection area active, reselect the Content Aware Move tool and drag back to the undesired region (which will fit perfectly). This will now substitute the conspicuous highlight or shadow with the current selection area and proceed to blend in the seams.
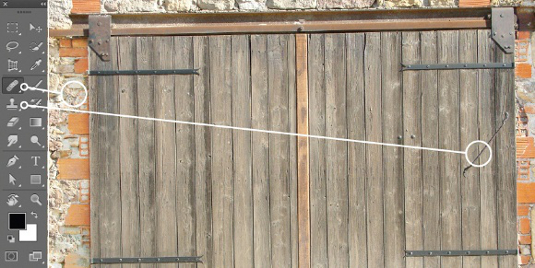
If you are lucky, these methods will work without any further intervention, but more often than not they will require some tweaking. The third tool, which can be used in support or independently if the corrections are minimal, is the Clone Stamp tool. This proves very useful for concealing seams and removing minor problem areas as it is used to replace an area of your image by sampling a different region.
Once selected, hold down [Alt] to turn your cursor into a target icon, and then click on the area that you wish to sample. Release the mouse button and begin painting out the unwanted area. Be mindful that this will not automatically blend in seams, as this is a manual technique, but it does offer more control if done with care. The shape and style of the stamp relies on brush selection, so you may need to vary the brush according to the nature of the image. For example, a random pattern would best suit a textured brush whereby a more architectural subject may benefit from a harder-edged brush.
One final tool that works well for refinement is the Healing Brush which, in a similar way to the previous tool, samples pixels from your image. But unlike the Clone Stamp, the Healing Brush matches the lighting and texture to the region being healed. Once you have carried out one or more of the above techniques, you can use this tool to remove any remaining imperfections.
Get rid of unwanted shadows and highlights
01 CONTENT AWARE PATCH

Select the Content Aware Patch and draw a region around the highlight. Next, move the selection area to a part of the image that would work best as a replacement (in this case slightly to the left). In an architectural context or one where straight lines are apparent, try to select an aligned area to minimise clean-up.
02 CONTENT AWARE MOVE

Use the Magic Wand or Quick Selection tool to select the shadow left of the vertical beam in the centre of the gate. Now select the Marquee tool and move the selection area to a part of the gate that would best match it. (Use the tongue and groove as a guide.) Next, select the Content Aware Move tool, click and drag the selection area over to the shadow and release the mouse.
03 HEALING BRUSH AND CLONE STAMP

Use the Clone Stamp tool to remove the shadow from the door handle. Click on a section of wood above the shadow to designate the source area and then begin painting out the shadow. Be careful to align the tongue and groove as you do so. The Healing brush could also be used as an alternative. Use the Quick Selection tool to select the shadow left of the gate and then lighten it using Image > Adjustments > Brightness Contrast. When similar, click OK and then use the Healing Brush tool to blend in the stone texture.
Richard Tilbury works part-time at 3D Total as lead artist, as well as working as a freelance concept artist and illustrator

Thank you for reading 5 articles this month* Join now for unlimited access
Enjoy your first month for just £1 / $1 / €1
*Read 5 free articles per month without a subscription

Join now for unlimited access
Try first month for just £1 / $1 / €1

The Creative Bloq team is made up of a group of art and design enthusiasts, and has changed and evolved since Creative Bloq began back in 2012. The current website team consists of eight full-time members of staff: Editor Georgia Coggan, Deputy Editor Rosie Hilder, Ecommerce Editor Beren Neale, Senior News Editor Daniel Piper, Editor, Digital Art and 3D Ian Dean, Tech Reviews Editor Erlingur Einarsson, Ecommerce Writer Beth Nicholls and Staff Writer Natalie Fear, as well as a roster of freelancers from around the world. The ImagineFX magazine team also pitch in, ensuring that content from leading digital art publication ImagineFX is represented on Creative Bloq.
