Prepare a photo for printing
If you print a photo without prepping it, it's likely to look nothing like it did on the screen. Here's how to get it ready in three easy steps.
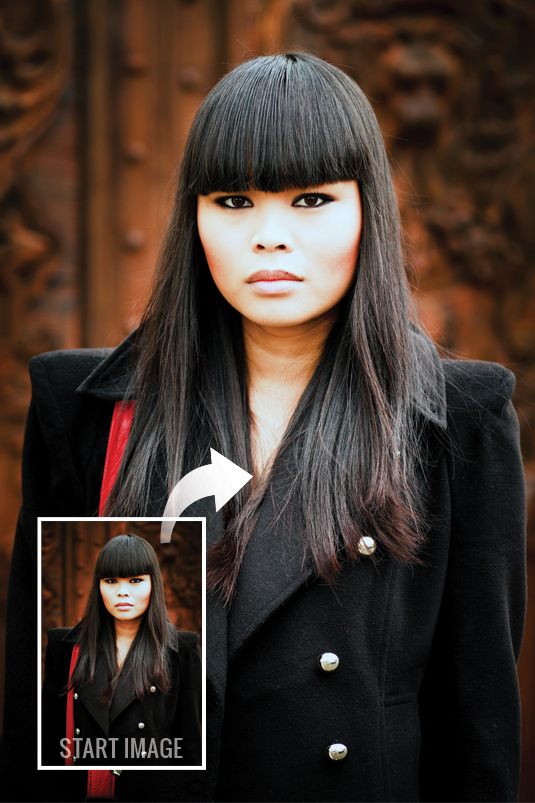
There are three steps to preparing a photo for printing. Start by calibrating your monitor. Most screens have a strong blue cast, and without calibration, your prints won’t match the display. Calibration is easy as long as you have a colorimetric device such as those made by Spyder or Pantone. Just connect the device, start the supplied software and follow the on-screen instructions.
Second, you need to adjust the brightness of the image. Monitors tend to be too bright for printing. Start by reducing the brightness of your monitor to around 30%, then brighten your image appropriately. It will seem strange at first, but if you don’t do this, your photos will come out too dark.
Finally, the image needs to be sharpened. Use the Smart Sharpen tool in Photoshop CS6 or any version with this tool. Trial and error is required as the amount of sharpening needed varies according to subject matter, paper surface, and print size.
Click here to download your start image
01. Brighten the image
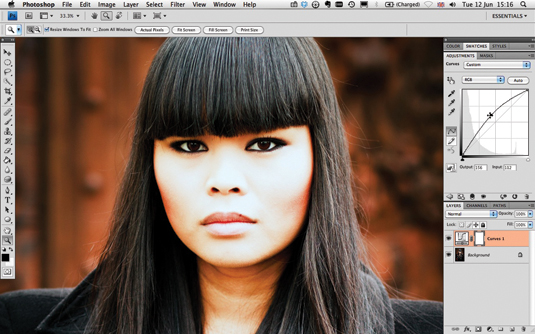
With the monitor calibrated and darkened, open the photo you want to print and create a new Curves Adjustment Layer. Grab the centre of the curve with the mouse and move it upwards to lighten.
02. Flatten and save
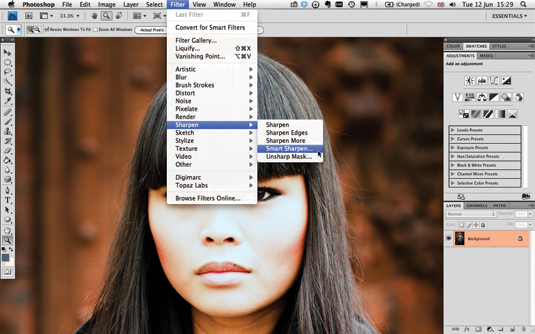
Flatten the image and save under a new name so that you don’t overwrite the original. Go to Filter>Sharpen>Smart Sharpen.
03. Sharpen and print
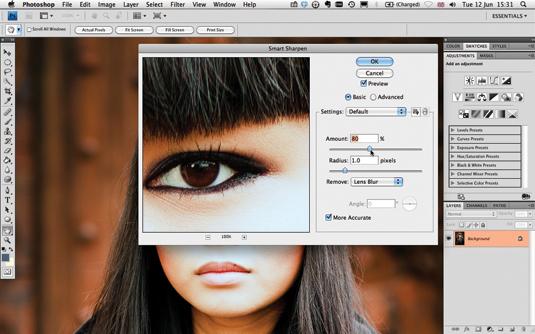
Set Amount to 80% and Radius to 1.0 pixels. Select Remove Lens Blur. Click OK, then make a test print. If the print is too sharp or too soft, undo the sharpening and start again.
Words: Andrew Gibson
Get the Creative Bloq Newsletter
Daily design news, reviews, how-tos and more, as picked by the editors.
This article first appeared in Practical Photoshop magazine, the number one magazine for lovers of photography and image-editing. To find out extra tips, tutorials, and expert advice: get the mag!
Don't forget to check out:
- Create a sinister fantasy backdrop in Photoshop
- Master studio portrait photography: set up a studio today!
- 101 Photoshop tutorials!

Thank you for reading 5 articles this month* Join now for unlimited access
Enjoy your first month for just £1 / $1 / €1
*Read 5 free articles per month without a subscription

Join now for unlimited access
Try first month for just £1 / $1 / €1

The Creative Bloq team is made up of a group of art and design enthusiasts, and has changed and evolved since Creative Bloq began back in 2012. The current website team consists of eight full-time members of staff: Editor Georgia Coggan, Deputy Editor Rosie Hilder, Ecommerce Editor Beren Neale, Senior News Editor Daniel Piper, Editor, Digital Art and 3D Ian Dean, Tech Reviews Editor Erlingur Einarsson, Ecommerce Writer Beth Nicholls and Staff Writer Natalie Fear, as well as a roster of freelancers from around the world. The ImagineFX magazine team also pitch in, ensuring that content from leading digital art publication ImagineFX is represented on Creative Bloq.
