Mastering Photoshop brushes: 6 top tips
Get to know Photoshop’s default brushes, then start adding your own, advises artist Tony Foti.
Photoshop is a complex bit of kit, which can take years to learn properly. Thankfully, there's lots of Photoshop resources around to help you out, including handy Photoshop tutorials and Photoshop actions to create impressive effects. But one of the essentials Photoshop features to know as a digital artist are the Photoshop brushes.
Just as with traditional painting, knowing what effects you can create and what tools to use to do so is a great advantage to have. By mastering your brushes, you can get the very most out of the software and once you understand the basics, you can go ahead and create your very own.
01. Brush options
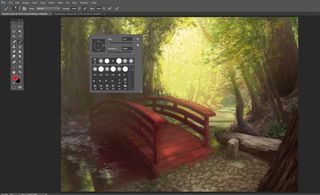
Once you've selected the Brush icon from the toolbar, right-clicking anywhere on the canvas will bring up a small menu with shape and size options. Size is pretty straightforward, with a slider on the top right. Each of the strange shapes located in the white boxes below are alternate tip shapes, enabling you to create all kinds of different marks.
02. Alter your brush edges
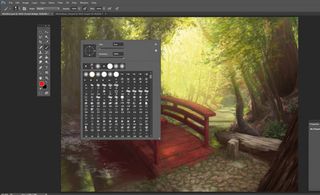
Some tips, like the basic Round brush you start with, can also have the hardness of their edges adjusted. Accessing the slider labelled Hardness and moving it to the right will make for more distinct, hard-edged brush strokes, while moving it to the far left will create a soft airbrush effect.
03. Brush modes
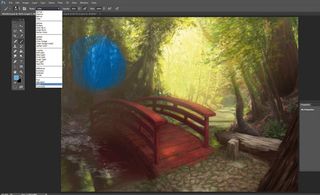
When the Brush Tool is selected, there'll be an options bar at the top of the screen with Mode and Opacity drop-downs menus. These both work the same way that their Layers window counterparts do, and the Mode settings are exactly the same for both (Lighten, Darken, Overlay and so on). Instead of controlling a whole layer, though, they're just applying those settings to your individual brushstrokes.
04. Tip settings
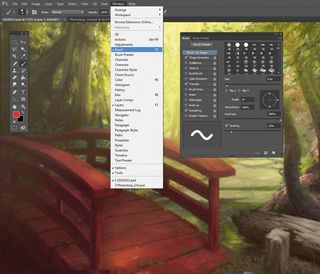
The brush is the tool you'll be using most often as an illustrator or concept artist, so take the time to get to know its features. Go to Window>Brush to open the Brush Window, where you'll see a list of options such as Shape Dynamics (pressure on your drawing tool of choice dictates brush size), Dual Brush (use two brushes at once), Color Dynamics (use multiple colours at once) and Scattering (turns brush strokes into a scattering of marks in the shape of the brush tip).
05. Create your own brush
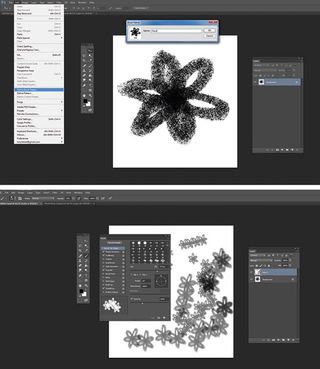
Photoshop comes with an impressive assortment of brush options, but when something more specific is needed you can create your own custom ones.
Open a new document, and then draw your desired tip shape. Go to Edit>Define Brush Preset… from the top menu and it'll add the new brush tip to your assortment, shaping it from the black and leaving transparent any white parts of the canvas.
06. Loading custom brushes
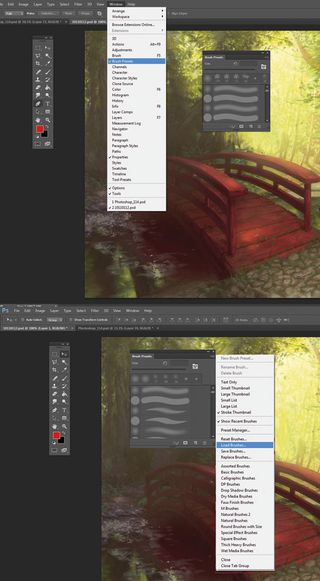
The internet is full of custom brushes available for download. I have some Nagel brushes that have served me well over the years. You'll most likely be downloading the files in .Abr format, which you can then move to the Adobe Photoshop CS>Presets> Brushes folder on your hard drive.
Open the Brush Preset window and click the drop-down menu option to bring up the Load Brushes option. Navigate to the file, double-click it and the new tip will appear in your menu.
Words: Tony Foti
Tony Foti is a freelance illustrator who regularly contributes to Fantasy Flight Games‚ Star Wars and Lord of the Rings lines, as well as numerous other books, games and magazines. This article originally appeared in ImagineFX magazine issue 114.
Like this? Read these!
- Illustrator tutorials: amazing ideas to try today!
- Automate effects with these amazing Photoshop actions
- Discover the 5 best pencils for artists and designers
- How to choose the right drawing tools
- Read our guide to choosing the best photo editor

Thank you for reading 5 articles this month* Join now for unlimited access
Enjoy your first month for just £1 / $1 / €1
*Read 5 free articles per month without a subscription

Join now for unlimited access
Try first month for just £1 / $1 / €1
Get the Creative Bloq Newsletter
Daily design news, reviews, how-tos and more, as picked by the editors.
The Creative Bloq team is made up of a group of design fans, and has changed and evolved since Creative Bloq began back in 2012. The current website team consists of eight full-time members of staff: Editor Georgia Coggan, Deputy Editor Rosie Hilder, Ecommerce Editor Beren Neale, Senior News Editor Daniel Piper, Editor, Digital Art and 3D Ian Dean, Tech Reviews Editor Erlingur Einarsson and Ecommerce Writer Beth Nicholls and Staff Writer Natalie Fear, as well as a roster of freelancers from around the world. The 3D World and ImagineFX magazine teams also pitch in, ensuring that content from 3D World and ImagineFX is represented on Creative Bloq.
