Kinetic typography techniques with Photoshop and After Effects
Creative director and motion graphic artist Angie Taylor (@theangietaylor) shows how to use Photoshop and Adobe After Effects for kinetic typography - combining text and motion to express ideas in the form of animation.
- Knowledge needed: Intermediate After Effects and Photoshop skills
- Requires: Adobe After Effects CS5.5, Adobe Photoshop CS5.1
- Project Time: Two to three hours
- Support file
In this useful and practical tutorial you’ll learn valuable techniques you’ll want to use over and over again in your Photoshop and After Effects work. Please watch the final movie below to see some of the techniques covered. This is an experimental, art project – created in response to the song, That Day by artist, Richard Walker.
In Photoshop you’ll discover how to use the often-overlooked but powerful Variables feature to automatically enter text into type layers from a regular text file.
In After Effects you’ll use markers to create visual reference points that make animation easier, add nulls to group words together into sentences so they can be animated easily as groups, use text presets to create per-character animation and add expressions to create flickering light effects. I’ll also show you how to control the new Light Falloff properties to help control 3D shadows.
01. Variables
Variables are an overlooked feature of Photoshop but are very useful if you design text for on-screen graphics. We’ll use variables to automatically import text from a document into individual Photoshop layers, saving you tons of time – not to mention typing.
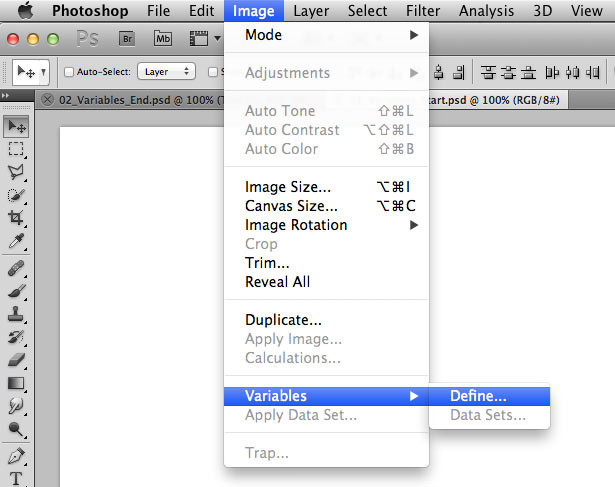
Open 01_Variables_Start.psd and go to Image>Variables>Define.
02. Setting up Text Replacement
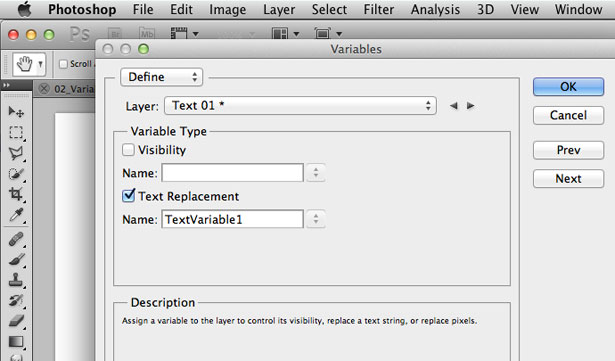
In the dialog box, click the Text Replacement checkbox and you’ll see the Name field populate with the text – TextVariable1. Basically, we are assigning a code to each layer that we can use to refer to variable data in a text document. Bear with me; you’ll understand why soon!
03. Assigning names to layers
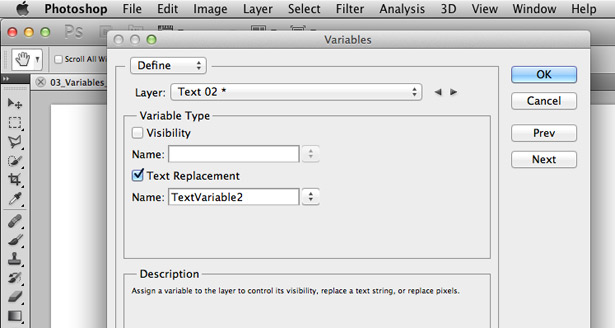
Click on the Right arrow, next to the Layer drop-down menu to advance to the next layer, that’s named Text 02. Click on the Text Replacement checkbox again. The Name field will populate with the text – TextVariable2. Repeat this process till all 11 layers are matched to equivalent names.
04. Importing data from text files
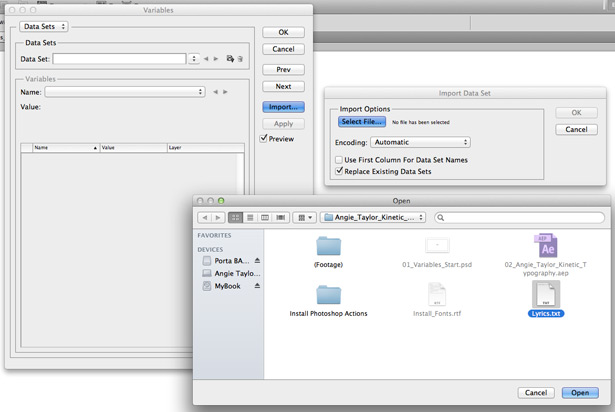
Click on the Next button to open the Data Sets. Click the Load button and then the Select File button in the Import Data Set dialog. Select the Lyrics.txt file from Angie_Taylor_Kinetic_Typography folder then click OK. A list appears at the bottom with corresponding names, values and layers.
Get the Creative Bloq Newsletter
Daily design news, reviews, how-tos and more, as picked by the editors.
05. Applying data sets
Click Apply and then OK. In the Layers panel the text is updated with the text from the file. Imagine how much easier this makes life when working with lots of layers in multiple documents. Simply edit the text file and update the data set to automatically update the layers.
06. Preparing files for After Effects
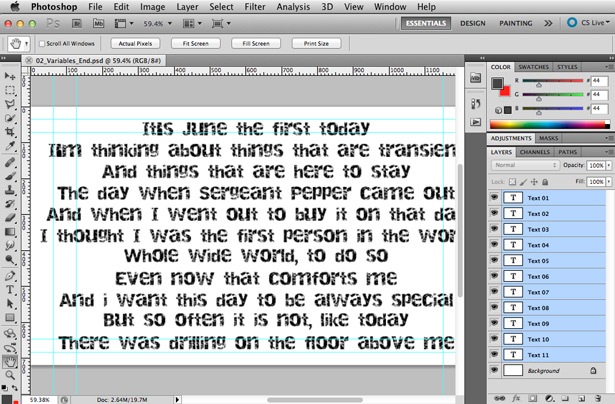
Plan the style the layout in Photoshop. Use title-safe guides to help layout the text and the Type Tool Presets menu to quickly format it with font styles. In the Layers panel organise the words into sentences within Layer Groups for each section of the song. This will save time in After Effects.
07. Understanding project structure
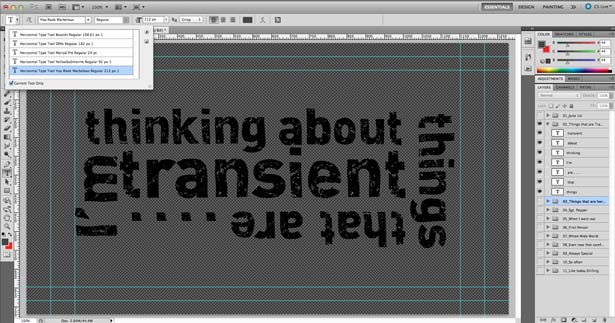
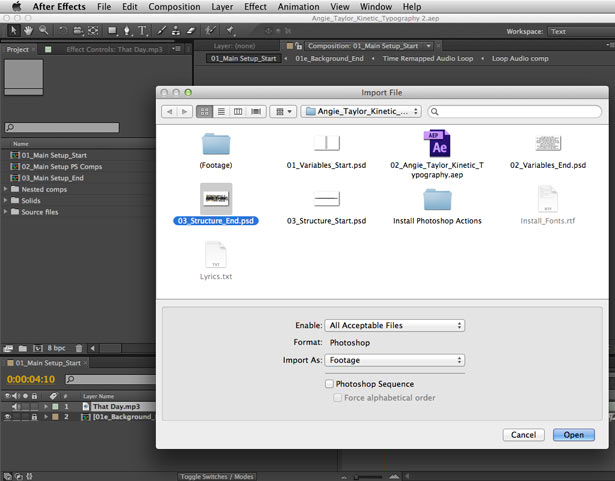
In After Effects, open Angie_Taylor_Kinetic_Typography.aep - 01_Main Setup_start comp. The Photoshop file has been imported into an After Effects project. Layer Groups appear as nested comps within the main composition. An audio file containing the soundtrack has been added to the comp. An animated background comp has been created using a combination of effects.
08. Add markers in time with the audio
Select That Day.mp3 and double-hit the L key to open up the audio Waveform. This will help guide you as you follow the next few steps. RAM preview the comp and while listening to the audio, hit the * key (Shift+8) to add markers at the beginning of each sentence spoken.

09. Adding lyrics to Comments field
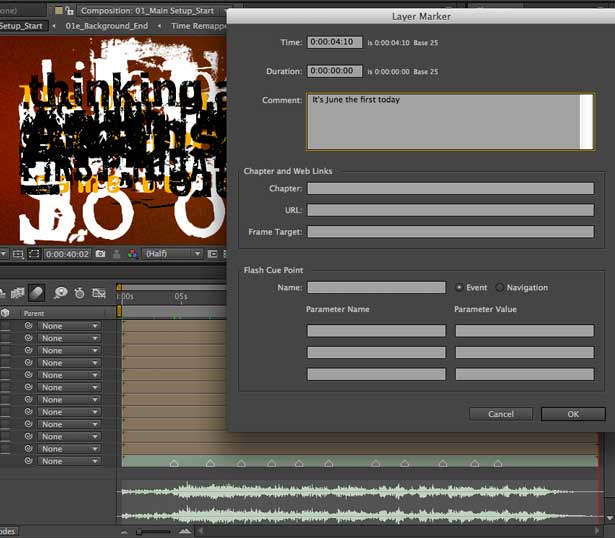
Double-click each of the markers one by one to edit them. Type or paste the song lyrics into the Comment field and then click OK. The comments will appear on the layer as a visual reference to help you navigate the timeline. Use the J and K keys to jump between markers.
10. Trimming layers
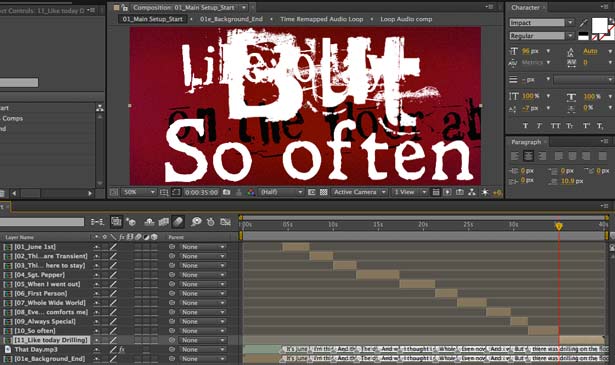
Each layer from the Photoshop file should begin at the corresponding marker. Jump to the first marker by hitting K. Select the 01_June 1st layer and hit Alt+[ to trim the In point. Jump to next marker then hit Alt+] to trim the Out point. Repeat to trim other layers accordingly.
11. Moving Layers
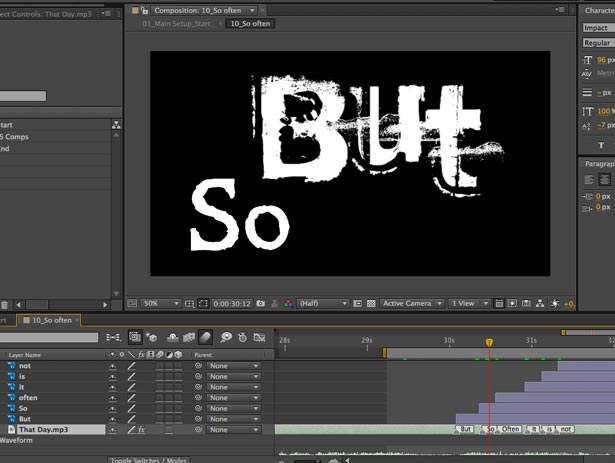
Double-click 10_So often layer to open the nested comp. Jump to the first marker on the That Day.mp3 layer by selecting it then hitting the K key. Select the But layer and click [ to move it’s In point to the time-marker. Repeat this for the other layers so that each begins on the subsequent markers.
12. Using nulls and parenting to create groups
Go to Layer>New>Null Object to add a Null layer. Select all the Photoshop Layers and then choose Null 1 as their parent from the Parent drop-down menus. This gives us one single set of controls for animating the group of words while retaining their individual animations.

13. Animating the Null
Move to 30:10. Select Null 1 then hit Alt+A to add a keyframe for the Anchor Point property and simultaneously expose it. Move to 31:11 and scrub the Anchor Point X value till you see the word Not in the centre of the screen. This will automatically add a new keyframe. RAM preview.

14. Adjusting Motion Blur
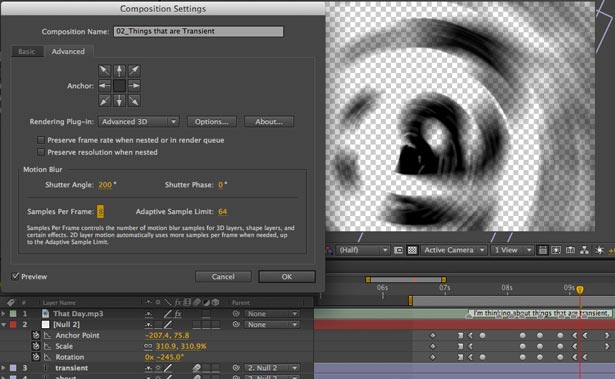
Open 02_Things that are Transient comp from 01_Main Setup_Start comp. Here, Scale, Rotation and Anchor Point have been keyframed to create a complex animation. Notice at 09:04 the motion blur is not detailed enough. Go to Composition>Composition Settings and click on the Advanced tab. Increase Shutter Angle to 200 and Adaptive Sample Limit to 64.
15. Making Photoshop text editable
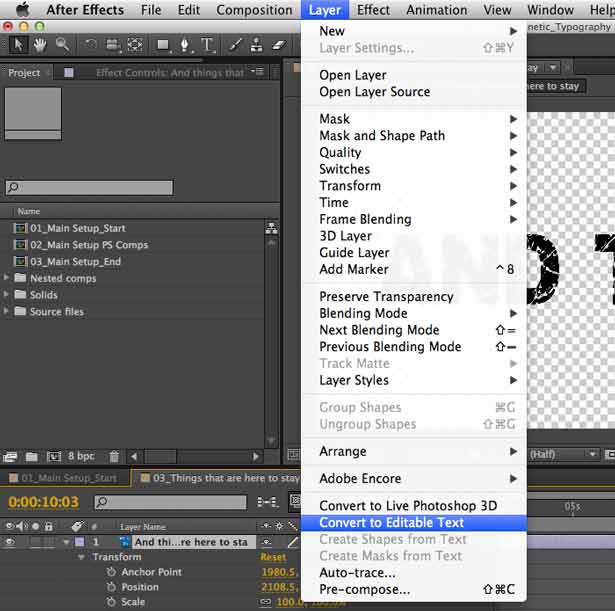
Double-click 05_When I went out comp. Notice the text from the Photoshop file appears here as a rendered layer. To convert the Photoshop layer to editable text, select it then go to Layer>Convert to Editable Text. Open the layer to see the Text property group is now available.
16. Applying animation presets
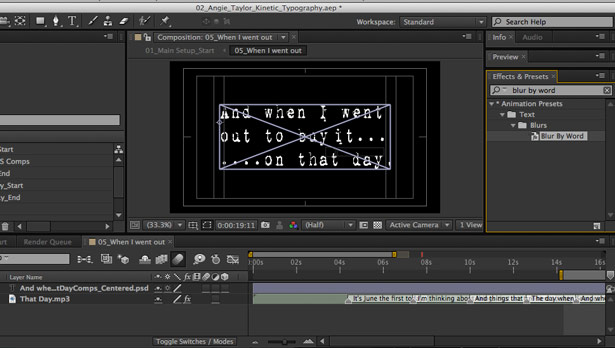
Presets can automatically animate the text on a per word basis. In the Effects & Presets panel, type Blur By Word to isolate the preset. With the Time-marker at 14:10, drag it onto the text layer. Hit U to reveal the keyframes. Drag the last keyframe to 17:04. RAM preview.
17. Adding lighting
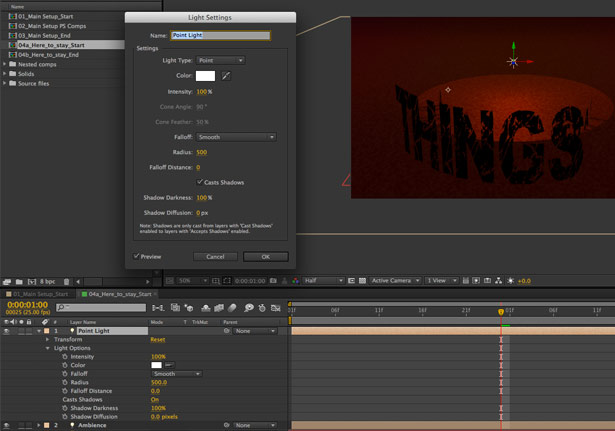
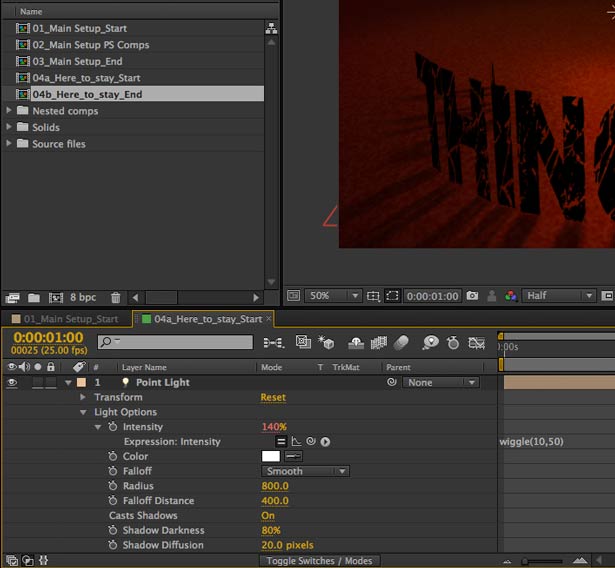
From the Project panel, open 04a_Here_to_stay_Start comp – RAM preview. Switch on Ambience layer – it darkens the scene by reducing the ambient light to 20%. Switch on Point Light layer and notice shadows being cast. Double-click Point Light to open Light Settings. Change the Falloff Menu to Smooth – notice the light beam has a hard edge. Click OK.
18. Adjusting light falloff and shadows
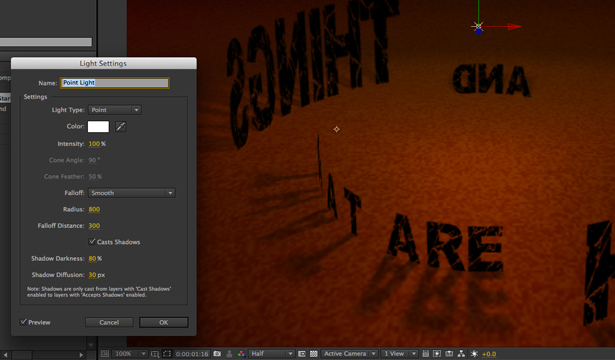
In the timeline, change the Falloff Distance to 300, this softens the edge as the light gradually fades. Change the Radius to 800 to widen the ‘beam’ projected by the light. Change the Shadow Darkness to 80% and the Shadow Diffusion to 30 for softer, subtle shadows. RAM Preview.
19. Animating the Light with Expressions
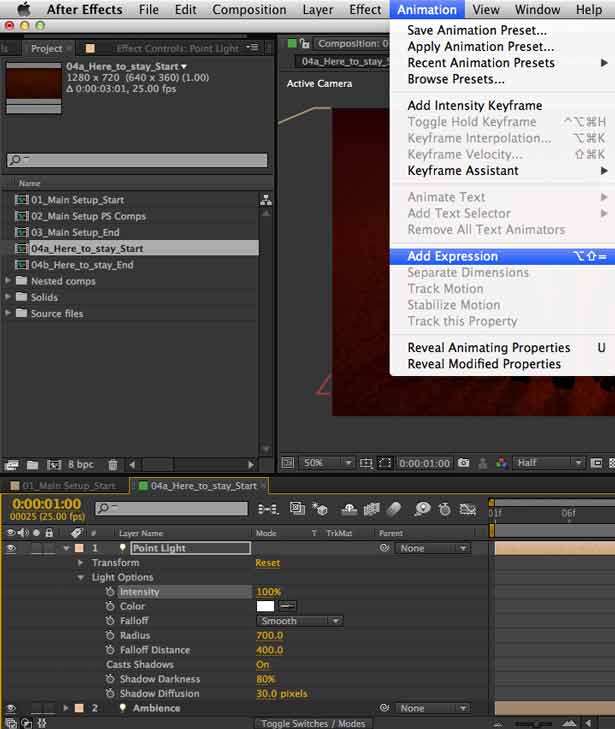
To make the light flicker, select the Intensity property of the Point Light layer by clicking on its name in the Timeline. Go to the Animation menu and choose Add Expression. An expression is added to the selected property and a text field appears beside the property in the timeline.
20. The Wiggle expression
The Expression reads:
lightOption.intensity
Edit the expression text so that it reads:
wiggle(10,50)
Hit Enter (Not Return!) then RAM Preview to see the light flashing on and off. You can adjust the frequency by changing the first value in the parentheses. Adjust the amplitude by changing the second value.
So there you have it, some valuable tips and tricks that I find useful when creating kinetic typography animation. I hope you have enjoyed this tutorial and find these techniques useful – happy keyframing!
Extend your knowledge
If you’d like to learn more techniques like these check out Angie's video workshop. This comprehensive course includes over seven hours of video tutorials and covers other techniques used in the final video.
There are some free example movies from Angie's workshop available to view here on her blog.
Angie Taylor is an author, animator and creative director. She produces animation, illustration and motion graphics for television and film and is the author of “Design Essentials for the motion media artist” and "After Effects Learn by Video".
Liked this? Read these!
- After Effects CS6 review
- How to build an app
- Free graffiti font selection
- Illustrator tutorials: amazing ideas to try today!

Thank you for reading 5 articles this month* Join now for unlimited access
Enjoy your first month for just £1 / $1 / €1
*Read 5 free articles per month without a subscription

Join now for unlimited access
Try first month for just £1 / $1 / €1

The Creative Bloq team is made up of a group of art and design enthusiasts, and has changed and evolved since Creative Bloq began back in 2012. The current website team consists of eight full-time members of staff: Editor Georgia Coggan, Deputy Editor Rosie Hilder, Ecommerce Editor Beren Neale, Senior News Editor Daniel Piper, Editor, Digital Art and 3D Ian Dean, Tech Reviews Editor Erlingur Einarsson, Ecommerce Writer Beth Nicholls and Staff Writer Natalie Fear, as well as a roster of freelancers from around the world. The ImagineFX magazine team also pitch in, ensuring that content from leading digital art publication ImagineFX is represented on Creative Bloq.
