Get creative with a montage
Use the power of Photoshop's Layer Masks to combine your image elements together at different sizes and positions, with complete creative freedom.
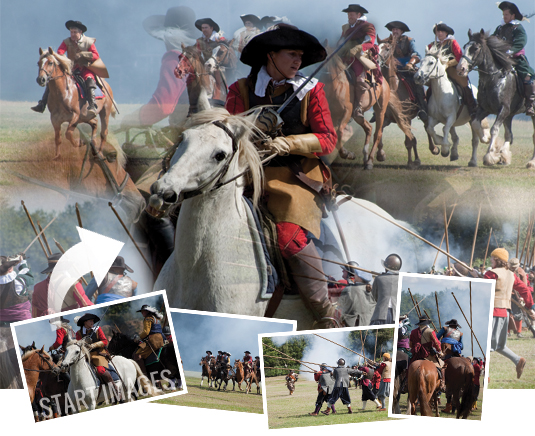
One effective way to capture the thrills and spills of an event such as a historical re-enactment is to combine several shots together as a photomontage. This enables you to share all your favourite shots in a single image and summon up a flavour of the overall event.
You could create a photomontage using traditional darkroom techniques. By masking your photo paper with bits of card you could focus light on a specific section and place an image in a particular position. However, once you’d exposed a section of paper, you couldn’t change the position of the image in your overall composition. Instead, Photoshop gives you much more creative control over your montage’s composition, thanks to layers and Layer Masks. We’ll show you how layers enable you to change the position and size of various elements with ease. Photoshop Elements 9 also boasts a Layer Masks feature that enables you to paint on a mask to hide corresponding pixels on the attached layer; you can then hide bits of one shot to reveal image details on the layers below.
Layer Masks
Photoshop’s Layer Masks are the key to merging the montage’s components together in an effective way. As a bonus they’re nondestructive, so you can show or hide any part of a layer simply by swapping a black brush tip with a white one. This gives you much more control over your creation than you’d get using the traditional darkroom photomontage techniques.
Read on to find out how to get a great montage effect with Photoshop Elements 9 (you can also use all versions of of CS up to and including Photoshop CS6).
Click here to download start image 1
Click here to download start image 2
Click here to download start image 3
Click here to download start image 4
01. Unlock layer
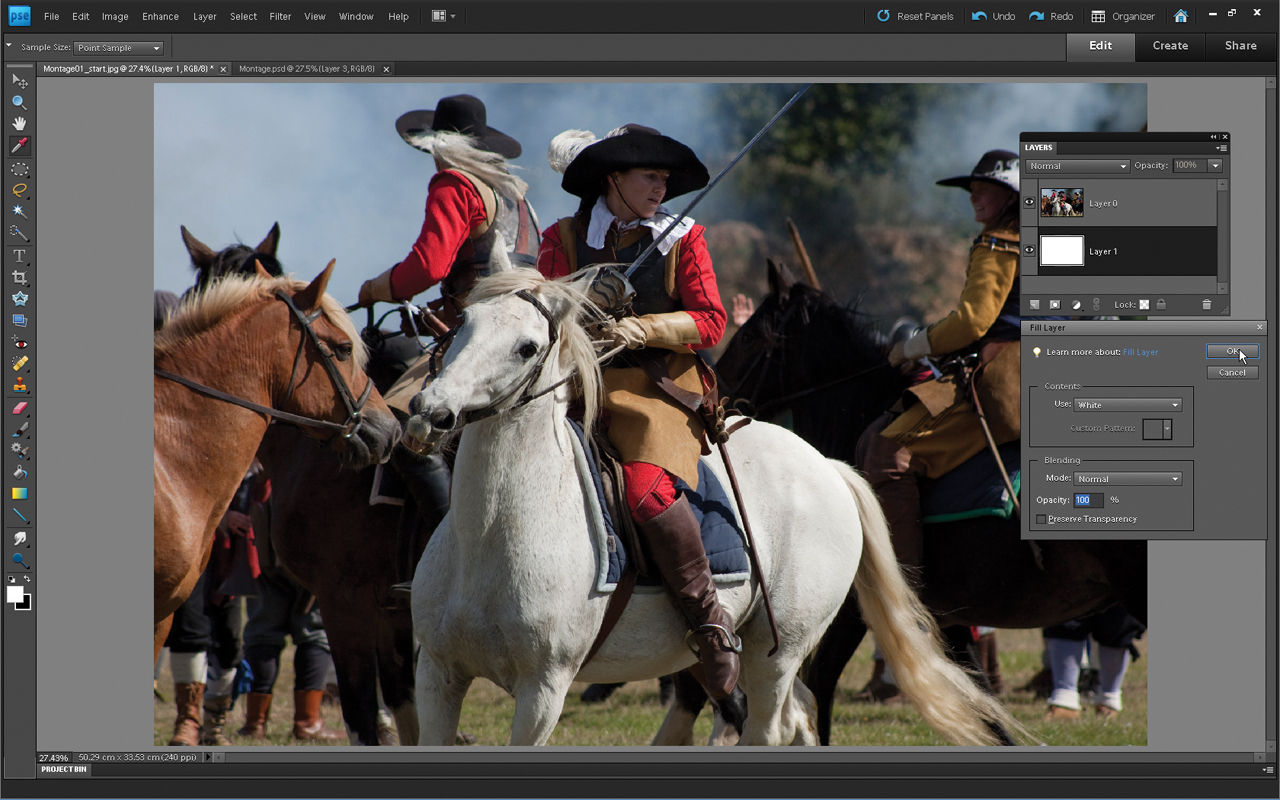
Open montage01_start.jpg. This strong shot will be the centrepiece of the montage, with the other shots anchored around it. In the Layers palette, double-click the 'Background' layer's thumbnail to unlock it; it becomes 'Layer 0'. Click Create New Layer at the bottom of the Layers palette. Drag the new one below 'Layer 0'. Go to Edit>Fill Layer. Set Contents to White, and click OK.
02. Add layer mask
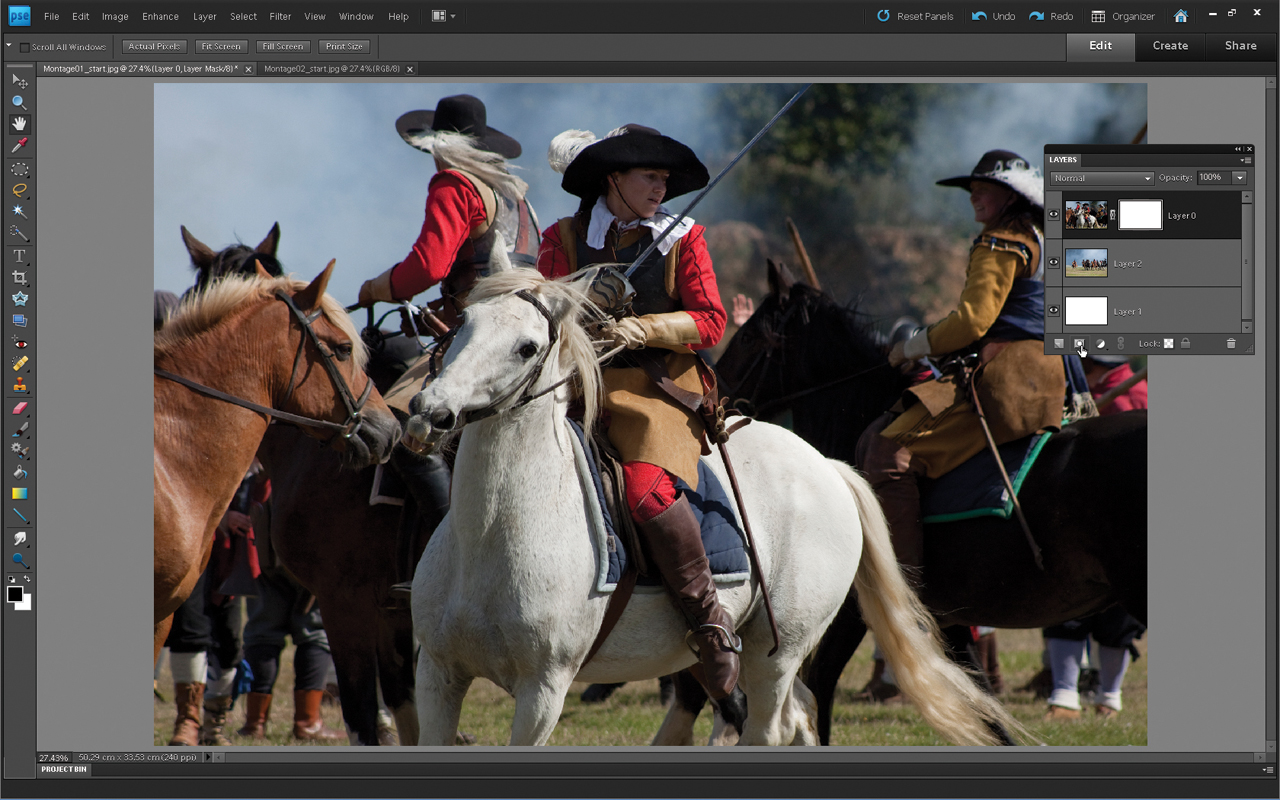
Open montage02_start.jpg. Choose Select>All, Edit>Copy. Go to Montage01_start and click Edit>Paste to add it to a new layer ('Layer 2'). Drag 'Layer 2' below 'Layer 0' in the Layers palette. Click on 'Layer 0' at the top of the layer stack, then click Add Layer Mask at the bottom of the Layers palette. A white mask will attach itself to 'Layer 0'.
03. Hide layer content
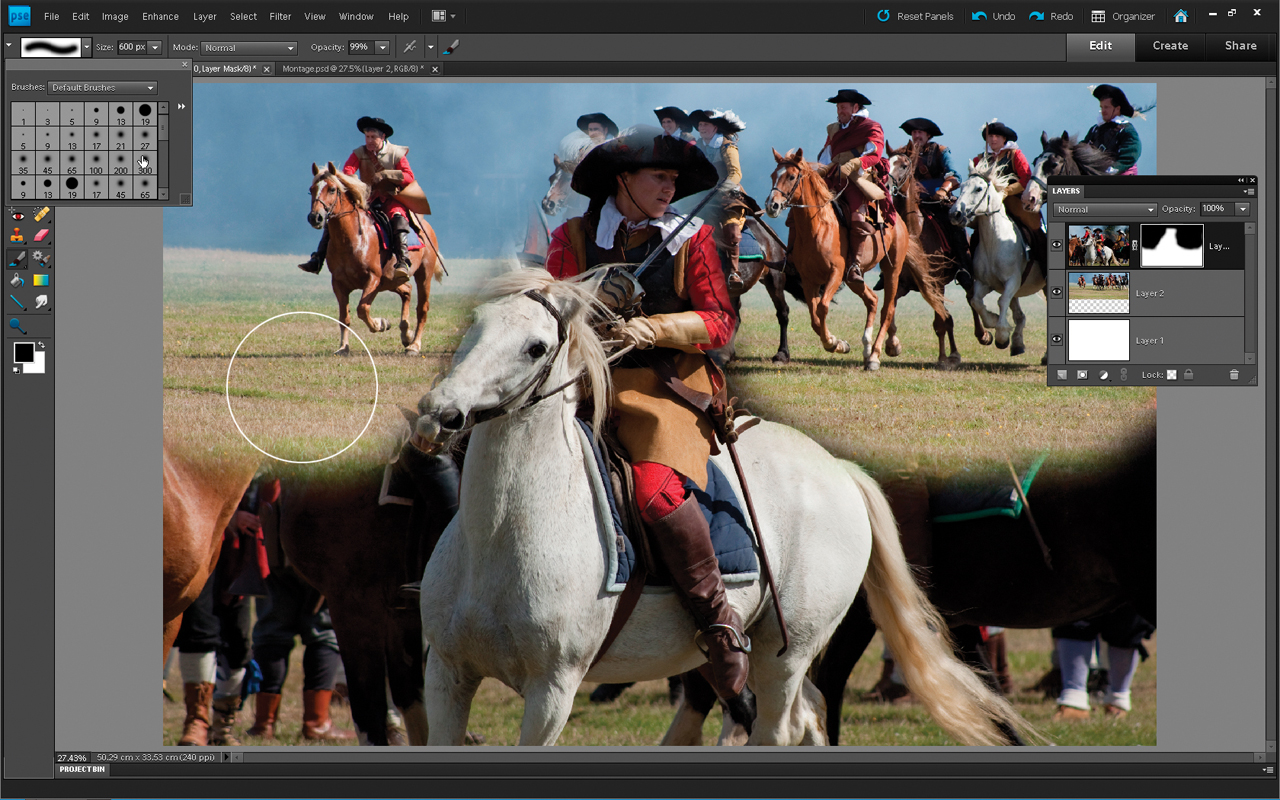
Click on 'Layer 2'. Use the Move tool to slide the layer up so the riders' heads are near the top. Grab the Brush tool from the Tools palette and pick a soft round brush. Set Size to 600. Set the foreground colour to black. Click on the white mask of 'Layer 0'. Spray around the edge of the main rider to reveal the riders on the layer below. If you erode the main rider's edges you can restore the detail later.
Get the Creative Bloq Newsletter
Daily design news, reviews, how-tos and more, as picked by the editors.
04. Scale and blend
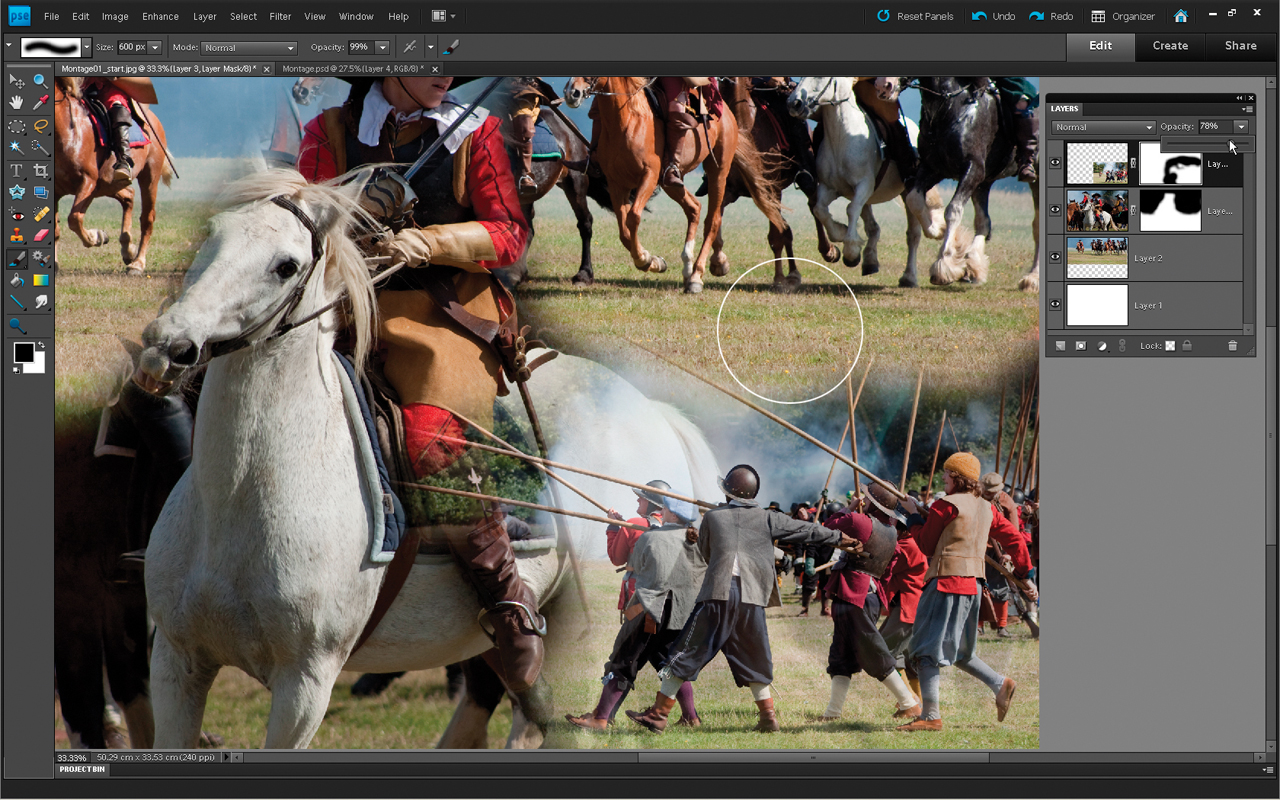
As in Step 2, now Open montage03_start.jpg, Select, then Copy and Paste on to the project as 'Layer 3' and move it to the top of the layer stack. Go to Image>Resize>Scale, and reduce the Width and Height to 60%. Hit Return. Move the image to the bottom-right. Add a Layer Mask to 'Layer 3'. Spray a soft black brush around the edge of the layer to blend its edges with the horse on 'Layer 0' and the grass on 'Layer 2'. Reduce the Opacity of 'Layer 3' to 78%.
05. Add a new layer
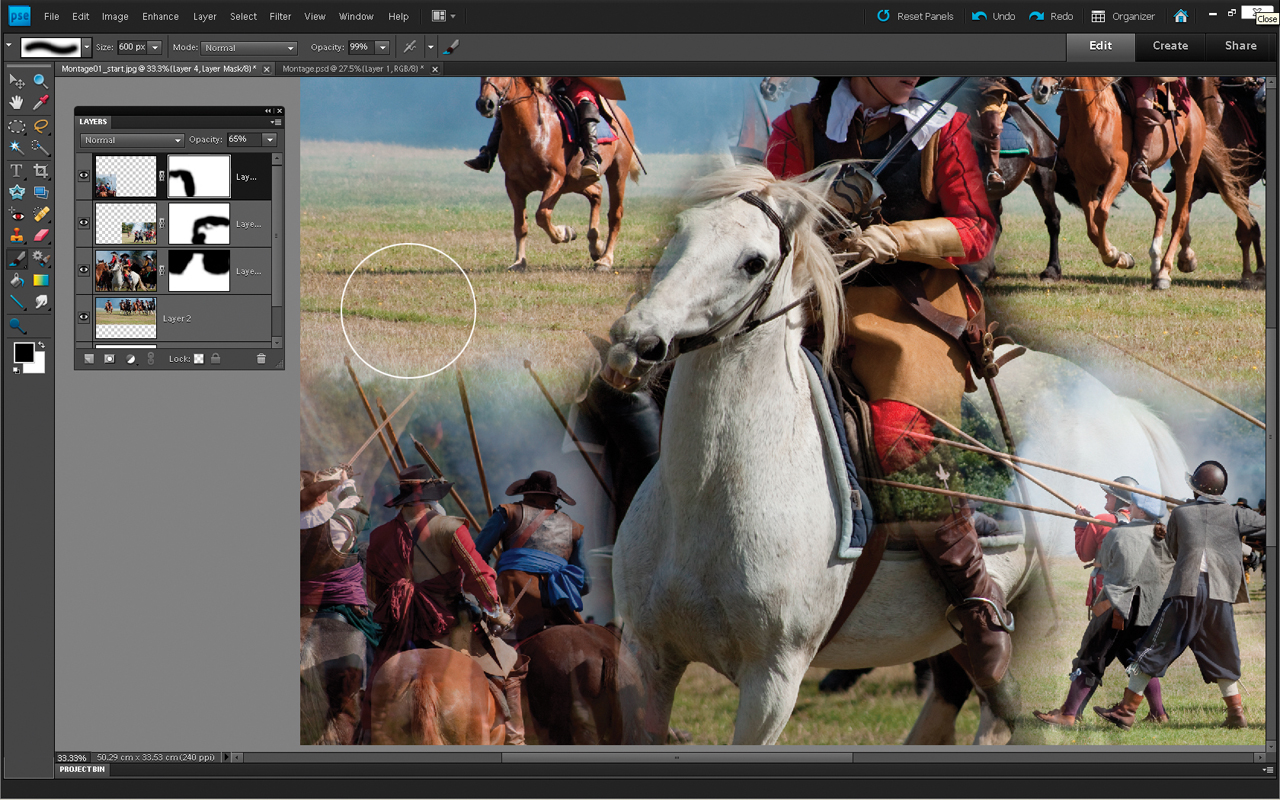
As before, open montage04_start.jpg and add it as 'Layer 4', at the top of the layer stack. Scale it down to 50% and move it to the bottom-left. Add a mask to 'Layer 4' and spray a black brush on the mask to hide the edges of the layer so it blends with the rest of the shot. Set Opacity on 'Layer 4' to 77%. Slide the horses on 'Layer 2' to the left to improve composition, and reduce that layer's Opacity to 83%.
06. Fine-tune masks
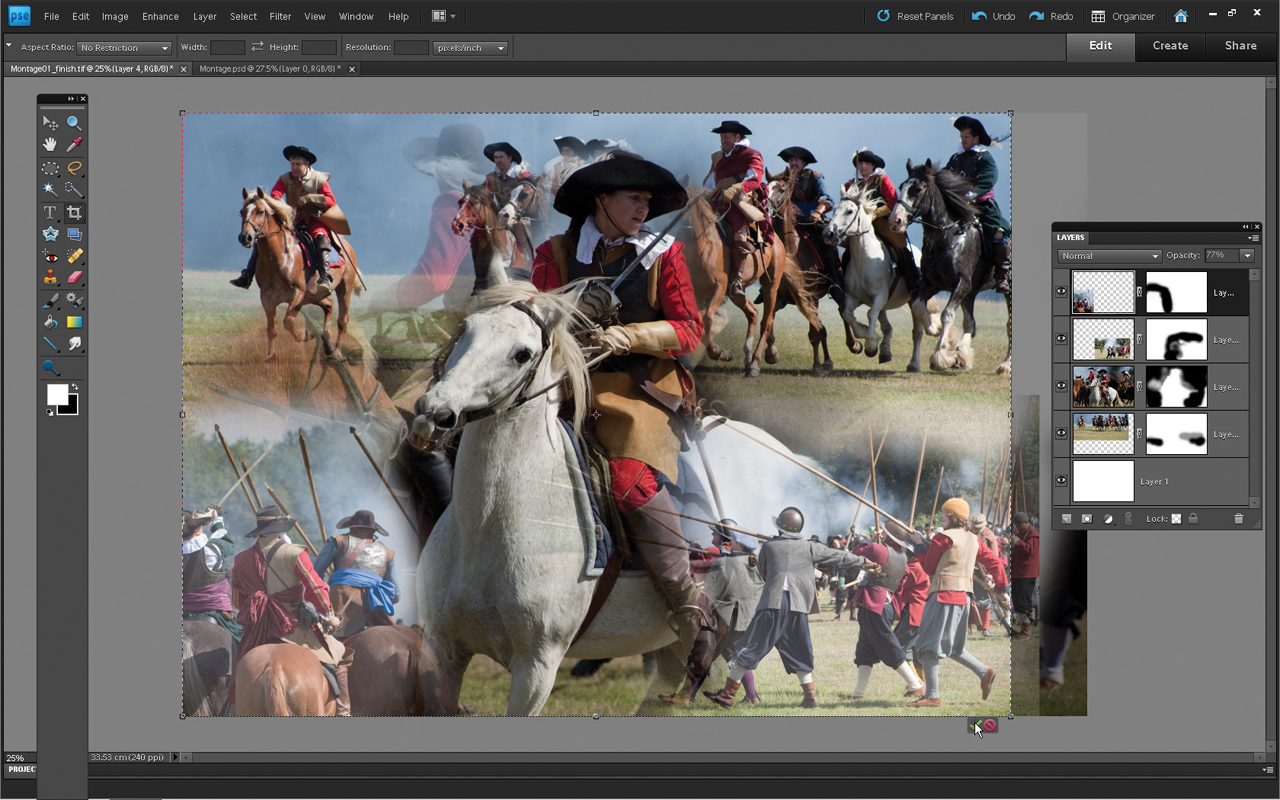
Click on the mask of 'Layer 0' and spray a black brush on the lower corners of the image to hide more detail. Swap the foreground colour to white and spray on the mask to restore important areas, such as the main rider’s sword. By setting the brush's Opacity to 20% you can spray grey on the mask; this enables you to reveal extra semi-transparent details from 'Layer 0', which helps reveal layer content in a subtle way.
This tutorial first appeared in Portrait Photography Made Easy - a bookazine from the makers of PhotoPlus.
Now read:
- 30 free Photoshop brushes every creative must have!
- 101 Photoshop tutorials
- 20 best Photoshop plugins

Thank you for reading 5 articles this month* Join now for unlimited access
Enjoy your first month for just £1 / $1 / €1
*Read 5 free articles per month without a subscription

Join now for unlimited access
Try first month for just £1 / $1 / €1

The Creative Bloq team is made up of a group of art and design enthusiasts, and has changed and evolved since Creative Bloq began back in 2012. The current website team consists of eight full-time members of staff: Editor Georgia Coggan, Deputy Editor Rosie Hilder, Ecommerce Editor Beren Neale, Senior News Editor Daniel Piper, Editor, Digital Art and 3D Ian Dean, Tech Reviews Editor Erlingur Einarsson, Ecommerce Writer Beth Nicholls and Staff Writer Natalie Fear, as well as a roster of freelancers from around the world. The ImagineFX magazine team also pitch in, ensuring that content from leading digital art publication ImagineFX is represented on Creative Bloq.
