9 things you didn't know you could do in Photoshop
Photoshop has lots of handy tools you may not know about. Here are 9, and what you can do with them.
Without question, Photoshop is one of the most popular and flexible image manipulation programs available. With each revision, Adobe adds more power to the program, through design enhancements, plugins, workflow changes and more. In this article we look at 9 things you can use to enhance your Photoshop experience.
01. Surface the new features in CS6
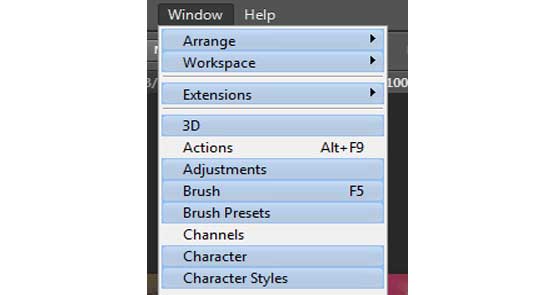
One fast way of getting up to speed with the latest changes is to go to Window>Workspace>New in Photoshop CS6. This closes all the panels and replaces them with the above section with a panel showing all the new features.
In addition, if you now return to the Window menu, you will see various features highlighted as in the screen shot below:
02. Fix perspective errors
This is a new feature within Photoshop CC which allows you to quickly fix perspective errors in buildings.
Here is an example of a building with perspective issues.

To fix the perspective, go to Edit>Perspective Warp. The cursor changes into a different tool tip. When you click in the image, it creates a grid made up of nine sections.

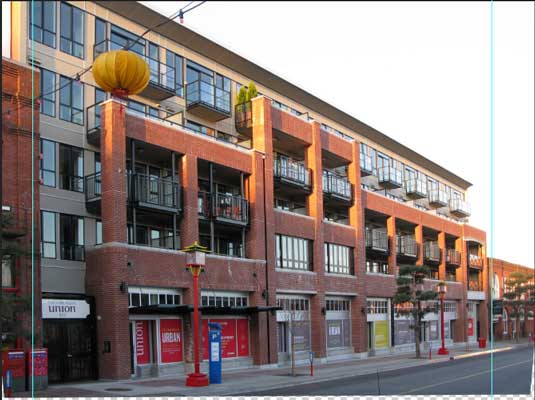
Your task is to align the edges of the grid with the tilted parts of the building. Once that is done, go to the menu bar and click on the Warp button. The grid will vanish and pins will become active, allowing you to drag them and straighten the building.
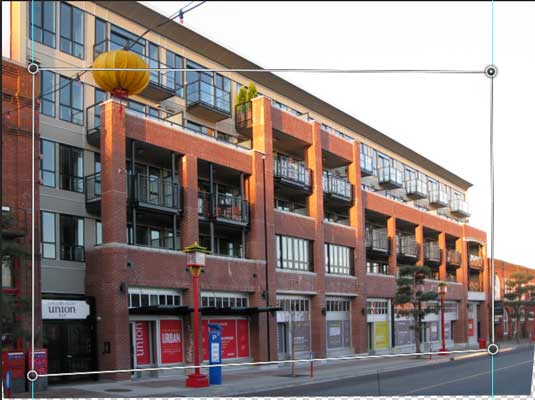
For extra accuracy, you might want to use guidelines. When you are satisfied with your changes, click on the checkmark icon in the menu bar. Photoshop will apply your changes to the image.
03. Apply effects to multiple files
With this option you can load multiple files into a single document then apply effects to the whole stack or selected files of the stack. (You can also use a folder.) To do so, go to File>Scripts>Load Files into Stack.
One of my colleagues likes to create star trail photos from several images shot at one location. He loads all the images, selects all the layers (with the exception of the background, chooses 'Lighten' for the blending mode. This produces the star trail effect he wants.
04. Batch-convert images into a specific format
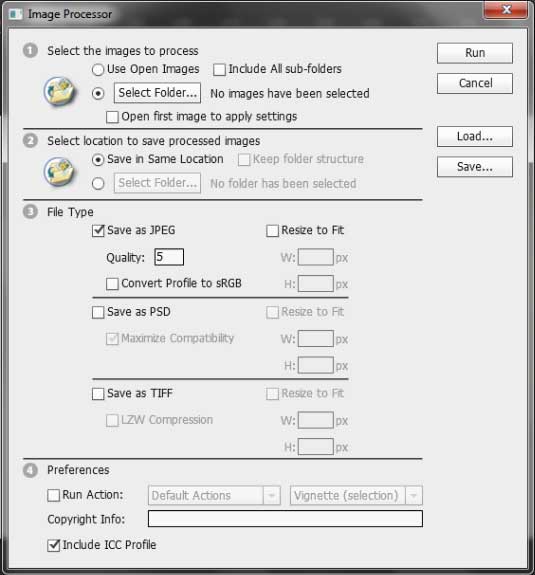
To activate this option, go to File>Scripts>Image Processor. This tool is great for converting image files into a particular format, quickly.
An example would be thumbnails or low resolution images for photo sharing sites. As an example, you could choose a folder with images you wanted to resize, specify the output dimensions and click on Run. The program will process your images quickly and save them as a JPEG, PSD, or TIFF. You can also control settings such as compression or compatibility.
05. Generate CSS from a Photoshop mockup
When you use Photoshop CC and Edge Reflow CC you can make use of the Generator plugin. This allows you to build a web design in Photoshop then export the entire project, complete with CSS and all the appropriate image files to Reflow for further tweaking and customization. It will save you a lot of time as a web designer.
06. Generate an image assets folder
In addition to being able to build move your Photoshop layout into Edge Reflow, you have another option. If you are building a layout which makes use of image elements only, you can create a folder for those elements only and use them in your layouts. To do, go to File>Generate>Image Assets.
07. Make bitmaps bigger without blurring
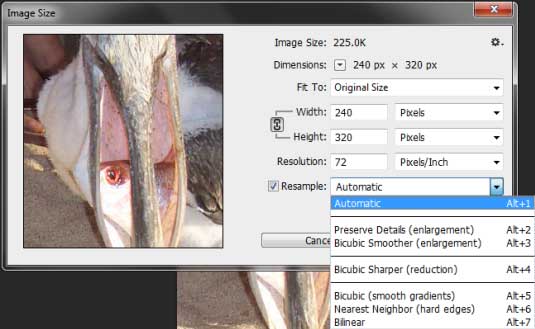
In Photoshop CC a new feature allows you to increase the size of bitmaps with negligible quality loss. In the past, one could increase the size of an image, but it would blur and artifacts would become visible.
To activate it, go to Image>Image Size. In the screen shot above, note the Resample option at the bottom of the dialog box. This gives you many options for controlling the quality of the image as you increase the size. Here is more information on the subject, along with a video
08. Mask with Color Range
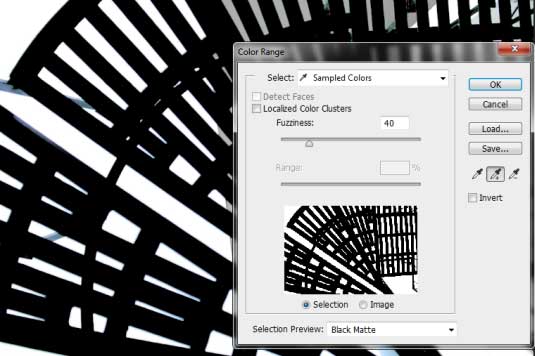
This is especially useful for fiddly jobs such as trees with many leaves against a sky or for hair against a neutral background. Here's an example of a slotted stairwell against a neutral sky.
To get started, click on Select>Color Range. Choose Sampled Colors, Fuzziness 40, Selection, Selection Preview: Black Matte and use the Eyedropper+. This lets you add to the selection as you move around the image. After the entire background is selected, you can increase/decrease the fuzziness as necessary to sharpen the mask. When you are satisfied with your selection, click on OK.

You might need to tidy up the mask a bit with the Refine Edges option but overall, you will find the Color Range command to be both fast and accurate when creating masks.
09. Revert the Preferences File to default
One source of many problems within Photoshop is the Preferences file. The Preferences file can sometimes be the source of strange problems that have no apparent cause (such as receiving out of memory errors when you have more than enough, sudden system slowdowns, freezes or crashes for no apparent reason and menu options which suddenly stop working).
The solution is to go into your directory structure, find the preferences file, delete it and close Photoshop. When you launch Photoshop again it will create a new preferences file with the factory default settings. (Note that the location of the preferences file will vary depending on which version of Photoshop you have.)
As you can see, there are many ways of increasing your workflow in Photoshop. Some of your options are new updates to the program, while others are lesser known tools which will make your life easier.
Words: Nathan Segal

Thank you for reading 5 articles this month* Join now for unlimited access
Enjoy your first month for just £1 / $1 / €1
*Read 5 free articles per month without a subscription

Join now for unlimited access
Try first month for just £1 / $1 / €1
Get the Creative Bloq Newsletter
Daily design news, reviews, how-tos and more, as picked by the editors.

The Creative Bloq team is made up of a group of art and design enthusiasts, and has changed and evolved since Creative Bloq began back in 2012. The current website team consists of eight full-time members of staff: Editor Georgia Coggan, Deputy Editor Rosie Hilder, Ecommerce Editor Beren Neale, Senior News Editor Daniel Piper, Editor, Digital Art and 3D Ian Dean, Tech Reviews Editor Erlingur Einarsson, Ecommerce Writer Beth Nicholls and Staff Writer Natalie Fear, as well as a roster of freelancers from around the world. The ImagineFX magazine team also pitch in, ensuring that content from leading digital art publication ImagineFX is represented on Creative Bloq.
