Create a Polaroid pinboard effect
Transform a single image into a striking montage of Polaroid shots with this fun Photoshop layers technique.

This editing technique sits firmly in the 'fun' rather than the 'authentic recreation' category. The aim of this tutorial is to jazz up a single image by creating the sense that it's actually comprised of a number of different Polaroid shots, all cleverly placed together to create the final image. Is it believable? Probably not. Does it look cool? Oh yes!
It's no simple technique, as it involves a little fiddling and a lot of duplicate layers, but the beauty of it is that you can see the image underneath in real time as you move your Polaroid pictures around in the shot. This means that you can ensure all the important parts of the frame are on show, such as the face, arms and hoola hoop in our example shot. Part of the skill is also in arranging the Polaroid frames in such a way that they make for an interesting composition. Think about the overall shape that they make, as well as how they relate to each other in the mix; stick in some opposing angles when positioning your Polaroid frames to really create a dynamic finish.
Read on to find out how it's done with Photoshop Elements (you can also use all versions of of CS up to and including Photoshop CS6) - there's a sample image for you to use below.
Click here to download image
01. Establish a black background
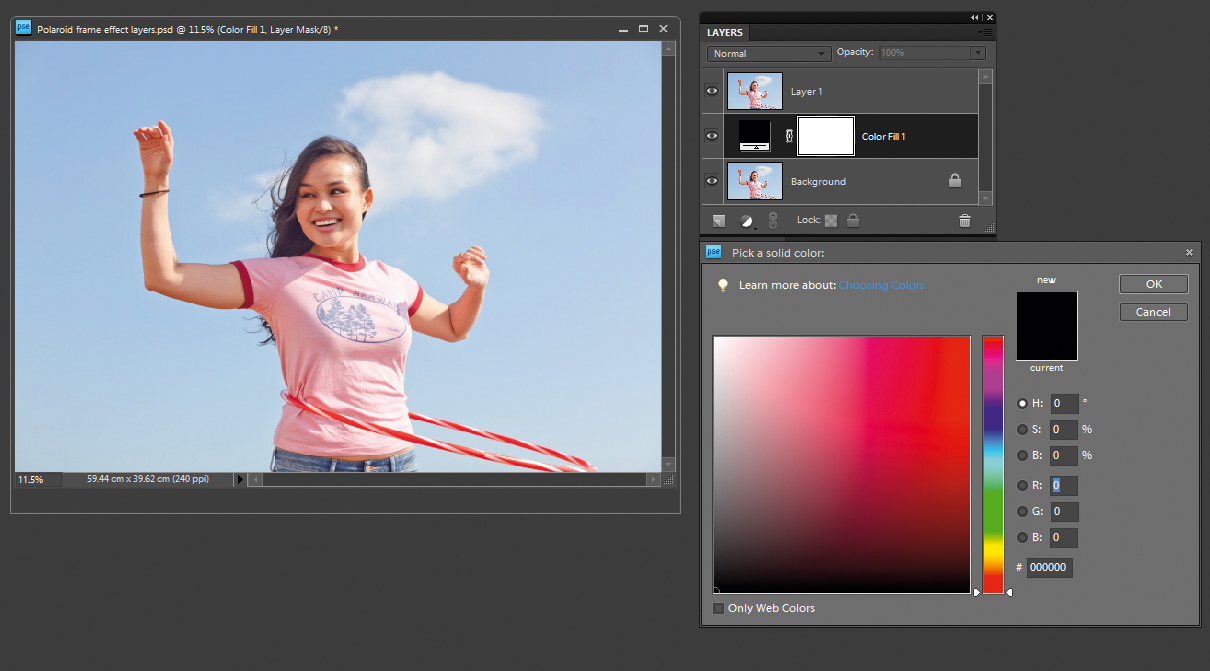
Open hoola_start.jpg and duplicate the ‘Background’ layer using Ctrl+J. The new layer appears in the Layers palette. Use the Create New Fill Or Adjustment Layer button at the bottom to add a Solid Colour Adjustment Layer. Drag the Colour Picker circle as far bottom-left as you can to select black. In the window that opens, drag the Solid Colour layer between the two image layers.
02. Add a new layer
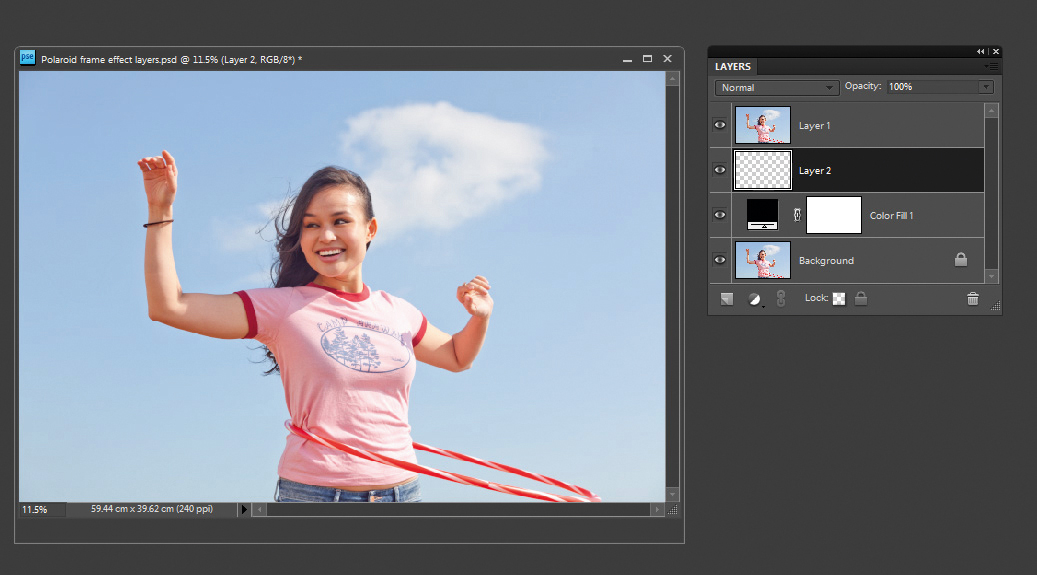
The Solid Colour layer is going to function as your new background, once you add the Polaroid frames. Select the Solid Colour layer and click the Create New Layer button at the bottom of the Layers palette to add a layer above it. Press M to select the Rectangular Marquee tool and, in the Options bar, change Mode from Normal to Fixed Ratio.
03. Draw image area
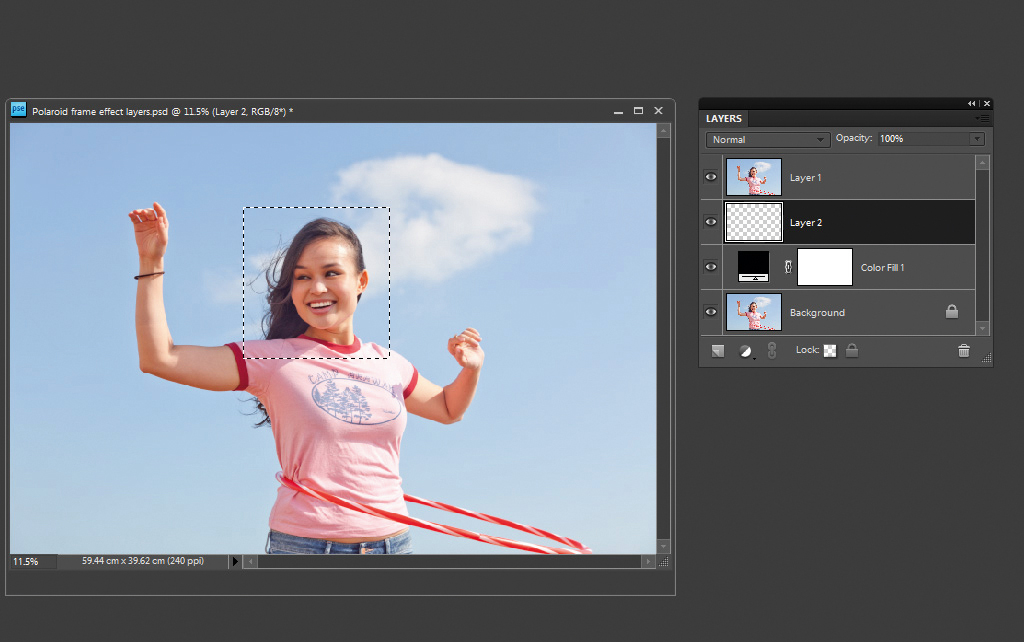
In the Width box enter 76 and in the Height box enter 78, which is the size ratio of a Polaroid image area. Now drag on the canvas - the area inside the selection will be the area visible inside the Polaroid. Don’t worry too much about size and placement, as you can alter both later down the line.
04. Create a clipping mask
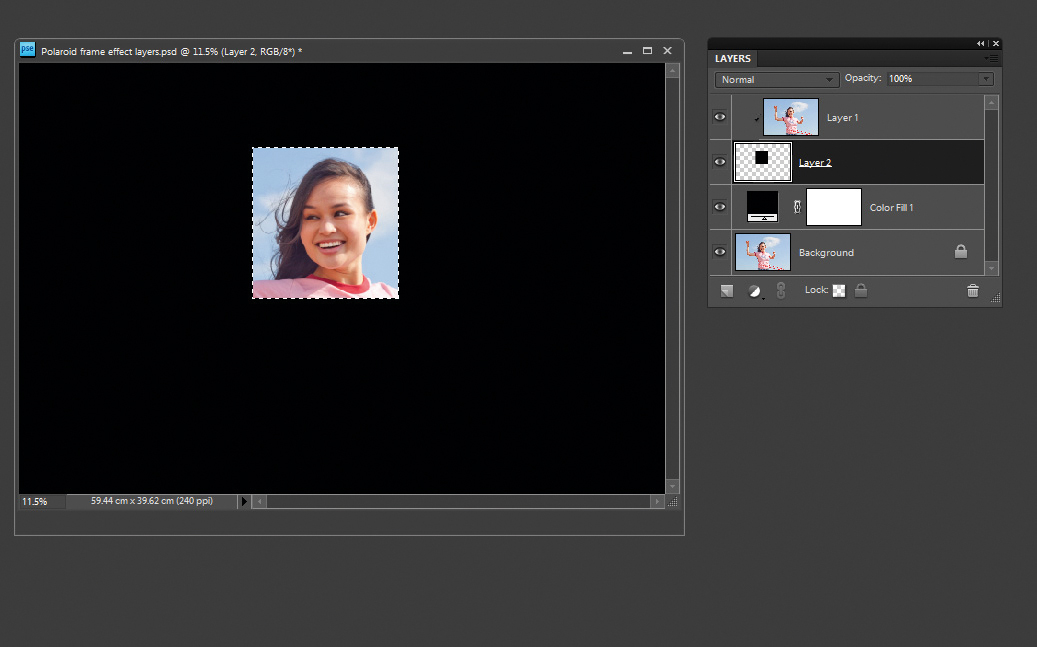
Now press K to select the Paint Bucket tool and make sure the foreground colour in the Tools palette is set to black. Click inside the selection to fill with black. You won’t see the colour yet as there’s an image layer on top. You can now make a clipping mask between these two layers to ensure only the Marquee-selected area is visible. Hold down Alt and hover between the top layer and the layer below until two circles appear, then click OK.
Get the Creative Bloq Newsletter
Daily design news, reviews, how-tos and more, as picked by the editors.
05. Draw Polaroid border
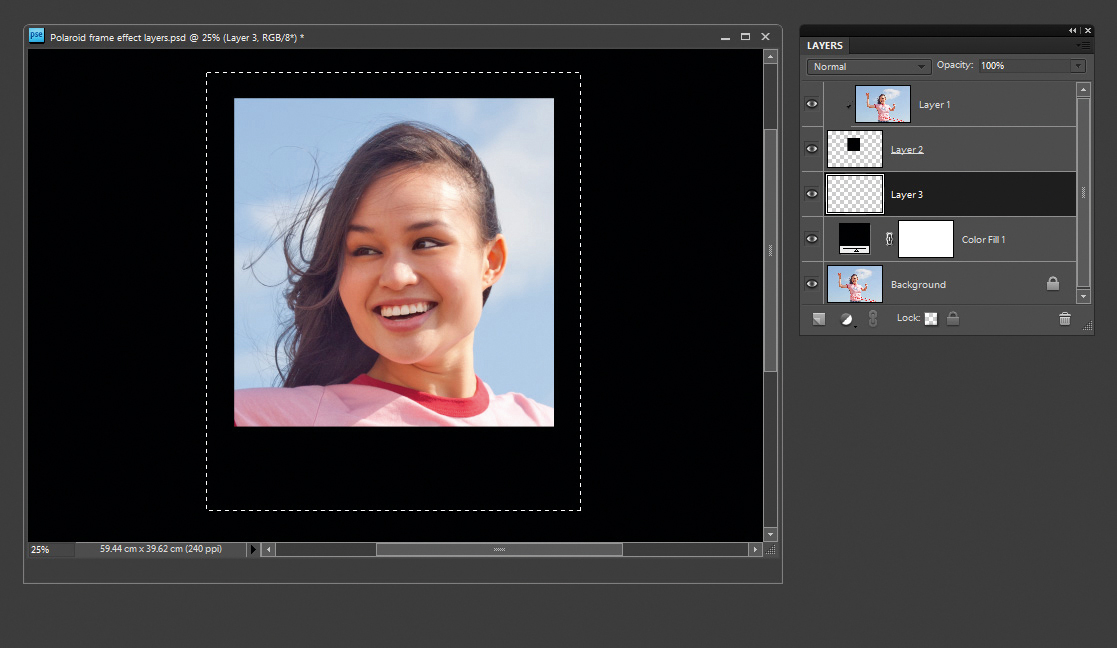
Now select the Solid Colour layer again and click Create New Layer to add a layer above. Select the Rectangular Marquee tool again and enter 88 for Width and 103 for Height (the size ratio of the whole Polaroid, including the white frame). Draw the Polaroid border around the main image. The border above is the same width as the edges, with a much larger border below.
06. Fill to reveal
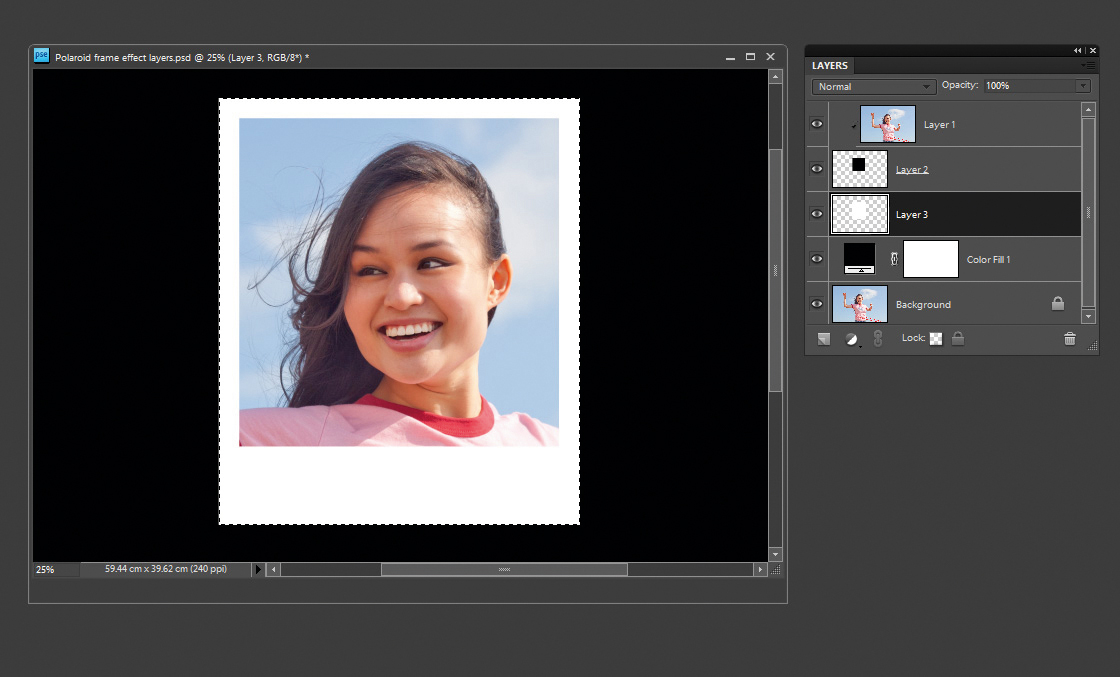
Use the arrow keys to reposition the border, or simply draw again if it’s not quite right. Make sure that New Selection, and not Add To Selection, is chosen in the Options bar (the first of the four icons). Choose the Paint Bucket tool (press K) again; this time select white as the foreground colour and click inside the selection to fill with white.
07. Add a drop shadow
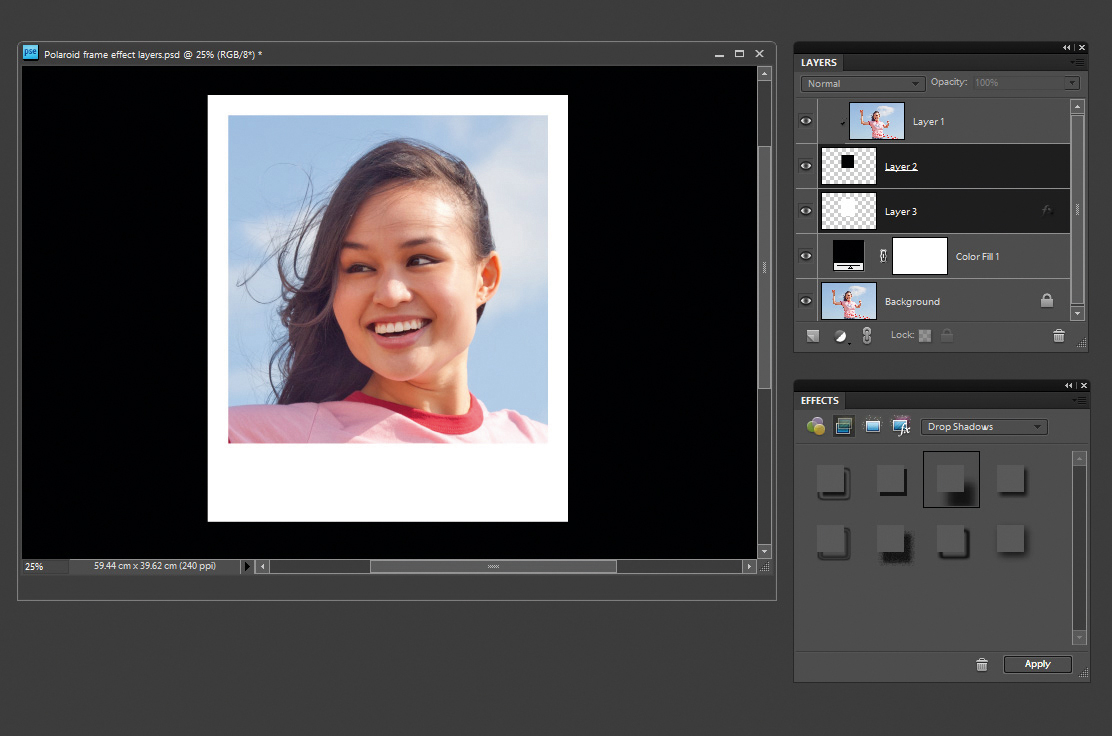
Deselect with Ctrl+D and select Windows>Effects to open the Effects palette if it’s not already there. Click the Layer Styles icon, then select Drop Shadows from the drop-down list. Choose Low Drop Shadow and click Apply. You won’t see anything just yet, but an fx symbol should appear on the layer. Now select both the image area and border layers in the Layers palette, by clicking on each while holding down the Ctrl key.
08. Rotate and resize
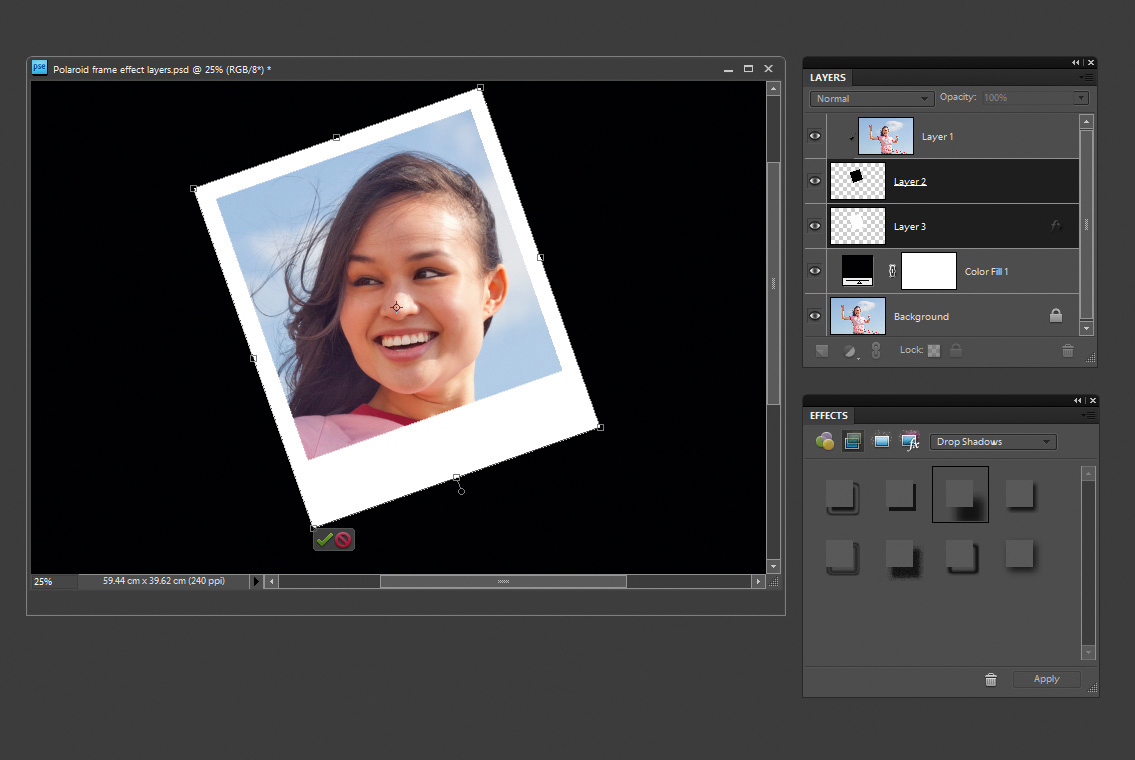
Once they’re active, use Ctrl+T to initiate a Free Transform. Make sure Constrain Proportions is checked in the Options bar, then drag outside one of the corner handles to rotate the Polaroid frame, and drag one of the corner handles to resize the Polaroid frame. Press Enter to complete the transform when done, or click the Tick button.
09. Duplicate and move
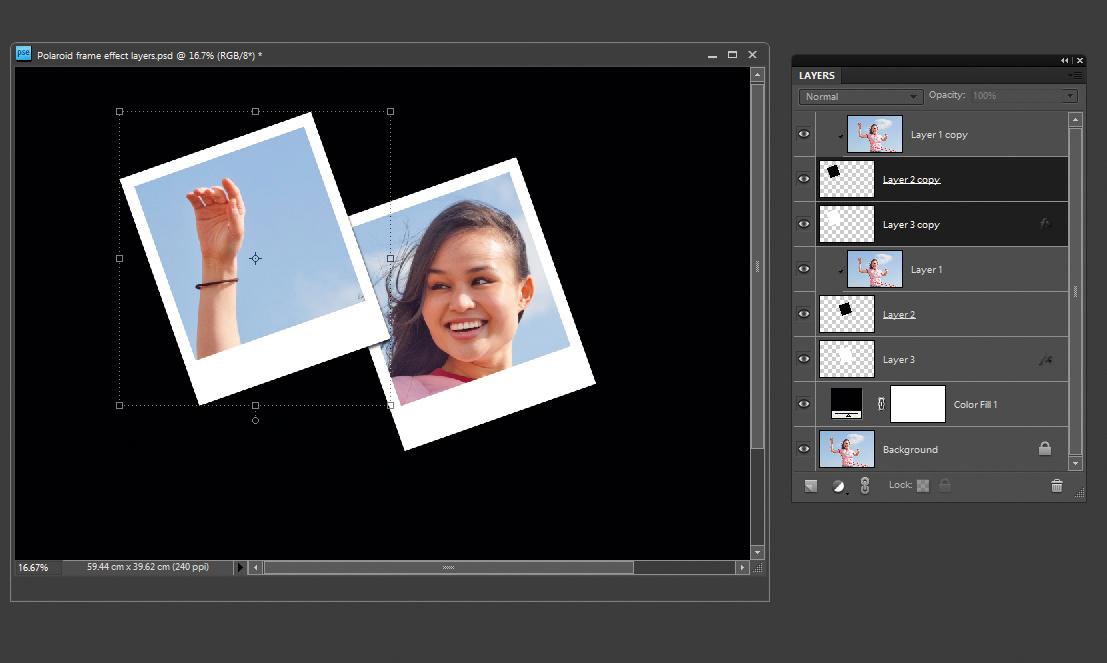
Hold Ctrl and click the top layer, so you have three active layers. Drag those layers to the Create New Layer button in the Layers palette to duplicate them. Now Ctrl-click the top layer to deselect it, so only the two Polaroid frame layers are selected, and press V for the Move tool. Turn Auto Select Layer off in the Options bar. Click on the Polaroid and drag it to another position.
10. More duplicates to finish
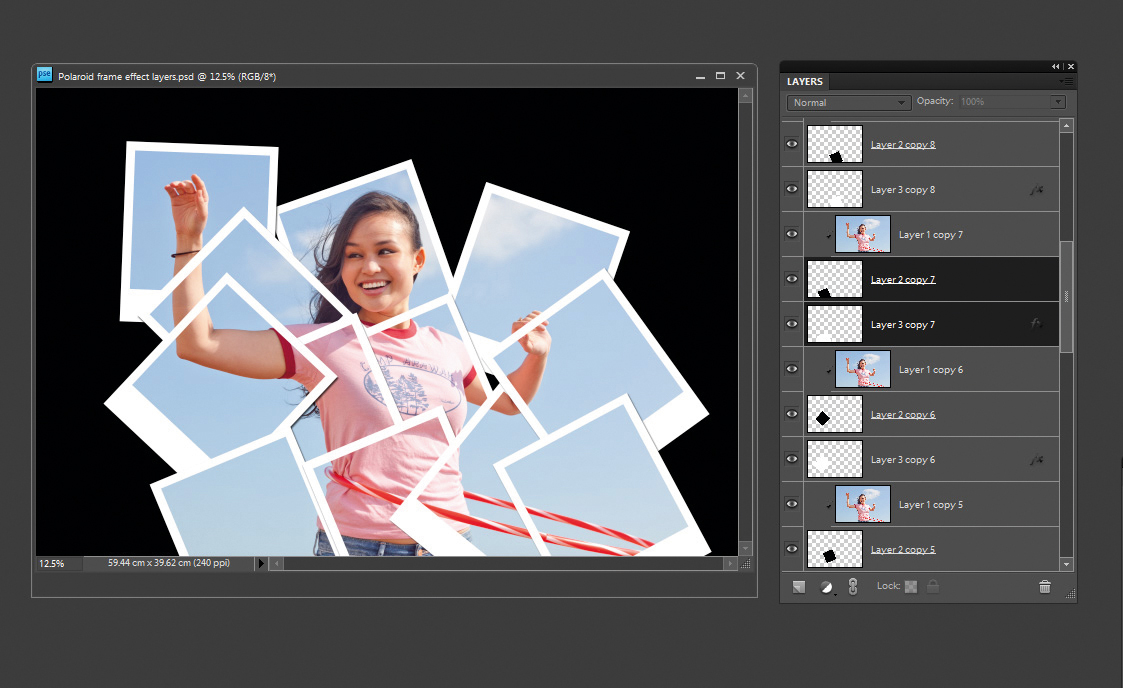
Use Ctrl+T for Free Transform and rotate outside the corner handles. Now Ctrl-click the three top layers again and drag them to the Create New Layer button to duplicate this frame. Deselect the top layer again, to highlight the frame layers only; move and rotate as before, to make your third frame. Repeat this process as needed, until all the areas of the image you want to show are all revealed with Polaroid frames.
This tutorial first appeared in Portrait Photography Made Easy - a bookazine from the makers of PhotoPlus.
Now read:
- 30 free Photoshop brushes every creative must have!
- 101 Photoshop tutorials
- 20 best Photoshop plugins

Thank you for reading 5 articles this month* Join now for unlimited access
Enjoy your first month for just £1 / $1 / €1
*Read 5 free articles per month without a subscription

Join now for unlimited access
Try first month for just £1 / $1 / €1

The Creative Bloq team is made up of a group of art and design enthusiasts, and has changed and evolved since Creative Bloq began back in 2012. The current website team consists of eight full-time members of staff: Editor Georgia Coggan, Deputy Editor Rosie Hilder, Ecommerce Editor Beren Neale, Senior News Editor Daniel Piper, Editor, Digital Art and 3D Ian Dean, Tech Reviews Editor Erlingur Einarsson, Ecommerce Writer Beth Nicholls and Staff Writer Natalie Fear, as well as a roster of freelancers from around the world. The ImagineFX magazine team also pitch in, ensuring that content from leading digital art publication ImagineFX is represented on Creative Bloq.
