How to make an animated banner
Luke O'Neill runs through the basics of creating a simple but striking banner ad using Photoshop.

Every designer will be asked to create a banner ad at some point in their career, whether its a stand alone advert or just one deliverable within a much larger campaign. On a very basic level, this is like any other design job if you wish to simply create a static banner which for many purposes is fine. But if you wish to really catch the eye of the viewer or indeed have a lot of information to convey, then you'll need to create an animated banner.
Through this 10 step tutorial I'll run through the very basics of creating an animated banner ad in Creative Suite or Creative Cloud versions of Photoshop using the layers panel in conjunction with the animation timeline. This is simple animation work but once you get your head around working with a timeline and the layers panel together, it can quickly lead onto more complex animation work.
01. Setting up
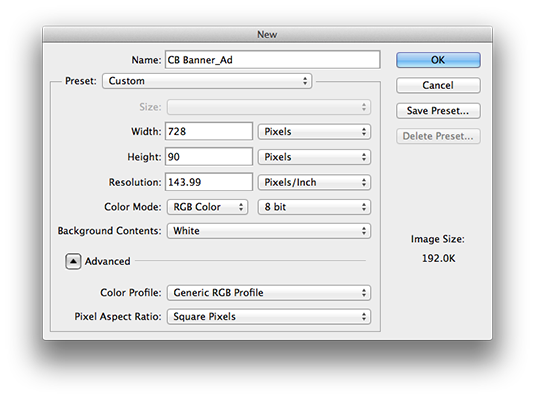
Firstly we need to set up our document to the right spec. Navigate to photoshop, create a new document and int he new document dialog box ensure the dimensions are set to pixels and enter 728 for the width and 90 for the height end ensure that the colour mode is set to RGB. As we're working in pixels, don't worry about the resolution. This is the standard size for a horizontal leader board banner ad.
02. Start designing
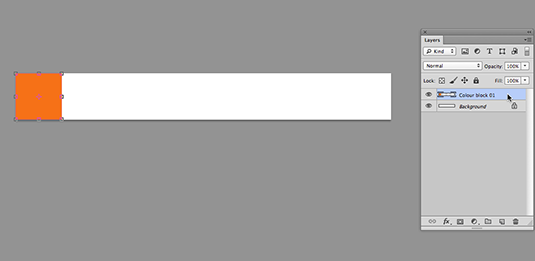
Now to start designing the ad. This is going to be a typography led design so I want to keep it bold and graphic using Creative Bloqs brand colours, but feel free to use your own colours and graphic elements to best suit your project.
First create a new layer in the layers panel and make a perfect square selection by holding shift whilst using the rectangular marquee tool. Now fill this with a colour using the paint bucket tool and name the layer something suitable, in this case I've called it "colour block 01".
03. Fill the banner
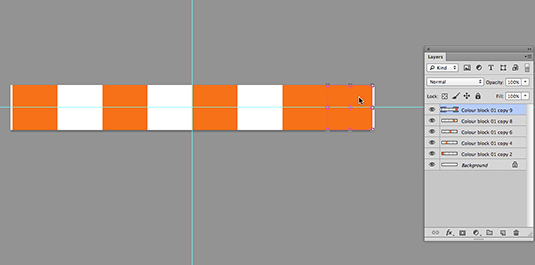
Now hover over the square with the move tool and whilst holding alt, drag and duplicate the square so that it snaps to the edges of the original square. Snap will need to be turned on under the view menu.
Keep duplicating the squares until you've filled the banner, then select them all by holding shift and ensure that they're centred in the document. Now simply delete every other orange square to create a simple square grid to base our design and animation on. With all the squares still selected hit Cmd+E to merge all the square layers.
Get the Creative Bloq Newsletter
Daily design news, reviews, how-tos and more, as picked by the editors.
04. Create type elements
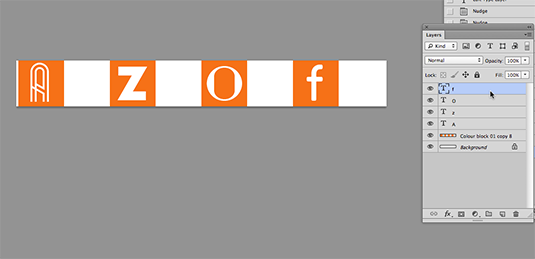
Now to start creating the type elements. Hit T to bring up the type tool and draw a square over the first orange square. Make sure white is selected in the foreground colour, type a character and select the font you'd like to use, the bolder and more graphic the better. Use the keyboard shortcut Cmd+Shift+. to quickly increase the point size.
Once you're happy hit the move tool and then use the cursor keys to centrally position the type within the orange frame. Duplicate the text frame and repeat the process filling all the orange squares with different characters.
05. Duplicate and merge
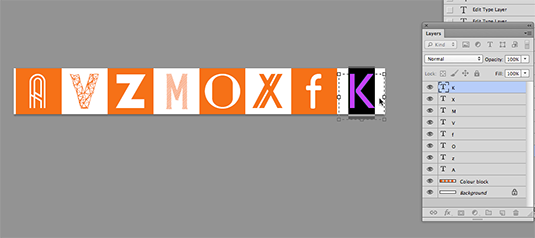
Now duplicate one of the text frames and repeat the process in step 4 filling the white squares with orange type as shown above. Now we want to create a single layer out of the orange type and the white type.
To do this simply hold shift and select all the white type and then hit Cmd+E to merge the layers. Repeat this process for the orange type and name them something appropriate such as "white type 01" in the layers panel. This will rasterise the type and you won't be able to edit it anyone so make sure you're happy with it.
Next page: the next five steps

Thank you for reading 5 articles this month* Join now for unlimited access
Enjoy your first month for just £1 / $1 / €1
*Read 5 free articles per month without a subscription

Join now for unlimited access
Try first month for just £1 / $1 / €1

The Creative Bloq team is made up of a group of art and design enthusiasts, and has changed and evolved since Creative Bloq began back in 2012. The current website team consists of eight full-time members of staff: Editor Georgia Coggan, Deputy Editor Rosie Hilder, Ecommerce Editor Beren Neale, Senior News Editor Daniel Piper, Editor, Digital Art and 3D Ian Dean, Tech Reviews Editor Erlingur Einarsson, Ecommerce Writer Beth Nicholls and Staff Writer Natalie Fear, as well as a roster of freelancers from around the world. The ImagineFX magazine team also pitch in, ensuring that content from leading digital art publication ImagineFX is represented on Creative Bloq.
