Build a custom Photoshop brushes library
Discover the secrets behind creating a comprehensive custom Photoshop brush library.
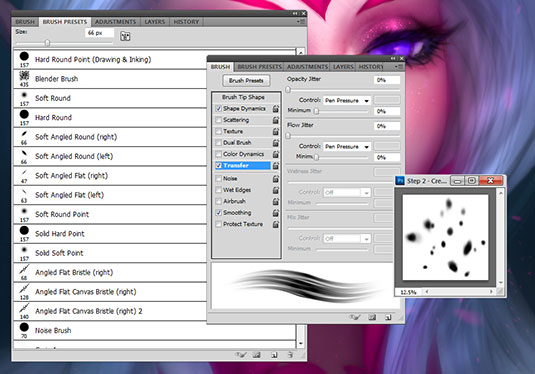
There are many free Photoshop brushes and textures online available to download, which, in many instances, can be all an artist will need in their brush library. However, creating custom brushes from your own photo textures or hand-painted samples can also come in handy if you want to create a specific effect that can make your art unique.
You can build your own custom Photoshop brush library by collecting stock brushes from the web, creating your own brushes from scratch, editing pre-existing brushes that come with Photoshop and organising your brushes into an easy-to-browse brush library.
Here I'll explain how to create your own custom Photoshop brush library to help you save time creating awesome effects in your art.
01. Free downloads

One way to quickly collect a lot of useful Photoshop brushes is to download free stock ones from useful sites such as brusheezy.com and myphotoshopbrushes.com. These sites provide a wide variety of brushes and brush libraries with many different uses. When collecting brushes from the web, I select which brushes I want and create custom libraries with them.
02. Create custom brushes
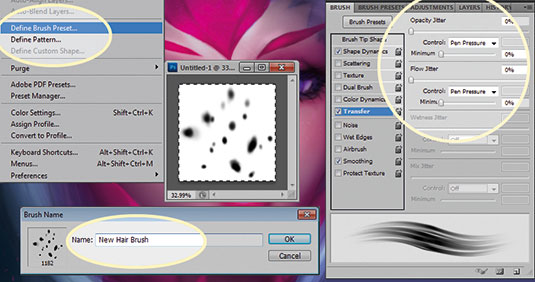
To create custom brushes, I take a photo or a custom-painted shape or texture and convert it to black and white. Then I select it with the Rectangular Marquee tool and go to Edit>Define Brush Preset and give it a useful name that will enable me to find it easily. In the Brush window I can customise the brush's settings such as Shape Dynamics, Scattering, Texture and so on.
03. Customise existing brushes
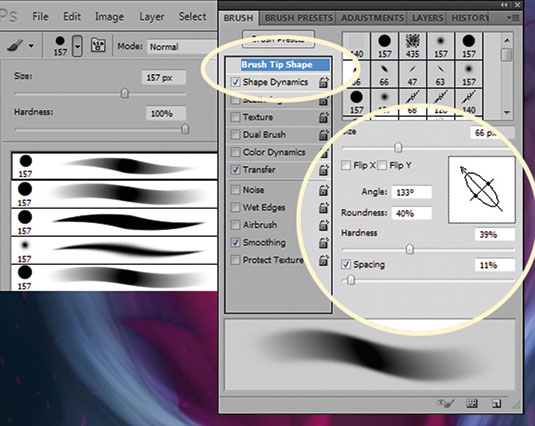
I also use Photoshop's default brushes that have extra useful customisable tip options. These can be changed dynamically with a stylus and hotkeys as I paint, such as the Hardness, Softness, Angle and Roundness. To customise a pre-existing Photoshop brush, I select it from the Brush Preset dialog and adjust its properties in the Brush Tip Shape section of the Brush window.
04. Organize brushes
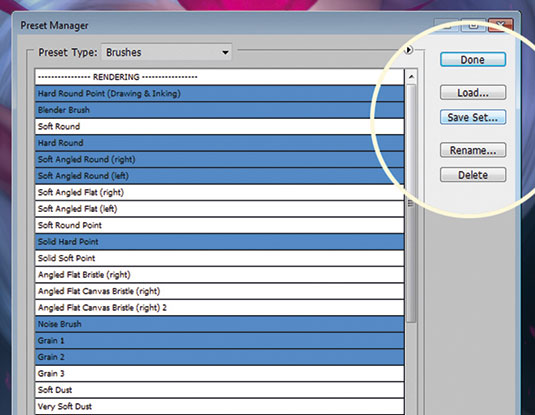
To organise brushes into an easy-to-browse brush library, I open the Brush Presets window, click the icon in the upper-right corner and select Brush Preset Manager. From there I Ctrl+click to select each brush that I want to save into a new customised brush library and then click Save Set. I also add the name and edit the order of the brushes in the Brush Preset Manager.
Artist's secret: Customise brush library views
A great way to help you navigate your brush library is to customise how each brush is viewed in the library. For quick navigation of your brush library, you can switch the brush thumbnail view to Small List or Large List.
This article was originally published in ImagineFX magazine issue 134. Buy it here.

Thank you for reading 5 articles this month* Join now for unlimited access
Enjoy your first month for just £1 / $1 / €1
*Read 5 free articles per month without a subscription

Join now for unlimited access
Try first month for just £1 / $1 / €1
Get the Creative Bloq Newsletter
Daily design news, reviews, how-tos and more, as picked by the editors.

Michelle Hoefener has worked in the gaming and entertainment industries for six years now. And she's been painting and publishing her work online for well over 15 years.
