120 Photoshop tips, tricks and fixes
Improve your skills with these great Photoshop tips.
Adobe Camera Raw and Bridge tricks
103. Use select all
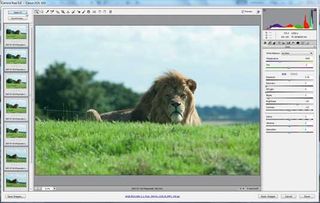
The following Photoshops tips focus on Camera Raw. To quickly batch process a group of images, open them all in ACR (the easiest way to do this is through Adobe Bridge) and then click Select All. Now, any changes you make to one image will be applied to all the open files.
104. Open smart objects
Hold down Shift in ACR and the Open Image button switches to Open Object. Now the file opens as a Smart Object, which means you can double-click the layer thumbnail in Photoshop to go back and edit the layer in ACR.
105. Mask sharpening
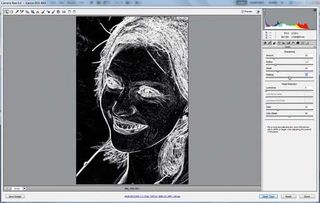
The Masking slider in the Detail Panel lets you control which areas of an image are sharpened, but it's impossible to judge unless you hold down Alt as you drag. This displays a greyscale view, in which black areas are protected from sharpening, enabling you to isolate the sharpening to edge areas.
106. Reset the sliders quickly
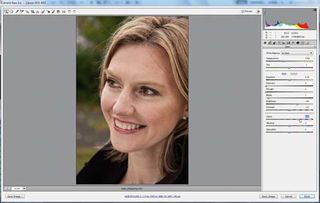
Double-click any slider to reset it to 0. If you click once, then the slider jumps to the point you're over. So if you keep the mouse still, you can single-click, then double-click over a point for a quick 'before and after' view of any adjustment you've made.
107. Crop ratios
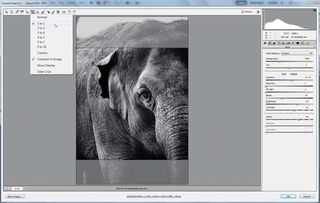
Square crops can help to make your images stand out from the crowd. For a list of different crop ratios, hold down the mouse button over the Crop tool. Remember, like everything else in ACR, cropping is non- destructive, so you can try out different ratios and adjust the crop at any time.
108. Exposure before colour
It's always best to adjust exposure before you move on to colour correction.
109. Adjustment brush controls
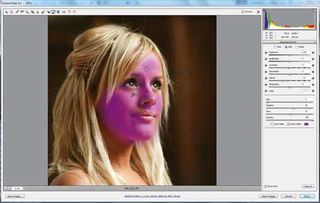
The Adjustment Brush is perfect for selective toning in ACR. The brush works by setting pins, each linked to a painted mask that specifies the area you want to tweak. You'll need to view the mask when painting, and hide it when using the sliders to adjust the area. Hit Y to switch the view of the mask on or off.
110. Erase masks
When painting with the Adjustment Brush, hold down Alt to erase parts of the mask.
111. Clip the blacks
Deep blacks give an image extra punch, so it's okay to clip the blacks a little. For deep blacks, drag the Black point slider inwards while holding down Alt until a few dark spots appear.
112. Straighten horizons
Hold down A and drag a line to straighten your images.
113. Clipping views
Hold down Alt while dragging the Exposure, Blacks or Recovery slider to see any clipped pixels, or click the icons at the top right and left of the histogram to see them all the time.
114. Screen real estate
Make the most of your screen size by hitting F to switch the ACR display to Full Screen Mode.
115. 3D carousel view
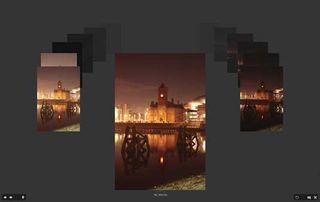
Looking for Photoshop tips to view images in interesting ways? Look no further. All you need to do is hit Cmd/Ctrl+B to see your images in a snazzy 3D carousel. Scroll through the images with the left and right arrow keys and hit down to remove an image from the view.
116. Paste ACR settings
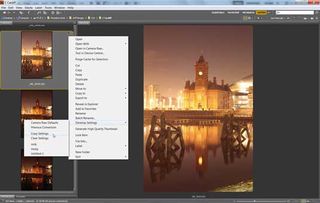
You can copy ACR treatments from one file to another in Bridge. Right-click any file with the circular ACR icon, then go to Develop Settings>Copy Settings. Right-click another file (or hold down Cmd/Ctrl and click to select more than one) then choose Paste settings.
117. Stack similar images
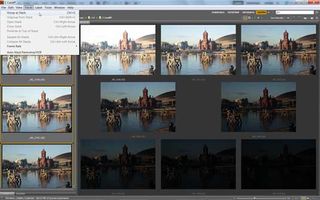
Stacks can help you keep your workspace tidy and easier to navigate by grouping similar images together. Select a group of files (hold down Shift and click the first and last) then go to Stacks>Group as Stack.
118. Open in ACR
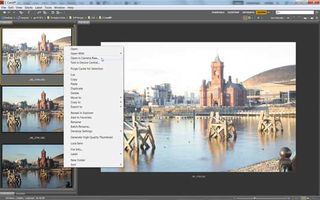
Raw files open automatically into ACR, but you can open JPEGs and TIFFs, too, by right-clicking them and choosing 'Open in Camera Raw', or simply hit Cmd/Ctrl+R.
119. Open as layers
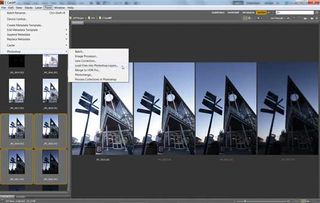
You can load a group of images into layers of a single document by going to Tools> Photoshop>Load Files into Photoshop Layers.
120. Step by step: solarisation in ACR
A: Make a cone-shaped curve
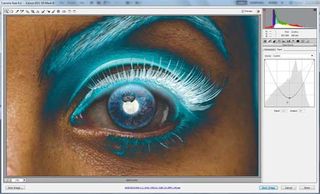
Open an image in ACR, then click the Tone Curve Panel. Drag all the points off the curve to delete them, then make one single point in the middle. Drag this down, then drag the bottom left of the curve to line up to the top, making an inverted cone shape.
B: Convert to mono
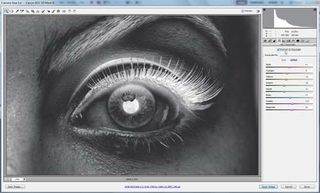
Click the HSL/Greyscale Panel and check 'Convert to Black and White'. Use the sliders to tweak the black and white conversion. If you want to add some colour, go to Split Toning and adjust the sliders to add colour to the shadows and highlights. One of the top mono Photoshop tips!

Thank you for reading 5 articles this month* Join now for unlimited access
Enjoy your first month for just £1 / $1 / €1
*Read 5 free articles per month without a subscription

Join now for unlimited access
Try first month for just £1 / $1 / €1
Get the Creative Bloq Newsletter
Daily design news, reviews, how-tos and more, as picked by the editors.
The Creative Bloq team is made up of a group of design fans, and has changed and evolved since Creative Bloq began back in 2012. The current website team consists of eight full-time members of staff: Editor Georgia Coggan, Deputy Editor Rosie Hilder, Ecommerce Editor Beren Neale, Senior News Editor Daniel Piper, Editor, Digital Art and 3D Ian Dean, Tech Reviews Editor Erlingur Einarsson, Ecommerce Writer Beth Nicholls and Staff Writer Natalie Fear, as well as a roster of freelancers from around the world. The ImagineFX magazine team also pitch in, ensuring that content from leading digital art publication ImagineFX is represented on Creative Bloq.
