Photoshop techniques explained: Exposure
What is a histogram? How do you fix poorly exposed photos? We answer these questions and more with this guide to exposure in Photoshop and Camera Raw.
Modern camera exposure and dynamic range optimisation systems are
extremely sophisticated, but the majority of images still benefit from a tweak to the exposure or contrast. Even when a camera does manage to produce an image that's near perfect, you may decide to reduce the exposure to ensure that there's detail in the brightest highlights, or to increase it to bring out shadow detail.
Many landscape photographers, for example, routinely underexpose the foreground of their images to make sure that the white clouds have some tonal detail. All that's required to get the image looking absolutely spot-on is a little exposure adjustment to brighten the shadows and mid-tones while retaining that elusive highlight detail.
Exposure control
Given that exposure control is such a fundamental part of photography, it's no surprise that Photoshop offers an extensive array of ways to adjust it. Under Image>Adjustments there are no fewer than six controls:
- Brightness/Contrast
- Levels
- Curves
- Exposure
- Shadows/Highlights
- HDR Toning
These can all be used, with Levels and Curves often being the choice of experienced photographers.
Meanwhile, in Camera Raw (ACR) there are sliding controls called Exposure, Contrast, Highlights, Shadows, Whites and Blacks that allow precise adjustment of exposure. It's even possible to add a graduated filter and use the Adjustment Brush to control exposure. In fact, the level of control accorded by ACR over exposure and contrast means that in many cases your image exposure issues can be resolved without even using Photoshop.
So, what's a Histogram?
If maths lessons have put you off looking at image histograms, think again, because they are extremely useful, and help to avoid detail and tonal gradation from being lost from your shots. The histograms in the Levels and Curves Panels, and in the ACR information box, are representations of the image's brightness distribution, and show
the proportion of image pixels of each brightness from 0 to 255, with 0 at the left-hand end of the scale being black and 255 at the right-hand end being white.
The larger the peak at any particular
point along the histogram, the greater the number of pixels with that corresponding brightness.
The 'average' image histogram is shaped like a hump-backed bridge with the majority of pixels having mid-range brightness. If the 'hump' is on the left, the image is predominantly darker than a mid-tone, and if it's on the right, the image is brighter than a mid-tone. The images on the right illustrate these principles.
The 'average' image
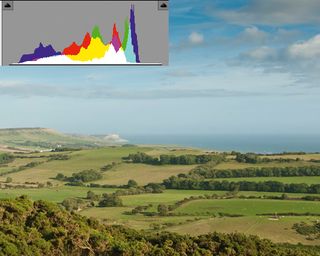
This image has been captured using the camera's suggested exposure setting to give an 'average' exposure. As a result, the majority of the pixels have middling brightness values, with peaks around the midpoint of the graph. A good exposure and healthy looking histogram.
The 'over-exposed' image
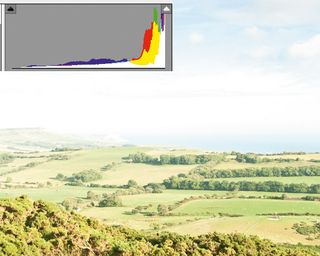
Over-exposing the image means that it's made up of brighter pixels
and hence the hump in the histogram trace is over towards the right and nearer to the white values. The large peak at the very end of the graph indicates that some highlights may be burnt out.
The 'under-exposed' image
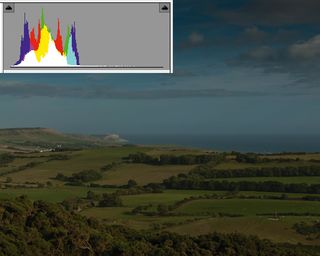
Under-exposing to darken the image moves the hump in the histogram to the left, nearer to black. The large peak at the very far left end of the
graph indicates that some of the shadows will be very dark with little
tonal gradation. Recovering detail in these areas will be tricky.
Adjusting exposure with Camera Raw
Now built in to Photoshop CS6, Camera Raw 7 has a host of tools at your disposal. To open an image in CR7 the simplest thing to do is right-click the image in Bridge, and select 'Open in Camera Raw'. Then acquaint yourself with some of these great features ...
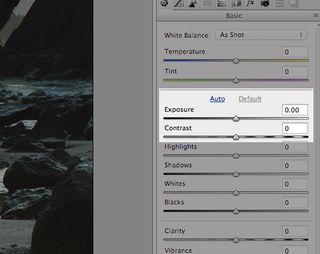
Exposure and Contrast sliders
Under-exposing to darken the image moves the hump in the histogram to the left, nearer to black. The large peak at the very far left end of the
graph indicates that some of the shadows will be very dark with little
tonal gradation. Recovering detail in these areas will be tricky.
Graduated filter in ACR
ACR 7 allows graduated filters to be applied to images, but rather than just applying a neutral tone like a traditional filter, they work like a graduated Adjustment Layer with control over aspects such as exposure, contrast and saturation. The adjustments can be edited using slider controls, while the position, size and rotation of the filter is altered by clicking and dragging it around.
ACR's Adjustment Brush
ACR 7's Adjustment Brush is a useful feature that allows you to apply exposure, contrast, saturation and clarity adjustments to specific areas of an image. So you can brighten the shadows of one area and darken
the highlights of another with just a few strokes of the brush. Each adjustment can be tweaked after it's been applied, and the Eraser mode allows the affected area to be decreased.
Highlights and shadows
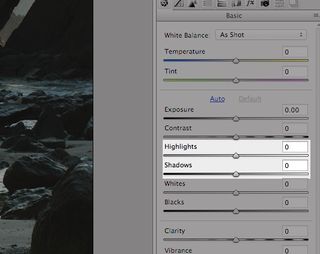
Adobe introduced new Shadows and Highlights sliders to Camera Raw with version 7. The controls run from -100 to +100, and allow shadows and highlights to be darkened or brightened independently to create images that stop just short of HDR (high dynamic range) images and usually without introducing haloes or posterised colours. The Highlights control replaces the Recovery control, while the Shadows slider is the new, improved version of the Fill Light control in the
previous version of Camera Raw. They are extremely useful for recovering detail from the brightest and darkest areas of landscape shots.
The Curves Adjustment Layer Panel in Photoshop CS6
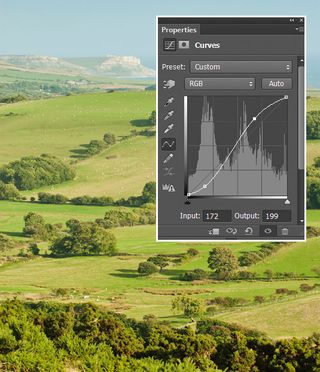
Most contrast adjustments can be made in Camera Raw, but Curves Adjustment Layers are still useful when you need to tweak the contrast of an image with several layers. The beauty of using an Adjustment Layer is that you can revisit it at any time to alter the contrast again. To create an Adjustment Layer, select Layer>New Adjustment Layer>
Curves, or click the option at the bottom of the Layers Panel.
Curves can be used to reduce contrast, but it's more commonly used to give it a boost. This is done by clicking the straight diagonal line and dragging a couple of points (or more) to form a shallow S-shape. Dragging a point about halfway between its mid-point and top right upwards increases the brightness of the highlights, while dragging a point between its mid-point and bottom left downwards darkens the shadows.
As soon as the first point is moved, the straight line becomes a curve. If the curve touches the top or bottom of the graph, those tones are clipped. Steepening the central section of the curve increases the contrast of the mid-tones, which make up the main part of the picture.
That's it. We hope this article has helped demystify some of the areas around improving and understanding exposure in Photoshop. Now, check out Practical Photoshop magazine for more great articles, reviews, and tutorials!
Liked this? Read these!
- Hands-on review: Adobe Photoshop CC
- Photoshop tips, tricks and fixes to try today
- Free Photoshop brushes every creative must have
- Free Photoshop actions to create stunning effects
- The best Photoshop plugins

Thank you for reading 5 articles this month* Join now for unlimited access
Enjoy your first month for just £1 / $1 / €1
*Read 5 free articles per month without a subscription

Join now for unlimited access
Try first month for just £1 / $1 / €1
Get the Creative Bloq Newsletter
Daily design news, reviews, how-tos and more, as picked by the editors.
The Creative Bloq team is made up of a group of design fans, and has changed and evolved since Creative Bloq began back in 2012. The current website team consists of eight full-time members of staff: Editor Georgia Coggan, Deputy Editor Rosie Hilder, Ecommerce Editor Beren Neale, Senior News Editor Daniel Piper, Editor, Digital Art and 3D Ian Dean, Tech Reviews Editor Erlingur Einarsson and Ecommerce Writer Beth Nicholls and Staff Writer Natalie Fear, as well as a roster of freelancers from around the world. The 3D World and ImagineFX magazine teams also pitch in, ensuring that content from 3D World and ImagineFX is represented on Creative Bloq.

