How to make a face mask: 4 simple ways to make DIY face coverings at home
A beginner's guide on how to make a face mask using common household items.

Knowing how to make a face mask is one of the most useful skills you can learn these days. Yes, even as mask mandates are either being loosened or fully eliminated in some parts of the world where Covid-19 cases are declining due to more widespread vaccinations, face coverings may still be a requirement to enter certain establishments like health care facilities. If you're travelling by air domestically or internationally, you'll still need to wear a mask; in the UK and the US masks are still required on trains and buses.
Now we know you can buy face masks, but the disposable kind can end up being pretty expensive and aren't great for the planet either. Plus, making your own face covering means you can tailor it to your own requirements, which is especially helpful if you wear glasses that tend to fog up.
If you'd rather buy a face covering (even if you are making your own mask, you may still want to buy spares) then see our guide on where to buy a face mask, use the quick links below to jump straight to retailers selling face masks right now. Or, keep reading to learn more about face masks.
- Face masks UK: Should you be wearing one? Plus where to buy them
- Where to buy kids' face masks
Beyond mask mandates, wearing face coverings has become a more accepted practice in much of the West. In Eastern countries like Japan and South Korea, mask wearing has long been a cultural norm. In such places it's expected you wear a mask if you have a cold or allergies to protect those around you from the droplets that escape when you cough or sneeze. Many Westerners are keen to adopt that practice long after the pandemic is officially declared over, so they won't be dumping their collection of masks straight in the bin when that happens.
Our step-by-step guide is loosely based on the methods outlined by the CDC (Centers for Disease Control and Prevention) and the good news is, making your own mask is a breeze. Below, we've got four super-simple methods for you to choose from, each with only a few short steps to follow.
Where to buy face masks: quick links
- Etsy.co.uk – handmade face masks from just £1.50
- ASOS – fashionable designs at low prices
- Buff – stylish face coverings at low prices
- Ebay.co.uk – washable face masks at bargain prices
- Vistaprint - 25% off 3 or more masks with code 'MASK25'
- Silkies – two protective face masks for $0.99
- Stringking – CDC-recommended cloth masks for just $5.99
- Etsy.com – patterned face masks for as a little at $2.99
- Los Angeles Apparel - 3 adjustable face masks for only $30/£22
- Sock Fancy – funky face masks for only $8
4 ways to make a face mask
This guide is ordered in terms of difficulty level. The first two methods – how to make a bandana-style face mask and how to make a face mask using a T-shirt – are super-easy and require no sewing at all. We've then got two methods for sewing your own face mask, one without a sewing machine, and one with a sewing machine (though seasoned sewers will be able to do either method with or without a machine).
If you are sewing, you can either using spare fabric you have lying around at home, or buy something new. If you want your DIY face mask to stand out, bright or patterned fabric is best – John Lewis (UK) has loads of affordable designs in the UK, as does Etsy (US). A bright design also means you are less likely to get your face mask confused with anyone else's, and are perhaps less likely to lose it.
Get the Creative Bloq Newsletter
Daily design news, reviews, how-tos and more, as picked by the editors.
- Browse fabric at JOANN (US) – from just $3.99 p/y
- Browse fabric at John Lewis (UK) – from just £6.50 p/m
Before we get into our instructions of making a face mask, first consider the guidelines in your country. The official advice on this differs across the globe, but the general consensus is that wearing a homemade face mask will not help protect you from contracting Covid-19. However, it can help protect others from you passing on any germs that you may be carrying, which may be particularly useful if you are asymptomatic and don't realise you are carrying the virus. Note that the face masks we're talking about here are not medical-grade face masks, and we wouldn't advise you to attempt making your own versions of PPE: leave that to the professionals.
The CDC recommends unvaccinated individuals continue to wear a face mask in places where social distancing is not possible, and many countries around the world are also asking their citizens to wear face masks when out in public, or in enclosed spaces such as supermarkets or on public transport. In the UK, mask wearing and other social distancing guidelines are still in place until mid-July.
Check your country's own guidelines if you're unsure and remember that wearing a face mask or covering doesn't mean you should stop following social distancing, washing your hands and practising good hygiene. It's also very important that you put your face mask on and off very carefully, following government guidelines.
With all of that in mind, here are four ways to make your own face mask.
01. How to make a bandana-style face mask

You will need:
- A bandana or scarf
- 2 x elastic or rubber bands, or hair ties
- A coffee filter, paper towel or kitchen roll (optional)
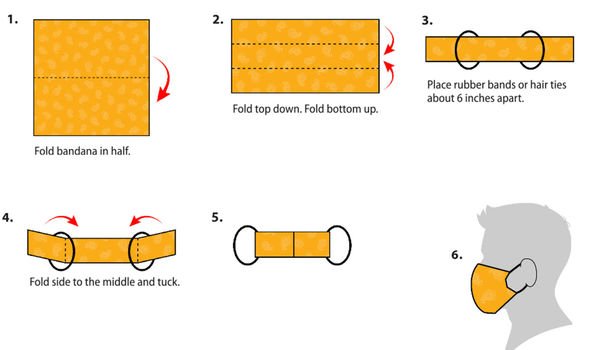
The easiest method for making your own face mask is as simple as folding a bandana or a scarf. Note that you need to choose the right bandana or scarf or you risk your mask won't be effective, or not being able to breathe properly. Hold your material up to the light to see how much you can see through it. The less you can see, the better; if the material is too thin then your face mask won't be as effective. Tightly woven, 100 per cent cotton is best.
Fold your bandana in half, then folding it again twice – lengthways from both the top and the bottom. At this point, you can also add a square piece of coffee filter, paper towel or kitchen roll to your mask – which you can change regularly.
Then, place your rubber bands or hair ties around your strip of material, and fold the material in towards the middle, tucking the ends into each other if possible.
Surgeon general, Dr Jerome Adam, demonstrates how to do this in the video below. As you can see, this is a very quick and easy method of making your own face mask.
02. How to make a T-shirt face mask

You will need:
- A T-shirt
- Scissors
- Coffee filter or paper towel (optional)
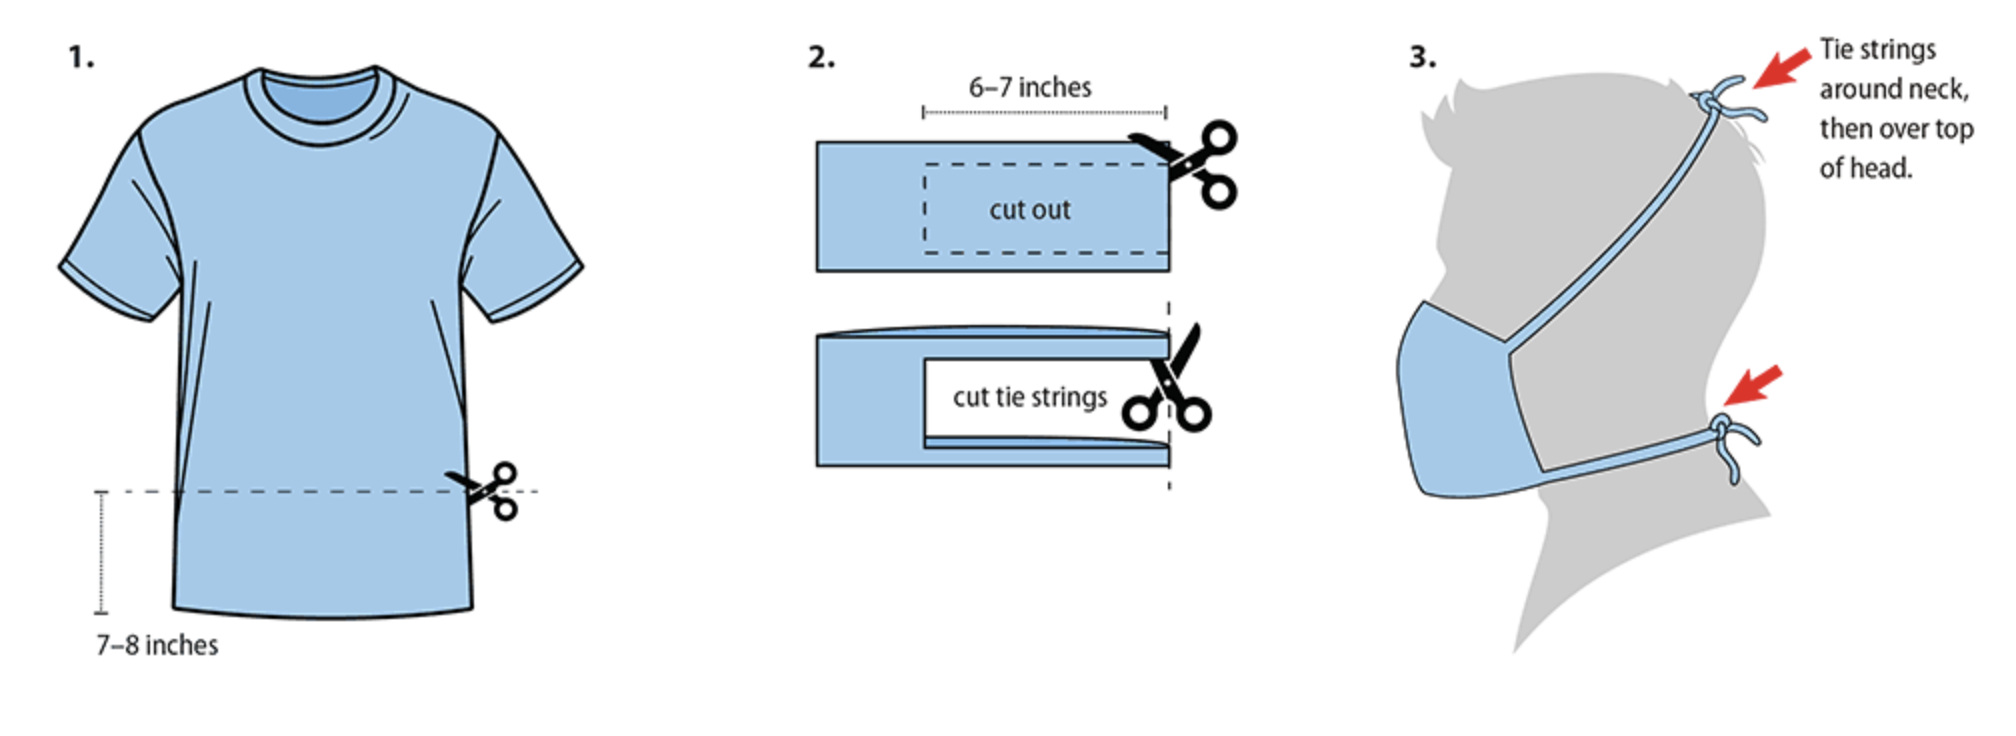
If you have a T-shirt that you don't mind cutting up, then you can easily and quickly make a face mask from it. Note that you don't want to be using really old T-shirts if they have holes in them or are worn through. Ideally, your T-shirt should be 100 per cent cotton and as opaque as possible.
To start, simply cut the bottom off your T-shirt. The height of the amount of material you need should be the length from the top of your nose to underneath your chin (around seven to eight inches of 17-20cm). It's best to get the measuring tape out if you're unsure, and cut bigger than you think you need so you can trim the excess later (if you cut too small, you'll run into problems).
You then need to cut into your T-shirt – around six to seven inches (15-17cm) – to make the ties for your face mask, making a sort of elongated c-shape. Next, cut your ties so that you can retie them around your head. Adjust until you get a snug fit around your nose and chin. If you like, you can add a coffee filter or paper towel to your face mask, and secure it with a safety pin. See the video below for further instructions on making a face mask from a T-shirt.
03. How to make a cloth face mask without a sewing machine

You will need:
- Cotton fabric (10-11-inches or 25-28cm in diameter)
- 2 x 6-inch (15cm) pieces of elastic or rubber bands, hair ties or strips of cloth
- A plate, or something round to use as a template
- Needle and thread
- Scissors
- Pins
- Jewellery wire or similar (optional)
Create your own unique face mask with fabric from these retailers:
- JOANN (US)
- Fabric.com (US)
- Etsy US
- Michael's (US)
- John Lewis
- Etsy UK
This method of making a face mask can be done with or without a sewing machine. It's a simple pattern, and our instructions are based on the video below, which is very easy to follow, and we recommend watching it before you start (though you'll probably want to mute the cheesy music!).
This face mask method gives you a slightly rounded mask, which you may or may not prefer to the rectangular pattern in the next method. It is also all made from one piece of material, which makes it nice and easy.
Iron your material if necessary, and then place your material face down on a flat surface. Place a plate, which is roughly 10-12-inches or 25-28cm in diameter, on top of it, and draw around the plate. Then cut out your circle shape. Once it is cut out, fold it twice, so you get four curved triangles on top of each other, and then cut down the sides of your triangles, so you have four separate shapes (watch the video if you're unsure about this and all will become clear!).
Next, place one shape face up, and another face down on top of it, so the wrong sides of the material are on the outside. Pin together if you have pins. Do the same with the other two shapes.
Then, stitch along the curved edge of your fabric with a needle and thread, using running stitch or similar. You ideally don't want any gaps between your stitches. Once you have done this, unfold your triangles, so you get a sort of dome-like structure. Place the domes on top of each other, front sides together.
If you want to insert some sort of wire into your face mask – this is useful for stopping your glasses fogging up when you're wearing your face mask – then insert it now by placing it along the nose (or middle) section of the top side of your mask and folding down the material. Jewellery wire works well, something like sandwich bag ties can also work. Then sew along the top edge of the mask, encasing the wire into your face mask.
Whether or not you have inserted your nose wire, the next step is to pin your mask in place and sew round the edges of your face mask, leaving a small gap at one end.
Next, pull your material through the gap (carefully), until you have the front sides of your material on the outside of your face mask, then stitch up the small gap – it is probably easiest to do this by hand.
All you need to do now is insert your ties into you face mask. To do this, fold one of the pointy edges of your mask over itself and then sew it down. Then do the same on the other side.
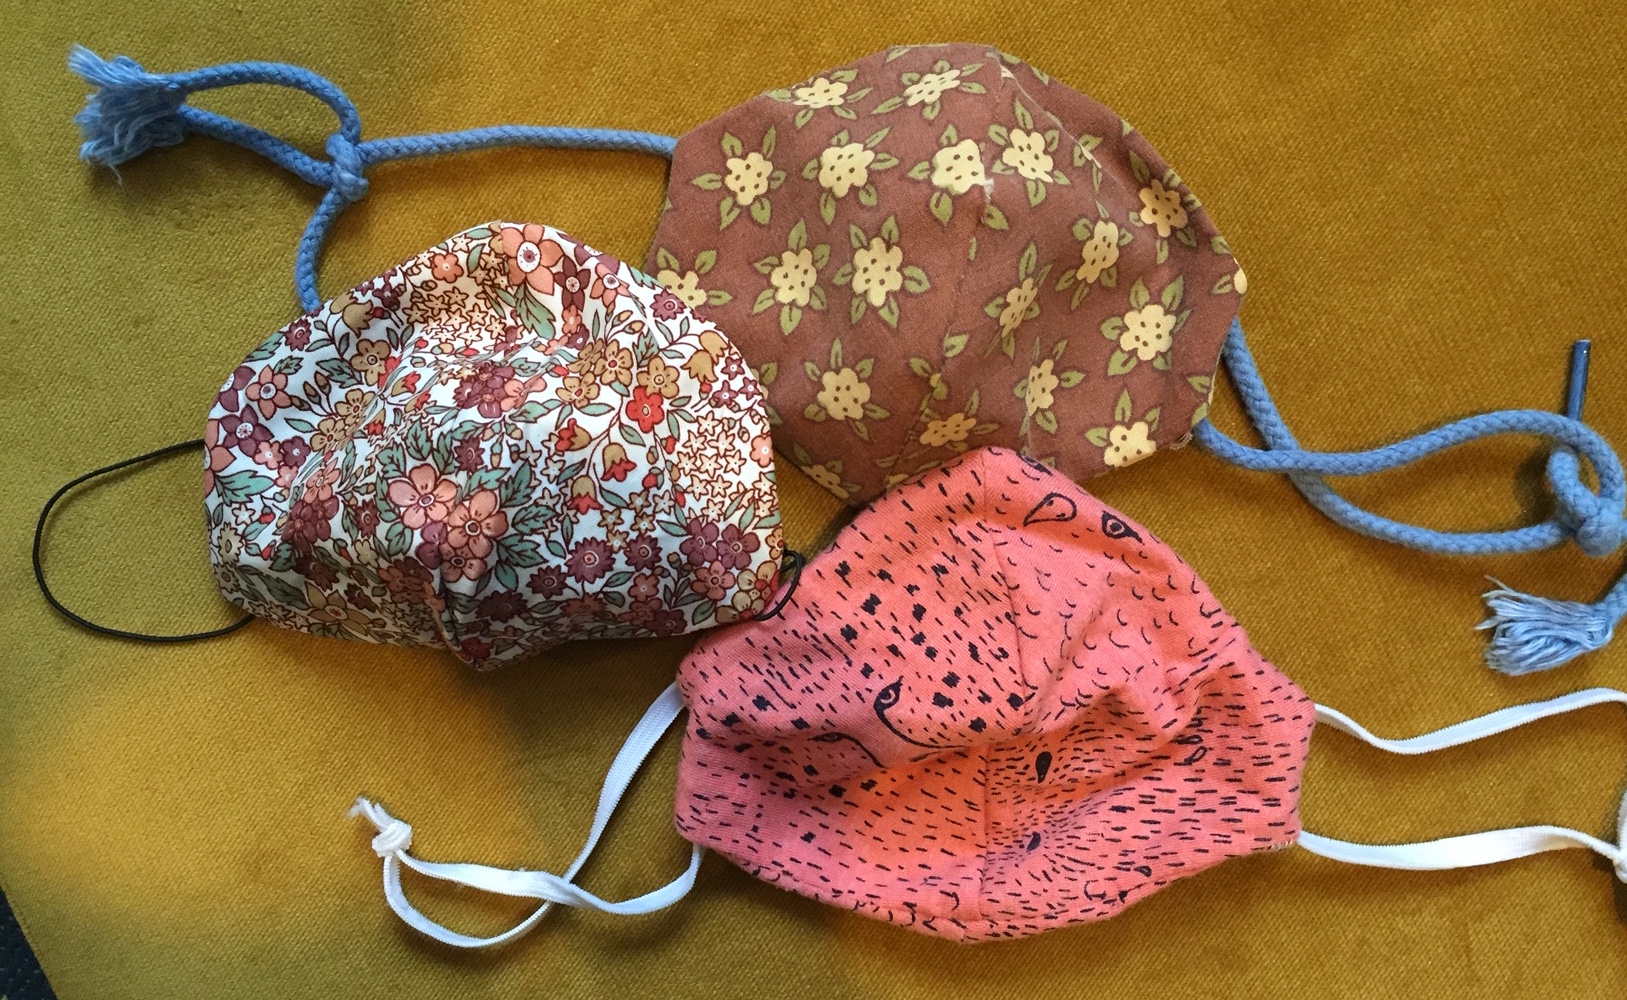
You should now have created a little pocket, or hem, to insert your ties into. You can then insert your elastic or ties, using a safety pin or needle to thread them through the hem. Tie up your elastic and you are done. You can pull the ties so that the knots are inside your face mask if you want to, and you are done.
04. How to make a cloth face mask with a sewing machine

You will need:
- Cotton fabric (10 x 6-inches or roughly 25 x 15 cm)
- 2 x 6-inch (15cm) pieces of elastic or rubber bands, hair ties or strips of cloth
- Sewing machine (ideally)
- Needle and thread
- Scissors
- Pins
- Jewellery wire, or thin wire (optional)
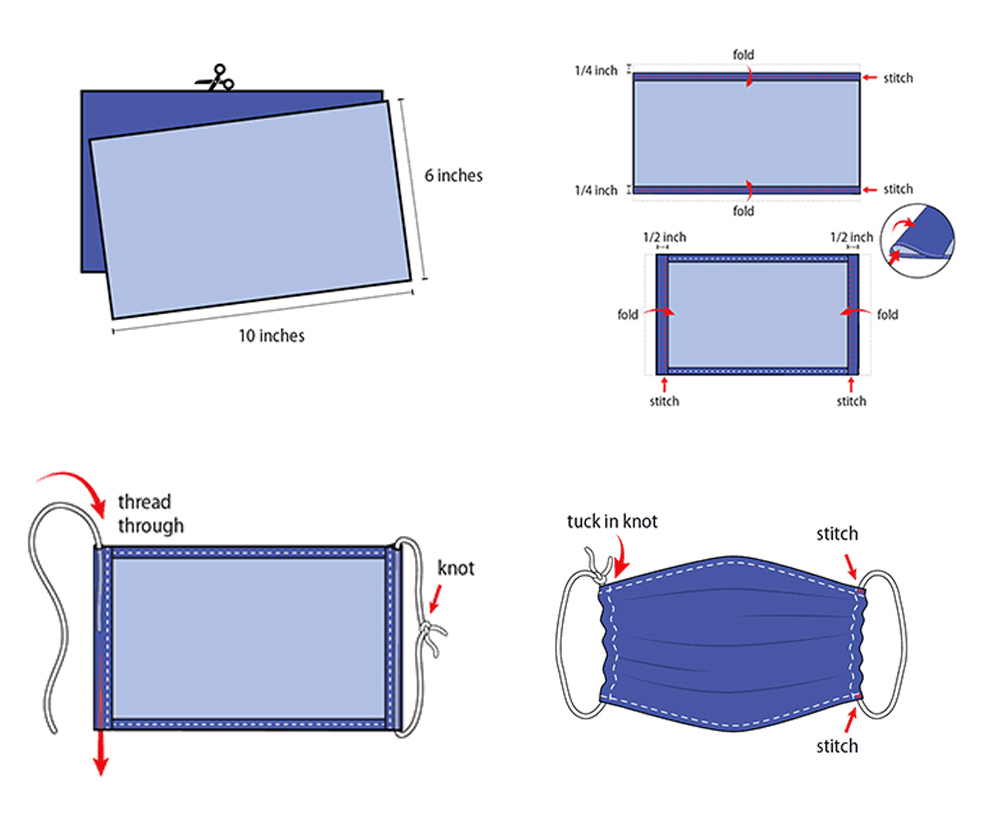
To make a face mask with a sewing machine (although note that is is possible to create this face mask design by sewing by hand), first, cut your material to around 10 x 6-inches or roughly 25 x 15 cm.
If you want to make it really clear which part of your mask is the front and which is the back, use two different materials, this will help you avoid putting on the mask back to front (which is not recommended for hygiene purposes). Next, place your two pieces of fabric on top of each other. You want the pattern that you'd like to be on the 'front' of your mask face down. The piece of material facing up towards you will be the inside of your mask.
Next, fold over the long sides of the material around 1/4-inch or 0.5-1cm. Pin in place (don't worry too much if you don't have any pins, you can always use a needle or just keep checking that your fabric is held together) and hem. Hem just means folding the edges of your material over and stitching them so that your fabric will not fray and will stay together. You could also add some thin wire into the top hem of your face mask to help you shape it around your nose, and to stop your glasses fogging up, jewellery wire works well for this. To add wire, place it along the top length of the material, and then fold over and sew it down.
Once you have hemmed the length of your face mask, fold over the sides of your face mask around 1/2 an inch (1.5cm), pin and hem the sides too.
Once you have created your side hem, you can thread your elastic or hair ties through it. You'll need a needle to do this, or a pin, or safety pin or basically anything that you can use to poke the elastic through your hem – a thin pencil might do the job.
With your ties threaded through the sides of your mask, tie your elastic or hair ties in secure knots, and move the knots until they can be tucked inside the hem. You can then adjust your face mask to fit your face, and add some stitches on either end of your face mask to keep your elastic in place.
If you are a seasoned sewer, you can sew the whole thing in one go, turning it as you go, or you can create face mask with a pocket for a filter (see video below). You could even add your elastic in before you hem. The reason beginner sewers shouldn't do this is that it's very easy to catch the elastic in your hem and accidentally sew it down, and that will make it much harder to adjust later.
Alternatively, you can also follow this face mask sewing tutorial from designer Amanda Riley.
Read more:

Thank you for reading 5 articles this month* Join now for unlimited access
Enjoy your first month for just £1 / $1 / €1
*Read 5 free articles per month without a subscription

Join now for unlimited access
Try first month for just £1 / $1 / €1

Rosie Hilder is Creative Bloq's Deputy Editor. After beginning her career in journalism in Argentina – where she worked as Deputy Editor of Time Out Buenos Aires – she moved back to the UK and joined Future Plc in 2016. Since then, she's worked as Operations Editor on magazines including Computer Arts, 3D World and Paint & Draw and Mac|Life. In 2018, she joined Creative Bloq, where she now assists with the daily management of the site, including growing the site's reach, getting involved in events, such as judging the Brand Impact Awards, and helping make sure our content serves the reader as best it can.
