Photoshop lomo: a beginner's guide
Vignetting, noise and colour saturation are all image imperfections you normally hope to avoid, but not when it comes to lomography. With Photoshop, lomo is just a few steps away, as we show you here
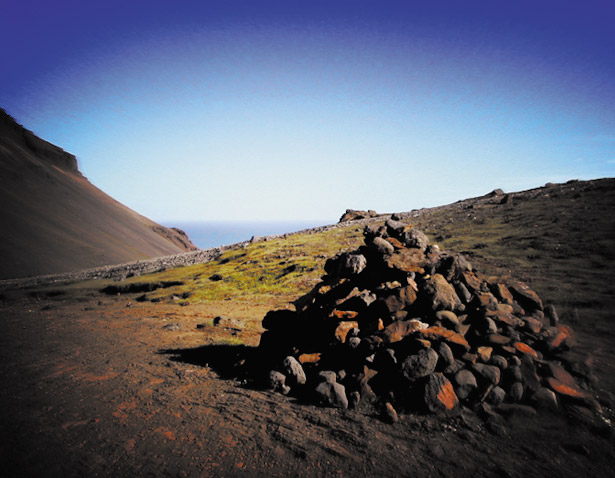
The lomo bug has bitten deep in recent years, and entire communities have sprung up around it. Primarily, the movement uses dubious Russian cameras and cross-processing to create vibrant, highly saturated images, which often have imperfections that are said to add character to the photos.
The thing is, if you take a lomo shot, there’s no way of turning it into a clean image. You might also have images that you’d like to apply the effect to, but it’s now too late to do so. Ultimately, a decent compromise is to fake the lomo effect in Photoshop. Although this won’t provide random elements evident in a roll of shots taken with a real lomo camera, you’ll be able to rework any shot you choose and also control and fine-tune the outcome. Crucially, by using layers, you won’t need to amend your photo at all and can also rapidly slot new images into the effect.
It’s also worth noting that it’s the processing rather than the camera that produces most of the effect. By processing a slide film taken with any camera as a standard colour print film (something referred to as ‘cross processing’), the saturation and colour shifts evident in lomo should be achieved.
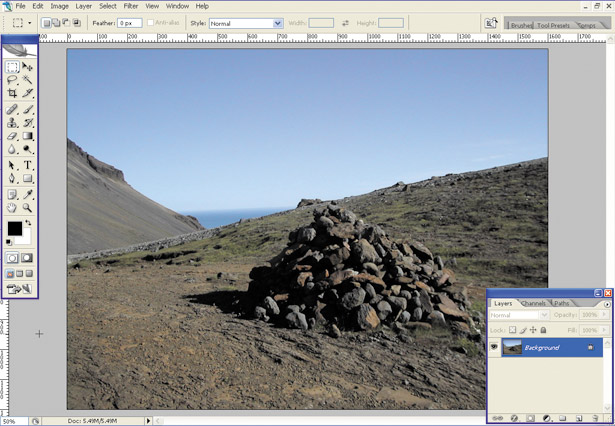
1. Find a photo
Choose an image to work with. To work with the settings as defined here, image dimensions of approx 1,600x1,200 pixels are recommended (use Image > Image Size to resize your image, if required).
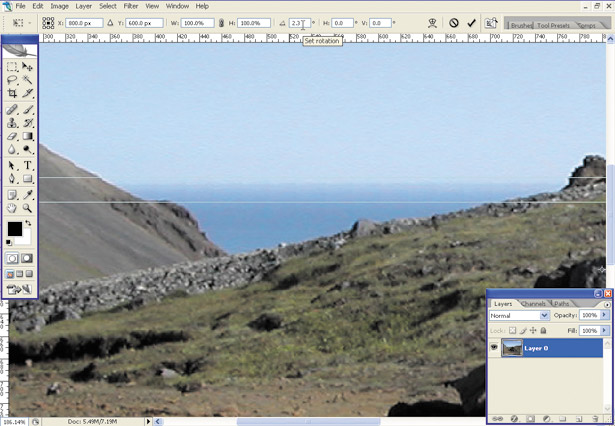
2. Straighten the image
Unless you used a tripod when taking your photo, it’s probably a bit wonky. Ensure View > Rulers is checked and drag down a guide or two. Float your background layer (Alt/Option+click) and use Free Transform (Ctrl/Command+T) to rotate and straighten your image
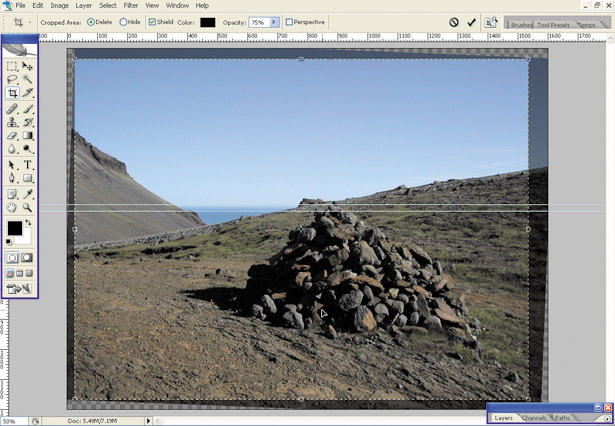
3. Crop and make corrections
If you’ve rotated your image, use Photoshop’s Crop tool to remove the transparent corner pieces. Make any other corrections that you deem necessary, such as correcting any colour casts, by using the various options within the Image > Adjustments sub-menu.
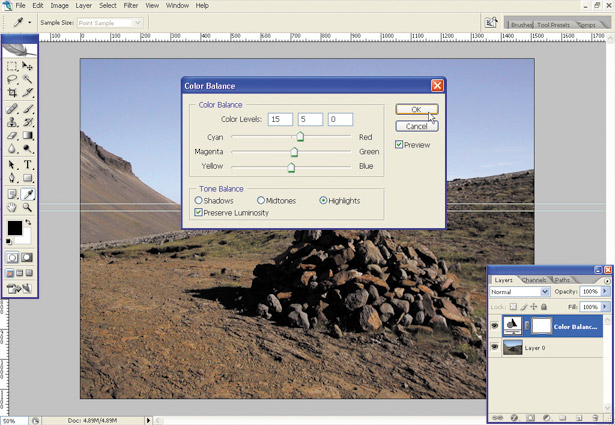
4. Shift colours
Create a Color Balance adjustment layer using the Layers palette in Photoshop. Lomo cameras emphasise reds and greens, so use the sliders to increase these colours. We set the first two Color Levels values to +6 and zero in Shadows, +20 and +5 in Midtones and +15 and +5 in Highlights.
Get the Creative Bloq Newsletter
Daily design news, reviews, how-tos and more, as picked by the editors.
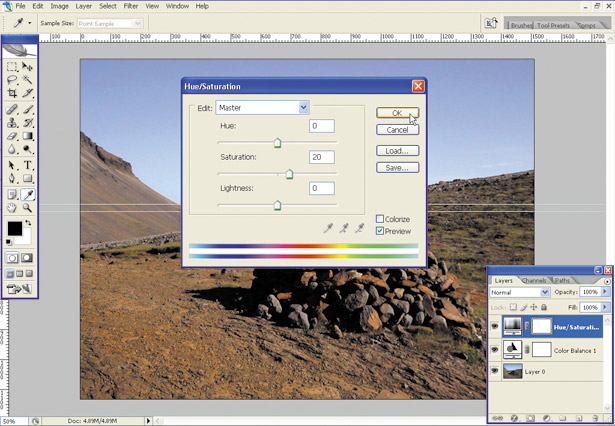
5. Increase the colour saturation
As stated earlier, lomo cameras over-saturate colours. Therefore, create a Hue/ Saturation adjustment layer and drag the Saturation slider to a value of 20. Note that because we’re working with adjustment layers, all these settings can be edited later, if required.
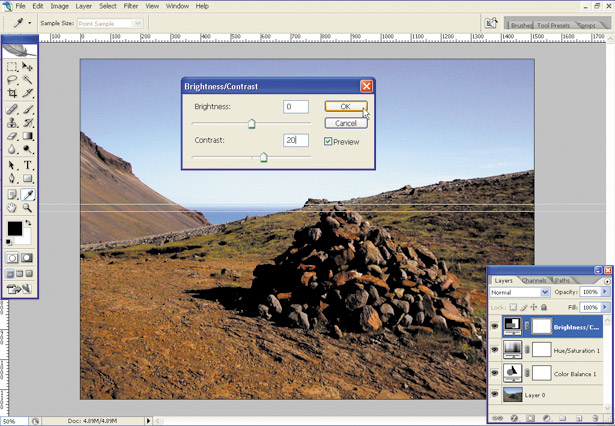
6. Increase the contrast
Create a third adjustment layer, this time choosing Brightness/Contrast from the menu. Move the Contrast slider to a value of +20. This will emphasise highlights and shadows. Note that the lomo effect tends to work well on images with plenty of existing contrast.
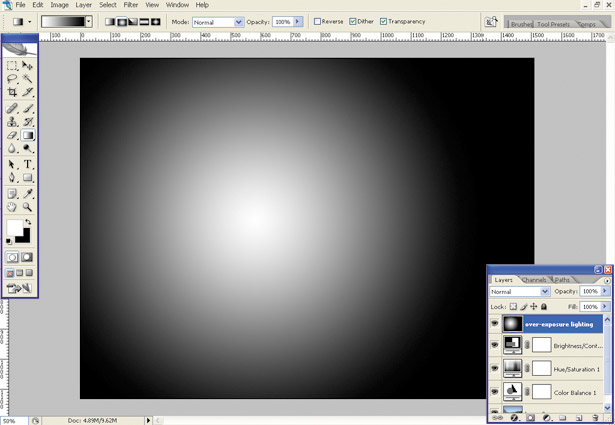
7. Over-expose
To apply an over-exposed effect to your image press D to reset the toolbar colours and X to make the foreground colour white. Choose the Gradient tool and select Foreground to Background and Radial Gradient. On a new layer, drag a gradient from the centre to the right-hand edge.
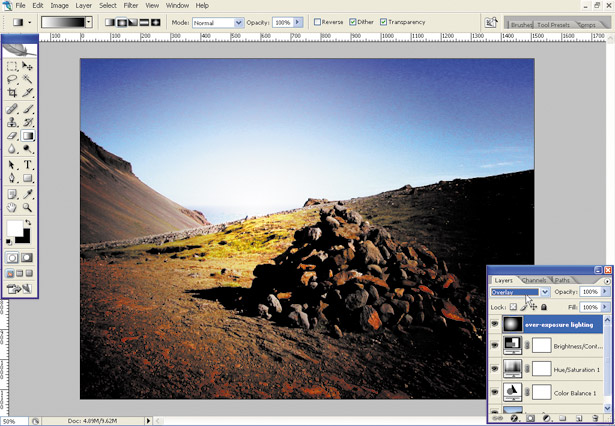
8. Change the mode
Change the mode of the layer created in step 7 to Overlay. This blends the layer into the image below, retaining the highlights and shadows of the base layer. You’ll see another marked boost in the image’s vibrancy at this point, and it already resembles some lomo images.
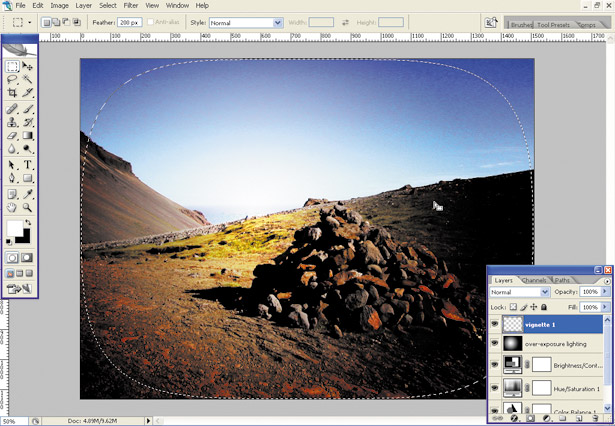
9. Make a selection
We’re now going to create a vignette effect. Create a new layer and then select the Marquee tool. Set Feather to 200 pixels and then drag from the top-left to the bottom-right of the canvas. You should see a selection created with rounded edges, due to the Feather setting.
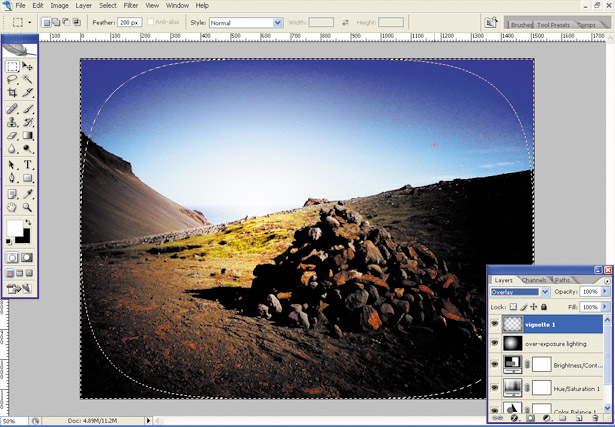
10. Fill the selection
Invert the selection (Shift+Ctrl+I/ Shift+Command+I) and fill it with black. Change the layer’s mode to Overlay and this will continue to enhance the saturation and exposure effects. Although the effect isn’t as random or circular as the real-life effect, it works well enough.
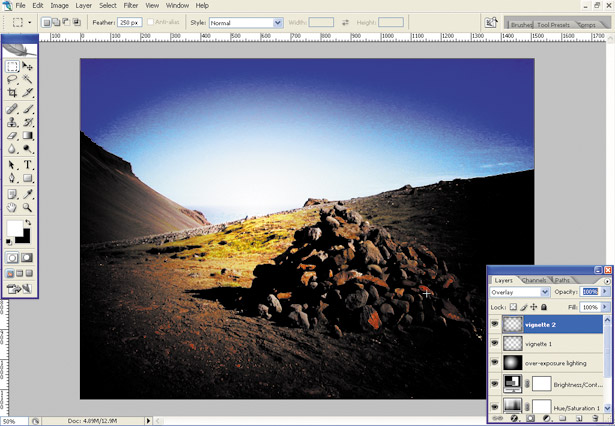
11. Emphasise the vignette effect
Repeat steps 9 and 10, but this time set the Feather value to 250 pixels. This will further emphasise the vignette effect and create more graduated colour from the centre of the image outwards.
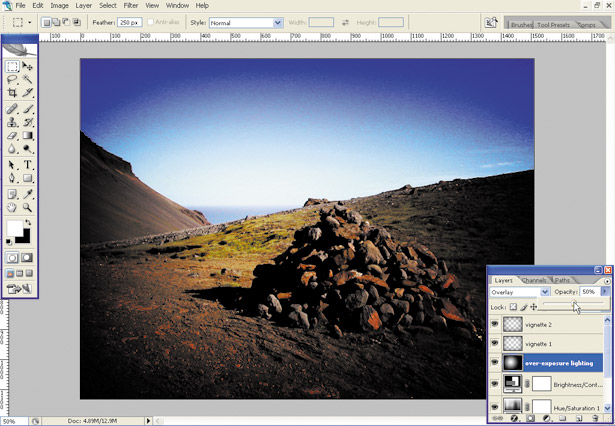
12. Edit opacity settings
The next few steps show how flexible the effect can be when it’s created in Photoshop. If, for example, you find the result from the three layers created between steps 7 and 11 too harsh, try reducing the Opacity setting of the over exposure layer to 50 per cent.
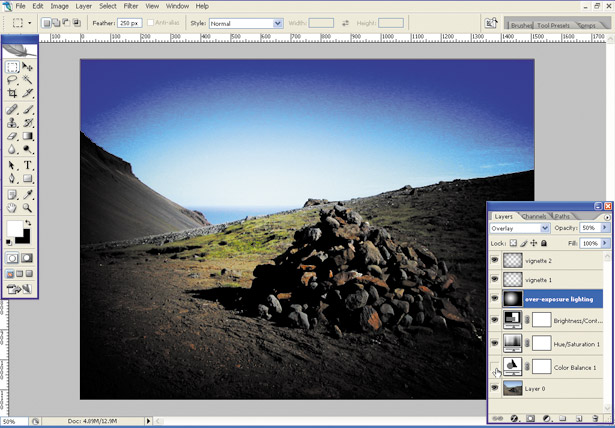
13. Toggle layers
Adjustment layers have been used for a number of elements, so each can be toggled. For example, turn off the Color Balance 1 layer to see how the image looks now. You could also use layers to add variations of each of the adjustment layers to an overall lomo template.
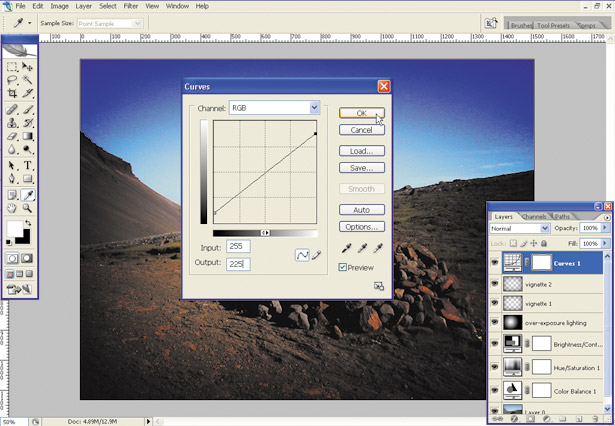
14. Black and white reduction with Photoshop
Lomo cameras tend to show white as off-white and black as a dark grey. To create this effect, make a Curves adjustment layer. Drag the left-hand handle to ‘Input: 0; Output: 25’ and the right-hand handle to ‘Input: 255; Output: 225’. Position this layer above the others.
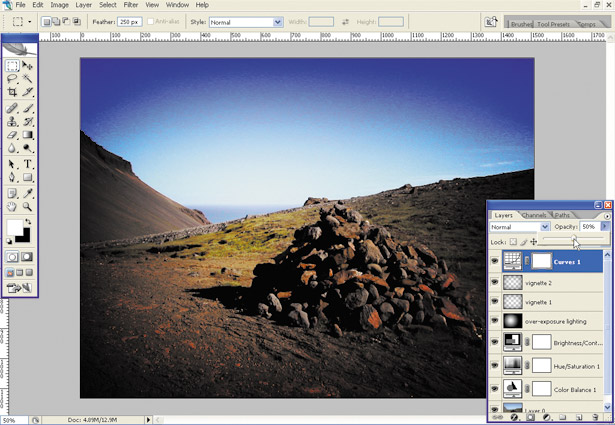
15. Contrast and saturation
If you feel the previous step has reduced the image’s edge too much, double-click Brightness/Contrast 1 and/or Hue/Saturation 1 and increase the settings. Don’t go over the top, though, or the image will appear garish and colour banding will become obvious.
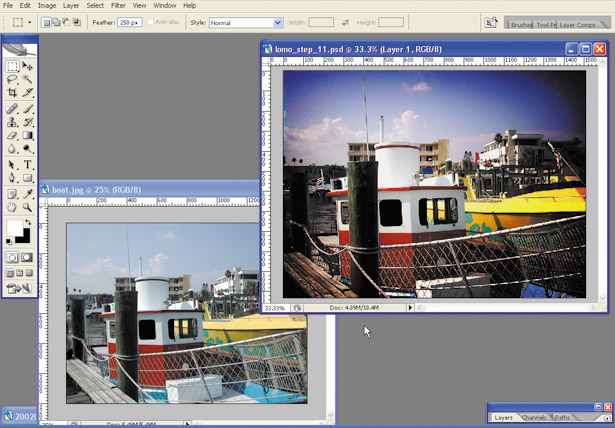
16. Add more photos
To see how the effect looks with other images, simply paste them above your photo layer, but below all of the adjustment layers and exposure/vignette layers. If you have many images, use Photoshop’s Layer Groups feature (Layer > New > Group) to sort them into sets.
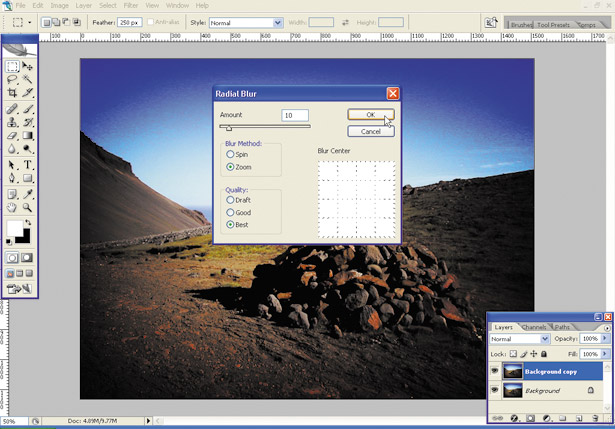
17. Add a radial blur
Ensure that you save your image as a .psd file, so you can edit it in the future. Flatten the image (Layer > Flatten Image), duplicate the Background layer and select the copy. Go to Filter > Blur > Radial Blur. Set Amount to 10, Blur Method to Zoom and Quality to Best.
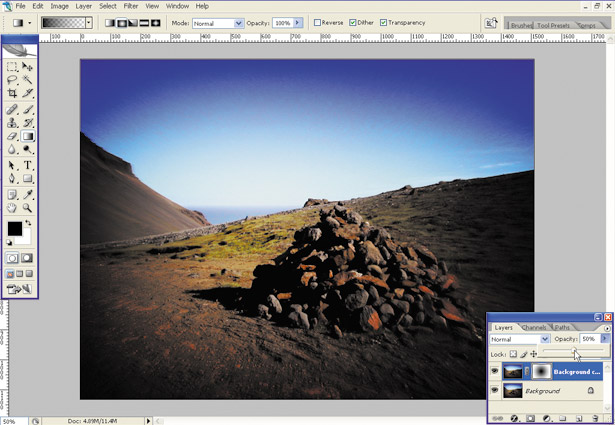
18. Add a layer mask
Click the Add layer mask button. Choose black as your toolbar’s foreground colour and select the Gradient tool. Choose Foreground to Transparent and Radial Blur. Drag a gradient from the image’s centre to the right-hand edge. Reduce the layer’s opacity to 50 per cent.

Thank you for reading 5 articles this month* Join now for unlimited access
Enjoy your first month for just £1 / $1 / €1
*Read 5 free articles per month without a subscription

Join now for unlimited access
Try first month for just £1 / $1 / €1

The Creative Bloq team is made up of a group of art and design enthusiasts, and has changed and evolved since Creative Bloq began back in 2012. The current website team consists of eight full-time members of staff: Editor Georgia Coggan, Deputy Editor Rosie Hilder, Ecommerce Editor Beren Neale, Senior News Editor Daniel Piper, Editor, Digital Art and 3D Ian Dean, Tech Reviews Editor Erlingur Einarsson, Ecommerce Writer Beth Nicholls and Staff Writer Natalie Fear, as well as a roster of freelancers from around the world. The ImagineFX magazine team also pitch in, ensuring that content from leading digital art publication ImagineFX is represented on Creative Bloq.
