How to manipulate and visualise web audio
Jordan Santell takes a look into how to get started with the Web Audio API.

The Web Audio API is powerful and can be used for real-time audio manipulation and analysis, but this can make it tricky to work with. Using a routing graph to pipe audio from node to node, it's different from other web APIs – and is a tad daunting the first time one approaches the specification. In this piece we'll walk through a bare-bones example of manipulating audio in real time, then visualise the audio data.
Plug and play
Imagine you're a guitarist for your favourite band: sound comes from your guitar, via effects pedals (you want to sound heavy, right?) and into your amplifier so it can be heard. The Web Audio API works similarly: data travels from a source node, via transformation nodes, and ultimately out of a computer’s sound card.
Everything in web audio starts with instantiating an AudioContext instance. The AudioContext can be thought of as our audio environment, and from the context we create all of our audio nodes. Because of this, all audio nodes live inside an AudioContext, which becomes a network of connected nodes.
First we'll need a source node from where the audio originates. There are several types of source nodes, such as MediaElementAudioSourceNode for using an <audio> element, a MediaStreamAudioSourceNode for using live microphone input with WebRTC, an OscillatorNode for square and triangle waves, or an audio file with an AudioBufferSourceNode. In this case, we’ll use a MediaElementAudioSourceNode to leverage the native controls the <audio> element gives us.
Here we'll be prepared for prefixed object names, and support different audio codecs. You may need to serve this page from a server so appropriate headers for the audio files are set. Let's create an <audio> element, instantiate an AudioContext and hook a MediaElementAudioSourceNode to our <audio> element:
<body>
  <audio id="audio-element" controls="controls">
   <source src="audio/augment.mp3" type="audio/mpeg;">
   <source src="audio/augment.ogg" type="audio/ogg; codecs=vorbis;">
</audio>
<script>
   var ctx = new (window.AudioContext || window.
   webkitAudioContext)();
   var audioEl = document.getElementById("audio- element");
   var elSource = ctx.createMediaElementSource(audioEl);
  </script>
</body>
The <audio> element's audio is being pumped into our web audio context. So why can't we hear the track when we click play? As we're re-routing the audio from the element into our context, we need to connect our source to the context’s destination. It’s as if we’re playing an electric guitar that’s not plugged into an amp.

Every AudioContext instance has a destination property: a special audio node representing a computer’s audio out, and all our audio nodes have a connect method enabling us to pipe audio data from one to another. Let’s connect our audio element node to the destination node, like a guitar cable to an amp.
Get the Creative Bloq Newsletter
Daily design news, reviews, how-tos and more, as picked by the editors.
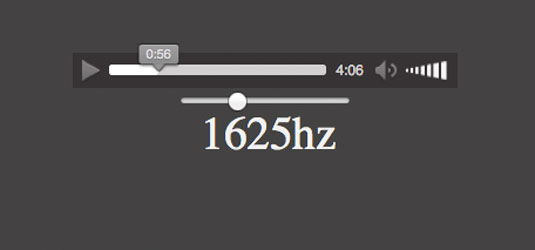
elSource.connect(ctx.destination);Now when we hit the playback, we have the <audio> element node being pumped into the destination node, and can hear the song. But that's no different to using the <audio> tag on its own. Let's add a filter node to play with the audio track's frequencies. First, we'll control the filter with a slider and a display so we can see what the value is:
<input id="slider" type="range" min="100" max="22000" value="100" />

<div id="freq-display">100</div>
Now we must create a BiquadFilterNode: our filter and functions, like an equalizer in web audio. As with all nodes we make, we instantiate our filter from the AudioContext. Previously, we connected our MediaElementAudioSourceNode directly to our context's destination. Now we want our source node to connect first to our filter, and our filter to the destination, so our filter node can manipulate the audio being passed through it. We should have something like this now:
var ctx = new (window.AudioContext || window. webkitAudioContext)();

var audioEl = document.getElementById("audio-element");
var elSource = ctx.createMediaElementSource(audioEl);
var filter = ctx.createBiquadFilter();

filter.type = "lowpass";

filter.frequency.value = 100;

elSource.connect(filter);

filter.connect(ctx.destination);
Filter nodes have several kinds of frequency filtering, but we'll use the default "lowpass" – only frequencies lower than the frequency can pass through. Give it a listen: notice how it sounds kind of like there's a party next door. Only frequencies below 100hz are going to the destination, so we're only hearing the bass. Let's hook up our slider so we can manipulate this filter.
var slider = document.getElementById("slider");

var freqDisplay = document.getElementById("freq-display");
// Cross-browser event handler

if (slider.addEventListener) {
  slider.addEventListener("change", onChange);
} else {
  slider.attachEvent("onchange", onChange);
}
function onChange () {

// Update the filter node's frequency value with the slider value

  filter.frequency.value = slider.value;
  freqDisplay.innerHTML = slider.value;
}
With our slider able to control our filter node's frequency, we can manipulate our audio playback in real time. To get a better look at the data being passed around, we can visualise the frequency data of the signal. While our filter node actually modified the sound coming out of our speakers, we'll use two new nodes to analyse the signal rather than affecting it. Let's create an AnalyserNode and a ScriptProcessorNode:
var analyser = ctx.createAnalyser();

var proc = ctx.createScriptProcessor(1024, 1, 1);
The createScriptProcessor (formerly createJavaScriptNode) method takes three arguments. The first is the buffer size, which must be a power of 2, and the number of inputs and outputs are the remaining arguments accordingly. With a processor node, we can schedule an event to be fired when enough audio is processed. If our buffer size is 1024, that means every time 1024 samples are processed, our event will fire.
Our AudioContext sample rate is 44100Hz (44100 samples to process per second) and our event will fire every 1024 samples – every .023 seconds, or 43 times a second. Keeping this simple, our processor node enables us to hook into a callback when new audio data is processed. We'll use this to draw to a canvas shortly.
Using our script processor as a callback hook, we need our AnalyserNode to get the data. But our audio signal has to pass through both analyser and processor: let's alter our routing and send our filtered signal's output into the analyser, then the analyser connect to our audio destination and script processor:
elSource.connect(filter);
filter.connect(analyser);
analyser.connect(proc);
filter.connect(ctx.destination);
proc.connect(ctx.destination);
A WebKit bug means we must connect the processor's output back into the destination to receive audio processing events, which we will use in a moment.
Frequency control
Now our audio routing is set up, let's hook into that processing event I mentioned earlier. We can assign a function to a ScriptProcessorNode’s onaudioprocess property to be called when our buffer is full of processed samples, and use our AnalyserNode's ability to get the signal's raw frequency data.
The analyser's getByteFrequencyData populates an Uint8Array with the current buffer's audio data, in this case, as values between 0 and 255. We reuse the same array on every call so we don't need to keep creating new arrays.
// Make the Uint8Array have the same size as the analyser's bin count

var data = new Uint8Array(analyser.frequencyBinCount);
proc.onaudioprocess = onProcess;
function onProcess () {
  analyser.getByteFrequencyData(data);
  console.log(data[10]);
}
Presently we're just printing out the tenth element of the audio data on every process (not very interesting) but we can see our processor event being fired with our analyser interpreting the data being passed through it. This would be way more exciting to draw to a canvas. Add a <canvas> element with an id of "canvas", width of 1024 and height of 256 – let's look at the drawing code we'll add to our onProcess function.
var canvas = document.getElementById('canvas');
var canvasCtx = canvas.getContext('2d');

function onProcess () {
  analyser.getByteFrequencyData(data);
  canvasCtx.clearRect(0, 0, canvas.width, canvas.height);
  for (var i = 0, l = data.length; i < l; i++) {
     canvasCtx.fillRect(i, -(canvas.height/255) * data[i], 1, canvas.height);
  }
}
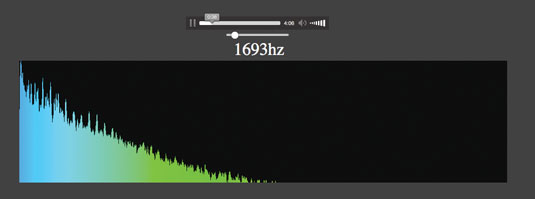
Now an event is called whenever an audio buffer is processed, thanks to our processor node, as our analyser node populates an Uint8Array with audio data, and we clear the canvas and render the new data to it in the form of frequency bins, each representing a frequency range. As we scrub our filter controls back and forth, we can see in the canvas that we're removing high frequencies as we move our slider left.
We can see that once we connect audio nodes, we can manipulate sounds we hear and visualise the audio data. This example uses a simple biquad filter node, but there are convolvors, gains, delays and other ways to alter audio data for musicians, game developers or synthesizer enthusiasts. Get creative and play with the Web Audio API, as the lines blur between audio engineers and web developers.
Words: Jordan Santell
This article originally appeared in net magazine issue 254.

Thank you for reading 5 articles this month* Join now for unlimited access
Enjoy your first month for just £1 / $1 / €1
*Read 5 free articles per month without a subscription

Join now for unlimited access
Try first month for just £1 / $1 / €1

The Creative Bloq team is made up of a group of art and design enthusiasts, and has changed and evolved since Creative Bloq began back in 2012. The current website team consists of eight full-time members of staff: Editor Georgia Coggan, Deputy Editor Rosie Hilder, Ecommerce Editor Beren Neale, Senior News Editor Daniel Piper, Editor, Digital Art and 3D Ian Dean, Tech Reviews Editor Erlingur Einarsson, Ecommerce Writer Beth Nicholls and Staff Writer Natalie Fear, as well as a roster of freelancers from around the world. The ImagineFX magazine team also pitch in, ensuring that content from leading digital art publication ImagineFX is represented on Creative Bloq.
