Get started with Pixi.js
Mat Groves explains how to use 2D renderer Pixi.js to seamlessly deliver interactive content across different devices and browsers.

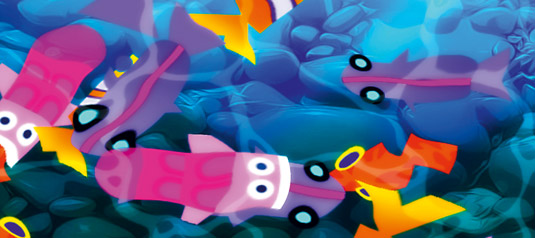
Pixi.js is a 2D renderer. In a world gone mad on 3D we're going all flat, but not because we're anti-3D; we love those little triangles! The aim of this project is to provide a fast, lightweight 2D library that works across all devices, both mobile and desktop. The Pixi.js renderer allows everyone to enjoy the power of hardware acceleration without prior knowledge of WebGL.
Why use it?
The main reason for using Pixi.js is therefore as a means of delivering awesome, interactive content that can reach as many devices and browsers as physically possible. Right now, the browser landscape is a world of fragmentation so Pixi.js is intended as a handy tool to have in your back pocket to help reach them all, and make them all play nice!
To get started, download the source files here. Open up the index.html file and you'll see that the basic HTML is set up for you, including the all important importing of Pixi.js:
<!DOCTYPE HTML>
<html>
<head>
     <title>My Pixi.js Koi Fish Pond</title>
     <style>
          body {
                margin: 0;
                padding: 0;
                background-color: #000000;
            }
            .rendererView {
                   position: absolute;
                   display: block;
                   width: 100%;
                   height: 100%;
	     }

     </style>
     <script src="js/pixi.js"></script>
</head>
<body>
     <script>
          // Code goes here
     </script>
</body>
</html>
First, we'll need to create an instance of a Pixi.js renderer. Pixi.js has two renderer flavours: WebGL and Canvas. The best way to create a renderer is to use the autoDetectRenderer function. Pixi.js will perform an internal check and make sure to return a renderer most suitable to the user's browser:
var viewWidth = 630;
var viewHeight = 410;
var renderer = PIXI.autoDetectRenderer(viewWidth, viewHeight);
renderer.view.className = "rendererView";
Now we have a renderer, we add its view to the DOM:
document.body.appendChild(renderer.view);It’s time to create a Pixi Stage element. Much like Flash, the Stage element is the root display object where all visual elements will be added. The only parameter for creating a stage is its background colour. Let's use white!
var stage = new PIXI.Stage(0xFFFFFF);To add some visuals to our new stage, we need a Texture and a Sprite. A Texture stores the information that represents an image. It cannot be added to the display list directly and so has to be mapped onto a Sprite. Texture.fromImage tells Pixi.js to create a new
Texture based on the image path provided, which can be reused for multiple Sprites. Now we create a Sprite that will use it:
Get the Creative Bloq Newsletter
Daily design news, reviews, how-tos and more, as picked by the editors.
var pondFloorTexture = PIXI.Texture.fromImage("img/ pondFloor.jpg");
var pondFloorSprite = new PIXI.Sprite(pondFloorTexture);
Once a Sprite has been created, for it to be rendered, it must be added to the Stage display list:
stage.addChild(pondFloorSprite);Done! If you were to render the stage now you would see a nice image of a rockpool floor on your screen. If you come from the Flash side of the world then you will know where Pixi.js gets a lot of its terminology. Now we have a rockpool, we need to create 20 swimming fish and add them to the stage:
// set how many fish we would like to add
var totalFish = 20;
// create an array to store a reference to the fish in the pond
var fishArray = [];
for (var i = 0; i < totalFish; i++)
{
// generate a fish id betwen 0 and 3 using the modulo operator
     var fishId = i % 4;
     fishId += 1;
     // generate an image name based on the fish id
     var imagePath = "img/fish"+fishId+". png";
// create a new Texture that uses the image name that we just generated as its source
     var fishTexture = PIXI.Texture.fromImage(imagePath);
     // create a sprite that uses our new sprite texture
     var fish = new PIXI.Sprite(fishTexture);
     // set the anchor point so the fish texture is centred on the sprite
     fish.anchor.x = fish.anchor.y = 0.5;
     // set a random scale for the fish - no point them all being the same size!
     fish.scale.x = fish.scale.y = 0.8 + Math.random() * 0.3;
// finally let’s set the fish to be a random position..
    fish.position.x = Math.random() * viewWidth; fish.position.y = Math.random() * viewHeight;
    // time to add the fish to the pond container!
    stage.addChild(fish);
We created more sprites and modified the sprite properties. Every Pixi.js sprite has a position, scale and rotation property which you can modify to move them around. We now need to add a few extra properties to make the little guys swim around:
// create a random direction in radians. This is a number between 0 and PI*2 which is the equivalent of 0 - 360 degrees
     fish.direction = Math.random() * Math.PI * 2;
     // this number will be used to modify the direction of the fish over time
     fish.turningSpeed = Math.random() - 0.8;
     // create a random speed for the fish between 0 - 2
     fish.speed = 2 + Math.random() * 2;
     // finally we push the fish into the fishArray so it it can be easily accessed later
     fishArray.push(fish);
}
Let's create a bounding box for the fish. We'll use this to ensure, when the fish swim out of the bounds, they wrap around the scene. The padding ensures the fish are off screen before it wraps to avoid any 'popping'.
// create a bounding box for the little fish
var fishBoundsPadding = 100;
var fishBounds = new PIXI.Rectangle(-fishBoundsPadding,
                     -fishBoundsPadding,
                     viewWidth + fishBoundsPadding * 2,
                     viewHeight + fishBoundsPadding * 2);
The waves are created using another Pixi.js object called a TilingSprite. Using this, we can scroll the waves over the pond to give a nice water effect. We create a new texture and create a new tiling sprite:
var waveTexture = PIXI.Texture.fromImage("img/waves. png");
var wavesTilingSprite = new PIXI.TilingSprite(waveTexture, viewWidth, viewHeight);
wavesTilingSprite.alpha = 0.2;
stage.addChild(wavesTilingSprite);
We then set the alpha of the object. This is a Pixi.js property that sets how opaque a display object is. Now add our new waveSprite to the stage. Only one more thing to set up now! The displacement filter will create the real time wobbly water effect. (Note: this is a WebGL-only feature.)
// create a new wave texture to add over the fish
var waveDisplacementTexture = PIXI.Texture. fromImage("img/displacementMap.jpg”);
var displacementFilter = new PIXI.DisplacementFilter(wave DisplacementTexture);
// configure the displacement filter..
displacementFilter.scale.x = 50;
displacementFilter.scale.y =
50;
// apply the filters to the stage
stage.filters = [displacementFilter];
It's time to create the update loop to run each frame and update the position of the fish, water and displacement. Use the requestAnimationFrame, like so:
var tick = 0;
requestAnimationFrame(animate);
function animate()
{
We loop through the fish array and update the position of the fish based on speed and direction. The fish are wrapped as they reach the edge of the screen.
// iterate through the fish and update the position
     for (var i = 0; i < fishArray.length; i++)
     {
          var fish = fishArray[i];
          fish.direction += fish.turningSpeed * 0.01;
          fish.position.x += Math.sin(fish.direction) * fish.speed;
          fish.position.y += Math.cos(fish.direction) * fish.speed;
          fish.rotation = -fish.direction - Math.PI/2;
          // wrap the fish by testing there bounds..
          if(fish.position.x < fishBounds.x)fish.position.x += fishBounds.width;
          else if(fish.position.x > fishBounds.x + fishBounds. width)fish.position.x -= fishBounds.width
          if(fish.position.y < fishBounds.y)fish.position.y += fishBounds.height;
          else if(fish.position.y > fishBounds.y + fishBounds. height)fish.position.y -= fishBounds.height
      }
Let's update the tiling water texture. A TilingTexture has an extra property called tilePosition that controls the offset of the texture as it tiles. Increasing this on each frame will give the illusion of the water moving:
// increment the ticker
     tick += 0.1;
     // scroll the wave sprite
wavesTilingSprite.tilePosition.x = wavesTilingSprite. tilePosition.y = tick * -10
We also need to update the displacement map offset. Moving this each frame will scroll the displacement map giving the lovely illusion of rippling water.
// update the displacement filter by moving the offset of the filter
     displacementFilter.offset.x = displacementFilter.offset.y =tick*10
We need to render the scene using our renderer. Calling this function will draw all of the contents of the stage to the renderer's view that we attached to the stage. Once the scene has been rendered we
requestAnimationFrame again. This creates a loop of constant updating and rendering:
// time to render the state!
renderer.render(stage);
// request another animation frame
requestAnimationFrame( animate );
}
Done! Don’t be 'koi', load it up and try it out.
Words: Mat Groves
Creative technologist and co-founder of Goodboy Digital, Mat Groves specialises in JavaScript, visual coding and games programming. This article originally appeared in net magazine issue 253.

Thank you for reading 5 articles this month* Join now for unlimited access
Enjoy your first month for just £1 / $1 / €1
*Read 5 free articles per month without a subscription

Join now for unlimited access
Try first month for just £1 / $1 / €1

The Creative Bloq team is made up of a group of art and design enthusiasts, and has changed and evolved since Creative Bloq began back in 2012. The current website team consists of eight full-time members of staff: Editor Georgia Coggan, Deputy Editor Rosie Hilder, Ecommerce Editor Beren Neale, Senior News Editor Daniel Piper, Editor, Digital Art and 3D Ian Dean, Tech Reviews Editor Erlingur Einarsson, Ecommerce Writer Beth Nicholls and Staff Writer Natalie Fear, as well as a roster of freelancers from around the world. The ImagineFX magazine team also pitch in, ensuring that content from leading digital art publication ImagineFX is represented on Creative Bloq.
