Build an ecommerce store with LemonStand (part 1)
Freelance developer Phil Schalm talks us through the installation and setup of new PHP ecommerce platform LemonStand and explains the basics of building a theme
A new ecommerce platform produced by the minds at Limewheel Creative, LemonStand has been developed with a focus on stability and performance, but also with the goal of being easy to use. It’s described as “Easy to use for everyone. Powerful API for developers. Simple template system for web designers. Everything that you’re looking for.” And, for all intents and purposes, it delivers what it promises.
This tutorial will guide you through the installation and templating of a LemonStand store. Configuration and product setup will be touched on briefly. Ready? Let’s get to it!
Overview of features
Exceptional templating system
Although extremely powerful, LemonStand’s templating system makes it easy for developers and designers alike to create functional and beautiful stores without getting lost in a mess of code and files. This includes a very easy to customise checkout system. You can either stay with the default (which is great to begin with) or customise the checkout so it works exactly as you expect.
Simple updates
If you’ve ever developed a web store with another ecommerce platform, you'll know that updates are often a nightmare. Some platforms require you to manually update dozens of files, while other solutions don’t work correctly or break your template files, leaving you with a huge mess to clean up. The LemonStand developers have planned out their code and this can be seen in the update system. Updating LemonStand is as simple as clicking the “click here” notification displayed by LemonStand and letting it do its thing. No mangled templates, no manual updating of files, no broken features – it just works.
Easy content management
LemonStand allows you to easily set up and maintain static pages in tandem with the dynamic pages for things such as Products and Categories. A developer can quickly set up additional content blocks for specific sections such as sidebars and pullouts. A simple blog module is also included. While this does not include all the features of a fully-fledged blogging platform such as WordPress or Movable Type, it’s more than sufficient for nearly all ecommerce sites.
Easy product management
LemonStand’s product management is just as simple as its content management, but it doesn’t sacrifice power or flexibility for this simplicity. You can easily set up products, categories and groupings, or import them all via a simple drag-and-drop CSV import tool. Advanced features such as tiered pricing, grouped products, product attributes, and related products are all built in.
Reporting
Reporting is built into LemonStand, and an option to tie in your existing Google Analytics account is also included. The reporting allows you to track a massive amount of data over various time intervals and filter those by things such as customer groupings, addresses, and more.
Daily design news, reviews, how-tos and more, as picked by the editors.
Powerful discount engine
LemonStand’s powerful ‘Discount’ and ‘Catalog Price Rule’ features enable you to easily set up discounts and marketing promotions.
Simple module system
LemonStand uses an event-based system for allowing developers the ability to extend the built-in functionality. While an event-based system is ultimately less powerful than a true extension-based system such as is used in Magento, it's also much, much simpler. A simple module that extends the products to include an additional field requires only three files and less than 50 lines of code. Modules in LemonStand are also contained within a single directory, making development, deployment and updating custom modules a breeze.
Security
To help ensure your and your customer’s data is kept safe and confidential, LemonStand has been developed from the ground up with certifications such as PCI DSS in mind. It includes features such as built-in encryption of sensitive data and a payment mechanism that separates payment data from all other purchase data in order to better guarantee compliance with regulations. As well, no payment data is stored in the database to further ensure a user’s compliance with certification procedures.
Pricing
LemonStand is priced at $300 for a commercial licence, which includes three support tickets for timely support from the developers. A development licence is also available for those who aren’t sure if they wish to take the plunge. The only difference between the commercial and development version is that the order module is encrypted (via either IonCube Loader or Zend Guard) and the store is limited to a maximum of 10 orders. Support from the community and developers (when time allows) is also available via the forums.
Server requirements
- Apache Web Server
- PHP 5.2 or higher
- PHP CURL library
- PHP OpenSSL library
- PHP Mcrypt library
- PHP MySQL functions
- PHP Multibyte String functions
- Permissions for PHP to write to the installation directory
- Safe Mode is disabled
- Short PHP tags are allowed
If you’re unsure whether your server meets any of these requirements, the LemonStand team has put together a tool to check your server and see if it meets the requirements. Once your server meets all the requirements, let’s move on to installation!
Installation
This tutorial assumes that you’ve done the basics of getting Apache and MySQL set up (if you’re working locally) or you have a hosting account somewhere. In either case, you’ll need somewhere to put the files and your MySQL connection info. You can download the Lemosntand installer from your account page. Extract the files, and upload them to your web hosting or move them to the local directory you’re hosting from. Once that’s done, go to http://myLemonStandsetup.com/install.php and follow the on-screen instructions. There are a few things to note:
- You will probably want to check the ‘Delete all installation-related files after the installation is complete’ as leaving those files could pose a security risk.
- At one point you will be asked for a ‘Administration Area URL key’ and ‘Configuration Tool URL key’. Make sure to take note of both of these (they can be changed after installation).
- You will be asked if you want to import the ‘Demo Theme’. It’s a lovely theme, but for the purposes of this tutorial, please refrain from doing so.
- At the ‘Configuration Tool Account’ step, they really mean it when they say that “There is no password restore feature for the LemonStand Configuration Tool”. Make absolutely sure you have these recorded somewhere securely.
- At the “Encryption Key” step the same rule applies. If the crap really hits the fan, you will need this key and may not be able to recover it.
After everything’s done, when you go to the homepage of your LemonStand installation, you should be looking at a screen something like this:

If you are now facing an “Error 500” screen instead, try following these troubleshooting instructions.
Once the installation has been completed, double-check to make sure that the installation files were successfully removed, as their file permissions may have prevented them from being deleted.
For more information on the installation process (including notes on the command-line installation tool) see the full documentation.
Now that you’ve completed the installation process, let’s get to the fun stuff!
Before we can begin theming, a few setup items
The backend
Begin by navigating to your LemonStand administration URL (by default, http://yoursite.com/backdoor). You’ll be presented with the Dashboard, where you should see a notice indicating that the system needs some configuration, a “Visitors” chart, and some basic stats at the bottom. If you’re using the developer’s edition, you should also see a notice regarding that.
Please note, if you’re using the developer’s edition of LemonStand and the “Recent Orders” list looks really odd, you probably have your IonCube or ZendGuard encoder incorrectly set up. None of this matters right now, though (well, unless you’re having issues with the “Recent Orders” list).
In the top left you’ll see the Dashboard menu. You can click on that to gain access to everything that LemonStand offers. However, let’s start by getting the shipping configuration out of the way so that message goes away.
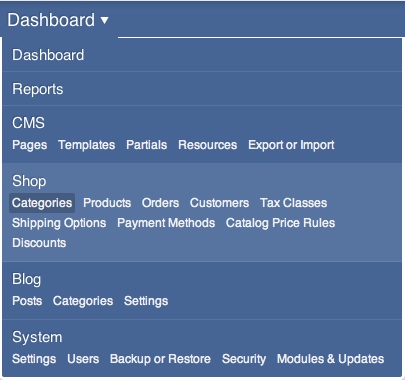
Shipping configuration
Click on the link in the “System Configuration Tips” notice to set up the basic shipping settings. Pick your location of origin and set up your weight and length units, then click “Save” at the bottom.
Now that we’ve got that out of the way, let’s set up some basic product information. We’ll start by adding some Categories, because you need at least one before you can add a Product. Select “Categories” under “Shop” from the main menu.
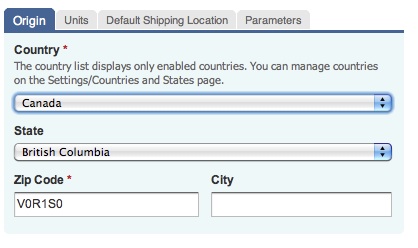
Categories and products
Once you’re on the main Categories page, click “Add category” to bring up a new Category form. There’s a fair number of fields and options here but the only one that really matters is “Name”. “But wait!” you cry. “What sort of shop are we going to build? How am I supposed to pick a category name if I don’t even know what you’re selling?” Well, our venerable English template builder, Nick Toye, decided that we shall be building a site selling Canadian beer (possibly because he’s having difficulty getting some of his favourites across the pond).
To that end, let’s enter “Pale Ale” as our category name. You’ll see that LemonStand automatically fills out “pale-ale” as our URL name, which is just fine. Click “Create” to add our new category to the system.
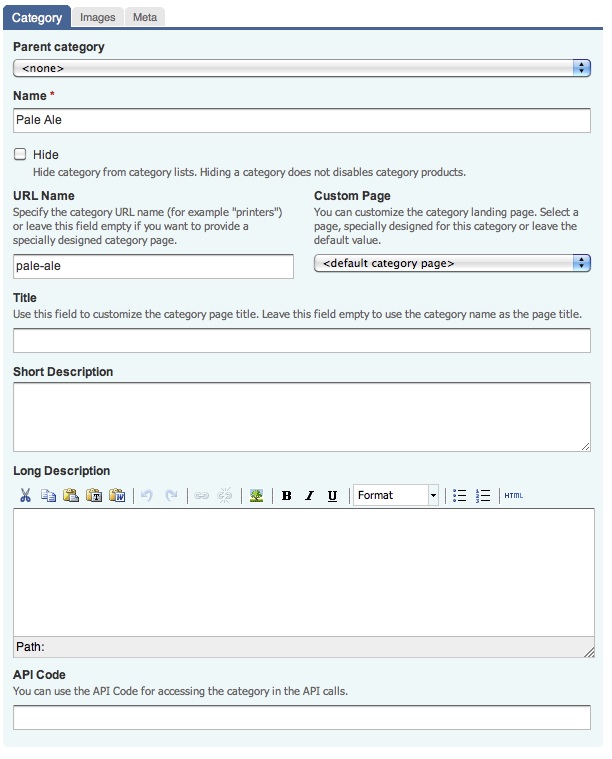
Now that we’ve added a Category, let’s go in and add a product. Select “Products” from the main menu, then click “Add Product”. Up comes a form similar to the Add Category form, but with a few (okay, a lot) more options. I’m not going to touch on all of these as our focus is on getting to the theming, but let's do a rundown of the various tabs so you have a general overview.
- Product - All the basic product information.
- Pricing - Set up the product’s pricing (including tiered pricing), tax class, and base cost (for reporting purposes).
- Images - Upload images related to this product.
- Shipping - Information about the product so shipping costs can be determined. This tab only shows up if “Goods” is selected as the “Product Type” on the main Product tab.
- Files - Upload files contained by this product. This tab only shows up if “Downloadable” is selected as the “Product Type” on the main Product tab.
- Inventory - All your options for inventory tracking, such as out of stock notifications, backorder configuration, etc.
- Categories - Self-explanatory.
- Meta - Description/Keyword meta tag information.
- Grouped - Here you can group other products with this product. You’d use this if you have a base product and other related models (that don’t really stand on their own).
- Options - Options are things such as colours or styles that don’t affect the product price but can be configured by the customer.
- Extras - Extras are things such as sizes or add-ons that affect the product price and are selectable by the customer.
- Attributes - Attributes could be specified in the description, but they’ve been separated for ease-of-use. You can also save and load attributes sets if you wish to share the attributes among many products.
- Related - Selected related products for cross and up selling.
- Visibility - You can limit products to be only visible to various customer groups, if necessary.
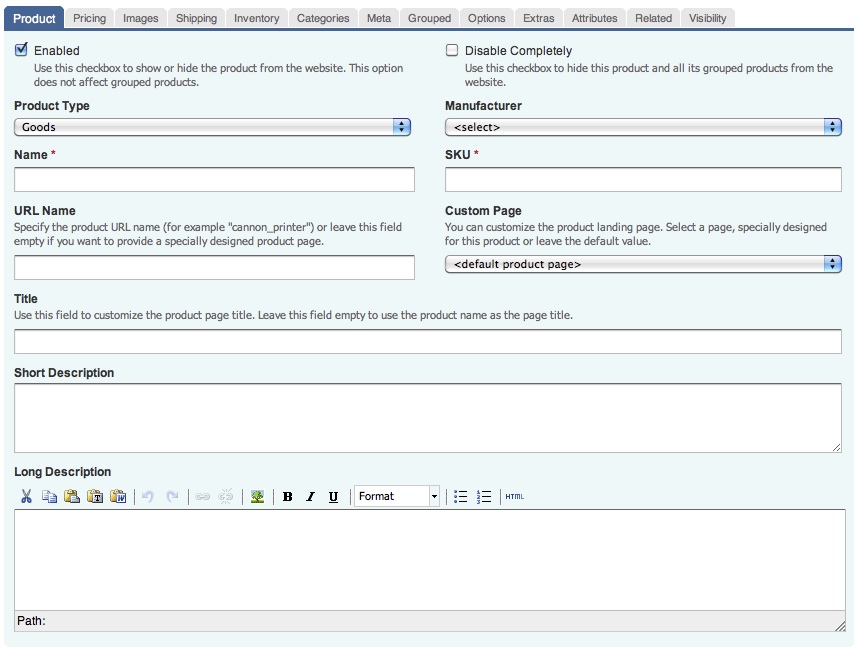
For now we just need the basics. Let’s give our new product a name, say “Edomonton Ale” and a SKU# – let’s use ED-ALE. In order to save our product, we need to specify two more things.
Select the “Pricing” tab and enter a price. I’m going to use $10.00 because I like simple numbers. We also need to specify a Category, so select the “Categories” tab and check off “Pale Ale”. Once that’s all done, click “Create”. Voila! You can now sell products on your website! Hmm, maybe not quite yet, there’s still a few things missing.
Shipping and payments
Unfortunately, while our store has a saleable product in it, we have no way of shipping that product to someone. What’s even worse is that there’s no way for them to pay for it, either! Let’s rectify those issues right now. Select “Shipping Options” from the menu bar, then click “Add shipping option”.
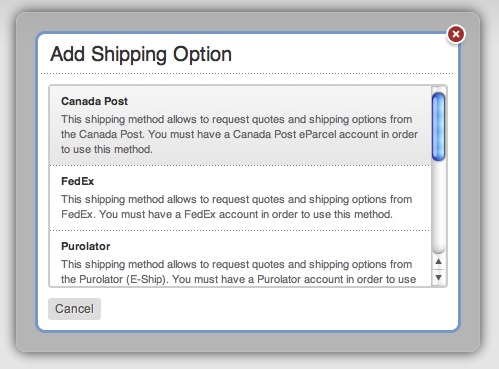
You’ll see a list of shipping options you can configure. Right now the list is a little North American-centric, but new shipping modules are being added on a regular basis, and if you really need a custom module created, it’s not difficult to create it yourself or find someone who can do it for you. Because our margins on the beer are so high we’re just going to offer free shipping, so pick “Table Rate” from the list.
A form not unlike the Category and Product forms shows up (are you seeing a trend here?). Feel free to investigate the options while I sample the product. Now that you’re done investigating, give it a name – I picked “Local Pickup” – and we’ll need to add one rate to the table. Pick the “Rates” tab, and you’ll see something like the following:
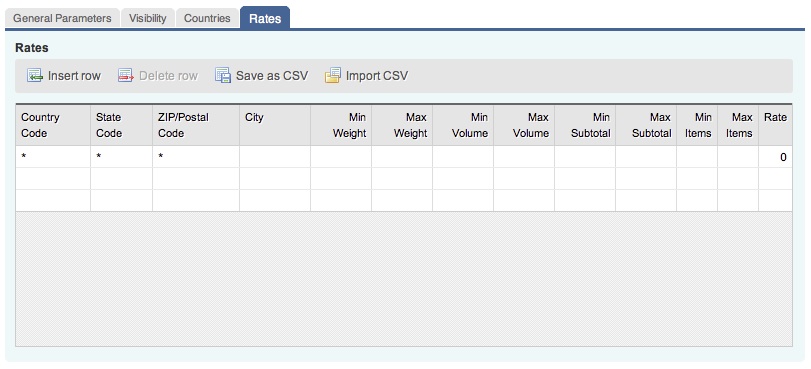
The Table Rate allows nearly unlimited flexibility in setting up rates for a custom shipping set up, but for our purposes we just want to make things free. For that, set up the row as follows:

Then click ‘Create’. Now that you’ve set up shipping, we also need to offer some way for customers to pay. Click on ‘Payment Methods’ in the menu, then ‘Add payment method’. Much like the Shipping Methods, you’ll see a list of valid payment methods pop up. All the major ways to pay are supported, with more on roadmap to be added and, much like the shipping methods, they’re fairly easy to create if you need to create one yourself. Our beer store is only going to accept cash, so just pick ‘Custom Payment Method’ for now.
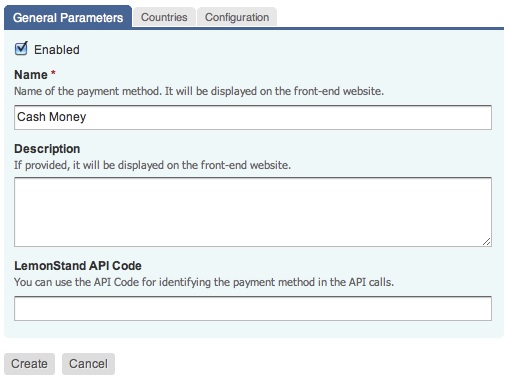
For the default set up all we need to fill out is the “Name” field, but feel free to take a look at the other tabs. Once you’re done, click “Create”.
Basic setup complete
At this point, if you had imported the demo theme, you would now be able to add some “Edmonton Ale” to your cart and run the checkout process all the way through. So, now that the basics are set up let’s get building!
Building the theme
The basics
When we have completed our online store, it’s going to look something like this:
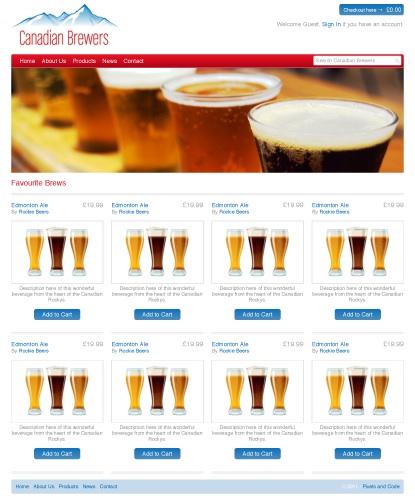
But first, let’s go over how the templating system works. By default, LemonStand stores everything in the database and you merely edit them via the built-in code editor. However, for those who have a favourite text editor they’d rather use, LemonStand offers the option to read the theme from the file system. All of this can be set up under System > Settings > CMS Settings. If you’d like to do that, feel free to do so now. For the purposes of this tutorial, though, I’m just going to use the built-in editor.
LemonStand doesn’t use a special templating language, XML files, or anything else like that for theming purposes. It keeps your life simple by using PHP for the code tags and plain HTML for everything else.
There are four main parts when constructing a theme for LemonStand: Templates, Pages, Partials and Resources, and of these the only thing you absolutely need to build a store are Pages (but you’d be duplicating a lot of code if you did that).
Pages
Pages are the go-to point for LemonStand when a request comes in, because they are the only piece with an URL assigned to them. When a request is received, LemonStand looks for the page with the closest matching URL. For example, if the URL was /product/edmonton-ale LemonStand would first look for a Page with the URL of /product/edmonton-ale, then /product. Each page can specify a Template to be used when viewing that Page. Pages can also have an “action” assigned to them. This is a block of PHP code that will run before the Page content is output and does things such as setting up variables and running checkout code. By default, LemonStand includes a whole host of actions and for most cases you’ll never need to use anything beyond the ones already built-in.
Templates
Templates “wrap” Page content. When a URL is requested, LemonStand finds the Page, then finds the Template associated with that Page (if you specified one). It renders the Page first, then renders the Template and inserts the Page’s content where you specify with a special PHP call.
Partials
Partials are the basic building blocks of LemonStand. They are small (or large) chunks of code that you can re-use throughout your site. LemonStand also has the ability to directly update portions of your page by mapping HTML id attributes to Partial names when making AJAX calls. We’ll touch more on that later, though.
Resources
Resources are all the non-HTML content of your site such as CSS, JavaScript, and image files. They can be stored wherever you’d like, but if you want the ability to manage them through LemonStand (say you’re on the fly and don’t have access to an FTP program) or package them with your theme, you’ll want to store them inside the /resources directory - or just upload them using LemonStand’s built in management tool.
The First Page
Now that you have a basic overview of how things tie together, let’s start building! We’ll begin by adding a Template, so go “Templates” in the main menu, and click the “Add template” button. I called it “Main Template” and here’s what I used as the HTML code to start with:
<title>Lemonstand Theme - Home Page</title> <meta name="description" content=""> <meta name="author" content="LemonStand Tutorial"> <link rel="stylesheet" href="css/boilerplate.css"> <link rel="stylesheet" href="css/960.css"> <link rel="stylesheet" href="css/screen.css"> <!--[if lt IE 9]> <script src="//html5shim.googlecode.com/svn/trunk/html5.js"></script> <![endif]--></head><body> <div id="container" class="container_12 clearfix"> <header class="grid_12"> <div id="logo"><a href="/">Home Page</a></div> <div class="mini_cart" id="mini_cart"><a href="#" class="btn checkout">Checkout here →</a> <span class="bag"><a href="#">$0.00</a></span></div> <nav id="main_nav"> <ul> <li class="active"><a href="/">Home</a></li> <li><a href="#">About Us</a></li> <li><a href="#">Products</a></li> <li><a href="#">News</a></li> <li><a href="#">Contact</a></li> </ul> <form method="post" action=""> <label for="search">Search</label> <input type="text" name="search" placeholder="Search Canadian Brewers"> </form> </nav> </header> <footer class="grid_12"> <nav id="footer_nav"> <ul class="clearfix"> <li class="active"><a href="/">Home</a></li> <li><a href="#">About Us</a></li> <li><a href="#">Products</a></li> <li><a href="#">News</a></li> <li><a href="#">Contact</a></li> </ul> </nav> <p class="copyright">© 2011 - <a href="http://www.pixelsandcode.co.uk">Pixels and Code</a></p> </footer> </div> <!-- end of #container --></body></html>Once that’s in the editor, press “Save”. Now, if you’re like me, you probably saved the Template then immediately refreshed the homepage to see what would happen. Unfortunately, we’re still missing a few things before this Template is doing its job correctly. The first thing we need to do is tell the Template where it should be rendering the content. Add the following code between the closing </header> and opening <footer> tags:
<? $this->render_page() ?>However, don’t go refreshing the homepage yet! We have one more step before things start to show up – we need to tell our Page to use the Template.
Big plate, small plate, salad plate, template
By default, LemonStand creates two pages when you don’t import any other themes – the home page and a 404 page. Let’s start by editing the homepage, so select “Pages” from the main menu and click on home page in the list. It probably has a title of something like “Welcome to the LemonStand eCommerce system!” and should have a URL of “/”. Once the form is up, let’s change a few things.
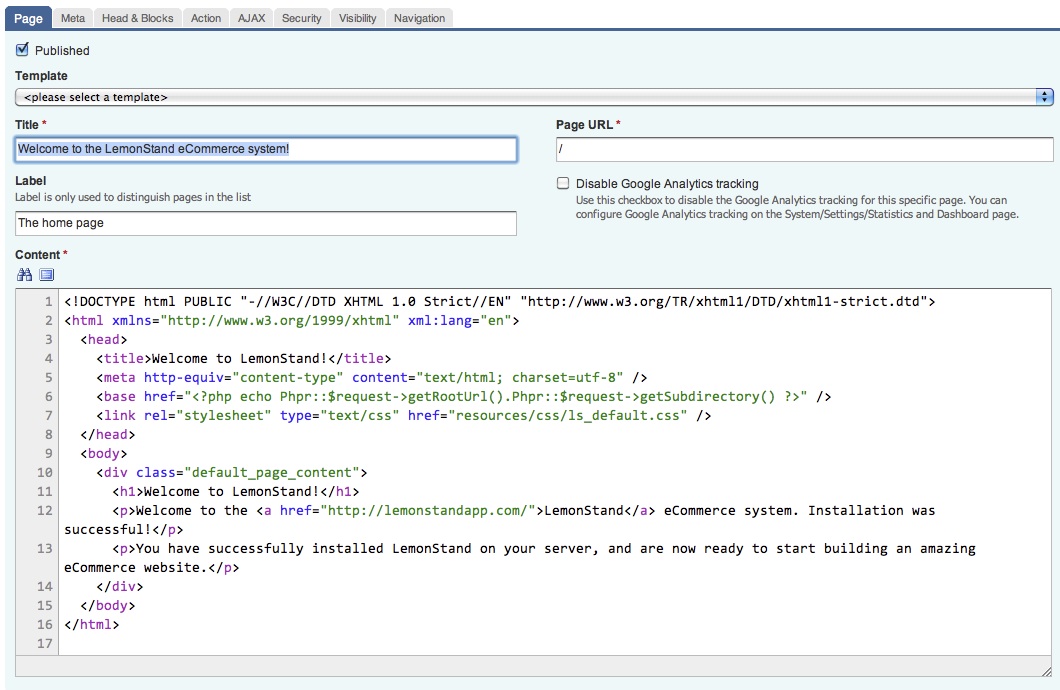
Select the brand new Template from the drop-down. Astute readers will probably notice that we’ll want to change something else. The Page content currently contains a bunch of markup we no longer need. Let’s strip out everything until we’re left with just the following:
<h1>Welcome to LemonStand!</h1><p>Welcome to the <a href="http://lemonstandapp.com/">LemonStand</a> eCommerce system. Installation was successful!</p><p>You have successfully installed LemonStand on your server, and are now ready to start building an amazing eCommerce website.</p>Now click “Save” and let’s go take a look! Load up your LemonStand homepage and take a look. Doesn’t it look wonderful?
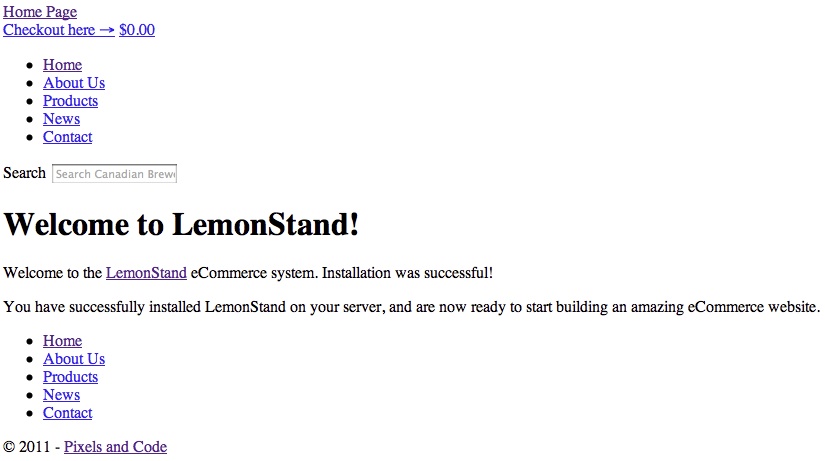
It may not look like much right now, but that’s pretty easy to solve. We just need to set up the Template to properly reference our CSS files and things should look way nicer. Let’s head to “Resources” under the main menu to do that.
The “ooh shiny” bits

As you can see, the Resources sections gives you a basic interface to use for uploading files and other basic file management tasks. Right now there’s a file in the “css” directory and one in the “images” directory, so go through and delete those. Once that’s done, I will upload my CSS and images files. To make your life easier, though, I’ve created a resource archive that you can import using LemonStand. Download the resource archive (see link above) somewhere you will remember. Once you’ve done that, go to “Export or Import” on the menu, then click the “Import pages, partials and templates” button. Select the file you just downloaded, click “Import” and you should be all set! The summary page should indicate that you imported seven files. If there are any issues with the LemonStand archive (I tested it, I swear!) please contact me and I will see about fixing things.
Now that we’ve got our CSS and images in LemonStand’s layout structure, we’ll need to tweak the template a bit so that it can find them, so let’s go back to “Templates” on the menu and pick the one we created earlier from the lst.
Inside the <head> tag you should see the following code:
<link rel="stylesheet" href="css/boilerplate.css"><link rel="stylesheet" href="css/960.css"><link rel="stylesheet" href="css/screen.css">That’s where we need to make some changes. There’s three different ways we could update this so it would work:
- Make the paths begin with “/resources/” so they’re referencing the correct directory (good)
- Use LemonStand’s root_url() function to make sure the correct path is referenced even if this LemonStand installation is moved (better)
- Use LemonStand’s css_combine() function to compress and cache our CSS on the fly so things will be faster for the end user (best!)
Because the final option is the best one, let’s go ahead and do that. To use css_combine you simple pass in an array of URLs to the function and it will work all its magic behind the scenes. Let’s change that previous code to the following:
<?= $this->css_combine(array('/resources/css/boilerplate.css', '/resources/css/960.css', '/resources/css/screen.css')) ?>Save the Template, then take a look at your LemonStand homepage. It should now look something like this:

Now we’re getting somewhere!
And on, and on, and on, and on, and on … (stop repeating yourself)
A few people may have noticed that our template includes both a header and footer nav that are completely identical. While in some stores you may want to have different navigation sections, we’re only using one here so let’s stop repeating ourselves and make a Partial for the nav. Go to “Partials” in the menu and click on “Add Partial”. Partials are about the simplest thing you can have in LemonStand. They have a Name, Description, and Code. The “Name” field is only allowed to contain “latin characters, numbers, colons and underscores” (yes, I took that right from the error message) so we’ll call it “html:navigation”. A general convention used for naming Partials is {general category}:{specific name}, so you’ll often see things such as “html:header” and “shop:product_list”. You can also add a description (I used “Navigation Partial”) and for the “HTML Code” field use the following:
<ul class="clearfix"> <li class="active"><a href="/">Home</a></li> <li><a href="#">About Us</a></li> <li><a href="#">Products</a></li> <li><a href="#">News</a></li> <li><a href="#">Contact</a></li></ul>Once everything looks good, click “Create and Close” to save it and bring us back to the list of Partials. Now we need to add it to our template, so bring up the Template that you created earlier. Find the first nav menu (it should be around line 24 or so) and delete the whole <ul>...</ul> bit. You’re going to replace it with the following code:
<? $this->render_partial('html:navigation') ?>This will grab that navigation partial we just created and pull it into the Template. Partials can be nested in partials, too, leading to a very simple but powerful system of putting together your site. Now that you’ve fixed the top navigation, do the same thing to the bottom navigation section.
The <body> section of your Template should now look something like this:
<body> <div id="container" class="container_12 clearfix"> <header class="grid_12"> <div id="logo"><a href="/">Home Page</a></div> <div class="mini_cart" id="mini_cart"><a href="#" class="btn checkout">Checkout here →</a> <span class="bag"><a href="#">$0.00</a></span></div> <nav id="main_nav"> <? $this->render_partial('html:navigation') ?> <form method="post" action=""> <label for="search">Search</label> <input type="text" name="search" placeholder="Search Canadian Brewers"> </form> </nav> </header> <? $this->render_page() ?> <footer class="grid_12"> <nav id="footer_nav"> <? $this->render_partial('html:navigation') ?> </nav> <p class="copyright">© 2011 - <a href="http://www.pixelsandcode.co.uk">Pixels and Code</a></p> </footer> </div> <!-- end of #container --></body>Now that you’ve got the basics of theming LemonStand, the next part of this tutorial will take you through setting up the rest of the content sections of the store - all the stuff that’s needed, like a Product page and how to set up a list of products.
Don't miss part 2 next week!

The Creative Bloq team is made up of a group of art and design enthusiasts, and has changed and evolved since Creative Bloq began back in 2012. The current website team consists of eight full-time members of staff: Editor Georgia Coggan, Deputy Editor Rosie Hilder, Ecommerce Editor Beren Neale, Senior News Editor Daniel Piper, Editor, Digital Art and 3D Ian Dean, Tech Reviews Editor Erlingur Einarsson, Ecommerce Writer Beth Nicholls and Staff Writer Natalie Fear, as well as a roster of freelancers from around the world. The ImagineFX magazine team also pitch in, ensuring that content from leading digital art publication ImagineFX is represented on Creative Bloq.
