Build your first Windows Phone 7 app
In this article, we will get to grips with Windows Phone 7 application development, download the tools and begin building a simple app from start to finish. From discovering the rich toolset, to writing XAML and C#, Microsoft MVP Michael Crump has you covered.
- Knowledge needed: General C# and basic XAML
- Requires: Visual Studio 2010 Express, Windows 7 Operating System, Windows Phone 7 SDK
- Project Time: Two to four hours depending upon the speed of your internet connection and computer
- Support file
Whether any of us like to admit it or not, mobile is here. It has been and will continue to be a core skillset that every developer will need to embrace. But how does someone new to mobile applications get started in mobile software development? Better yet, what if you have already built mobile applications on one platform and want to see the process of building an application on another one? This is what this article aims to accomplish. Get everyone up to speed with developing their first Windows Phone 7 application from start to finish.
Today we are going to get started developing applications for the Windows Phone 7 platform. Whether this is your first journey into mobile application development or you are just curious to see what developing an application on the Windows Phone 7 platform is like, then this article is for you. We are going to begin with downloading the tools required to build Windows Phone 7 applications, then dive straight into code and develop a simple, yet functional application. Let’s go ahead and get started.
01. Downloading the tools
Before we can get started developing for the platform, we will need to download and install several tools. I have listed the required tools below as well as a few extras to help speed up your development process.
- Windows Phone Software Development Kit (SDK) 7.1: This is the only required download and provides you with all of the tools that you need to develop applications and games for Windows Phone 7 devices. With the download, you can install Visual Studio 2010 Express (the IDE) which includes application templates for phone projects as well as productivity enhancements such as an app profiler and an improved emulator.
- Windows Phone SDK Documentation: When building Windows Phone apps, you will be referencing pages from this site frequently. It contains documentation for the entire API as well as plenty of sample code.
- Code Samples for Windows Phone: Now that you have the tools and documentation, you should download some sample applications. This page lists all of the sample applications that Microsoft has provided. It is broken down by features, so you can find the page you are looking for quickly and easily.
02. Our first Windows Phone application
Twitter is everywhere. It has become the new “Hello World” project for anyone learning a new platform and with good reason. It requires some sort of input control, event and error handling, web request and responses to formatting the data properly in your application. So, in this app we will build a Twitter application that allows the user to input a Twitter username and retrieve the tweets in a simple and easy to read format.
03. Construction begins
Author’s note: The screenshots listed below were recorded using Visual Studio 2010 Ultimate. If you are using Visual Studio 2010 Express for Windows Phone, then you may see some minor variations in menu commands or windows. However, the base functionality remains the same.
Now that we have downloaded and installed the tools, it is time to begin our first project. Open Visual Studio and select File -> New Project. Expand the Visual C# templates and select Silverlight for Windows Phone. Finally, select Windows Phone Application and give it a name as shown below.
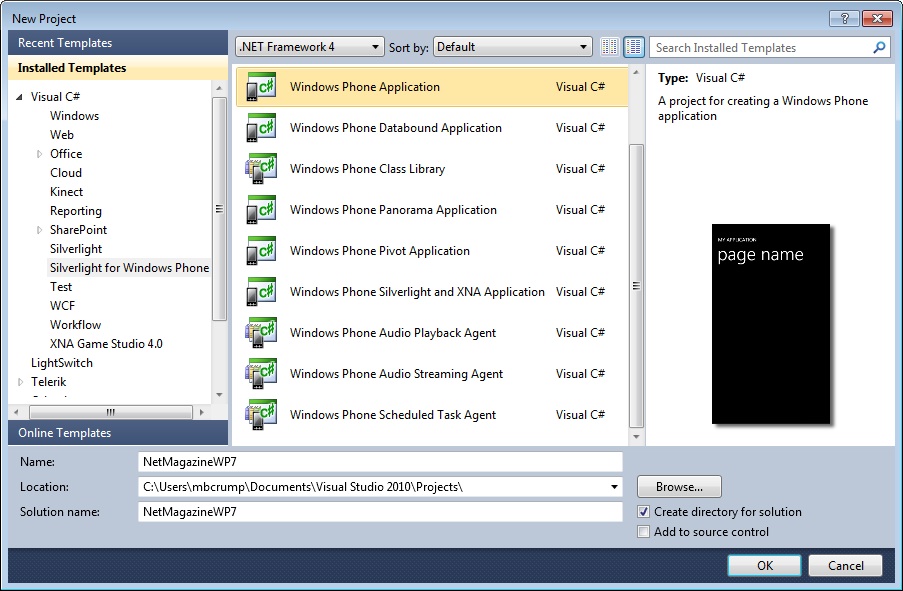
Now, click OK and you will see this dialog box:
Get the Creative Bloq Newsletter
Daily design news, reviews, how-tos and more, as picked by the editors.
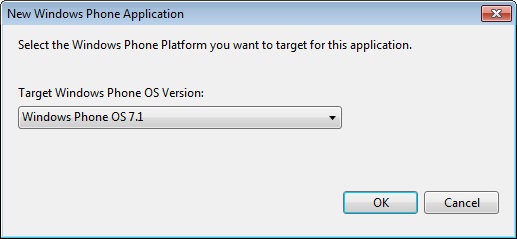
We have two options here:
- Windows Phone OS 7.1: This is for Mango applications and includes an additional set of APIs for working with the Windows Phone. This is the default setting and should be used for new applications going forward.
- Windows Phone OS 7.0: This is for the original version of the Windows Phone OS and should only be used in rare circumstances.
Let’s go ahead and select Windows Phone OS 7.1 and select OK.
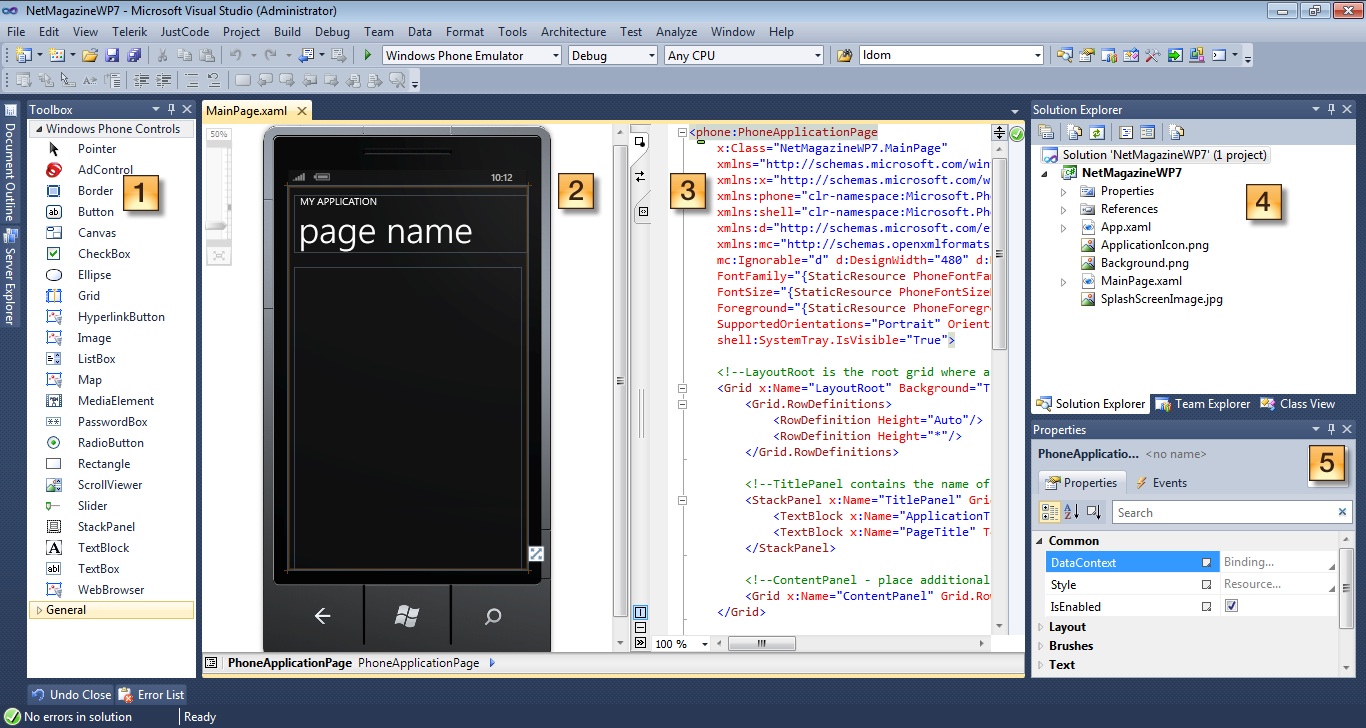
Once Visual Studio 2010 loads up, you will see the above screen.
- The Toolbox contains Windows Phone Controls that you can add to your application. Samples includes: TextBox, Buttons, Images and more.
- The Design View displays what your Windows Phone 7 application looks like real-time as you build the application.
- The XAML View displays the current XAML that makes up the screen shown in #2.
- The Solution Explorer Window displays all of the files that make up your application. This typically includes images and project files.
- The Properties Window allows you to change certain characteristics of the controls added to the phone application.
04. Modify the existing app name and page title
The first thing we need to change is the default Application Name and Page Title to our own. Navigate inside of your MainPage.xaml (Shown in Figure #3, item #3) and modify the Text properties of each TextBlock as shown below:
<!--TitlePanel contains the name of the application and page title-->
<StackPanel x:Name="TitlePanel" Grid.Row="0" Margin="12,17,0,28">
<TextBlock x:Name="ApplicationTitle" Text="MY TWITTER LOOKUP" Style="{StaticResource PhoneTextNormalStyle}"/>
<TextBlock x:Name="PageTitle" Text="enter user" Margin="9,-7,0,0" Style="{StaticResource PhoneTextTitle1Style}"/>
</StackPanel>
If you look at the designer window now, then you will see the following figure:
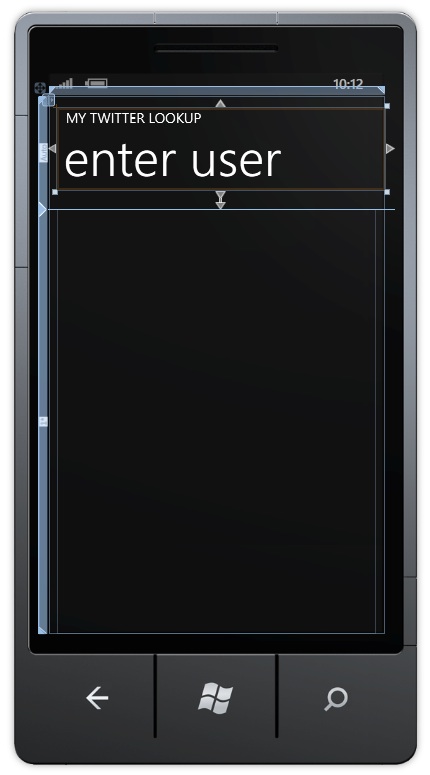
05. Adjusting layout and adding controls
The next thing that we will want to do is adjust the layout to allow our controls to fill the screen.
Move your mouse onto the designer and left click on the point shown in the grab below. This will allow us to fill this space with a TextBox and Button.
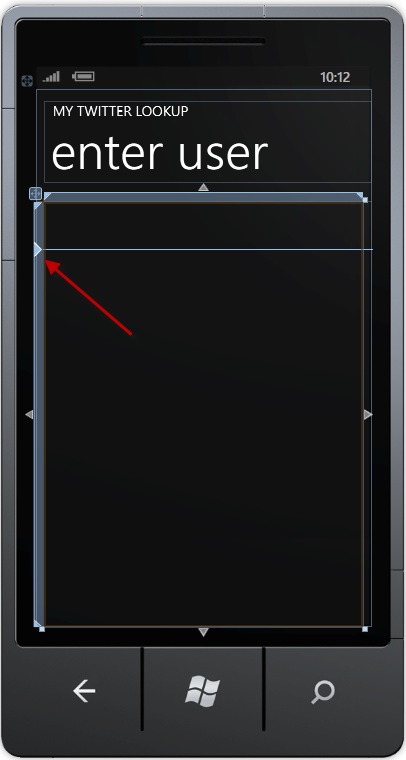
Once that is in place, we will want to drag and drop a TextBox, Button and ListBox from the ToolBox onto the designer window as shown here:
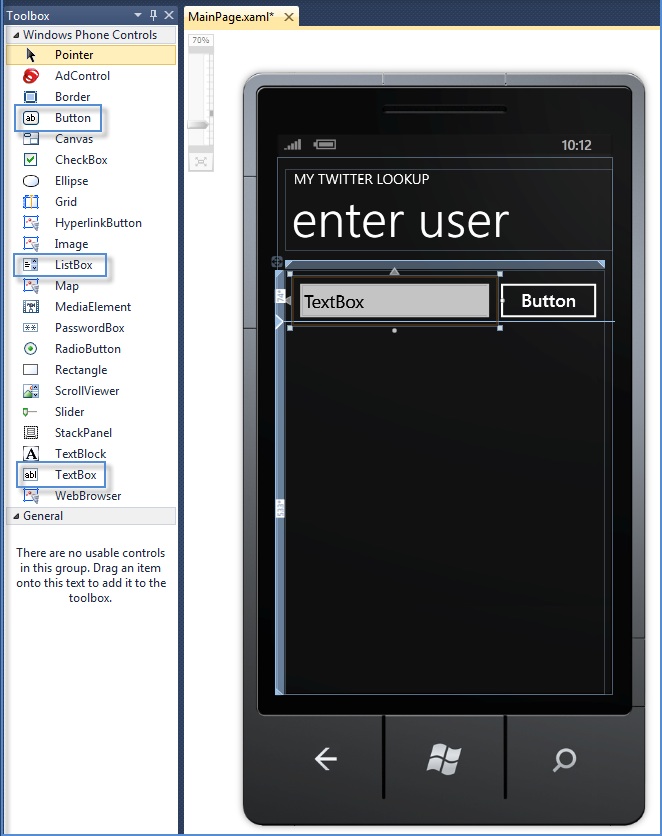
So, what do these buttons do?
- The TextBox is a user input control that will allow our user to type a Twitter username.
- The Button will be pressed when the user is ready to lookup tweets from the user entered into the TextBox.
- The ListBox will contain the users image as well as the tweet from the user.
Let’s go ahead and make the following modifications to the MainPage.xaml file. Look for the <!--ContentPanel - place additional content here--> tag and replace the code with the following:
<Grid x:Name="ContentPanel" Grid.Row="1" Margin="12,0,12,0">
<Grid.RowDefinitions>
<RowDefinition Height="74*" />
<RowDefinition Height="533*" />
</Grid.RowDefinitions>
<TextBox Grid.RowSpan="2" Height="72" HorizontalAlignment="Left" Margin="9,8,0,0" Name="txtUserName" VerticalAlignment="Top" Width="294" />
<Button Content="Lookup" Grid.RowSpan="2" Height="72" HorizontalAlignment="Left" Margin="296,8,0,0" Name="btnLookupUser" VerticalAlignment="Top" Width="160" Click="btnLookupUser_Click" />
<ListBox Name="lstTwitter" Grid.Row="1" Margin="10, 10, 10, 10">
<ListBox.ItemTemplate>
<DataTemplate>
<StackPanel Orientation="Horizontal" Height="110" Margin="-10,-10,-10,-10">
<Image Source="{Binding ImageSource}" Height="73" Width="73" VerticalAlignment="Top" Margin="10,10,8,10"/>
<TextBlock Text="{Binding Message}" Margin="10" TextWrapping="Wrap" FontSize="18" Width="350" />
</StackPanel>
</DataTemplate>
</ListBox.ItemTemplate>
</ListBox>
</Grid>
You will notice a few differences here if you compare this code snippet to what you already had.
- TextBox: We gave it a name and deleted the Text property. This will allow us to refer to the TextBox when the user presses the button.
- Button: We also gave it a name and changed the Content property to Lookup. We finally added a Click event handler to fire when the user presses the button.
- ListBox: This control had the most drastic of changes, we added a name and then a ListBox.ItemTemplate. The ItemTemplate determines the layout of each item in the list. You then associate DataTemplates with those data elements to define what UI elements are used to render them.
In this case, we are using a StackPanel which stacks elements in a direction. We horizontally stack an image and a TextBlock to display the image of the user and his/her tweet.
06. Time to code
Now that we have added XAML to our project, it is time to add some code behind to our page to make the application function.
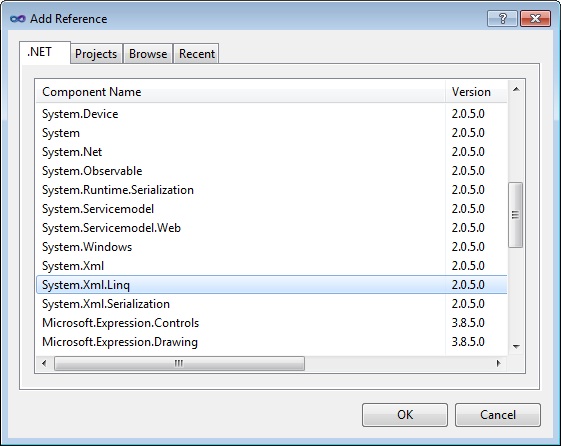
Let’s begin by adding a reference to an existing file built by Microsoft to help us parse the XML returned by the Twitter API we will be using.
Right click on References, and select Add Reference. Scroll down through the list until you get to System.Xml.Linq and select OK as shown here:
Now that we have the proper library in place, we will add a new class which contains the Twitter items.
Right-click on your project and select Add, then Class. Let’s give it the name of TwitterItem and press return. Inside of that class, we will add two properties as shown below which will contain our ImageSource and Message.
public class TwitterItem
{
public string ImageSource { get; set; }
public string Message { get; set; }
}
The ImageSource will refer to the location of the image on the web.
The Message will contain the user's tweet.
Go ahead and double click on the MainPage.xaml.cs file and add in the following code snippet just after the MainPage() constructor:
private void btnLookupUser_Click(object sender, RoutedEventArgs e)
{
WebClient twitter = new WebClient();
twitter.DownloadStringCompleted += new DownloadStringCompletedEventHandler(twitter_ DownloadStringCompleted);
twitter.DownloadStringAsync(new Uri("http://api.twitter.com/1/statuses/user_timeline.xml?screen_name=" + txtUserName.Text));
}
void twitter_DownloadStringCompleted(object sender, DownloadStringCompletedEventArgs e)
{
if (e.Error != null)
return;
XElement xmlTweets = XElement.Parse(e.Result);
lstTwitter.ItemsSource = from tweet in xmlTweets.Descendants("status")
select new TwitterItem
{
ImageSource = tweet.Element("user").Element("profile_image_url").Value,
Message = tweet.Element("text").Value
};
}
The first event handler is called btnLookupUser_Click and it will run once the user clicks on the Lookup button. We are using the built-in WebClient class as it provides common methods for sending data to and receiving data from a resource. In this case, we are passing the current username into an API provided by Twitter and it will return an XML file of the data requested.
The twitter_DownloadStringCompleted event uses LINQ to parse through the XML returned by the API and select the Image URL and Message.
In case you are wondering what LINQ is: LINQ is built entirely on general purpose language features, some of which are new to C# 3.0 and Visual Basic 9.0. Each of these features has utility on its own, yet collectively these features provide an extensible way to define queries and queryable APIs.
07. Ready for launch
Now that we have our application built, it's time to launch it and see it in action. The first thing we are going to need to do is make sure the target is set to Windows Phone Emulator as shown here:

Note: If you had a Windows Phone device and an App Hub membership, then you could change the drop-down to Windows Phone Device.
Once the application loads, then you will see the following screen:
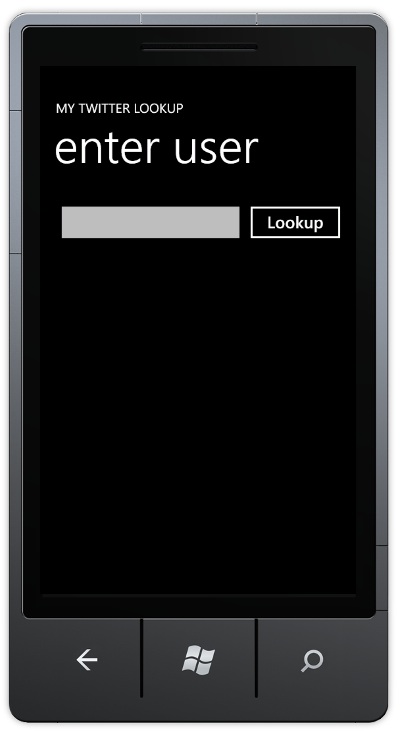
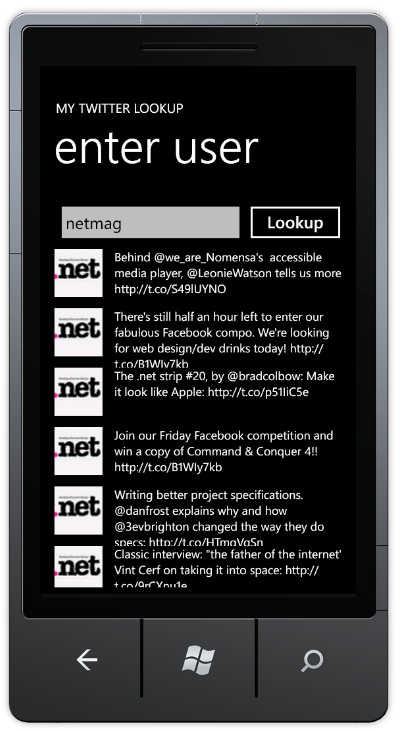
Go ahead and select the TextBox and you will see the software keyboard. You can optionally press page up to use the keyboard on your computer to type. Give it any valid Twitter Username and select Lookup. The application will return the tweets from the specified user as shown here:
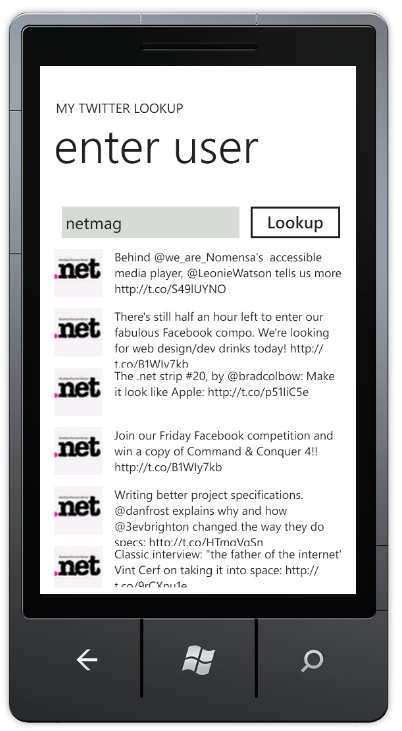
Your users could also switch to the Light theme built into the setting menu of Windows Phone 7 and the application’s colours would adjust automatically as shown below.
It's important to note that this sample application should contain additional error handling. I excluded them from the demo for the sake of learning purposes.
08. Conclusion
In just f a couple of hours, we have downloaded the tools, became familiar with the IDE and built our first Windows Phone 7 application. Of course, we have barely scratched the surface of what's possible with Windows Phone 7. I encourage you to read a few books, look at the samples and see what the community is doing with the platform. I can assure you that you will be surprised. As always, thanks for reading and if you have any questions/comments, then please leave them below.
Liked this? Read these!
- How to build an app
- Free graffiti font selection
- Illustrator tutorials: amazing ideas to try today!
- The ultimate guide to designing the best logos
- The best free web fonts for designers
- Useful and inspiring flyer templates
- The best 3D movies of 2013
- Discover what's next for Augmented Reality

Thank you for reading 5 articles this month* Join now for unlimited access
Enjoy your first month for just £1 / $1 / €1
*Read 5 free articles per month without a subscription

Join now for unlimited access
Try first month for just £1 / $1 / €1

The Creative Bloq team is made up of a group of art and design enthusiasts, and has changed and evolved since Creative Bloq began back in 2012. The current website team consists of eight full-time members of staff: Editor Georgia Coggan, Deputy Editor Rosie Hilder, Ecommerce Editor Beren Neale, Senior News Editor Daniel Piper, Editor, Digital Art and 3D Ian Dean, Tech Reviews Editor Erlingur Einarsson, Ecommerce Writer Beth Nicholls and Staff Writer Natalie Fear, as well as a roster of freelancers from around the world. The ImagineFX magazine team also pitch in, ensuring that content from leading digital art publication ImagineFX is represented on Creative Bloq.
