JavaScript animations: the link swipe
Tantalise users with a cool rollover effect on links. Mike Byrne of Fudge (madebyfudge.com) explains how to build it
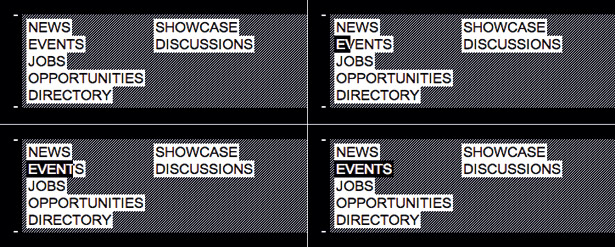
Working out a straightforward way to build a designer’s idea is one of the more interesting aspects of being a front-end developer. The designer on this project wanted the links in the primary nav to animate on hover, with a left to right sliding animation.
My initial thought was to use jQuery to animate a background position. Job done.
However, on further consideration I realised it had to be something more, because the text colour also needed to change.
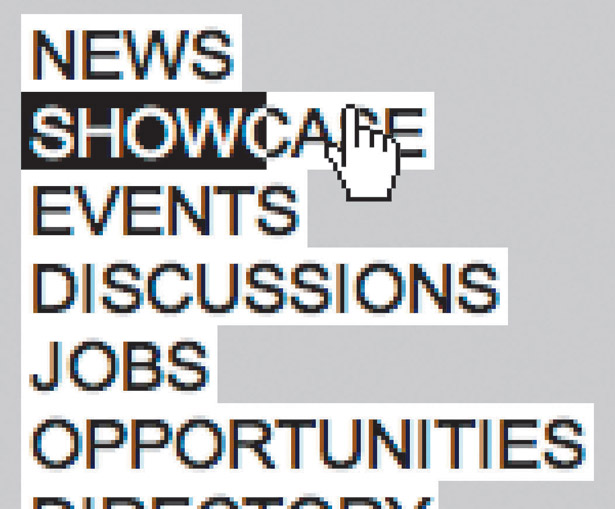
So here’s the idea. As you roll over a link, a swoosh from left to right animates in the link, taking a fraction of a second. When you roll off the link, the swoosh animates back over the same time period. So, if you roll over a bunch of links, the swoosh has the feeling of leaving a trail.
This tutorial will start with pretty default website navigation markup. We’ll style it with some easy CSS and then a little bit of JavaScript to give it that flashy look and feel.
It’s decoration for decoration’s sake, but it does look pretty and is fun to play with and so could be a nice way to freshen up an otherwise mundane part of a website.
1. Create files
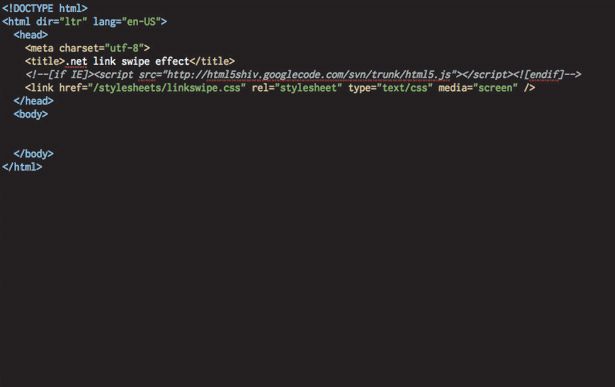
You’ll need a new HTML document, linking linkswipe.css, jQuery and linkswipe.js. Use a valid doctype: originally I used xhtml1 transitional, but now I’m using the HTML5 doctype (remember to conditionally include the HTML5 shiv in your <head>).
Daily design news, reviews, how-tos and more, as picked by the editors.
2. Script tags
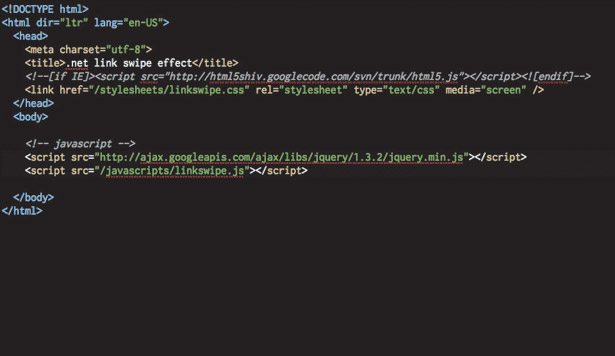
I like to have my script tags at the bottom of my page, just before the </body>. Linking jQuery from Google libraries (code.google.com/apis/libraries/) can help to speed up the loading of your assets. If you’re using HTML5, keep the shiv.js in the <head>.
3. The markup
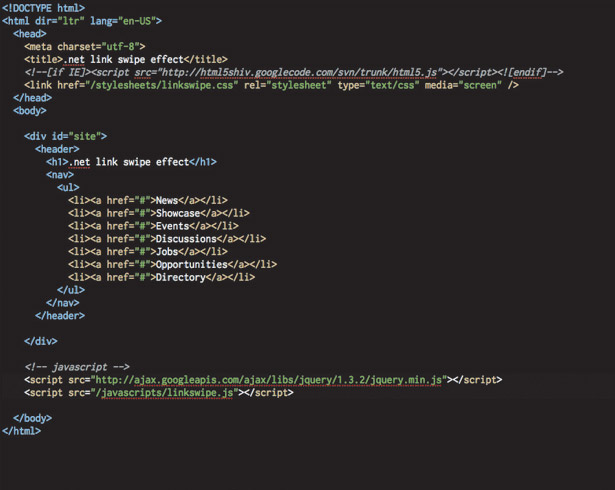
It’s simple, straightforward and semantic: link, in a list item, in a list. As this animation is going in the main nav of the site and I’m using HTML5, this list is going to live in a <nav> element within a <header> – the intention being that it’s site-wide.
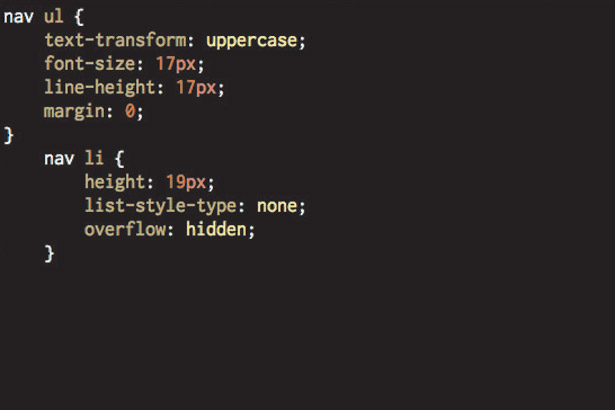
4. Start styling, ul, li
I’ve made the line-height match the font-size to have one less spacing issue to worry about. As the links won’t be line wrapping, remember to take off any default list style. Overflow and height are set to make sure everything lines up nicely.
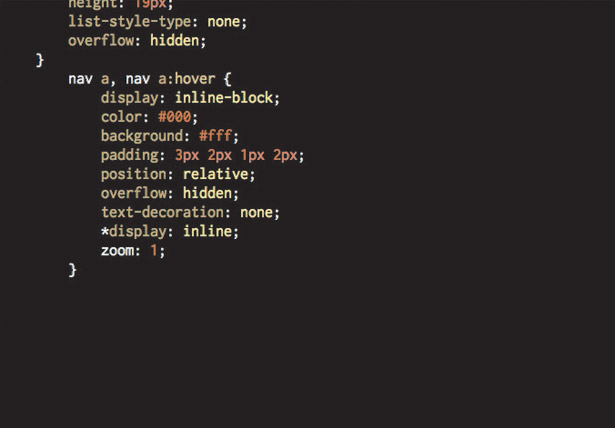
5. Styling the link
We want the background colour to only show around the text, so we’ll use display: inline-block and then fix IE with some browser hacks (you may want to use conditional style sheets for this). Make the link position: relative so we can position a span later.
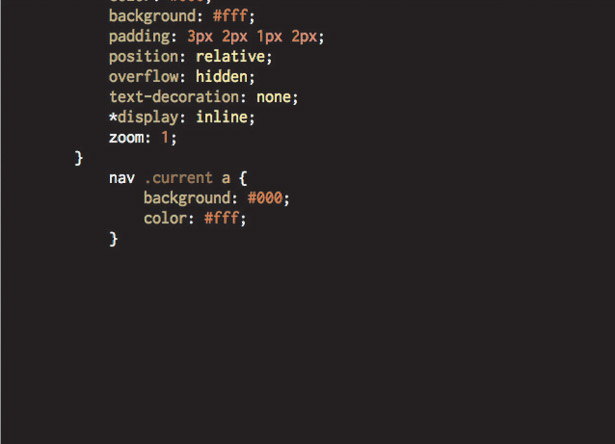
6. Style a current state
Something I tend to forget to do; when you’re on a page it’s handy to have a current state marker in the navigation indicating that this is the active page or section. I just use a class of current on the container <li> as it gives me more options for styling.
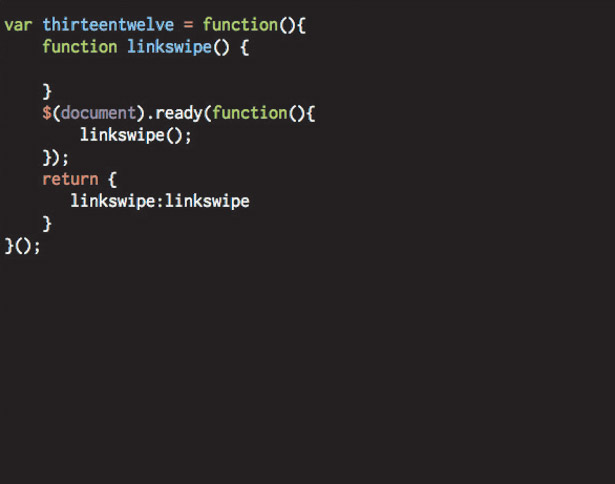
7. Write some JavaScript
In your linked JavaScript file you need a DOM-ready function and a function for our animation; I’ve called mine linkswipe. I call functions in document.ready rather than filling it with lots of code so I can turn things on and off quickly when testing.
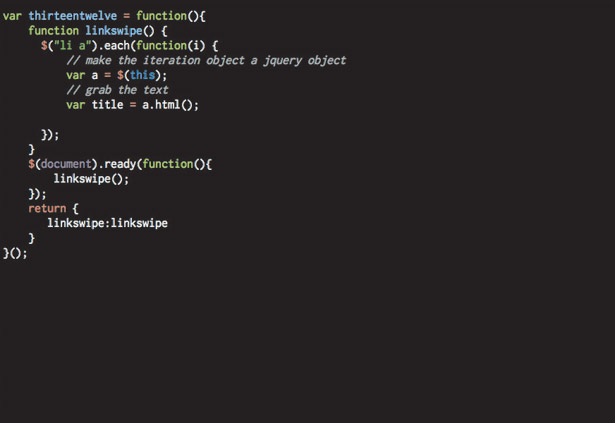
8. The function
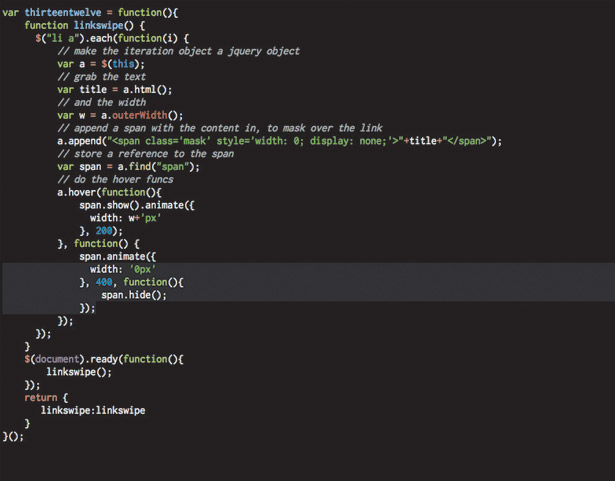
We’re going to use the jQuery each function to loop over the links you want to animate, store a reference to this link to save you retyping $(this) a lot. We’re also going to grab and store the text of the link for our inserted span.
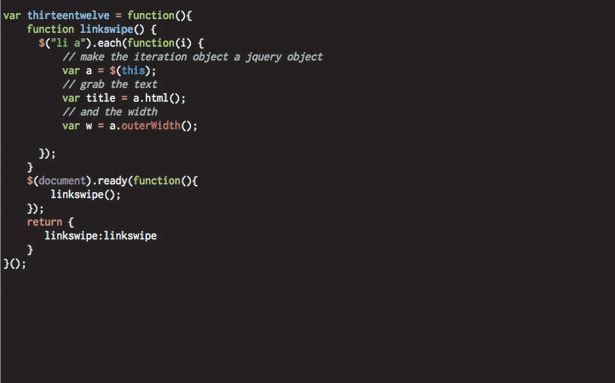
9. Grab the width
Get jQuery to measure the width of the link and store it. We need to know this so that we can set a maximum width to animate an inserted span. Without it, the animation will flicker horribly from its start width to 100% width and not animate smoothly.
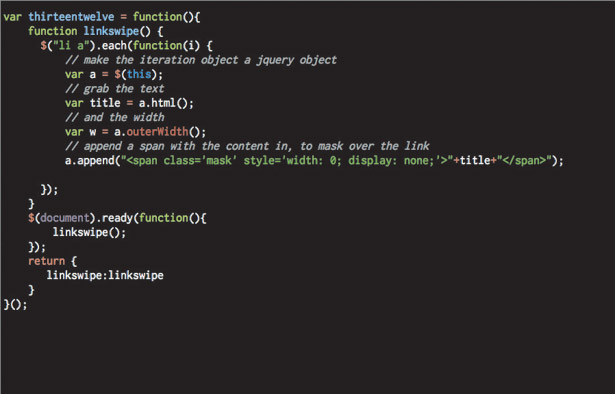
10. Append span to link
Next we need to append our span with the link title to the page. As it’s JavaScript-generated content, we don’t need to worry about the inline style. Its default state is going to be invisible with no width. This is what is going to expand on mouseover of the link.
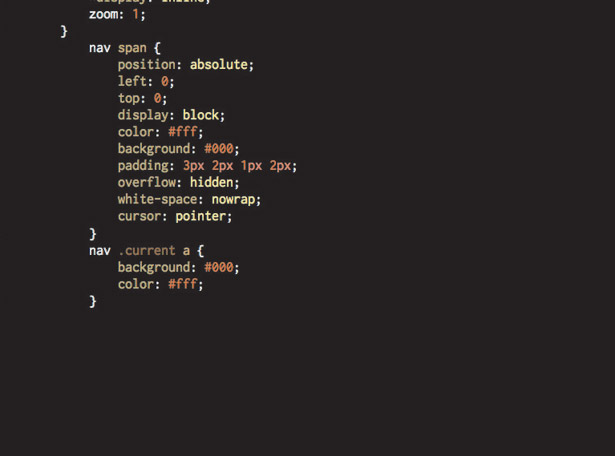
11. Style
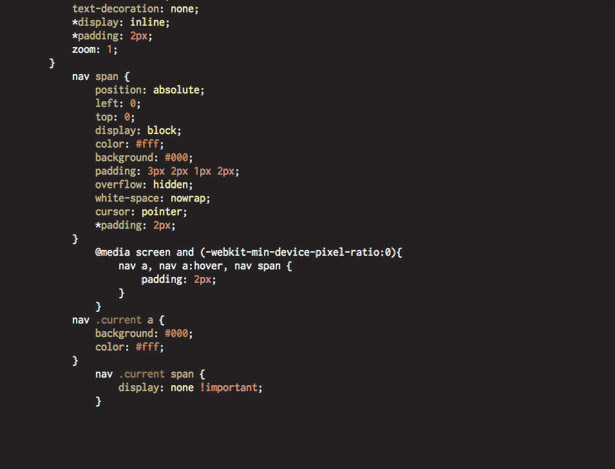
Remove the inline display: none in the append so you can style it in your CSS; mine is the inverse of the link it’s going to cover. IE needs cursor: pointer; to show the right cursor on the span. Update the JavaScript append to hide the span when you’re done.
12. Hide span on current
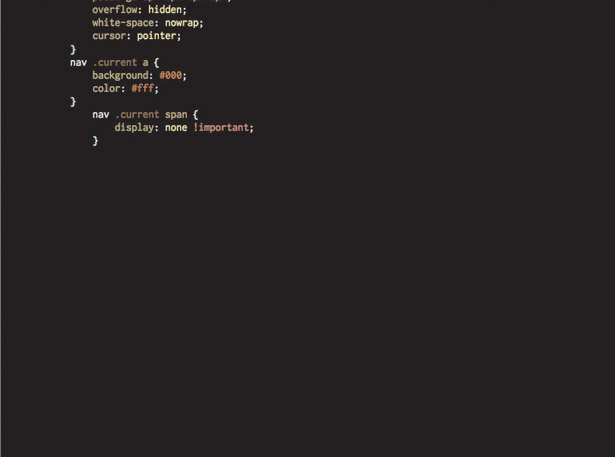
If we’re on a page in a section linked from the nav, we don’t want the animation to happen – we just want the current state to display. So hide the span here. I’ve used !important so it won’t show even if any jQuery show() functions try to make it visible.
13. Cache that span
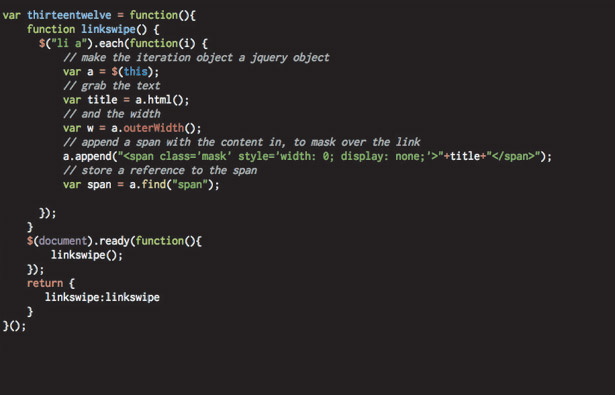
Store a reference to the span. There are a few reasons for this: it will stop you having to find it over and over when we animate it, which will make the JavaScript run quicker. It means you have to write less JavaScript and it makes it easier to follow.
14. The hover function
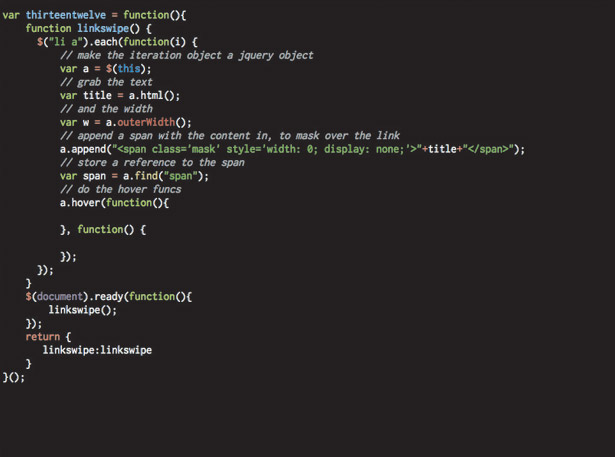
We need a hover function for the mouseover. I can never remember the syntax for the jQuery one so I always have the jQuery docs open in a browser tab (api.jquery.com/hover/). It has handy mouse enter and mouse leave functions built in.
15. Show span, animate it
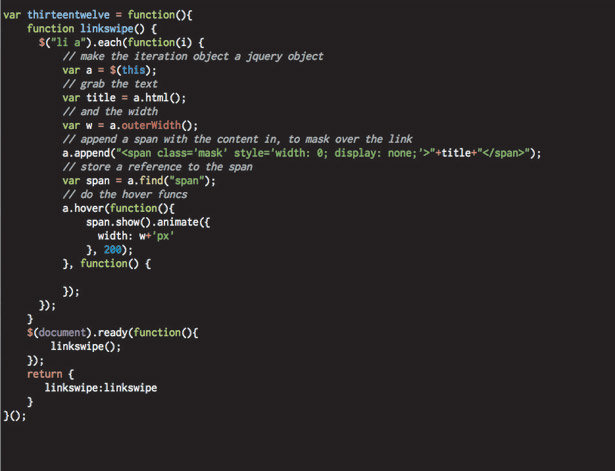
On hover, we want to show the span and change its width to be the full width of the link. Here we’re going to use the jQuery show and animation functions. I like a nice fast animation, so I’ve used 200ms for the length of animation: tweak this as you need.
16. Mouse off
On mouse out, we want to do the opposite. So we animate the width back to 0 and then use an anonymous callback function, which executes after the animation has finished, to hide the span. The callback function is built into lots of jQuery functions.
17. Have a play
Play with it a few times to make sure the span sits where you want it and to make sure you’re happy with the animation length. I use a longer mouseoff animation length than mouse enter, so that you get the trail effect.
18. Tweak padding
Tweak the CSS for the link and the span to get the spacing you want and then for the two to match, to stop any peculiar ‘jumps’ on mouse over. I’ve used a mix of IE hacks and a selector to target WebKit browsers; you may want to use conditional comments.
19. Stop that flicker
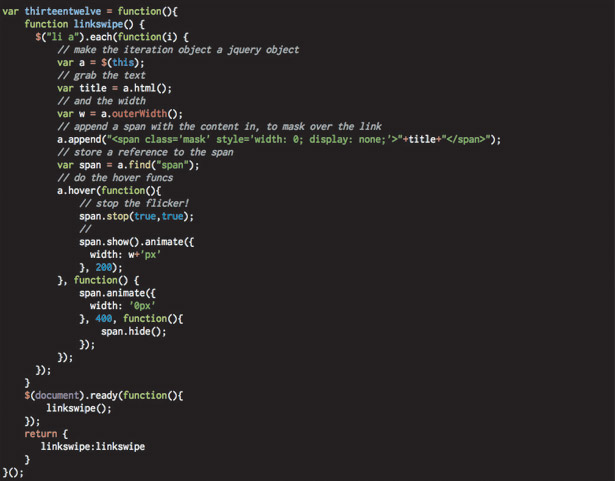
You may notice a flicker if you move your mouse over the links quickly, where an animation has not ended when you’re asking another to begin. Adding span.stop (true,true); will fix it. This stops all animations on the span and starts animating from where it is, to where it needs to go.

The Creative Bloq team is made up of a group of art and design enthusiasts, and has changed and evolved since Creative Bloq began back in 2012. The current website team consists of eight full-time members of staff: Editor Georgia Coggan, Deputy Editor Rosie Hilder, Ecommerce Editor Beren Neale, Senior News Editor Daniel Piper, Editor, Digital Art and 3D Ian Dean, Tech Reviews Editor Erlingur Einarsson, Ecommerce Writer Beth Nicholls and Staff Writer Natalie Fear, as well as a roster of freelancers from around the world. The ImagineFX magazine team also pitch in, ensuring that content from leading digital art publication ImagineFX is represented on Creative Bloq.
