Integrating Knockout.js with third-party libraries
In this tutorial we will finish off our slidr demo app, and at the same time take a look at how to integrate Knockout with existing frameworks
This tutorial is a continuation from Part 1, so if you followed along up to now, you should be good to go. If you are coming to this tutorial afresh, you can either start by reading Part 1, or just use the files in the “Start” folder of the download that accompanies this part of the tutorial.
Adding the scripts
As we did in Part 1, we’ll start by adding the script tags for the libraries we are going to need. Go ahead and add the script tags below to the head section of your HTML document.
<script type="text/javascript" src="js/jquery-ui-1.8.17.custom.min.js"></script><script type="text/javascript" src="fancybox/jquery.fancybox.pack.js?v=2.0.4"></script>Creating the timeline
The timeline area will allow us to arrange and edit the slides that make up our slideshow. To keep track of the queued photos we’ll add another observable array to our view model like so:
var viewModel = { searchTerm: ko.observable(“”), searchTimeout: null, foundPhotos: ko.observableArray([]), queuedPhotos: ko.observableArray([]), search: function(){ … }};And add the following markup to our HTML document in the timeline area:
<ol data-bind="foreach: queuedPhotos"> <li data-bind="attr: { 'data-id' : queuedPhotoId }"> <img src="img/cross.png" alt="Remove" title="Remove" class="remove" data-bind="click: remove" /> <img data-bind="attr: { 'src' : smallImageUrl, 'alt' : title, title: title }" /> </li></ol>Similar to the search results, all this does is to loop through the queued photos and render them out into a list. We also include a small ‘X’ icon to allow images to be removed from the queue. We’ll hook this up shortly.
Making it draggable and droppable
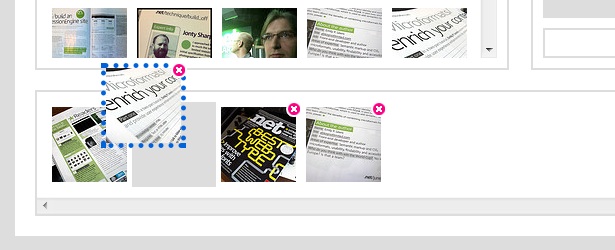
Now that we have a timeline defined, we’ll actually want to be able to add photos to it. To do this, we’ll use the jQuery UI libraries Draggable and Sortable components, and allow users to drag photos from the search results to the timeline area.
To setup the draggable search results, let's add the following snippet inside our initialise function:
Get the Creative Bloq Newsletter
Daily design news, reviews, how-tos and more, as picked by the editors.
$(function(){ $("#search-results ul li:not(.ui-draggable)").liveDraggable({ zIndex: 2000, helper: 'clone', start : function(event, ui) { // Populate the temp photo property with the selected photo var id = $(ui.helper.context).attr('data-id'); var data = viewModel.foundPhotos(); var idx = 0; while(idx < data.length && data[idx].id() !== id) { idx++; } viewModel.tempPhoto(data[idx]); }, stop: function(event, ui){ // Un-set the temp photo property viewModel.tempPhoto(undefined); } }); ko.applyBindings(viewModel);});The first thing you may notice is the semi strange selector and the use of a liveDraggable method instead of just a draggable one. This is simply a custom extension to allow the draggable component to work in more of a jQuery live manner. This is needed as we will be dynamically adding and removing photos to the search results container, and so need any new photos added to the list to also be draggable, which the default draggable component wouldn’t do. The code for the liveDraggable extension is as follows (go ahead and add this to your script file):
$.fn.liveDraggable = function (opts) { this.live("mousemove", function() { $(this).draggable(opts); });};The options for the component should be pretty self-explanatory. The only two we are interested in are the start and stop methods. The start methods job is to find the selected photo item in the found photos list by retrieving the photos ID from the selected element, and looking it up in the array. Once found it’s simply pushed into a tempPhoto variable. The stop method simply clears out the current tempPhoto variable. To get this working we’ll need to add the tempPhoto variable to our view model:
var viewModel = { searchTerm: ko.observable(“”), searchTimeout: null, foundPhotos: ko.observableArray([]), queuedPhotos: ko.observableArray([]), tempPhoto: ko.observable(), search: function(){ … }};If you test this now, you should be able to drag the photos from the search results.
So now that we can drag the photos, we’ll want to be able to drop them in the timeline, but before we can do that, we’ll need to setup the timeline itself using the Sortable component. To set this up, add the following snippet to your initialisation function:
$("#timeline ol").sortable({ receive: function (event, ui) { // Unmap the temp photo to a plan js object, essentially cloning the photo var unmapped = ko.mapping.toJS(viewModel.tempPhoto()); // Remap photo with queued photo extentions var remapped = ko.mapping.fromJS(unmapped, queuedPhotoMappingOptions); // Give the remapped item a new queued photo id. We'll use this to allow the same photo to be added more than once remapped.queuedPhotoId(remapped.id() + "-" + (Math.floor(Math.random() * 90000) + 10000)); // Just push the remapped item onto the end, we'll set the right index in the update handler viewModel.queuedPhotos.push(remapped); }, start : function(event, ui) { // Populate the temp photo property with the selected photo if(viewModel.tempPhoto() === undefined){ var id = $(ui.item).attr('data-id'); var data = viewModel.queuedPhotos(); var idx = 0; while(idx < data.length && data[idx].queuedPhotoId() !== id) { idx++; } viewModel.tempPhoto(data[idx]); } }, update: function(event, ui){ // Calculate new / old indexs var oldIndex = viewModel.queuedPhotos.indexOf(viewModel.tempPhoto()); var newIndex = ui.item.index(); // Update the index of the current item in the array viewModel.queuedPhotos.splice(newIndex, 0, viewModel.queuedPhotos.splice(oldIndex, 1)[0]); }, stop: function(event, ui){ // Remove the ui item as jquery UI will create a duplicate ui.item.remove(); // Un-set the temp photo property viewModel.tempPhoto(undefined); }});So here we initialise the sortable component with four event handlers, receive, start, update and stop. These four event handlers allow us to handle both the receiving of new elements, and the sorting of existing elements.
The receive method will be called when an item is dragged into the sortable list, the start method when and an existing item in the timeline is starts to be dragged, the update method after an existing photo has been moved to a new index and the stop method when all other actions have finished.
The job of the receive method is to add a copy of the receiving photo into the queuedPhotos array. This is done by taking a physical copy of the tempPhoto variable (the variable where we store a reference to the selected photo when we start dragging) by first converting it back to a plain old JS object, and then mapping back into an observable object. Unlike the search results however, we use queuedPhotoMappingOptions to create the queued photo observable as follows (add this to your script file alongside the photoMappingOptions from Part 1):
var queuedPhotoMappingOptions = { 'create': function(o){ var photo = ko.mapping.fromJS(o.data, photoMappingOptions); photo.queuedPhotoId = ko.observable(); photo.remove = function(){ viewModel.queuedPhotos.remove(this); } return photo; }}These mapping options map the photo in the same way as the original photoMappingOptions from Part 1, but add an additional queuedPhotoId property and a remove method to allow the photo to be removed from the timeline (if you take a look back at the timeline HTML snippet, you’ll see the little ‘X’ icons click binding is bound to the remove method).
Once the photo is mapped into a queued photo bindable object, we generate a unique id for the photo (just in case you want to add the same photo twice) and push it into the queued photos array.
The start event handler is basically the same as the start event handler for the draggable search results where we look up the item that is being dragged and store it in the tempPhoto variable. The only difference being we only start dragging if no other photo is already being dragged (such as from the search results) and we use the new queuedPhotoId, rather than just the id we get back from Flickr.
Next, the update method. The job of the update method is to keep the queuedPhotos array in order based upon where the tempPhoto is dragged to. It does this by looking up the item's old index, getting the new index from the updated UI element, and swapping the queued photo item's index accordingly.
The last method is the stop event handler. In this event handler we do something that you may think is a little strange, which is to delete the UI element that was just dragged. We do this on purpose though as we actually want Knockout to maintain the order of our queued elements, rather than the sortable component, so we delete the UI element created by the sortable component, and allow Knockout to recreate the item when the queuedPhotos list is re-bound back to the timeline element.
Lastly, and similar to the draggable component registration, we also clear out the tempPhoto variable.
Now that we have both the search results and the timeline setup, we can finally tie the two together by adding the following option to the search results draggable binding:
$("#search-results ul li:not(.ui-draggable)").liveDraggable({ zIndex: 2000, helper: 'clone', connectToSortable: '#timeline ol', start : function(event, ui) { … }, stop: function(event, ui){ … }});And with that, we should now be able to drag photos from the search results into the timeline, sort the queued photos in the timeline and remove them by clicking the ‘X’ icon. Woohoo!

Creating the preview
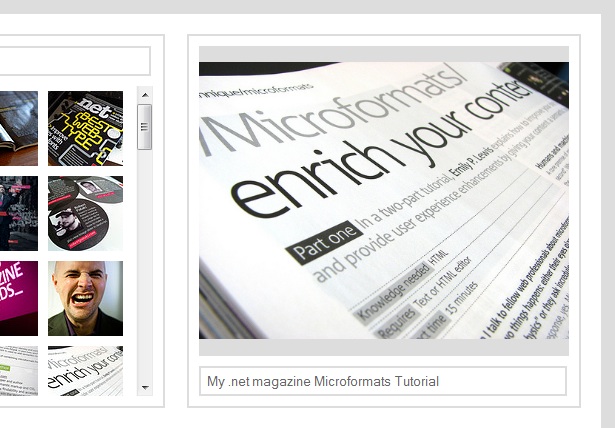
The preview area allows us to see a larger preview of a photo in the timeline, and also to edit the photos description. To start, we’ll need a variable on our viewModel to keep track of the selected photo. Go ahead and add a variable like so:
var viewModel = { searchTerm: ko.observable(“”), searchTimeout: null, foundPhotos: ko.observableArray([]), queuedPhotos: ko.observableArray([]), tempPhoto: ko.observable(), selectedPhoto: ko.observable(), search: function(){ … }};Next, update the timeline HTML snippet to allow the selection of a photo like so (NB: we also add a selected class to the surrounding LI to make it easier to identify the selected photo):
<ol data-bind="foreach: queuedPhotos"> <li data-bind="attr: { 'data-id' : queuedPhotoId }, click: select, css: { selected: $root.selectedPhoto() !== undefined && $root.selectedPhoto().queuedPhotoId() === queuedPhotoId() }"> <img src="img/cross.png" alt="Remove" title="Remove" class="remove" data-bind="click: remove" /> <img data-bind="attr: { 'src' : smallImageUrl, 'alt' : title, title: title }" /> </li></ol>Then, update the queuedPhotoMappingOptions with a select method to set the selectedPhoto variable like so:
var queuedPhotoMappingOptions = { 'create': function(o){ var photo = ko.mapping.fromJS(o.data, photoMappingOptions); photo.queuedPhotoId = ko.observable(); photo.select = function(){ viewModel.selectedPhoto(this); } photo.remove = function(){ viewModel.queuedPhotos.remove(this); } return photo; }}Finally, add the following HTML snippet to your preview area:
<div id="preview" class="box" data-bind="with: selectedPhoto"> <div id="preview-image"> <img data-bind="attr: { 'src' : mediumImageUrl, 'alt' : title }" /> </div> <div id="preview-caption"> <input id="search-term" type="text" data-bind="value: title, valueUpdate: 'afterkeydown'" /> </div></div>In this snippet, we use the binding option with: selectedPhoto to scope the inner bindings to use selectedPhoto as their model, rather than the global viewModel, then just bind the larger image to an img element, and the photo's title to a text input. Because the selectedPhoto is two-way bindable, any changes to the titles text box, will automatically update the title on the selected photo.
And that is the preview done.

Creating the slideshow
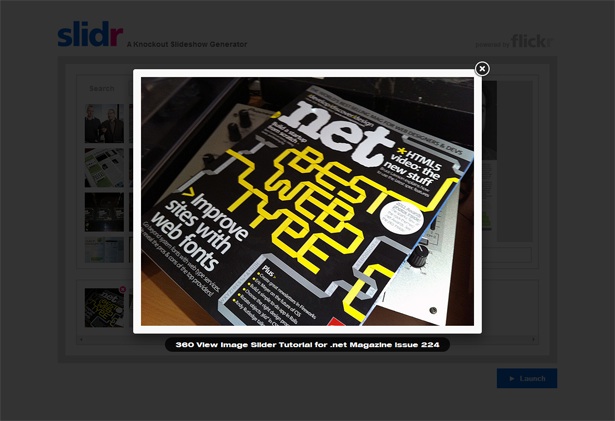
The final step of this tutorial is to launch the queued photos in an actual slideshow component, for which we will use Fancybox. The way Fancybox works is to take a list of links with a matching rel attribute and convert them into nice looking slideshow. So to start, let's add some HTML to the bottom of our HTML document to generate our list of links:
<div id="slides"> <!-- ko foreach: queuedPhotos --> <a rel="slideshow" data-bind="attr: { href: largeImageUrl, title: title }"> </a> <!-- /ko --> <a rel="slideshow" href="http://farm4.staticflickr.com/3273/3006780451_86a22b8ae9.jpg"> </a></div>In this snippet, we make use of another new Knockout feature, which is the ability to apply bindings to HTML comments, not just HTML elements. By doing this, rather than having a foreach on our div, it allows us to have a fixed final image in our slideshow without having to introduce any un-needed container elements.
Next up, we’ll want to initialise out slideshow by adding the following code snippet to our initialisation function:
$("#slides a").fancybox({ autoPlay: true, loop: false, nextEffect: 'fade', prevEffect: 'fade'});There is nothing special about this, we just tell the slideshow to auto play, and how it should transition between slides.
And finally, we’ll want something to launch the slideshow, so go ahead and add a launch button like so:
<button data-bind="click: launch, enable: queuedPhotos().length > 0, css: { disabled: queuedPhotos().length == 0 }">► Launch</button>And create a launch method on our viewModel to trigger the first images click event:
var viewModel = { searchTerm: ko.observable(“”), searchTimeout: null, foundPhotos: ko.observableArray([]), queuedPhotos: ko.observableArray([]), tempPhoto: ko.observable(), selectedPhoto: ko.observable(), search: function(){ … }, launch: function(){ // Trigger the click handler on the first slide $("#slides a:first").trigger("click"); }};And with that, we are done!

In this part we finished off our slidr app and looked at how to integrate Knockout with existing third-party libraries.
If you managed to follow along, and got your application running, congratulations, you’re well on your way to becoming a Knockout guru. If not, don’t fret, you can find a full copy of the slidr app in this tutorials accompanying download to help identify where you might have gone wrong.
Additional resources
The aim of this tutorial is to show you some of the main concepts of Knockout, however I couldn’t possibly cover every little bit, so, if you’d like to learn more, be sure to check out the documentation section on the Knockout site.
If you found this tutorial a little too much, you can also try out the tutorials on the Knockout site. They’ll build your knowledge up gradually.

Thank you for reading 5 articles this month* Join now for unlimited access
Enjoy your first month for just £1 / $1 / €1
*Read 5 free articles per month without a subscription

Join now for unlimited access
Try first month for just £1 / $1 / €1

The Creative Bloq team is made up of a group of design fans, and has changed and evolved since Creative Bloq began back in 2012. The current website team consists of eight full-time members of staff: Editor Georgia Coggan, Deputy Editor Rosie Hilder, Ecommerce Editor Beren Neale, Senior News Editor Daniel Piper, Editor, Digital Art and 3D Ian Dean, Tech Reviews Editor Erlingur Einarsson, Ecommerce Writer Beth Nicholls and Staff Writer Natalie Fear, as well as a roster of freelancers from around the world. The ImagineFX magazine team also pitch in, ensuring that content from leading digital art publication ImagineFX is represented on Creative Bloq.
