How to create collapsible CSS tables
We show you how you can collapse the body area of CSS tables, using a little JavaScript
It’s generally recommended you ensure the vast majority of your web page content is immediately visible when someone accesses it – but there are exceptions. For example, you might want to provide access to some historical information but not clutter up the page with several years’ worth, which might distract users.
This kind of thing often happens with tables. You might have a sports table or a favourites chart and want to provide the potential for comparison, but only initially display the most recent table’s content. This tutorial provides a simple and elegant way to create CSS tables that will collapse with a little help from JavaScript.
Although tables haven’t traditionally leant themselves to this kind of manipulation, due to basically being a bunch of row elements, that all changes when row groups are added to the mix. The three row group elements – thead, tbody and tfoot – provide a logical structure to a table (and also potentially enable all sorts of browser ‘tricks’, such as scrolling the body while leaving the head and foot in place) and group components, thereby enabling a section to be targeted and collapsed.
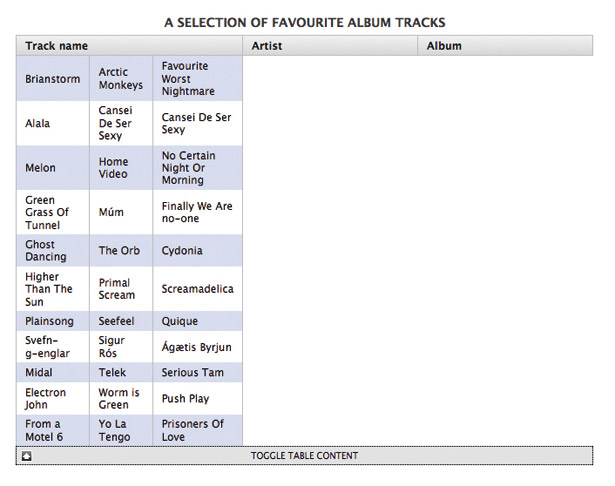
If you take a look at table.html in your tutorial files, you’ll see an example of such a CSS table. This is a simple three-column table that lists some audio track names, along with their related artist and album.
Reduced to its basic structural components, the CSS table looks like the following code block.
<table> <caption></caption> <thead></thead> <tfoot></tfoot> <tbody></tbody> </table>Note that the order in the previous code is correct: head, foot, body. This enables browsers to render the table’s foot prior to receiving all the table’s data. However, browsers then correctly display the row groups in the order you’d expect: head, body, foot.
Technological concerns
To move from a flat table to a collapsible one, a number of things need to be taken into account, such as how the interaction is going to work, which technologies are going to be used for various tasks, and what’s going to happen if certain technologies aren’t available – notably JavaScript.
Get the Creative Bloq Newsletter
Daily design news, reviews, how-tos and more, as picked by the editors.
First: interaction. There needs to be some way of toggling the table body’s visibility (which effectively results in the table ‘opening’ and ‘closing’). A link in the table footer is a logical device for achieving this. In terms of technologies, a combination of JavaScript and CSS is generally used for drawers, with JavaScript being used to toggle the display CSS property (and thereby the visibility) of the element comprising the drawer’s ‘content’. Therefore, JavaScript will be used to change the display value of the tbody element, which will initially be none, so the table starts life collapsed.
That last point then triggers an accessibility problem for users who don’t have JavaScript enabled: without scripting, the CSS table remains firmly shut. Therefore, logically, the default value of the tbody element actually has to make it visible; the none value should only be applied if JavaScript is enabled. This can be done by using JavaScript to attach an override style sheet.
If we do a quick ‘skip to the end’, the results of this thinking through and the subsequent answers are shown in collapsible-tables.html and its related files. Open the document in a web browser and you’ll see the same table caption and table head as earlier, but the table body isn’t visible. The footer, rather than being empty, now has a ‘toggle table content’ link, along with an inviting downwards-facing arrow. Click the link (the entire footer is effectively an active area), and the table body is shown; furthermore, the downwards-facing arrow changes to an upwards-facing one, in order to display what will happen to the table body when the footer link is next clicked.
If you disable JavaScript in whatever browser you’re using and reload the page, you’ll see that the table displays in full, with a couple of exceptions. First, the horizontal stripes are driven by JavaScript, so they aren’t displayed. Secondly, the footer link is irrelevant for browsers that have JavaScript disabled, and so said link is removed (to avoid people clicking it and nothing happening).
Under the hood
The majority of the HTML and CSS is pretty straightforward, and differs little from the CSS table tutorial mentioned earlier. In the mark-up, the only major important addition outside of the head section linking to various dependencies is the table footer, which now includes a link to trigger a JavaScript function. An identical link can be used in other similarly structured tables to drive the same kind of toggle.
<tfoot> <tr> <td colspan="3"><a href="#" onclick="toggle(this); return false;">Toggle table content</a></td> </tr> </tfoot>In the main CSS file, collapsible-tables.css, the things to look out for are the default styles for the tbody element and the link in the table footer. Remember, these are the defaults for when JavaScript is disabled.
tbody { display: table-row-group; } tfoot a { display: none; }
As you can see, tbody has a display value of table-row-group, which specifies that it displays as an element that groups one or more rows. The footer link is set to not display at all, as mentioned earlier. At this point, we need to make a brief aside.
As is often the case, Internet Explorer throws a quick curveball directly to the face. It doesn’t understand table-row-group, but, luckily, it seems to render the page correctly if the value block is used instead. Because this value screws things up in every other browser, it’s applied as an IE-specific override via a conditional comment.
Back to our main programme, and the tbody and table footer link styles for JavaScript-enabled browsers have been added to a separate style sheet, js-override.css. This sets the default display value of tbody to none, thereby making the table collapsed when the page is first opened. It also adds a bunch of styles to the footer link, setting it to display as a block element (thereby filling its container, the table footer) and defining the down-arrow image as its background. A third rule, tfoot a:hover, changes the background colour of the link on the hover state, making it more obvious that it’s a clickable element.
tbody { display: none;}tfoot a { display: block; text-decoration: none; text-transform: uppercase; color: #000000; padding: 4px 0; background: url(down-arrow.gif) 5px 60% no-repeat;}tfoot a:hover { background-color: #eeeeee;}
Exploring the script
The toggle functionality is driven by some of the contents of the JavaScript document collapsible-tables.js. However, the first chunk of code in the script is used to attach the override CSS (js-override.css). Note that this might look long-winded, but it’s compliant, unlike document.write, which should be avoided if you’re intent on using modern methods.
var cssNode = document.createElement('link');cssNode.setAttribute('rel', 'stylesheet');cssNode.setAttribute('type', 'text/css');cssNode.setAttribute('href', 'js-override.css');document.getElementsByTagName('head')[0].appendChild(cssNode);When the table footer link on the web page is clicked, two things must happen: the arrow image should switch, and the visibility of the tbody element has to toggle. Each target is defined via the toggle function.
For the arrow image, this is simple: the image is a background on the table footer link, and so there’s no path to define: style updates are therefore applied to the element that was clicked, denoted by toggler. However, to target the tbody element, a path along the DOM tree is defined using JavaScript properties.
Figuring out the target path is largely a logical process, using the parentNode property to go up one level in the document hierarchy (for example, from td to tr) and nextSibling to access the next child node of a parent. Some browsers count white space as the next sibling, hence the addition of another line to the script that hurries said browsers on to the subsequent sibling.
function toggle(toggler) { if(document.getElementById) { imageSwitch = toggler; targetElement = toggler.parentNode.parentNode.parentNode.nextSibling; if(targetElement.className == undefined) { targetElement = toggler.parentNode.parentNode.parentNode.nextSibling. nextSibling; }The final part of a switching script is usually a simple if/else statement that determines whether an element’s in its default state. If it is, it’s set to its alternate state; if not, it’s set to its default state. With the likes of a div drawer, these values are usually none and block – in other words, if upon the function being triggered a div’s display setting is none, it’s set to block, otherwise it’s set to none.

In the case of our example, the varying requirements of Internet Explorer and all other browsers mean an additional step is needed. First, a variable needs creating to define the alternate CSS display value used to expand the list – block for Internet Explorer and table-row-group for everything else.
if (navigator.userAgent.indexOf('IE')!= -1) { var displaySetting = "block"; } else { var displaySetting = "table-row-group"; }This value is then used in the aforementioned if/else statement. Said statement effectively reads: if the display value of the target tbody element is block (for IE) or table-row-group (for everything else), set it to none and display the down-arrow image; otherwise, set display to block (for IE) or table-row-group (for everything else) and display the up-arrow image.
if (targetElement.style.display == displaySetting) { targetElement.style.display = "none"; imageSwitch.style.backgroundImage = "url(down-arrow.gif)"; } else { targetElement.style.display = displaySetting; imageSwitch.style.backgroundImage = "url(up-arrow.gif)"; } } }
Thank you for reading 5 articles this month* Join now for unlimited access
Enjoy your first month for just £1 / $1 / €1
*Read 5 free articles per month without a subscription

Join now for unlimited access
Try first month for just £1 / $1 / €1

The Creative Bloq team is made up of a group of art and design enthusiasts, and has changed and evolved since Creative Bloq began back in 2012. The current website team consists of eight full-time members of staff: Editor Georgia Coggan, Deputy Editor Rosie Hilder, Ecommerce Editor Beren Neale, Senior News Editor Daniel Piper, Editor, Digital Art and 3D Ian Dean, Tech Reviews Editor Erlingur Einarsson, Ecommerce Writer Beth Nicholls and Staff Writer Natalie Fear, as well as a roster of freelancers from around the world. The ImagineFX magazine team also pitch in, ensuring that content from leading digital art publication ImagineFX is represented on Creative Bloq.
