Hook into native events with PhoneGap
Develop cross-platform apps with web standards: Matt Gifford introduces PhoneGap
We live in an ever-evolving technological landscape, and the transition from the traditional web for desktop machines to mobile devices is now of more importance than ever.
Mobile technology and device capabilities are constantly advancing while user adoption is increasing, too. It's not surprising that more organisations and individual developers want to hook into this exciting format whether for marketing purposes, for the creation of an amazing new application to generate a revenue stream and financial income, or simply to experiment with the software and solutions available.
Which platform do you target? Which language do you write in? The implications of developing mobile applications can raise questions such as these. It may mean that you have to consider learning a new language such as Objective-C, Java, or C++ to create your applications for each platform.
This alone potentially brings with it a number of costs: the financial cost of learning a new language (including time and resource material) and the cost of managing your development workflow effectively. If we then consider pushing the same application to a number of platforms and operating systems, these costs increase and the management of each codebase becomes harder to maintain and control.
PhoneGap aims to remove these complications and the worry of having to develop platform-specific applications using the supported native language for each operating system by letting developers build cross-platform applications using HTML, CSS, and JavaScript, existing web technologies that are familiar to most if not all of us.
This drastically opens the gateway to creating natively installed mobile applications to all web developers and designers, empowering them to use the language skills they already have to develop something specifically for mobile platforms.
We can then add into this the ability to tap into the device's native functionality such as geolocation and GPS, accelerometer, camera, video, and audio capture among other capabilities, implemented using the PhoneGap JavaScript API, and your HTML applications instantly become detailed apps with incredibly powerful features.
Get the Creative Bloq Newsletter
Daily design news, reviews, how-tos and more, as picked by the editors.
Displaying network connection status
Your application may require the user to be connected to a network. This may be for partial updates, remote data transfer or streaming. Using the PhoneGap API, we can easily detect the status or existence of any network connectivity.
How to do it...
In this recipe, we'll build an application to constantly check the network connection status of our device.
In addition to the PhoneGap / Cordova JavaScript library, we will also use XUI.js, a small lightweight JS library to manipulate and alter the DOM elements within our page. You can download a compiled version of the latest XUI.js from monkeh.me/uf65z. If you prefer, you can use the jQuery library instead:
1. Create the initial HTML layout for the application. Include references to the PhoneGap and XUI JavaScript libraries within the head of the document.
2. We will also be setting the deviceready event listener after the DOM has fully loaded, so we’ll also add the onLoad() function call to the body tag:
<!DOCTYPE HTML><html> <head> <meta http-equiv="Content-type" content="text/html; charset=utf-8"> <title>Network Status</title> <script type="text/javascript" charset="utf-8" src="cordova-2.2.0.js"></script> <script type="text/javascript" charset="utf-8" src="xui.js"></script> </head><body onload="onLoad()"> </body></html>3. Let’s add the UI elements to the body of our application. Create a div block to act as a container for our statusMessage and count elements, both of which we will be referencing directly using the XUI library. We will also be inserting content into the speedMessage element, so ensure the id attribute of those three elements match those shown:
<h3>Network Status</h3> <div id="holder"> <div id="statusMessage"></div> <div id="count"></div> </div> <div id="speedMessage"></div>4. Create a new script tag block before the closing head tag and define two global variables, which we will use within the custom code. We can also now define the onLoad method, which will set the deviceready event listener:
<script type="text/javascript" charset="utf-8"> var intCheck = 0; var currentType; function onLoad() { document.addEventListener("deviceready", onDeviceReady, false); } </script>5. Let’s now add the onDeviceready method, called from the deviceready event listener. Within this function we will add two new event listeners to check when the device is connected or disconnected from a network. Both of these listeners will run the same callback method, checkConnection.
6. We will then set up an interval timer to run the same checkConnection method every second to provide us with constant updates for the connection:
function onDeviceReady() { document.addEventListener("online", checkConnection, false); document.addEventListener("offline", checkConnection, false); var connCheck = setInterval(function() { checkConnection(); }, 1000);}7. The checkConnection function sets up the objConnection variable to hold a representation of the device’s connection. This object returns a value in the type property, from which we are able to determine the current connection type. We’ll pass that value into another function called getConnectionType, which we’ll use to return a user-friendly string representation of the connection type.
8. As this method runs every second, we want to be able to determine if the current connection type differs from the previous connection. We can do this by storing the connection type value in the currentType global variable and check if it matches the current value.
9. Depending on the returned value of the connection type, we can optionally choose to inform the user that, to get the most out of our application, they should have a better connection.
10. We will also increment an integer value, stored in the intCheck global variable, which we will use to count the number of seconds the current connection has been active for:
function checkConnection() { var objConnection = navigator.network.connection; var connectionInfo = getConnectionType(objConnection.type); var statusMessage = '<p>' + connectionInfo.message + '</p>'; if(currentType != objConnection.type) { intCheck = 0; currentType = objConnection.type; if(connectionInfo.value <= 3) { x$('#speedMessage').html('<p>This application works better over a faster connection.</p>'); } else { x$('#speedMessage').html(''); } } intCheck = ++intCheck; x$('#statusMessage').html(statusMessage); x$('#count').html('<p>Checked ' + intCheck + ' seconds ago</p>');}11. The getConnectionType method mentioned previously will return a message and value property depending on the type value sent as the parameter. The value properties have been assigned manually to allow us to control what level of connection we deem best for our application and for the experience of our users:
function getConnectionType(type) { var connTypes = {}; connTypes[Connection.NONE] = { message: 'No network connection', value: 0 }; connTypes[Connection.UNKNOWN] = { message: 'Unknown connection', value: 1 }; connTypes[Connection.ETHERNET] = { message: 'Ethernet connection', value: 2 }; connTypes[Connection.CELL_2G] = { message: 'Cell 2G connection', value: 3 }; connTypes[Connection.CELL_3G] = { message: 'Cell 3G connection', value: 4 }; connTypes[Connection.CELL_4G] = { message: 'Cell 4G connection', value: 5 }; connTypes[Connection.WIFI] = { message: 'WiFi connection', value: 6 }; return connTypes[type];}12. Finally, let’s add some CSS definitions to the bottom of our application to add some style to the UI:
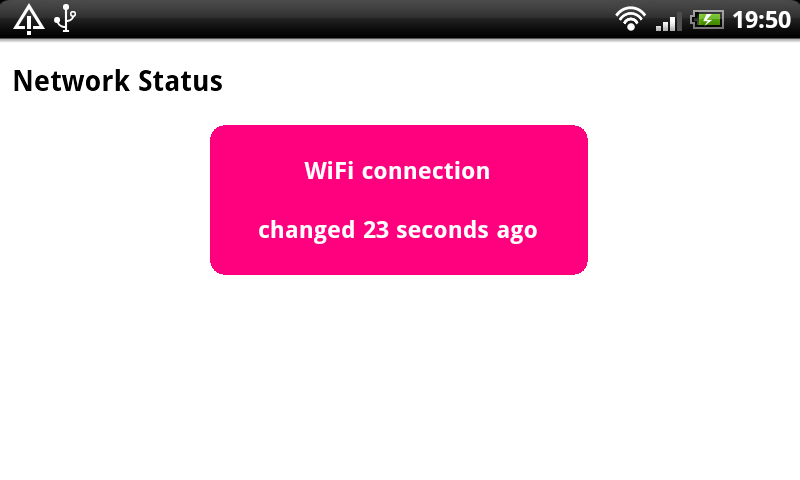
<style>div#holder { width: 250px; min-height: 60px; margin: 0 auto; position: relative; border: 1px solid #ff0080; border-radius: 10px; background: #ff0080;}div#holder p { margin: 20px auto; text-align: center; color: #ffffff; font-weight: bold;}div#speedMessage { width: 250px; margin: 0 auto; position: relative;}</style>13. Running the application on our device, the output will look something like this:

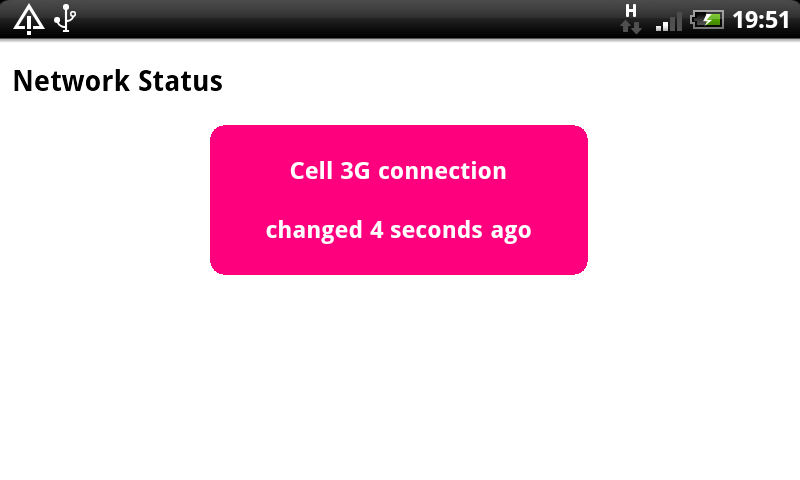
14. If our user changes their connection method or disconnects completely, the interval timer will detect the change and update the interface accordingly, and the timer will restart:

How it works ...
We set up the onDeviceReady method to create two new event listeners to check for the online and offline events respectively. The online event will fire when the device’s network connection is started, and the offline event will fire when the network connection is turned off or lost.
These events will only fire once, and so in this recipe we added in the setInterval timer function to constantly call the checkConnection method to allow us to obtain changes made to the network. The addition of this functionality helps greatly and identifies when a user's device switches from a 3G to a WiFi connection, for example. If this happens, the device would not go offline, but simply change the connection type.
There's more ...
Your application may involve streaming data, remote connections or another process that requires a certain level of connectivity to a network. By constantly checking the status and type of connection, we can determine if it falls below an optimal level or recommended type for your application. At this point, you could inform the user, or restrict access to certain remote calls or data streams to avoid latency in your application’s response and possible extra financial costs incurred to the user from their mobile provider.
To delve deeper into the available API methods and interacting with device features, check out the PhoneGap Mobile Application Development Cookbook, published by Packt Publishing.

Thank you for reading 5 articles this month* Join now for unlimited access
Enjoy your first month for just £1 / $1 / €1
*Read 5 free articles per month without a subscription

Join now for unlimited access
Try first month for just £1 / $1 / €1

The Creative Bloq team is made up of a group of art and design enthusiasts, and has changed and evolved since Creative Bloq began back in 2012. The current website team consists of eight full-time members of staff: Editor Georgia Coggan, Deputy Editor Rosie Hilder, Ecommerce Editor Beren Neale, Senior News Editor Daniel Piper, Editor, Digital Art and 3D Ian Dean, Tech Reviews Editor Erlingur Einarsson, Ecommerce Writer Beth Nicholls and Staff Writer Natalie Fear, as well as a roster of freelancers from around the world. The ImagineFX magazine team also pitch in, ensuring that content from leading digital art publication ImagineFX is represented on Creative Bloq.
