Create your own real-time forum with Meteor
Meteor is one of a new breed of JavaScript frameworks changing the way we build web apps. Tom Coleman and Sacha Greif explain how to get started in building a simple forum.
Launched in April 2011, Meteor is a JavaScript framework that's part of a wave of tools ushering in a new way of developing web apps. You know the kind: you keep hearing about them and promise yourself you'll check them out, yet never find the time to actually dive in.
Luckily we're here to help you out. So follow along, and in less than 30 minutes you'll have Meteor up and running, will be playing around with its impressive real-time capabilities, and will finally know what all the fuss is about.
- Download the source files for this tutorial

Why Meteor?
So what makes Meteor worth bothering with in the first place? Well for starters, it has a few very interesting features:
- Real-time and reactive Meteor's biggest selling point is that it's real-time by default. Everything happens live in your app, and Meteor will automatically reflect any change to the data in your user interface.
- All JavaScript Hate it or love it, you can't deny that JavaScript is one of the most popular languages online. The fact that Meteor uses JS both on the client and on the server makes it particularly approachable for beginners, especially if you've got past experience with traditional in-browser JavaScript.
- Simple and smart What makes Meteor so nice to work with is not just its powerful capabilities, but the small touches that make your life easier, such as automatic CSS and JavaScript including, or a built-in authentication UI widget.
Getting started
For this first tutorial, we'll create a bare-bones application and play around with it. So let's start by installing Meteor. Just open up your command line and run the following command:
curl https://install.meteor.com | /bin/shAs long as you are running a supported platform, everything should go smoothly. To make sure Meteor is working on your machine, we'll create a simple app:
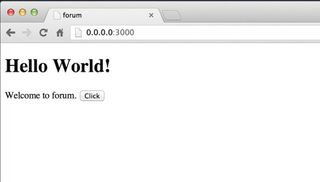
meteor create forumIf that works, we should be able to run the app by following the simple steps:
cd forum
meteor
Making sense of templates
The simple application that Meteor created for us doesn't do much yet, but it provides a good example of Meteor's templating system. Meteor uses Handlebars for its template, which you can simply see as normal HTML with a few special tags that act as placeholders.
Get the Creative Bloq Newsletter
Daily design news, reviews, how-tos and more, as picked by the editors.
Let's take a look by opening forum.html in a text editor. Here, {{> hello}} simply means 'replace me with the template named hello. And sure enough, the hello template is defined right below in the same file:
<template name="hello">
  <h1>Hello World!</h1>
  {{greeting}}
  <input type="button" value="Click" />
</template>
{{greeting}} is another type of placeholder. Unlike the first one, it calls a 'helper' rather than another template.
Helpers are defined in a template's JavaScript controller, and in this case, in forum.js, as follows:
Template.hello.greeting = function () {
  return "Welcome to forum.";
};
Storing data with collections
So we know how to display data with templates, but where does this data actually come from? Meteor uses MongoDB, which stores items in 'collections'. So let's create a new collection, and then tell the posts template about it. Clear away the contents of forum.js and then type this in:
var Posts = new Meteor.Collection('posts');
if (Meteor.isClient) {
  Template.posts.helpers({
    posts: function() {
      return Posts.find();
    }
  })
}
A lot is going on behind the scenes here. We've created a Meteor collection called 'posts', client- and server-side.

Server-side, when documents are added to the collection, they'll be written into the persistent MongoDB database. Client-side, the 'posts' collection automatically connects to the server and creates an in-browser local mirror (or cache) of the server-side collection. So when documents are created in a browser, they're shuttled up to the server, which then inserts them in Mongo, and transmits them out to all other connected 'posts' collections.
Client vs server
You may have noticed Meteor.isClient. Meteor apps stand alone in the web world in that they can run code both on the browser and on the server... and in some cases, even the same code!
Meteor provides you with two ways of controlling this. First, if you create /server and /client directories, anything you put in there will only be loaded in the given environment.
If you need more fine-grained control over your code's execution, Meteor also provides the Meteor.isClient and Meteor.isServer variables that we're using here, which enable you to mix server and client-side code in the same file. And if you don't specify an environment at all, the code will just run in both places, as happens with our first line of code.
Before we move on to actually adding data to our collection, let's also update our main app template to display the posts helpers we're going to be passing it. Just replace the contents of forum.html with this:
<head>
  <title>Forum</title>
</head>
<body>
  {{> posts}}
</body>
<template name="posts">
  <h1>Posts</h1>
  <ul>
    {{#each posts}}
      <li>{{title}}</li>
    {{/each}}
  </ul>
</template>
Pay attention to that {{#each}}. It's a 'block helper', and it's doing two things at once. First, it's telling the template to repeat the block once for each post (remember, we get the value of posts from our template helper of the same name). Second, it's saying that within the block, the value of this is the currently iterated element – in this case a single post. This means that when we write {{title}}, the template knows we really mean this.title even if we didn't define a specific title helper in our controller.

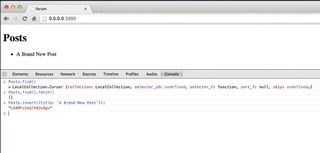
Let's take a closer look at this magic collection. Since Meteor partly lives in the browser, we can just use the browser console to talk to it! Run the code used to tell the posts template to query the data collection:
Posts.find()
» ‣LocalCollection.Cursor
A Cursor is a Meteor data source, which returns data matching the query it was given (an empty query in our case). It's not so interesting for us now, so let's extract the data out of it with:
Posts.find().fetch()
» []
That call should return an empty array []. That's because there are no posts. So let's add one!
Posts.insert({title: 'A Brand New Post'});Instantly, we see a post appear in the page, as Meteor's reactive rendering keeps the HTML in sync with the underlying data model. But wait, there's more; we can now fetch the post out of the collection in the client:
Posts.find().fetch()
» [‣Object]
Not only is the post now living in the local collection and appearing in our browser tab, but try refreshing the browser and our new post will still be there. Behind the scenes, Meteor has synchronised that post object ({title: 'A Brand New Post'}) up to the server, saved it into the database, and is now distributing it to all clients that ask for posts.

Fleshing out our user interface
Now that we know how to insert data via the console, let's see how to do the same thing via an actual user interface (and give our posts an extra body field in the process). First, let's add a simple form to our template. Add the form template to forum.html:
<template name="form">
  <form>
    <label>Post Title:
      <input type="text" id="title" />
    </label>
    <label>Post Body:
      <textarea id="body"></textarea>
    </label>
    <input type="submit" value="Submit" id="submit"/>
  </form>
</template>
Then call it from the app's markup:
<body>
  {{> form}}
  {{> posts}}
</body>
Now all that's left to do is hook up our controller to make our form really do something. To do this, let's define an 'event helper' for our form template. Add this inside the Meteor.isClient block:
Template.form.events = {
  'click #submit': function(event){
    event.preventDefault();
    var title = $('#title').val();
    var body = $('#body').val();
    Posts.insert({
      title: title,
      body: body
    });
    $('#title, #body').val('');
  }
}
First, to tell Meteor when to run the helper, we simply use the event keyword (in this case click) followed by a CSS selector.
The helper function takes the JavaScript event as argument, and we call the preventDefault() method on it to suppress the browser's default behaviour (submitting the form). We then obtain the form fields values thanks to our old pal jQuery, which conveniently happens to be bundled by default with Meteor.
All that's left is then to insert our new post into our collection. You'll have noticed that the syntax is exactly the same as when we were using the JavaScript console, and we finish up by clearing our form to prevent submitting the same thing twice by mistake. Finally, let's not forget to update our posts template to display our new body field:
<template name="posts">
  <h1>Posts</h1>
  <ul>
    {{#each posts}}
      <li>
        <h3>{{title}}</h3>
        <p>{{body}}</p>
      </li>
    {{/each}}
  </ul>
</template>
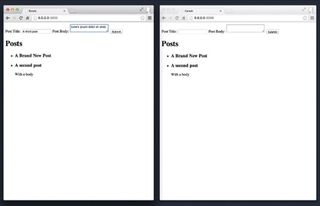
Open your site in two different browser windows side by side, and start a new post. You'll see data inserted in one window is instantly mirrored in the other!

User accounts
Meteor makes implementing user accounts very easy thank to its pre-packaged user authentication system. To activate it, we're going to add the accounts-ui and accounts-password packages (Meteor packages are optional modules give your app extra capabilities). Go back to your terminal and type:
meteor add accounts-ui && meteor add accounts-passwordNot only does Meteor provide all the behind-the-scenes machinery that makes user accounts work, but it also gives us a nice ready-to-use front-end widget. Let's go back to `forum.html` and add the `{{loginButtons}}` helper just before our form, like so:
<body>
{{loginButtons}}
{{>form}}
{{>posts}}
</body>
You should now have a 'sign in' link that opens up a log in/sign up dropdown. We want users to log in using a username/password combination. Add these lines in forum.js right after if (Meteor.isClient) {:
Accounts.ui.config({ passwordSignupFields: 'USERNAME_ONLY' });Once that's done, go ahead and create an account. Now let's link up our posts to our users. In the Post.insert block, let's add the username of the current user, which we get from calling Meteor.user() to the post properties:
Posts.insert({
title: title,
username: Meteor.user().username,
body:body
});
To modify our template, we'll make it that only logged in users can see the submit post form. Enclose our {{form}} template in a simple if statement. In a template, we can get the current user object by calling currentUser:
{{#if currentUser}}
  {{>form}}
{{else}}
  <p>Please log in to submit a new post.</p>
{{/if}}
Finally, display the username of each post's author:
{{#each posts}}
<li>
  <h3>{{title}}</h3>
  <p><em>by {{username}}</em></p>
<p>{{body}}</p>
</li>
{{/each}}
Throughout this tutorial, we've seen that, with Meteor, a few lines of code are enough to get a simple app up and running. And, if you want to learn how to take things further, you're welcome to check out our book Discover Meteor!
Words: Tom Coleman and Sacha Greif
This article originally appeared in net magazine issue 242.
Liked this? Read these!
- Brilliant Wordpress tutorial selection
- Our favourite web fonts - and they don't cost a penny
- How to make an app: try these great tutorials
Got a question? Ask away in the comments!

Thank you for reading 5 articles this month* Join now for unlimited access
Enjoy your first month for just £1 / $1 / €1
*Read 5 free articles per month without a subscription

Join now for unlimited access
Try first month for just £1 / $1 / €1
The Creative Bloq team is made up of a group of design fans, and has changed and evolved since Creative Bloq began back in 2012. The current website team consists of eight full-time members of staff: Editor Georgia Coggan, Deputy Editor Rosie Hilder, Ecommerce Editor Beren Neale, Senior News Editor Daniel Piper, Editor, Digital Art and 3D Ian Dean, Tech Reviews Editor Erlingur Einarsson and Ecommerce Writer Beth Nicholls and Staff Writer Natalie Fear, as well as a roster of freelancers from around the world. The 3D World and ImagineFX magazine teams also pitch in, ensuring that content from 3D World and ImagineFX is represented on Creative Bloq.


