Use glyphs to design a poster
Boost your typography design skills by using glyphs to create a striking poster in InDesign. Jo Gulliver shows you how.
- Software: InDesign CS3 or later
- Project time: 1-2 hours
- Skills: Substitute glyphs, use OpenType fonts, set up glyph sets
What are glyphs? They’re essentially a graphic shape that can represent a character, or part of a character. They can have the appearance of numbers, letters, punctuation or even a decorative form. Glyphs also refer to the graphic symbols that aren’t visible on your keyboard - things like fractions, currency symbols and accented letters.
There are a number of OpenType fonts that have an extensive selection of glyphs, with many alternative forms to represent one character. Incorporating these alternatives into your work is a great way to customise typography and add flourishes to your type design. This tutorial will take an in-depth look at InDesign’s Glyphs panel, showing you how to use glyphs and all the options available to speed up your workflow.
Step 01
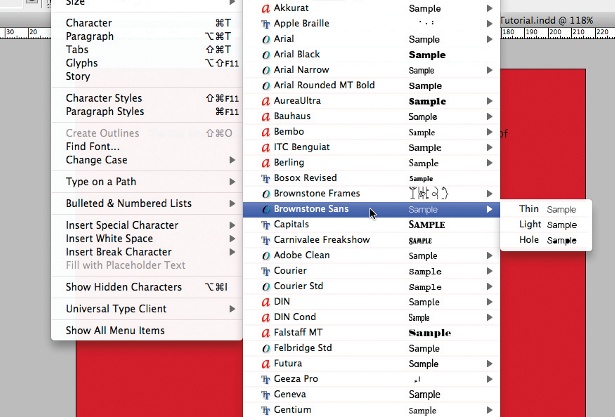
With a new document open, the first step is to decide what copy you’re using. You’ll then need to select your font. It’s best to use an OpenType font, since these are more likely to contain multiple glyphs. The type of font is easily visible if you go to Type>Font. The symbol to the left of the name indicates what type of format the font is and a preview of the font is also shown. If this isn’t showing, open Indesign preferences (Cmd/Ctrl+K) and under Type, tick the Font preview Size box.
Step 02
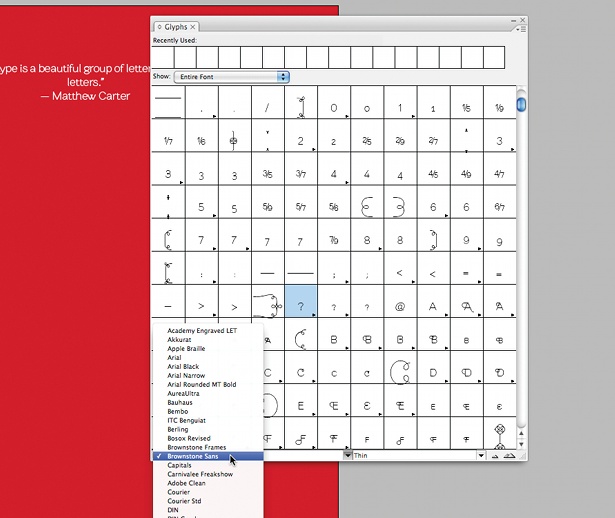
I’ve decided to use the Brownstone typeface family. Each weight contains up to 1,500 glyphs, so there are lots to play with. To see what glyphs are available in your font, open your Glyphs panel, which is found under the Window menu (Window> Type & Tables>Glyphs). If your font isn’t selected, use the drop-down menu at the bottom of the panel. There’s also a zoom in and out button located at the bottom of the panel, which is useful for getting a better look at the glyphs.
Step 03
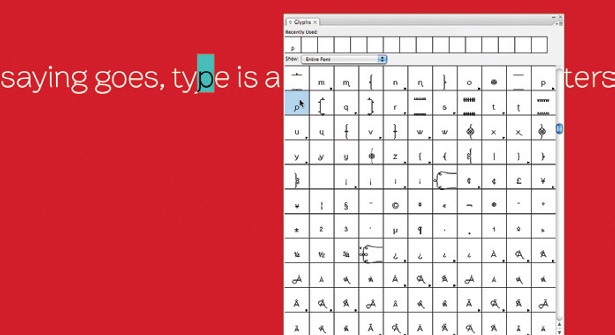
To show all the glyphs available, make sure Entire Font is selected in the Show drop-down menu. As you scroll through you’ll see a lot of variations of letterforms as well as numerous characters that aren’t on the keyboard. To use a glyph, just position the Text tool in the appropriate place and double-click on your selected glyph.
Step 04
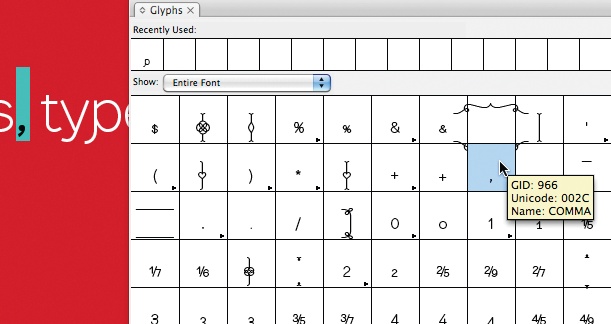
If you hover over a glyph in your panel, a tool tip will appear with information about it. Included in the information is the glyph’s Unicode number, which relates to a Unicode standard for numbering font characters. This standard ensures that each character has the same number across different fonts – for example, a comma always has the Unicode of 002C.
Step 05
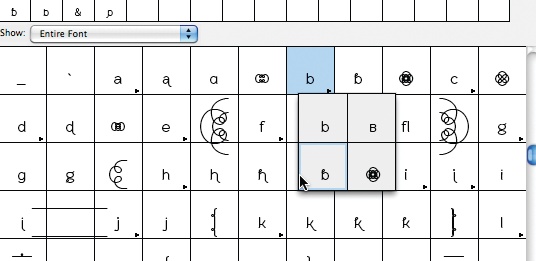
For fonts with lots of glyphs, scrolling through the panel can be time-consuming. However, there are a few options to make searching for different letterforms easier: some of the glyphs have a small, black arrow in the bottom-right of the box, which indicates there are alternatives. If you click-and-hold, the different options for that letter are revealed, helping you can make a quicker selection.
Step 06
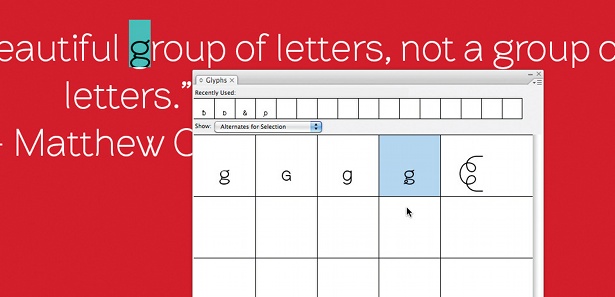
Alternatively, the Show drop-down menu in the Glyphs panel gives you lots of options for narrowing down your search. Alternates for Selection is really useful for viewing the options for different letterforms. When selected, highlight your chosen letter and the alternatives will be shown in the panel. In Brownstone’s case, we also get an ornamental border.
Get the Creative Bloq Newsletter
Daily design news, reviews, how-tos and more, as picked by the editors.
Step 07
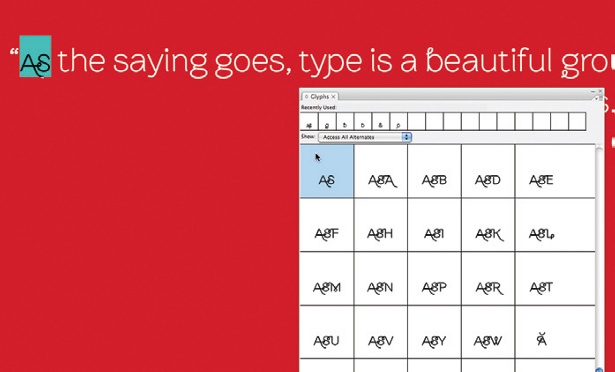
Many OpenType fonts will also have a number of custom ligatures, aside from the standard ligatures ‘fi’ and ‘fl’, so it’s always worth having a look through the glyphs to see the other letter combinations available. Brownstone has a number available to narrow your search under Access All Alternates in the Show drop-down menu.
Step 08
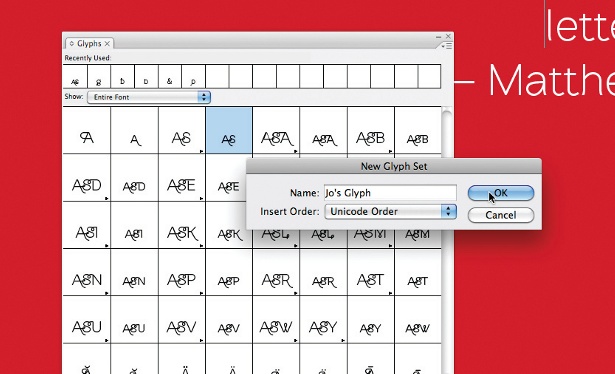
The Glyphs panel automatically stores your last 10 recently used glyphs at the top of the panel. You can also create a custom glyph set: select New Glyph Set from the fly-out menu, or Ctrl/right-click on the Glyphs panel. Name it, click OK, then add glyphs to your set by Ctrl/right-clicking on a chosen glyph and selecting Add To Your Set. The great thing about this option is you can use glyphs from multiple fonts and save them in the one set, which can really help speed up your workflow.
Step 09
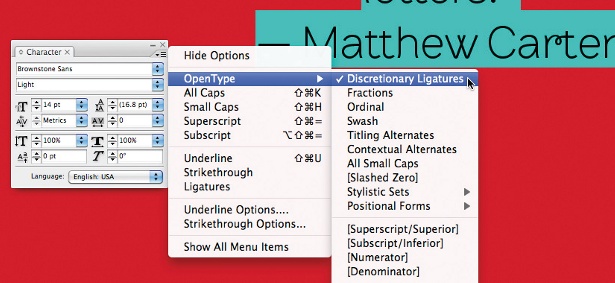
Another way to use glyphs is to select them via the Character panel and choose OpenType. This brings up a list similar to that of the Glyphs panel’s Show drop-down menu. If the selected font doesn’t support one of these options, it’s shown in square brackets. This method does limit you to only one alternative – which is fine for fonts that have limited glyphs – and is more suited to making global changes to a body of text.
Step 10
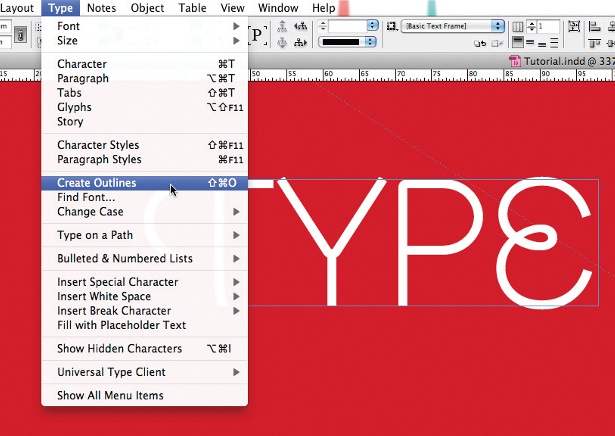
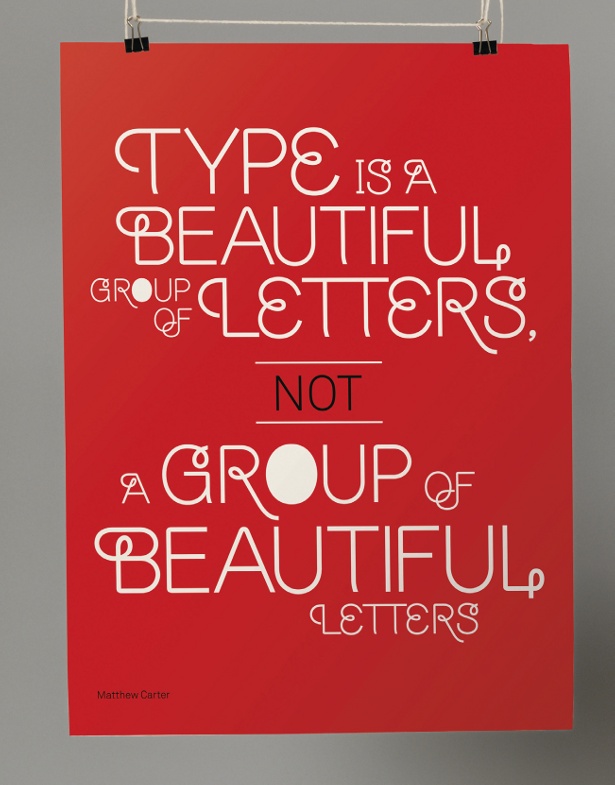
Now you know the ins and outs of the Glyphs panel, you can begin to design posters and experiment with combinations of glyphs and font sizes. When working with larger text I find creating outlined text of individual or groups of words makes them much easier to work with. To outline your text, select the text frame and, under the Type menu, select Create Outlines or hit Cmd/Ctrl+ Shift+O.
Final result:
Liked this? Read these!
- Download the best free fonts
- Free graffiti font selection
- Free tattoo fonts for designers
- Free Photoshop actions to create stunning effects
- Create a perfect mood board with these pro tips
- The best free web fonts for designers

Thank you for reading 5 articles this month* Join now for unlimited access
Enjoy your first month for just £1 / $1 / €1
*Read 5 free articles per month without a subscription

Join now for unlimited access
Try first month for just £1 / $1 / €1

The Creative Bloq team is made up of a group of art and design enthusiasts, and has changed and evolved since Creative Bloq began back in 2012. The current website team consists of eight full-time members of staff: Editor Georgia Coggan, Deputy Editor Rosie Hilder, Ecommerce Editor Beren Neale, Senior News Editor Daniel Piper, Editor, Digital Art and 3D Ian Dean, Tech Reviews Editor Erlingur Einarsson, Ecommerce Writer Beth Nicholls and Staff Writer Natalie Fear, as well as a roster of freelancers from around the world. The ImagineFX magazine team also pitch in, ensuring that content from leading digital art publication ImagineFX is represented on Creative Bloq.
