Design pixel-perfect vector icons
Jory Raphael shares some simple but effective techniques for creating scalable icons for web and mobile.
In this walkthrough, I'm going to demonstrate how I use Adobe Illustrator's built-in effects and core tools to simplify the process of drawing complex shapes.
Illustrator has two types of effects: Illustrator Effects and Photoshop Effects. Both are great ways to preview styles before fully committing to them. But Photoshop Effects, once fully applied, require converting objects and shapes to raster, whereas most Illustrator Effects keep the vector data.
While many icons are drawn using vectors, they're most often viewed in the bitmap world of screens. Paying attention to pixel-level detail is still important.
By adhering to a grid and specifying the exact placement of elements as we draw them, we can ensure that our vector icons are both crisp and pixel-perfect.
01. Starting out…
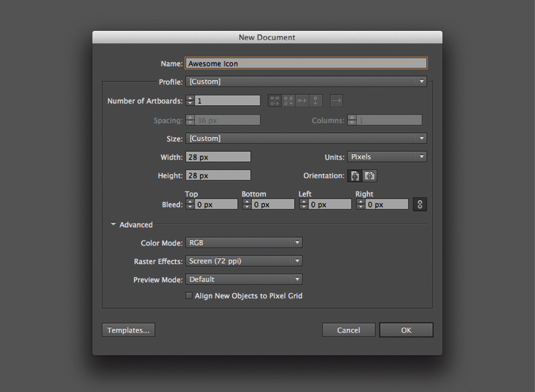
Create a new Illustrator document. Set the width/height fields to 28px. Set Units to Pixels. Click OK. Open Preferences>Guides & Grid…. Set Gridline to every: and Subdivisions: 10px. Click OK. Go to View>Show Grid. Hit Selection Tool (V) and select the line. Go to Effects>Distort & Transform>Zig Zag….
02. Zig zag and curve
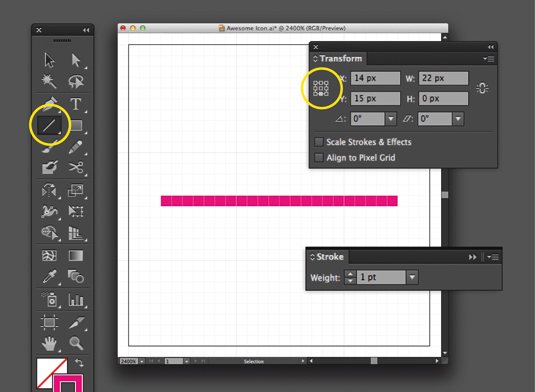
Enter Size: 1px, Ridges per segment: 5px. Set Points to Smooth. Choose the Line Segment Tool (\). Draw a line while holding shift. In the Transform panel, select the small grid and set X to 14px and Y to 15px. Set width to 22px. Open the Stroke panel. Set to 1pt. Select the line and go to Object>Expand Appearance.
03. Draw a circle
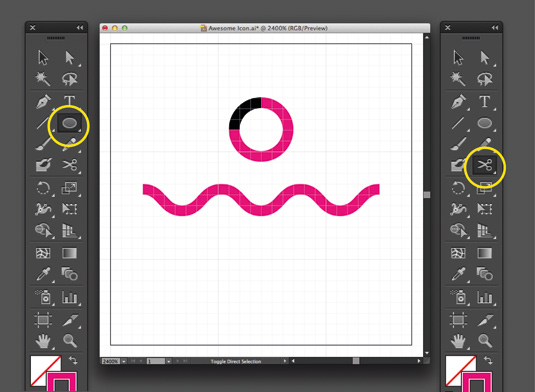
Hit the 'L' key. Click the Artboard. Set width height to 5px. Select the circle; hit 'C'. Click the circle's top/left anchor. Hit V, select the larger part of the circle and delete it. Select the last arc. With the Transform panel, select the top-right point. Set X to 3px and Y to 14px. Select the arc and go to Object>Path>Join.
Get the Creative Bloq Newsletter
Daily design news, reviews, how-tos and more, as picked by the editors.
04. Duplicate lines
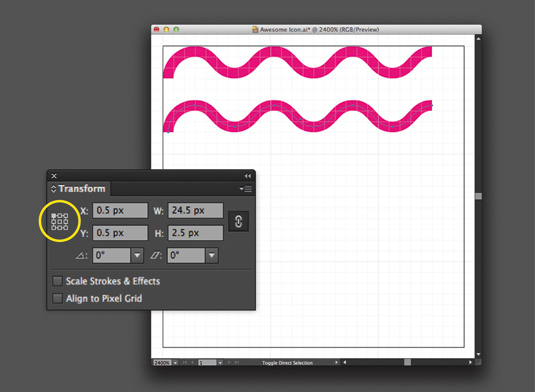
Select the path. Using the Transform panel, choose the top-left point and set X and Y to 0.5px. With the line selected, hold Opt/Alt move the line to duplicate. Select the new line, hit 'R' and Return. In the pop-up, set angle to 180-degrees. With the Transform panel, select the lower right point and set X and Y to 27.5px.
05. Join the lines
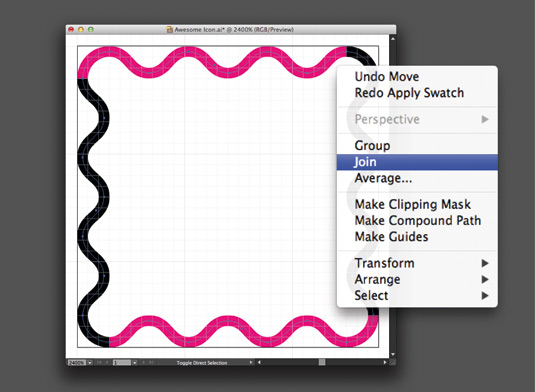
Select both lines, copy them, then paste them in place (Shift+Cmd/Ctrl+V). Press R for the Rotate Tool and hit Return. Input 90%. Select all four lines and go to Object>Path>Join. Select the new shape and go to Object>Expand. Hit OK in the dialog. Hit 'A', click the inside edge of the outline and hit delete.
06. Building the frame
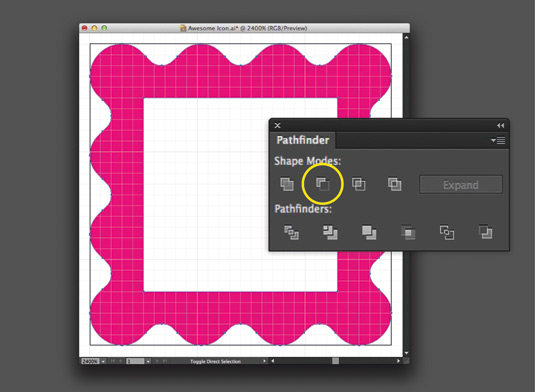
Select the Rectangle Tool (M); click on the Artboard. In the pop-up, set width and height to 18px. Click OK. In the Transform panel, select the centre point and set X and Y to 14px. Select the outer frame and the square. In Window>Pathfinder under Shape Modes, select Minus Front. Check everything is lined up.
07. Draw the head
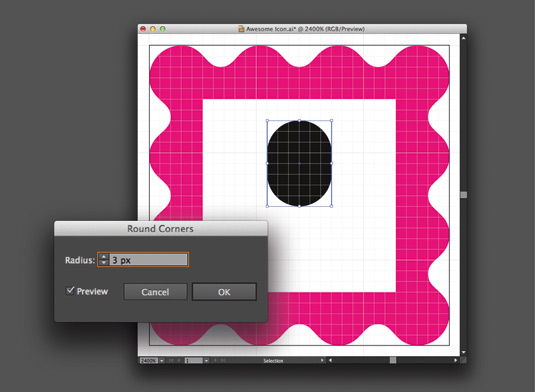
Draw a 6px by 8px rectangle (hit 'M') in the frame. In the Transform panel, select the top centre point: set X to 14px and Y to 7px. Select the rectangle and open the Effects menu. Select Stylize>Round Corners. In the pop-up, make radius 3px and go to Object> Expand Appearance to make it a single object.
08. Build the shoulders
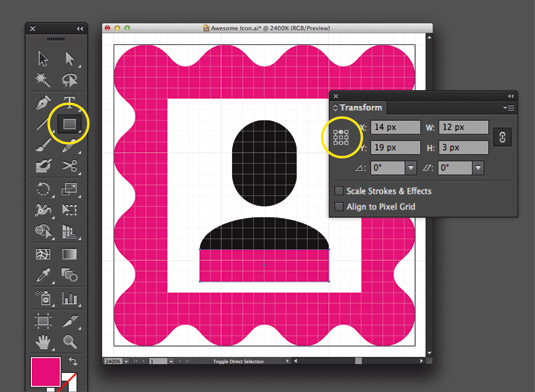
Draw an oval with the Ellipse Tool. In the pop-up, set width to 12pxm, height to 6px. Select the top centre point in the Transform panel and set X to 14px and Y to 16px. Press M, click anywhere and create a 12px by 3px rectangle. In the Transform panel, select the top centre point and set X to 14px and Y to 19px.
09. Merge the shapes

Select all the objects on the Artboard and in the Pathfinder panel select Unite. What once was four shapes is now a single shape. And there you have it. Now you have a simple vector icon created from a crisp pixel grid. It'll stay crisp at multiples of 28px (56px, 112px and so on) and can be infinitely scaled.
Words: Jory Raphael
Jory Raphael is a designer and illustrator specialising in clean, usable graphics. In addition to working at his Vermont studio, Sensible World, he is responsible for the artwork of 5by5 and is the creator of the custom-crafted icons at font foundry Symbolicons. This tutorial appeared in Computer Arts issue 235.
Like this? Read these!
- Illustrator tutorials: amazing ideas to try today!
- Free graphic design software available to you right now!
- Great examples of doodle art

Thank you for reading 5 articles this month* Join now for unlimited access
Enjoy your first month for just £1 / $1 / €1
*Read 5 free articles per month without a subscription

Join now for unlimited access
Try first month for just £1 / $1 / €1

The Creative Bloq team is made up of a group of art and design enthusiasts, and has changed and evolved since Creative Bloq began back in 2012. The current website team consists of eight full-time members of staff: Editor Georgia Coggan, Deputy Editor Rosie Hilder, Ecommerce Editor Beren Neale, Senior News Editor Daniel Piper, Editor, Digital Art and 3D Ian Dean, Tech Reviews Editor Erlingur Einarsson, Ecommerce Writer Beth Nicholls and Staff Writer Natalie Fear, as well as a roster of freelancers from around the world. The ImagineFX magazine team also pitch in, ensuring that content from leading digital art publication ImagineFX is represented on Creative Bloq.
