How to draw basic shapes
Follow this guide to learn how to create complex forms by combining simple, geometric shapes.
01. How to draw a circle
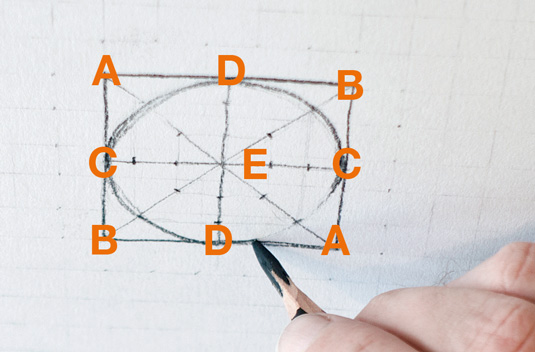
Measure out a square using a ruler. From the top left corner, draw a line [A] to the bottom right. Draw a second from top right to lower left [B]. Add two centre lines, [C] and [D]. On the eight short lines going out from the centre, plot dots at incremental thirds [E]. Now draw your circle tangent to the sides of the square and using the plot points placed two thirds from the centre. 'Ghost draft' this to practice first.
02. How to draw an ellipse
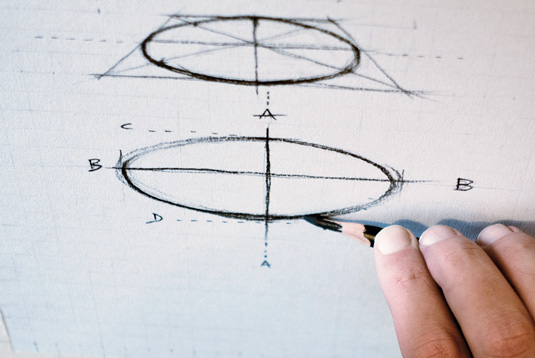
To draw a circle that appears tilted in perspective (an ellipse) repeat step 6 but this time start with a square drawn on an imaginary angled plane. You can simplify this process by drawing two lines dissecting each other, one short and vertical [A], the other horizontal and longer [B]. Now plot end points. Those on the horizontal line should be equal in distance from the centre.
Complete your ellipse
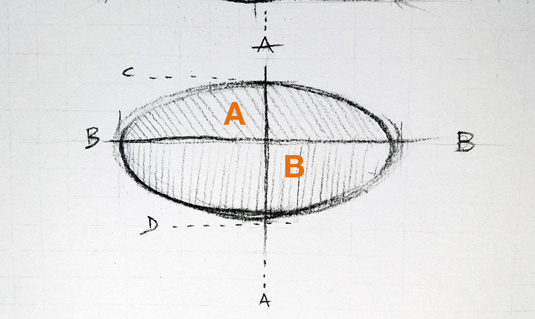
Once again it's about connecting these points with a curvilinear path. But this time the upper semi-circle [A] is more foreshortened than the lower arc [B]. Practise this process small at first, just to build up your confidence – then move onto larger ellipses, which require more gestural arm and shoulder movements. It takes a lot of training to draw accurate ellipses.
03. How to draw a cylinder
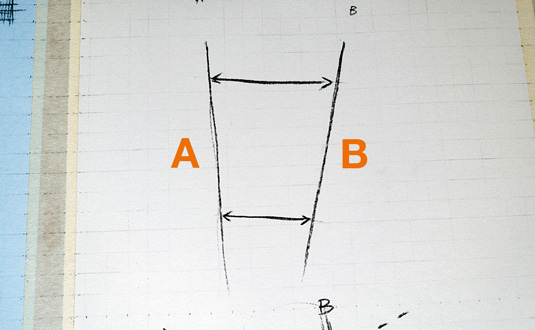
You first need to determine your cylinder's size and orientation in 3D space. Draw an angled line measured to express its length in depth [A]. Introduce a line that runs parallel to it to determine the cylinder's width [B].
These two lines should be tapering to an imagined far off point to express any foreshortening that's occurring. The shape of both end ellipses depends on your viewing angle; in both cases the angle of each is perpendicular to the established sides.
Complete your cylinder
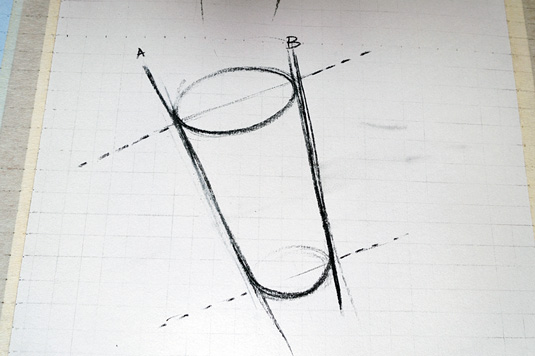
Your ellipses should run perpendicular to your edge lines; knowing this helps you avoid 'squished' cylinders, a common issue when using horizontal ellipses to cap the ends of angled cylinders. Applying this rule will also help you describe cross contour lines accurately. When you need to add a cross contour line to a cylinder, lightly 'draw through' the entire ellipse in question, this helps maintain the curved ends found when the visible line connects to the form edges.
Try this cylinder exercise
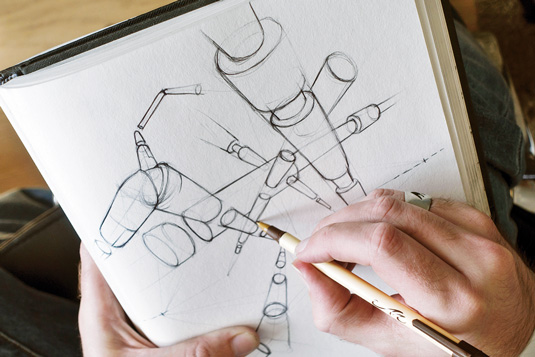
Establish a horizon line, then draw a plumb line directly down the centre of your paper. From the converging centre point, draw a set of diagonal lines reaching outwards mimicking the length and width lines [A & B] from step 9, and cap it off with an ellipse. As this first cylinder started life at a single point (the vanishing point) we've actually drawn a tiny cone. Now continue to draw more cylinders, continuing along the established perspective plane.
Get the Creative Bloq Newsletter
Daily design news, reviews, how-tos and more, as picked by the editors.
04. How to draw a sphere
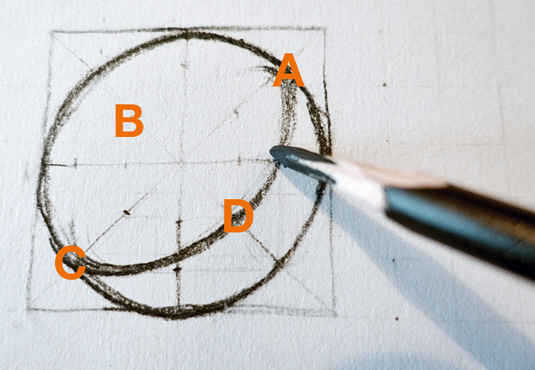
We can express spherical form using cross contour lines. Repeat step 6, but take it further by creating an ellipse within the circle. Starting at [A], lightly draw a curve with a trajectory that passes through the first third-from-centre plot point [B] then follows around to the opposite edge [C], continuing through to the next third-from-centre [D] point, ending where it began [A]. Erase the upper or lower arc.
This article originally appeared in ImagineFX's How to draw & paint bookazine.
Related articles:
- How to improve your character drawing
- How to draw manga
- Discover the 5 best pencils for artists and designers

Thank you for reading 5 articles this month* Join now for unlimited access
Enjoy your first month for just £1 / $1 / €1
*Read 5 free articles per month without a subscription

Join now for unlimited access
Try first month for just £1 / $1 / €1
