How to use the BodyPaint tool in Cinema 4D
Cinema 4D’s BodyPaint tool offers a fast way to get a good-quality render. Matt Roussel explains.
In this tutorial, I will show you a simple way to start texturing assets with the BodyPaint 3D paint assistant and the BodyPaint UV editor in Cinema 4D.
This method is the best way I have found to bridge the inevitable compromise between timeframe and finish quality. I used this method for the first time for the project momo, which is a book telling the story of a little bird flying to Paris to reach his best friend, another bird. For this project I made the most of using BodyPaint because the character didn’t change very much during the story, and I was working against a tight deadline.
Once the main character was textured, all I had to was change his pose in each illustration. I used this method for all textures of the book, including the buildings.
01 Name your elements
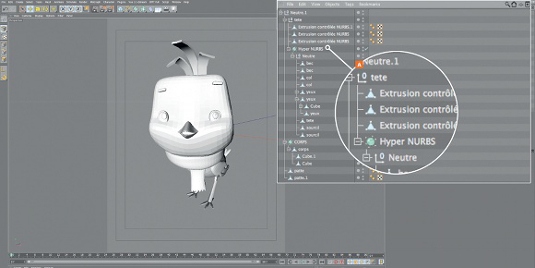
Momo the bird is composed of various grouped hyperNURBS. The first thing to do is to give a different name for each of the character elements. A This is important for the assistant and the names of the textures it generates. If you don’t do that, your textures will have really long names, and that could cause problems later on.
02 Paint set-up
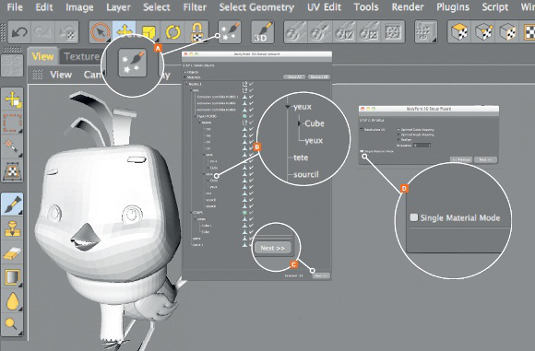
Select BP UV Edit form the Layout dropdown in the top right corner, and click on the Paint Setup Wizard icon. A Deselect all and select the object you want to texture – in this case, it’s the head. B Click on Next, C and don’t forget to untick the Single Material Mode option. D
03 Head resolution
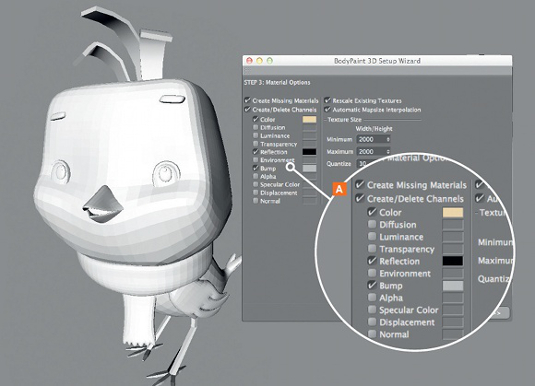
Click Next and add all the channels you want. A In this case, it’s colour, reflection and bump. Then choose a colour, but don’t touch the reflection and bump channels. To have a good enough resolution for the head, I chose a texture size of 2,000 x 2,000 pixels. Had I just been working on the eyes, the resolution would have been lower – something like 800 x 800 is enough for the print size I’m working on here. Once I have selected the size, I click End, and the colour is applied to the bird’s head.
04 Cubic mode
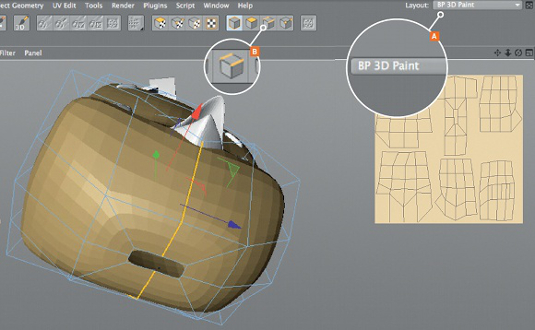
The next step is to reorganise the projection of the texture with the BP UV Editor before painting with BodyPaint. Load the BP 3D Paint menu via the drop-down in the top right of the interface. A Select the head in the viewport and, in the viewport’s Texture tab, choose UV Mesh > Show UV Mesh. You can see that the mesh is in Cubic mode.
Get the Creative Bloq Newsletter
Daily design news, reviews, how-tos and more, as picked by the editors.
Go back to the View tab and select Edge Mode via the top toolbar. B You have to select some edges if you want to cut the future mesh, so select them around the model as shown in the screenshot. You will also need to have a hole on your model for it to unfold properly.
05 Equal and even polygons
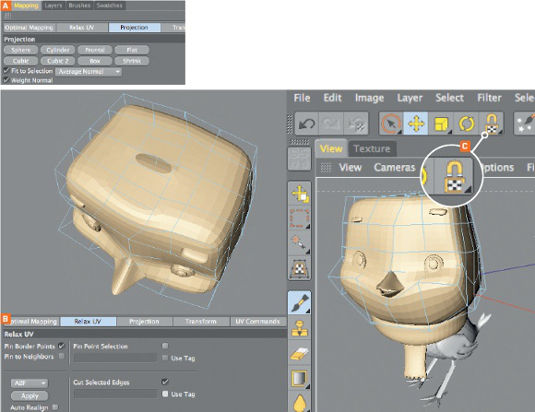
Now select Polygon Mode from the menu and, under Projection Type, select Flat. A You can see that the mesh has been altered.
In the Relax UV panel of the UV Mapping tab, check Cut Selected Edges, then click Apply. B The mesh has now changed again. Now select the UV Magnet tool, deselect the mesh in the middle and scale it. In Polygon Mode, move the texture with the UV Magnet tool. C Now try to reorganise the size of your polygons so that they are as equal as possible.
06 Start painting
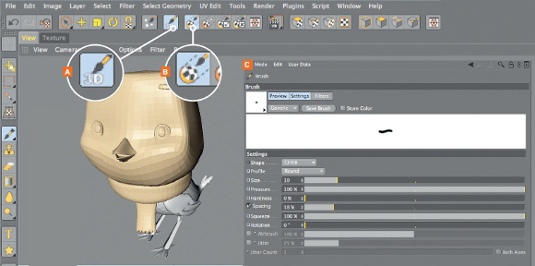
The next step is to go back to the BP UV Paint menu and, using the 3D Painting A and Projection B tools, select a brush and start painting. C Save your file in a folder – you will see that there are three files with the name of the textured object: one for colour, one for reflection and one for bump.
Matt Roussel has been an illustrator for 22 years. In 2012 he founded the company Square Igloo, which develops apps for children
Discover 15 inspiring examples of 3D art

Thank you for reading 5 articles this month* Join now for unlimited access
Enjoy your first month for just £1 / $1 / €1
*Read 5 free articles per month without a subscription

Join now for unlimited access
Try first month for just £1 / $1 / €1

The Creative Bloq team is made up of a group of art and design enthusiasts, and has changed and evolved since Creative Bloq began back in 2012. The current website team consists of eight full-time members of staff: Editor Georgia Coggan, Deputy Editor Rosie Hilder, Ecommerce Editor Beren Neale, Senior News Editor Daniel Piper, Editor, Digital Art and 3D Ian Dean, Tech Reviews Editor Erlingur Einarsson, Ecommerce Writer Beth Nicholls and Staff Writer Natalie Fear, as well as a roster of freelancers from around the world. The ImagineFX magazine team also pitch in, ensuring that content from leading digital art publication ImagineFX is represented on Creative Bloq.
