How to use PowerDirector Mac
All you need to know to get started editing great videos is explained in these tips and tricks for PowerDirector Mac.

CyberLink PowerDirector is one of the best consumer-level video editing programs. It has a great range of features, regular updates, and a good-value subscription cost. For most of its history, it’s been a Windows-only program, but in December 2020, PowerDirector was finally made available for Mac.
It can be tricky for beginners to get to grips with all its features, so in this article, we’ll guide you through the key stages of editing a video using PowerDirector Mac. Fore more info on PowerDirector, see our PowerDirector review, or for other editing options, explore our list of the best video editing software.
CyberLink PowerDirector: Get 25% off!
There's currently 25% off PowerDirector for Mac in the Memorial Day sale when you buy the annual plan. This deal ends June 20th so don't delay if you're interested in this powerful software.
How to use PowerDirector Mac: Preparation
Before you get started, you need to download and install PowerDirector. Make sure you meet the system requirements: you need Mac OSX 10.14 or later, at least 4GB of RAM (6GB is recommended), 128MB of VGA VRAM, and 7GB of free hard disk space.
PowerDirector is available from CyberLink’s website – or see below. There’s a free trial version, called PowerDirector Essentials, which has no time limit but significantly reduced features. For the full version, you need to sign up for a subscription, which costs $69.99 a year or $19.99 a month.
Once you’ve chosen your plan, you’ll be able to download a .dmg file. This isn’t the programme itself but a downloader. When you open this, it’ll take you through a simple set of steps to download and install PowerDirector. Once this is done, PowerDirector will be found in your Applications folder. Load it up, and it’s time to get started editing.
01. Launch PowerDirector
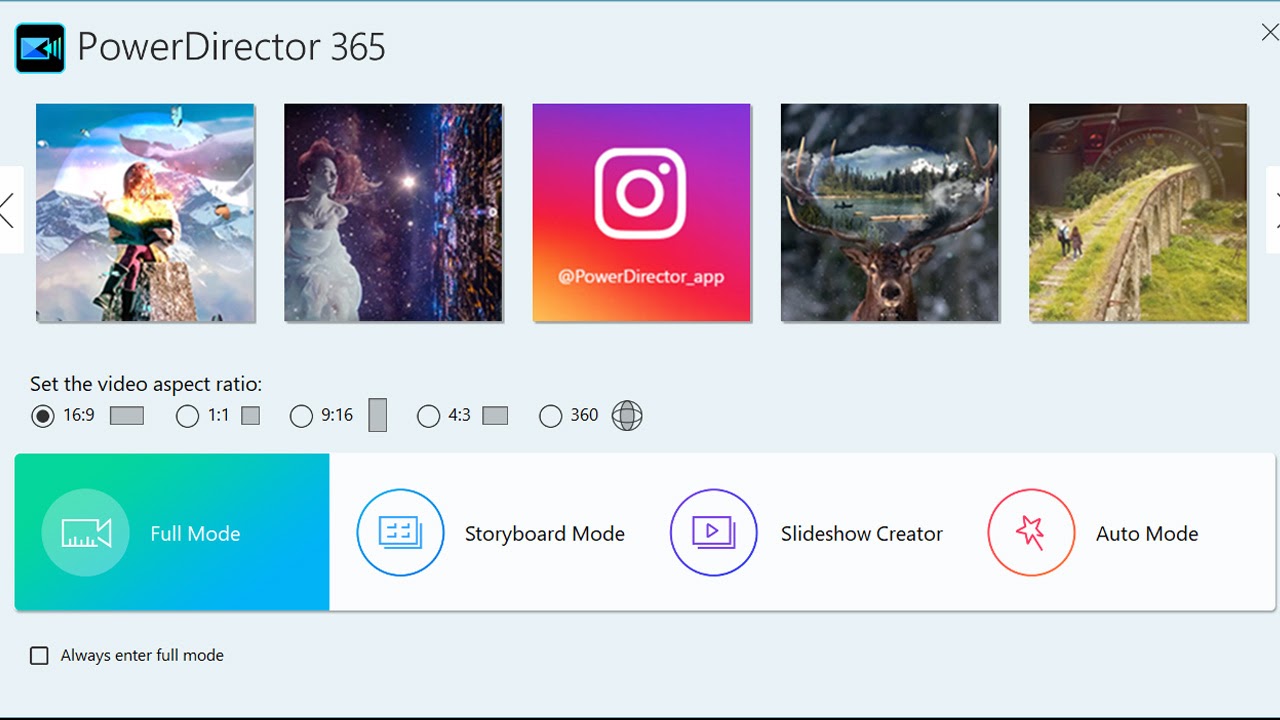
When you first open PowerDirector, you’ll be given a choice of four different modes: Full, Storyboard, Auto, and Slideshow Creator. Storyboard arranges your clips as a storyboard-like graphical display rather than a timeline, Auto features a wizard which guides beginners through basic edits, and Slideshow Creator is used for creating photo slideshows in video format.
Full Mode is where you’ll spend most of your time. Its interface has four tabs: Capture, for recording videos; Edit, for most of the editing work; Produce, for exporting videos; and Create Disc, for burning projects onto a disc.
Get the Creative Bloq Newsletter
Daily design news, reviews, how-tos and more, as picked by the editors.
02. Import and organise footage
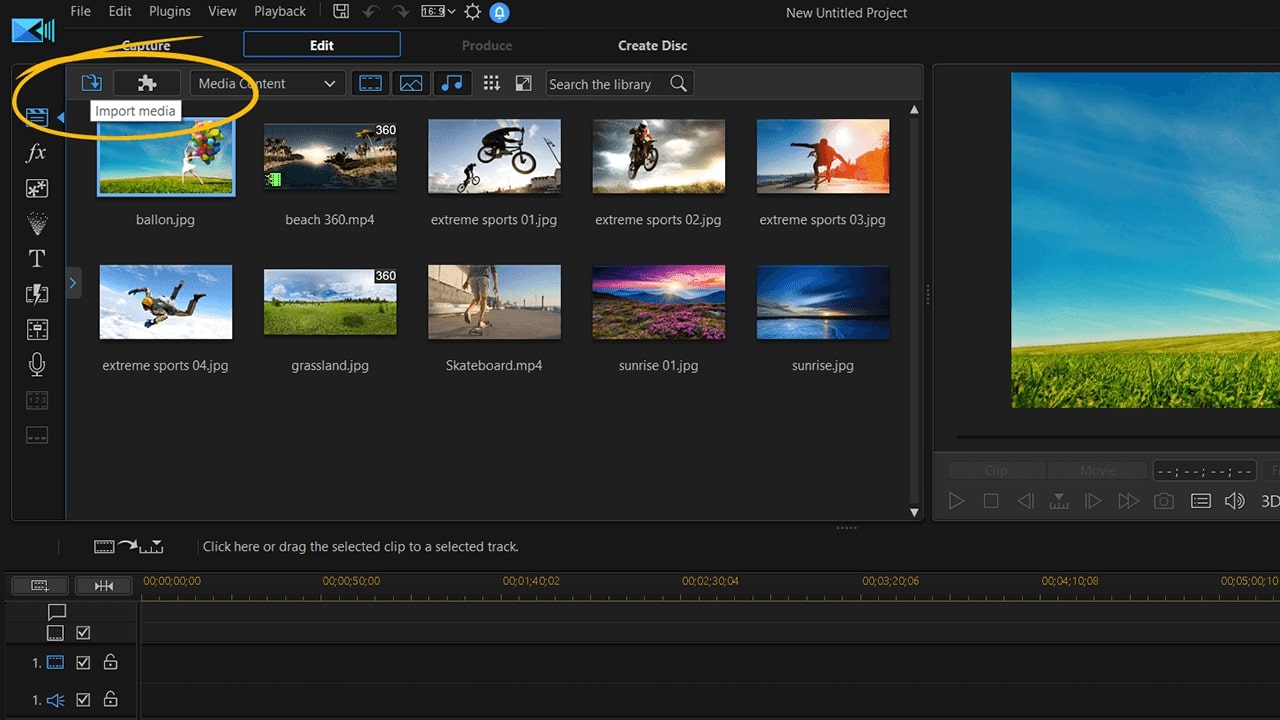
In the top left of the Edit tab is the media room, where all your video clips, audio clips, and still images are stored. To import media, simply drag and drop clips from Finder into the media room, or click the Import Media icon in the top left and find the clips on your computer.
To organise clips within the media room, you can add tags. Click the Add Tag button on the left to create a tag, then drag clips into the tag. This helps categorise clips by scene, location, or subject, for example. You can also use the top bar to filter by media type or to switch between list and icon views.
03. The timeline and preview windows
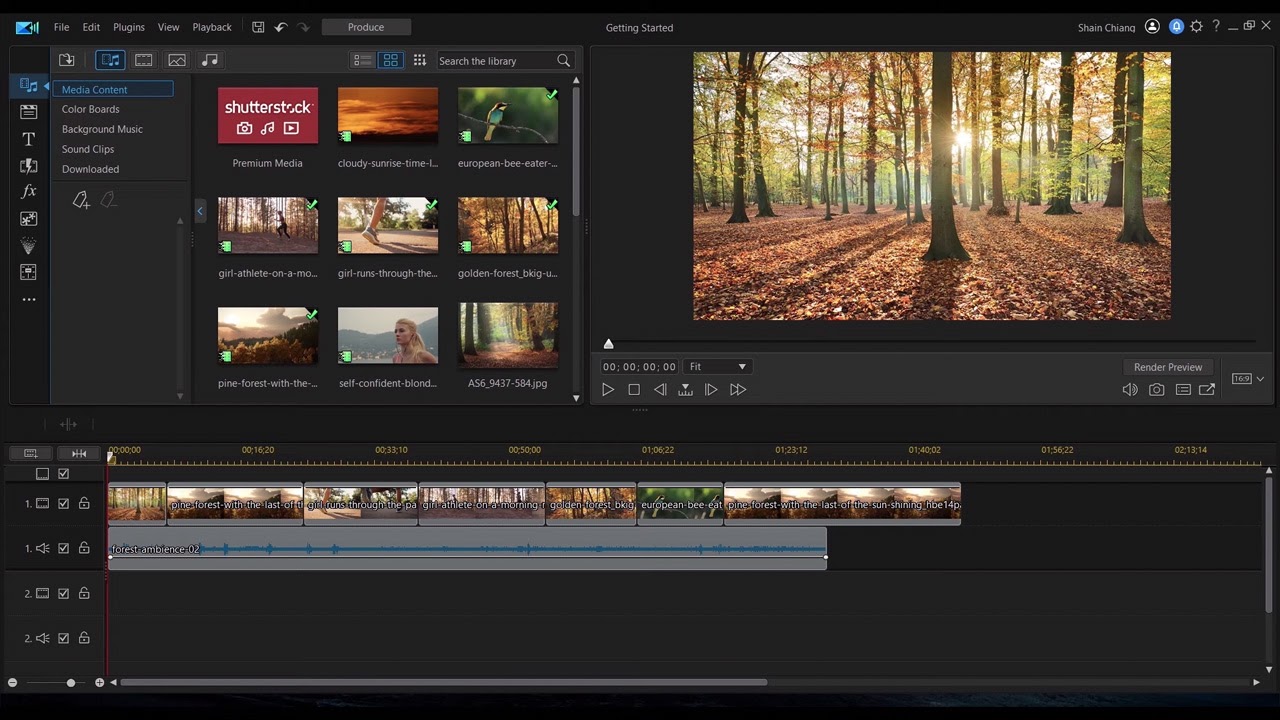
Along the bottom of the editing interface is a multitrack timeline, on which you will assemble your video. To add clips, drag them from the media room to the timeline. You can move clips around your timeline and layer them on top of each other.
The preview monitor in the top right of the screen is where you can either preview clips you have selected in the media room, or watch the assembly of clips on your timeline, depending on what you last selected. Drag the red bar across your timeline to select part of your edit to preview.
04. Trimming clips
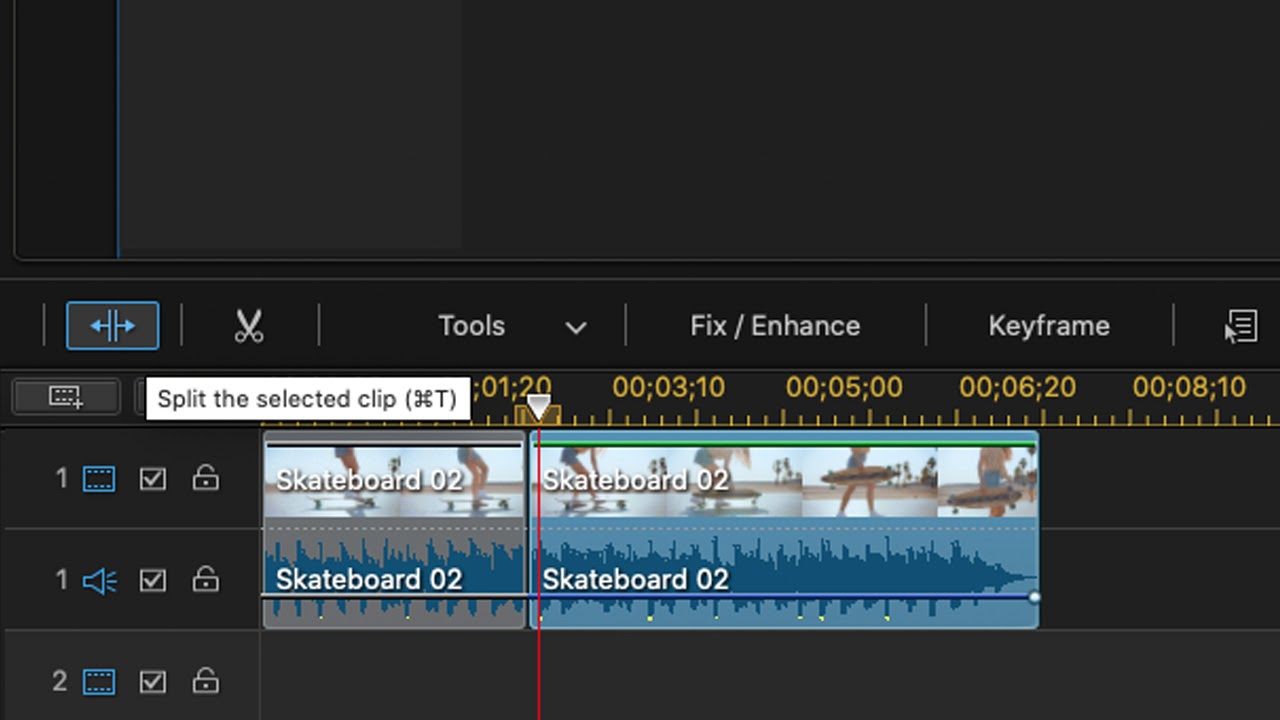
Often, you won’t want to use a full video clip. You can choose a section before adding it to the timeline by right-clicking on it in the media room and choosing Precut.
Or, you can trim in the timeline by dragging the end of the clip, by dragging the red bar to a point you want to cut at and clicking the Split Clips icon on the bar above, or by highlighting a clip and clicking the scissors icon to open a trimming window.
05. Transitions
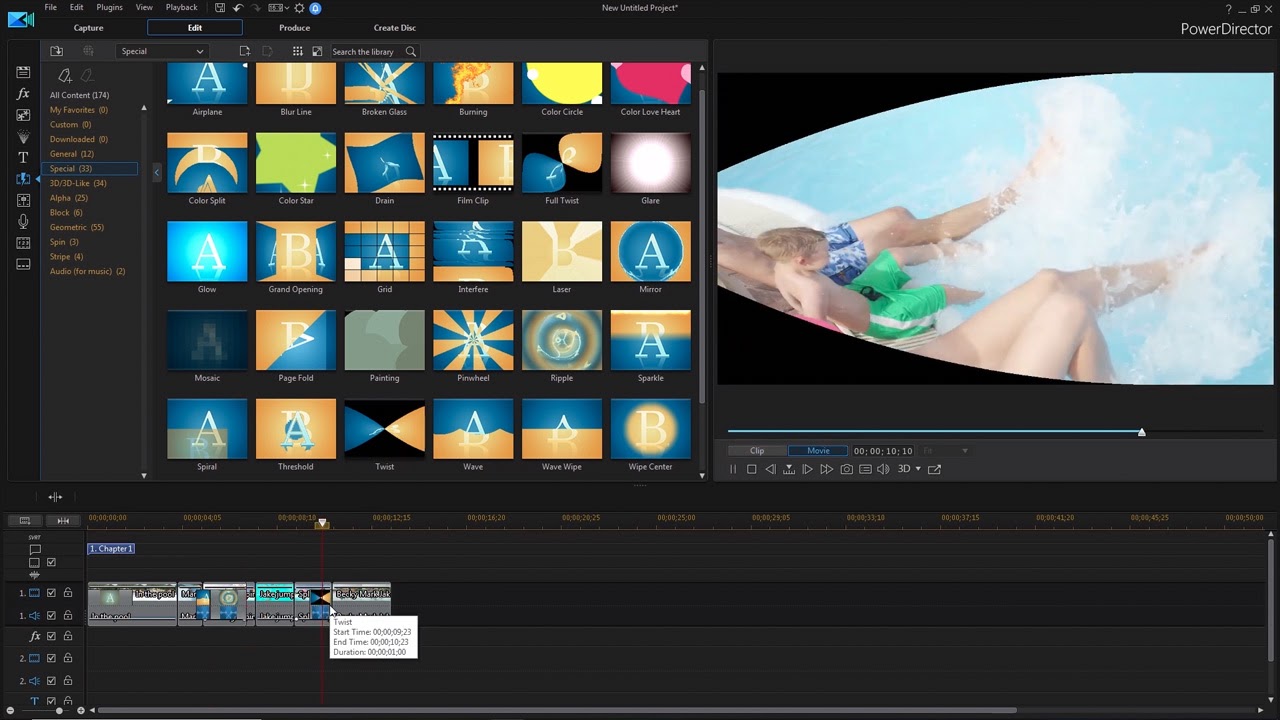
To find PowerDirector’s library of transitions, click the transition room button on the top left bar. You can preview all available transitions from here, and to add one to your video, drag and drop it to the point where one clip touches the next.
You’ll now see the transition appear on the clip in the timeline. Double-click on it to open the transition settings panel, where you can adjust duration and behavior. To remove a transition, highlight it and press backspace.
06. Add video effects
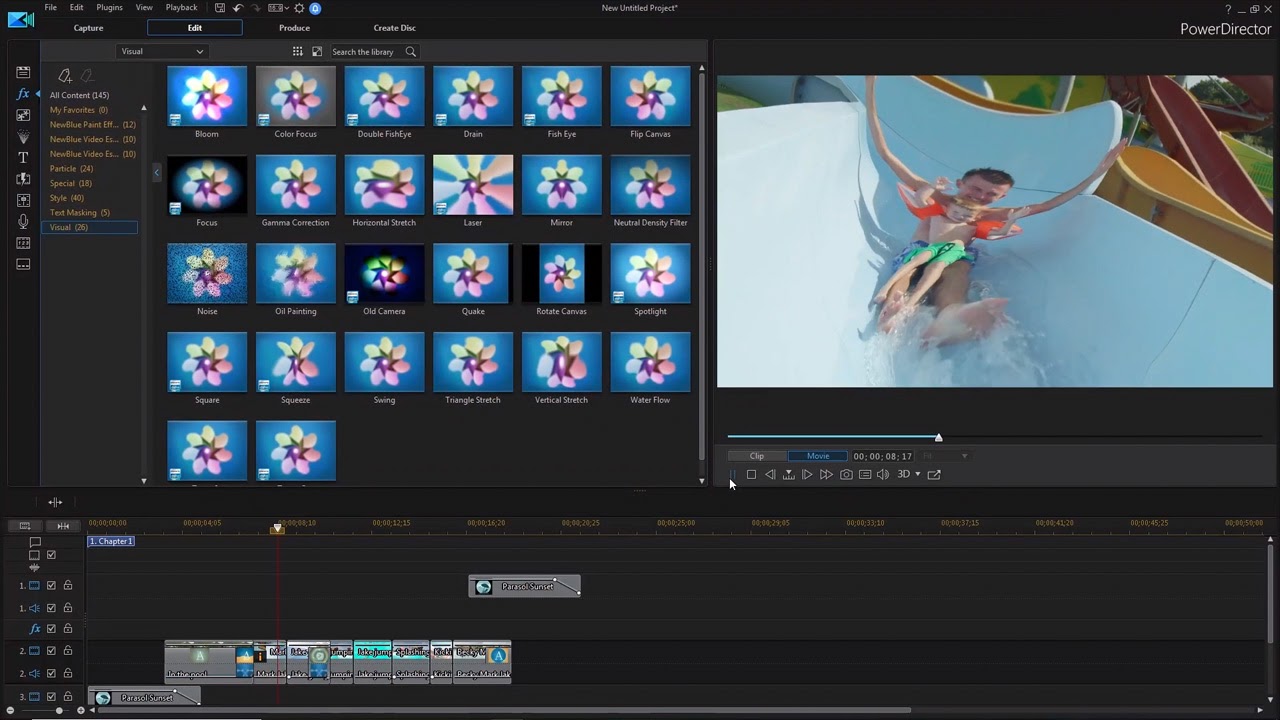
PowerDirector has a range of video effects, including color balance, spotlight, and stretch. Click the FX symbol on the top left bar to open the effects room. Then, drag an effect onto a clip on the timeline.
An effects symbol will appear on clips with effects applied, and clicking on this will open up a settings panel. Each type of effect has its own settings that can be modified. You can also add keyframes to an effect here – this means you can set different effects values for particular frames in the clip, then PowerDirector will automatically scale the effects between these keyframes.
07. Audio levels
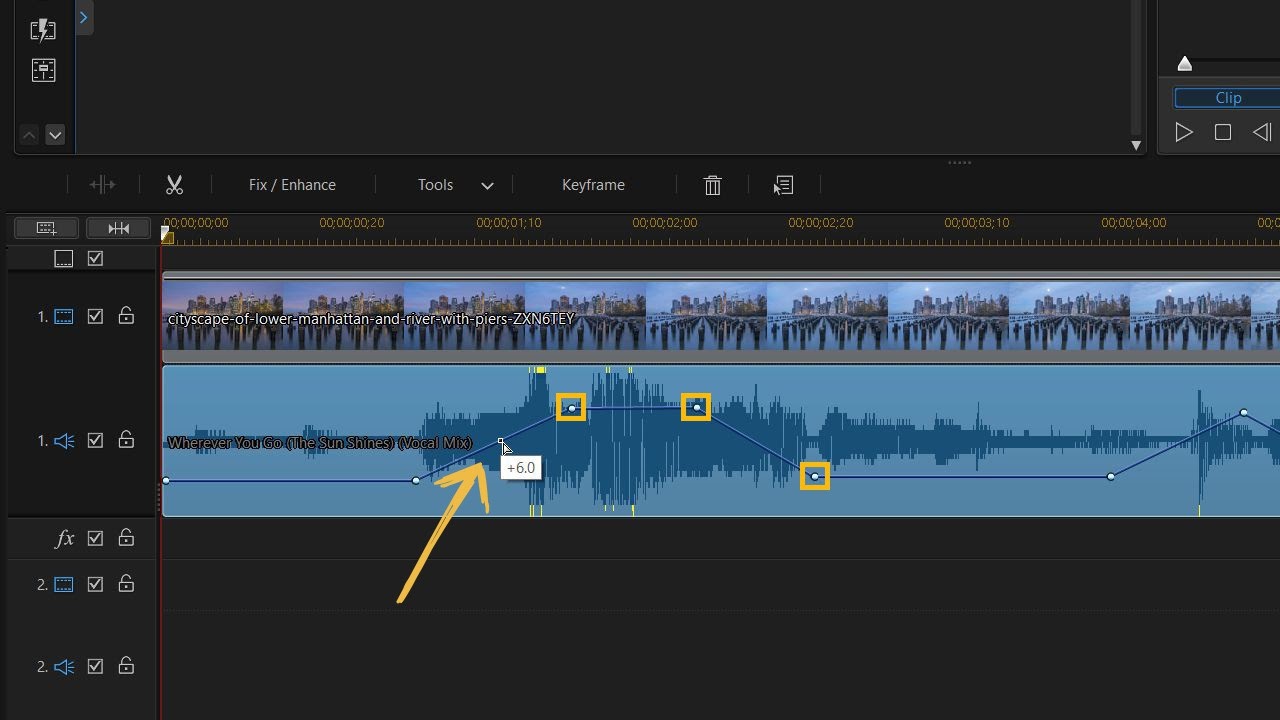
Audio clips are added and trimmed the same way as video clips. The clip’s graphic in the timeline will have a volume line across it. Drag this up or down to adjust the volume.
If you want the volume to change over time – e.g. for a music track to become quieter when someone is speaking in a simultaneous clip – you can use keyframes. To add a keyframe, hold Ctrl and click on a point on the clip. Set a level for each keyframe by dragging it up and down, and PowerDirector will automatically scale the volume between keyframes.
08. Titles
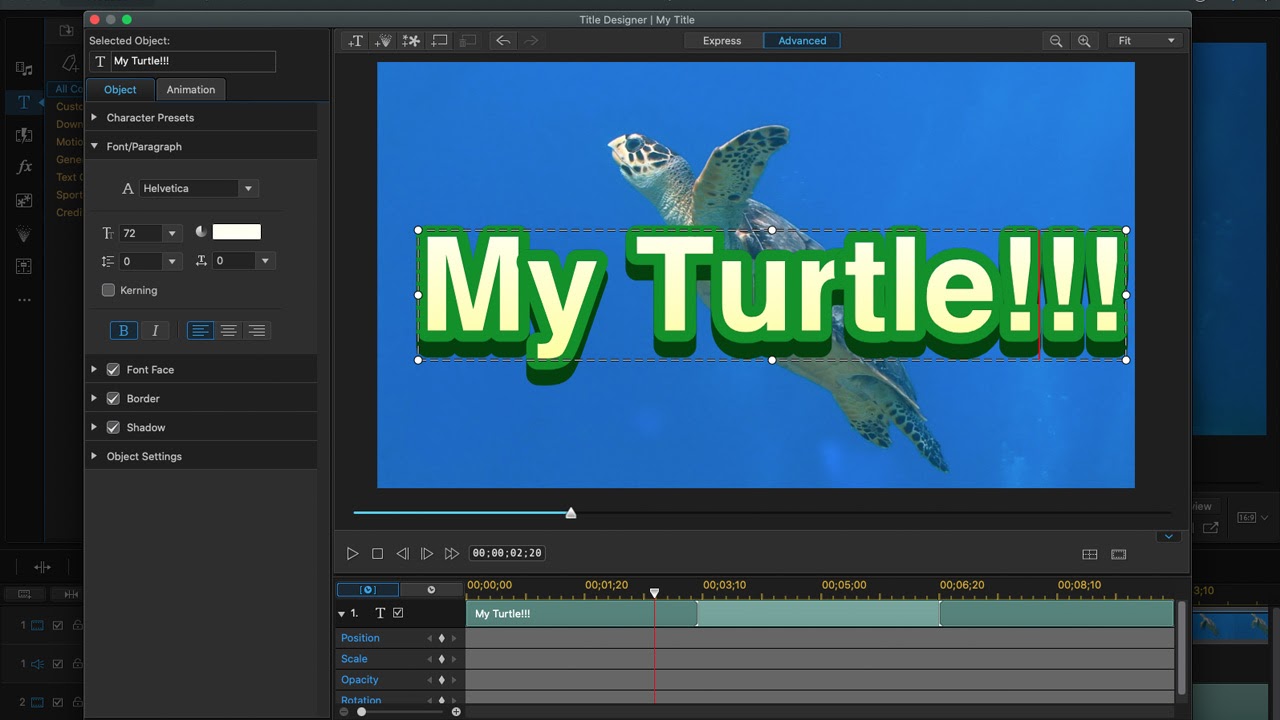
Click the T symbol on the top left bar to open the title room. Here, you’ll see various title presets. Drag the one you want onto the timeline. If you place it on a track below a video clip, the title will appear on top of the clip.
Double-click on a title on the timeline to open the Title Designer. Here, you can write the text and adjust its properties, including color, font, and shadow. Under its Advanced tab, you can also adjust the title’s animation.
09. Exporting
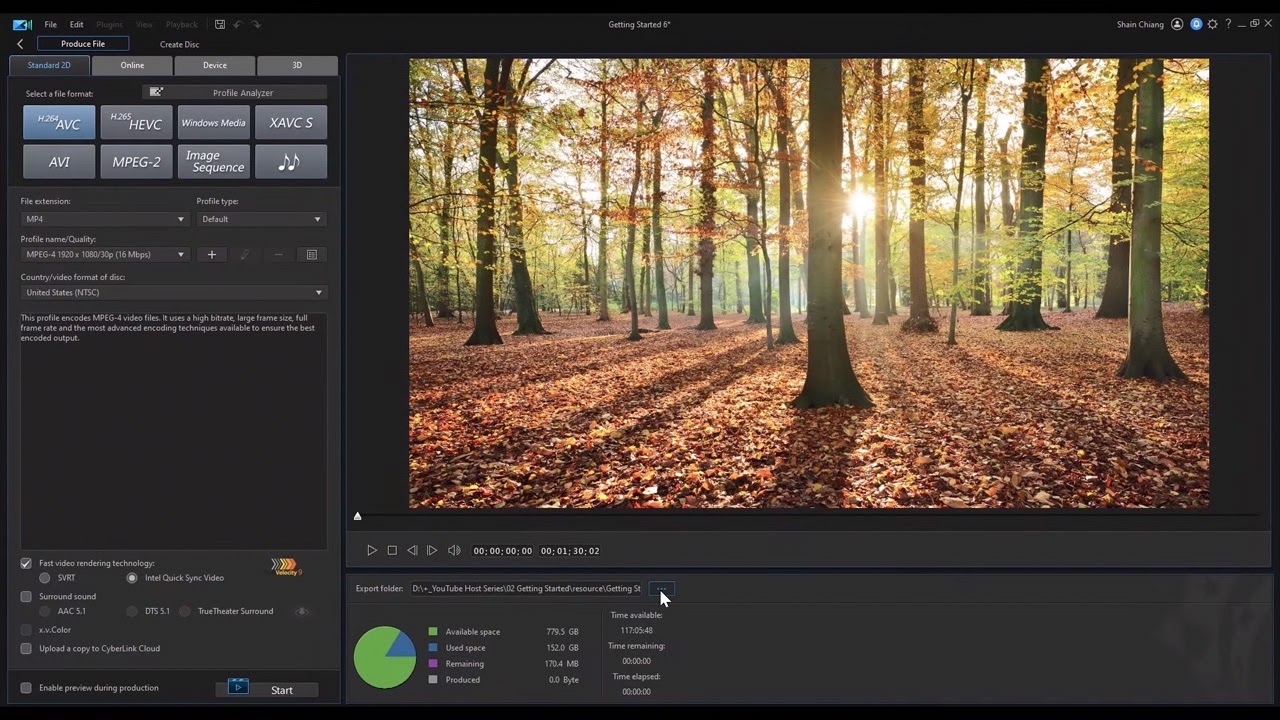
When you’ve finished editing your video and are ready to share it with the world, go to the Produce tab. Here, under the Standard 2D option, choose a video file format, save location, and file name, then press Start.
This page also has an Online option, which is compatible with YouTube, Dailymotion, Vimeo, and Facebook. You can use this to export your video in a format optimised to a particular web platform and directly upload to it.
Read more:

Thank you for reading 5 articles this month* Join now for unlimited access
Enjoy your first month for just £1 / $1 / €1
*Read 5 free articles per month without a subscription

Join now for unlimited access
Try first month for just £1 / $1 / €1

Kieron Moore is a freelance writer based in Manchester, England. He contributes to Future sites including TechRadar and Creative Bloq, focusing on subjects including creative software, video editing, and streaming services. This work draws on his experience as an independent filmmaker and an independent TV watcher. He can be found on Twitter at @KieronMoore, usually when he’s meant to be writing.

