Use particles to create a 3D splash
These tips and tricks will show you how to make this liquid splash using Realflow and 3ds Max.

This tutorial will take a look at how you can make a liquid splash, or crown effect, and can be used to make splashes out of water, milk, paint or any liquid. You may have seen this type of effect on the internet, as part of an advert or in real life, when you drop an object into liquid.
Various software and plug-ins can help us achieve the liquid effect, including RealFlow, 3ds Max’s Phoenix FD plug-in, Maya, Houdini and Cinema 4D. However, many big VFX and animation studios use RealFlow in their pipeline as this software is well established, trustworthy and, most importantly, user friendly. There are different techniques you can use to make this effect in RealFlow, including standard Hybrido or Dyverso particles, but for this project we are going to use standard particles.
Before you start working on this kind of effect, you should have good knowledge of the properties of liquid. You must know what viscosity, adhesion and surface tension are, for example. Also bear in mind that different types of liquid such as water, oil, milk and honey each have different properties.
I can’t teach you every single parameter of the plug-in and software, as this would require too much time. So as far as the liquid crown effect is concerned, we will learn as much as required for this particular tutorial.
This is a very interesting subject, because the process of creating this effect isn’t necessarily static or linear. As you use your creativity and play with the different tools, you may end up creating a variety of different effects, some which you’ll like more than others.
The result you end up with may also depend on your understanding of tools and techniques, as well as your own preferences and creative process.
For all the assets you need, go to, visit our resource page.
Get the Creative Bloq Newsletter
Daily design news, reviews, how-tos and more, as picked by the editors.
01. Create a scene in 3DS Max
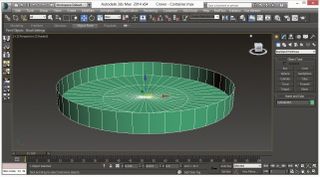
Before we start working on our scene, remember that we are going to use this geometry or shape as a container in RealFlow. To create an object, use Cylinder in 3ds Max by going to Create Panel>Geometry>Standard Primitives>Cylinder. Now change the parameters, make Radius 3.0, Height 0.6, Height Segments 1, Cap Segments 2 and Sides 44. Then set the Position to X: 00, Y: 00, Z: 00.
02. Export geometry
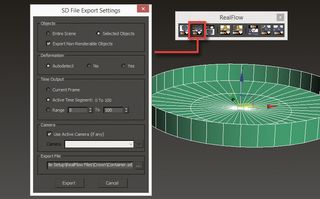
After finishing the geometry modelling, it’s time to work on sending this geometry into RealFlow. Just select the geometry and go to the RealFlow tab in 3ds Max, then click on SD File Export Settings and you will see new window has appeared. Now select the Selected Objects option, set the path to save our geometry and hit the Export button. Now your geometry is saved with the .sd format.
03. RealFlow scene set-up
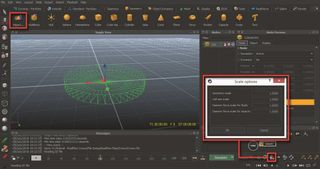
After finishing the modelling and exporting geometry, let’s import this geometry into RealFlow. Open RealFlow, create your new project, then first make sure to check the Scale Options and set the Geometry scale to 1.0. Then go to the Geometry section and click on the Import Geometry button, then select the .sd file which we saved earlier – don’t change anything in the parameters. Now we have created our basic scene.
04. Fill object in RealFlow
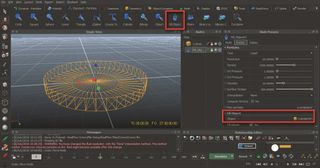
After finishing the scene set-up, go to the Standard Particles section and select Fill Object. Now go to Emitter in the Node Params section and make the following changes: First, select your container geometry, then go to the Particles section and set the Resolution to 20.00, Density 1000.00, Viscosity 10.00 and Surface Tension 500.00.
05. Add Crown Daemons
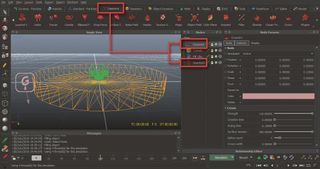
Now we need to add some daemons. To do this, first go to the Daemons section and select Gravity Daemon. Don’t change anything in parameters, keep Gravity at 9.80. Now select Crown Daemon, then go to Node Params and make the following changes. To change the size, go to Scale, make X: 0.4, Y: 0.4, Z: 0.125 and set Z: 0.4, then go to Daemon Parameters, make Strength 110.00, Acting Time 0.15, Surface Tension 300.00, Spikes Count 7, Crown Width 0.50.
06. Time to start the simulation in RealFlow
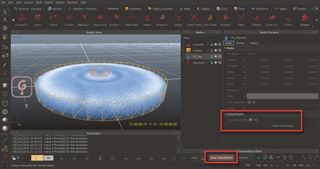
After setting the geometry, particles and daemons, it’s now time to start the simulation running – but first we need to set the initial state of particles. To do this, select Fill Object and go to Node Params>Node and turn on the Use Initial State. Next, go to Time Line and you will see the ‘lock’ icon, which is open on the bottom left side of the screen. Click on this button and close it down. Now click the Simulation button. You will see that simulation is going but your slider is on the same position at 0. After your liquid is settled, just stop the simulation and again go to Fill object>Node and click on the Make Initial State button. Then go to the lock icon and click on it to open. Now you are ready for final simulation, so click the Simulation button; it will take around two to three hours to finish so be patient.
07. Meshing in RealFlow
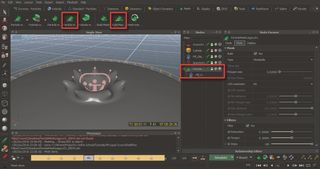
To create a mesh using your new particles, select Fill Object and go to the Mesh section, then select Particle Mesh (Legacy). You will see the Particle Mesh option in Nodes and one more Fill Object in this Particle Mesh. This is where you can set the parameters (see Mesh Parameters for my settings). Now select Particle Mesh Legacy again, then go to the Mesh section and click Build Mesh Sequence. It will take around one to two hours to complete.
08. Import mesh into 3DS Max
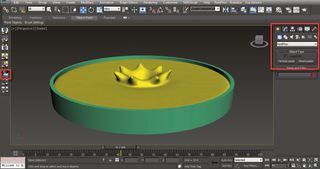
We now need to import this mesh into 3ds Max. So go to 3ds Max, then go to the RealFlow tab and click on Create BIN Mesh Object. A new window should appear, so just go to the folder where you saved the file, then go to the Meshes folder, select the .bin file and click open. Another way to import the mesh is to go to Create Panel>Geometry>RealFlow>Mesh Loader, click on it and drag it into the viewport, then import the mesh.
09. Setup the lighting and shading in V-Ray
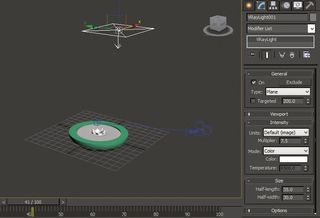
After importing the mesh, we can work on shading, lighting and rendering. For this tutorial I’m using V-Ray. Change the renderer to V-Ray and go to Material Editor. If you are good at shading, you can create your own material, or you can download it from www.vray-materials.de, which is totally free. I choose the latter option. Now create a simple VRayLight and place it on top of the liquid, and then set the parameters to Multiplier 7.5. Next, go to Render Setting by pressing F10, set the Image Sampler type to Adaptive, Shading Rate 6, turn off Image Sampler, then go to the Adaptive Image Sampler section and set Min Subdivs 8, Max Subdivs 16. Now go to Environment section and turn on GI Environment. After checking all these settings, set the output resolution and output path, then click the Render button, it should take around two to three hours to finish.
10. Final output
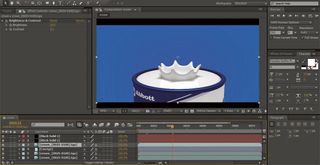
After rendering has finished, import your render elements into your preferred compositing software. I’m using After Effects. I import my elements and then drag them into the Time Line. Next, I select the Liquid Element and go to the Effect section, then I go to Color Correction>Brightness & Contrast. Here, I set the Brightness to 24 and Contrast to 0.0. Now all that’s left to do is render the composition into the required format and you have your liquid crown!
This article was originally published in 3D World magazine issue 213. Buy it here.
Related articles

Thank you for reading 5 articles this month* Join now for unlimited access
Enjoy your first month for just £1 / $1 / €1
*Read 5 free articles per month without a subscription

Join now for unlimited access
Try first month for just £1 / $1 / €1
