Turn your 2D designs into 3D with Project Felix
Transform your work into 3D in these 10 simple steps using Adobe’s Project Felix.
The recent pre-release of Adobe’s new Felix 3D package makes this a great time to take the leap from 2D to 3D image-making. Project Felix is designed for designers, rather than illustration pros or 3D techies. So it’s the perfect toolset to add to your repertoire this year.
Project Felix is capable of dealing with a wide range of images, and its capabilities are sure to grow as it is further developed. But we imagine it will quickly find heavy use as a tool for mocking up products, creating placeholders for photoshoots, and for client pitches.
So with that in mind, I’m going to show you how to use Project Felix to create an image that perhaps looks like an typical advert for a beverage or bottled water.
01. Add a model
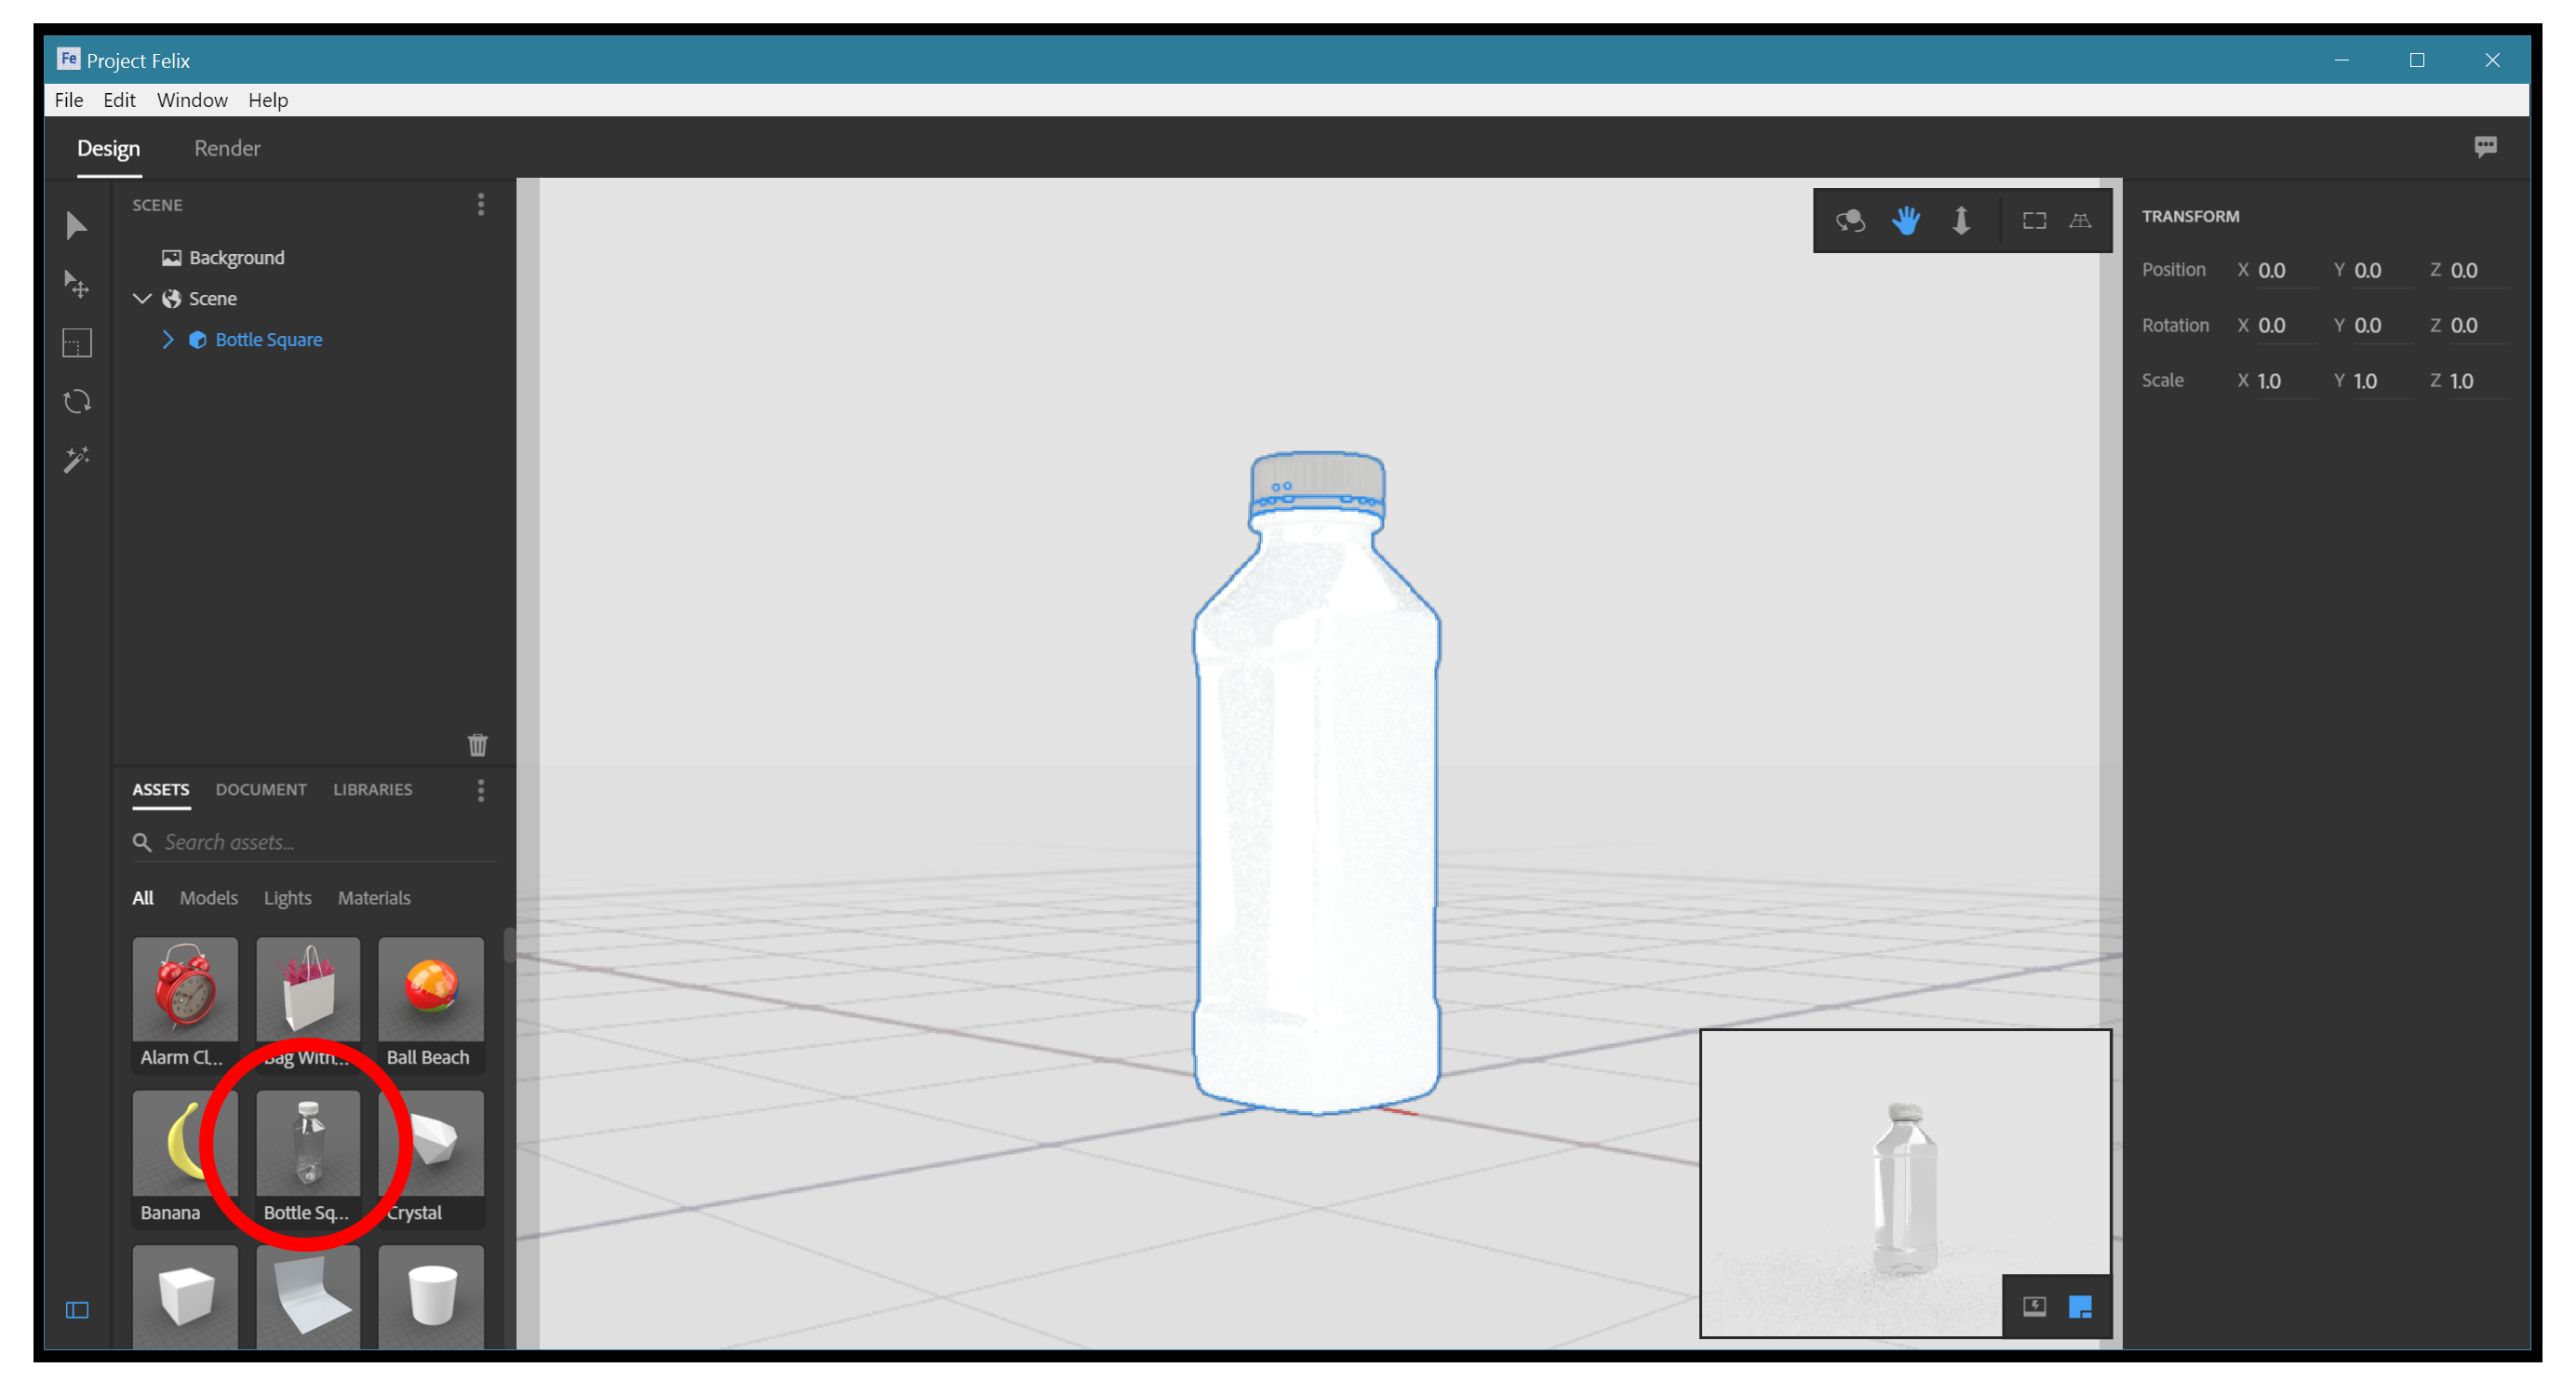
Open Felix and choose the New Document option. We will using one of Felix’s pre-installed models. Click on the ‘Bottle Square’ in the lower right corner of the screen, under ‘Assets > Models’ or ‘Assets > All’. The model will appear in the centre of the work area.
02. Choose a background
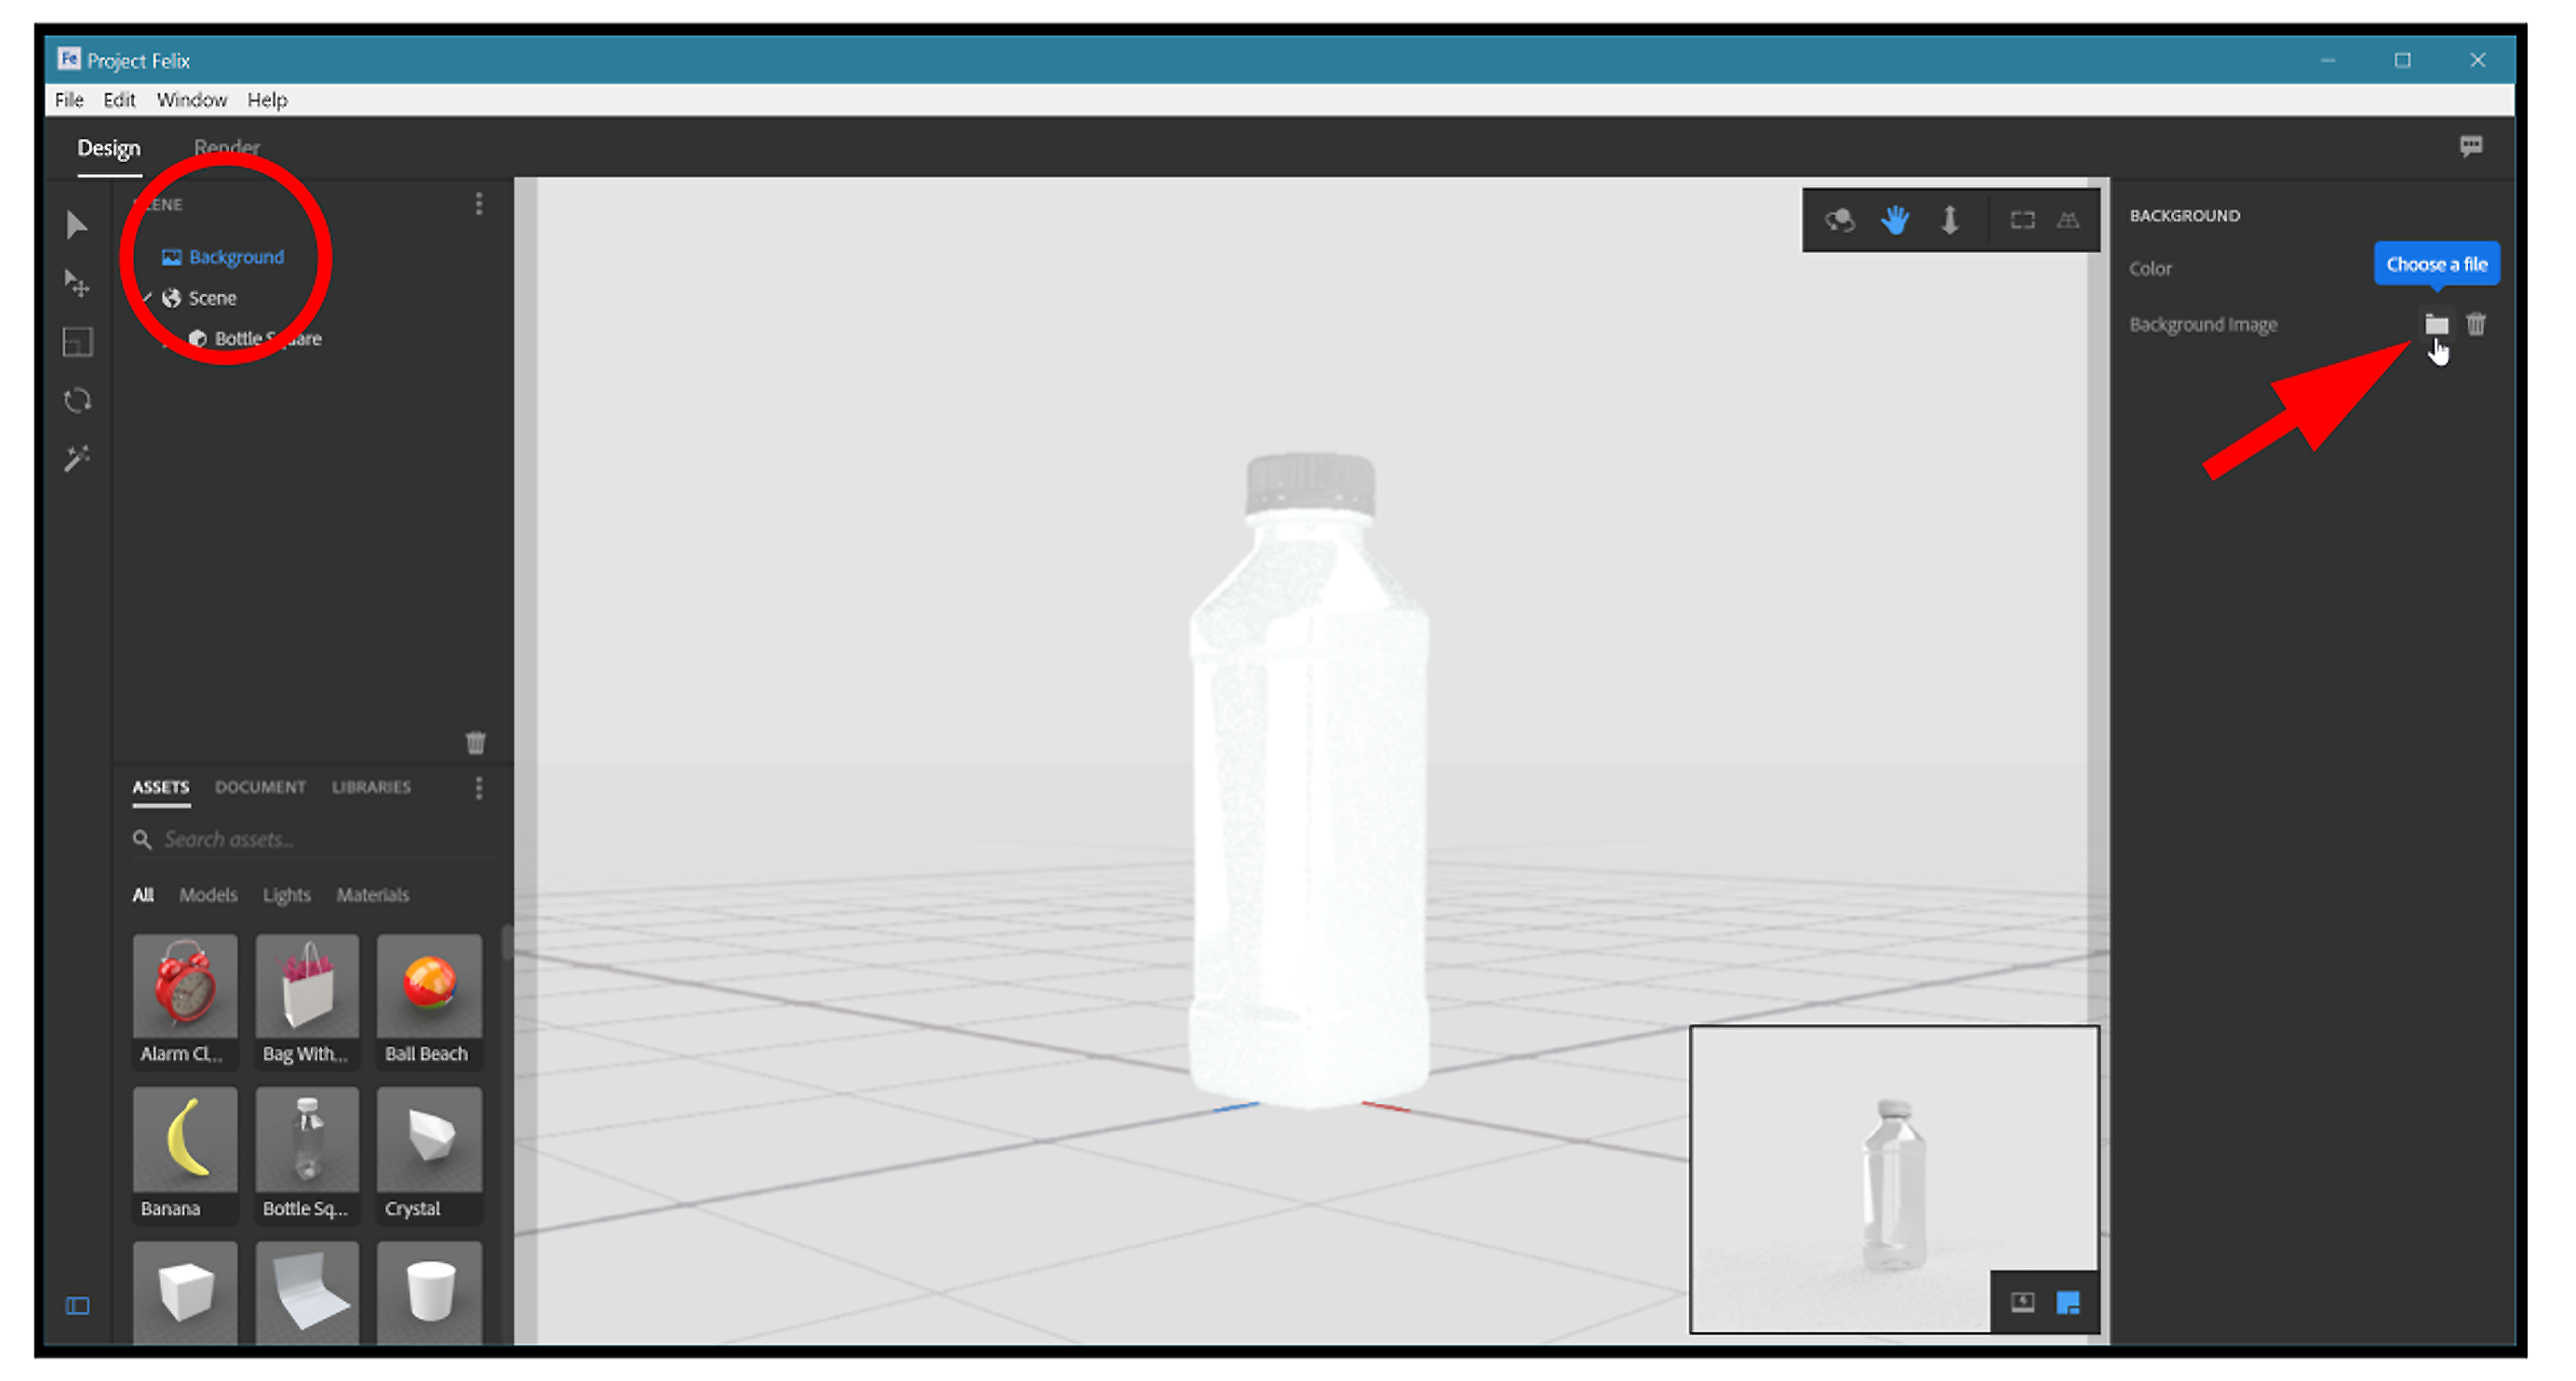
Go to the Scene list and select the Background item. On the contextual panel on the right you’ll can then import a background. Click on the folder icon and load a background of your choice – we used a free Creative Commons image from Pixabay.com.
03. Adjust your view
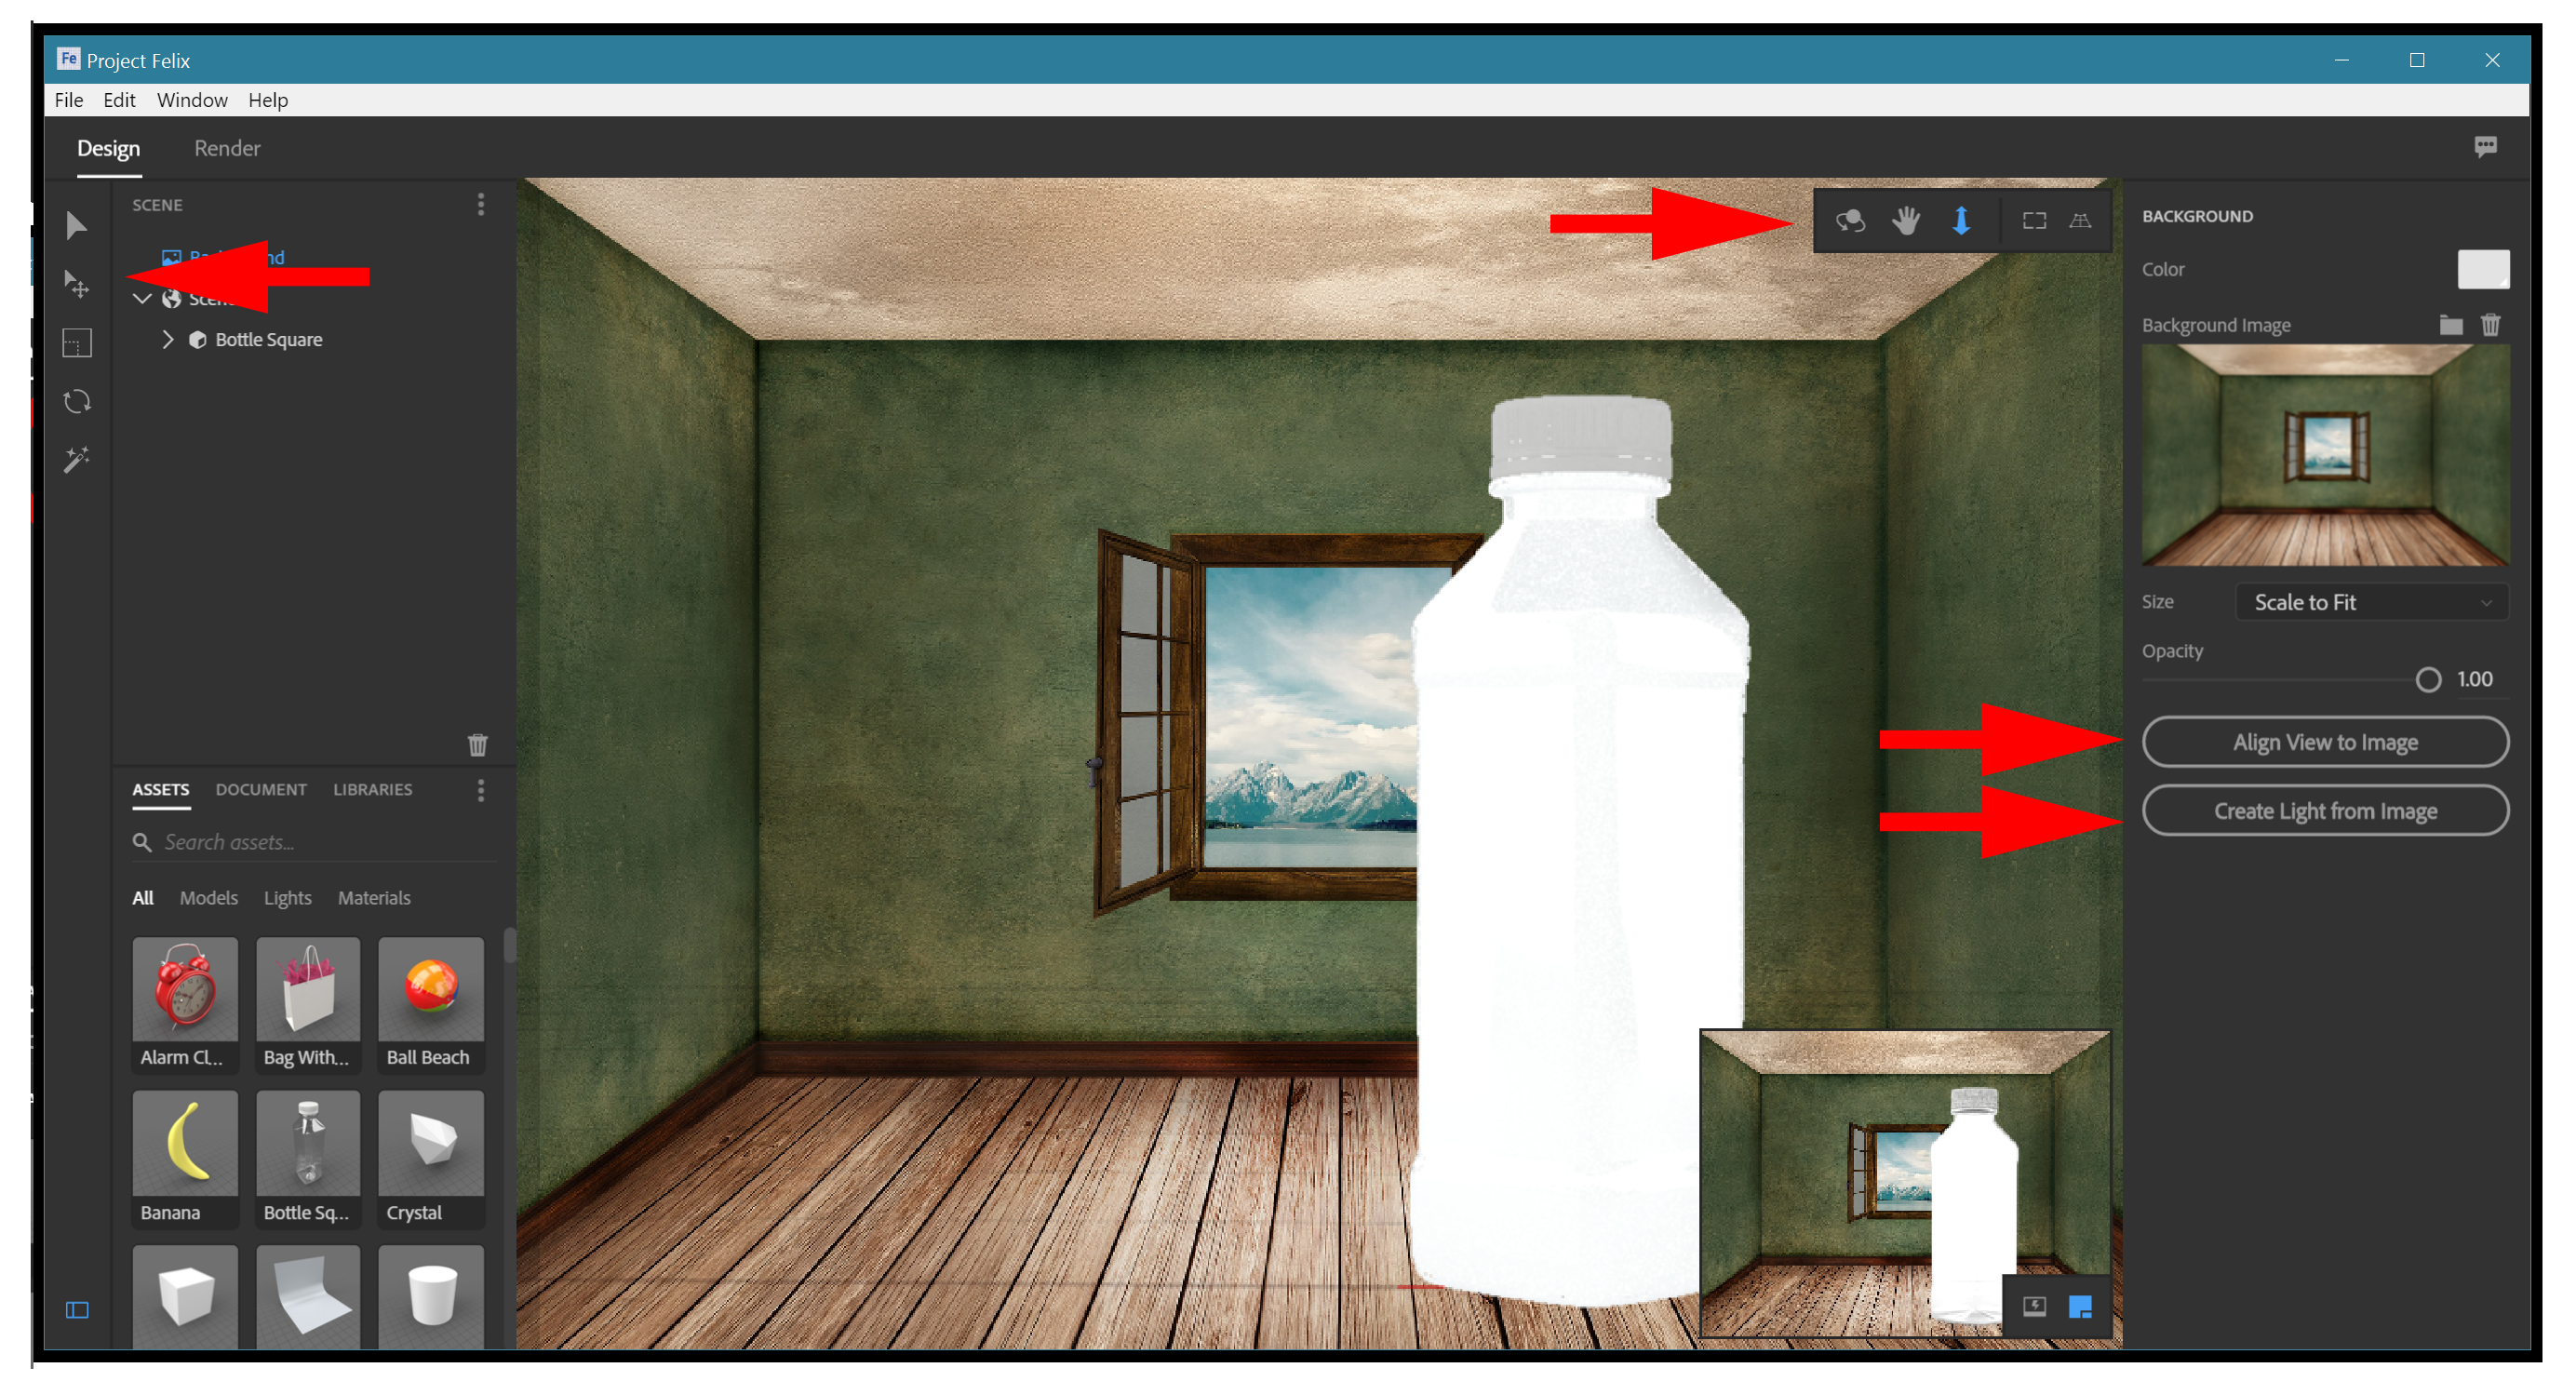
There are a few optional adjustments we can make now. The first is the Align View to Image setting. In our limited experience with Felix, this setting can make things easier or a bit more obtuse. If you activate this mode by clicking the button of the same name, the model will likely shift its position in the scene.
You will probably then need to move, scale or rotate the model, which you can do using either the controls on the left or the camera controls in the floater on the upper right (mixing the two toolsets isn’t the purist way to work, but given that we are doing still images rather than animation work, you have my permission to fudge this a bit).
Get the Creative Bloq Newsletter
Daily design news, reviews, how-tos and more, as picked by the editors.
Another option you can explore is the Create Light from Image button. This uses the imported backdrop for the image-based lighting (the rather sophisticated lighting system used by Felix – explored in step 06). Most of the time, this setting is an obvious choice, but while creating this tutorial we realised it didn’t make for the best results in this particular project. So in this instance, leave this unchecked.
04. Apply Materials
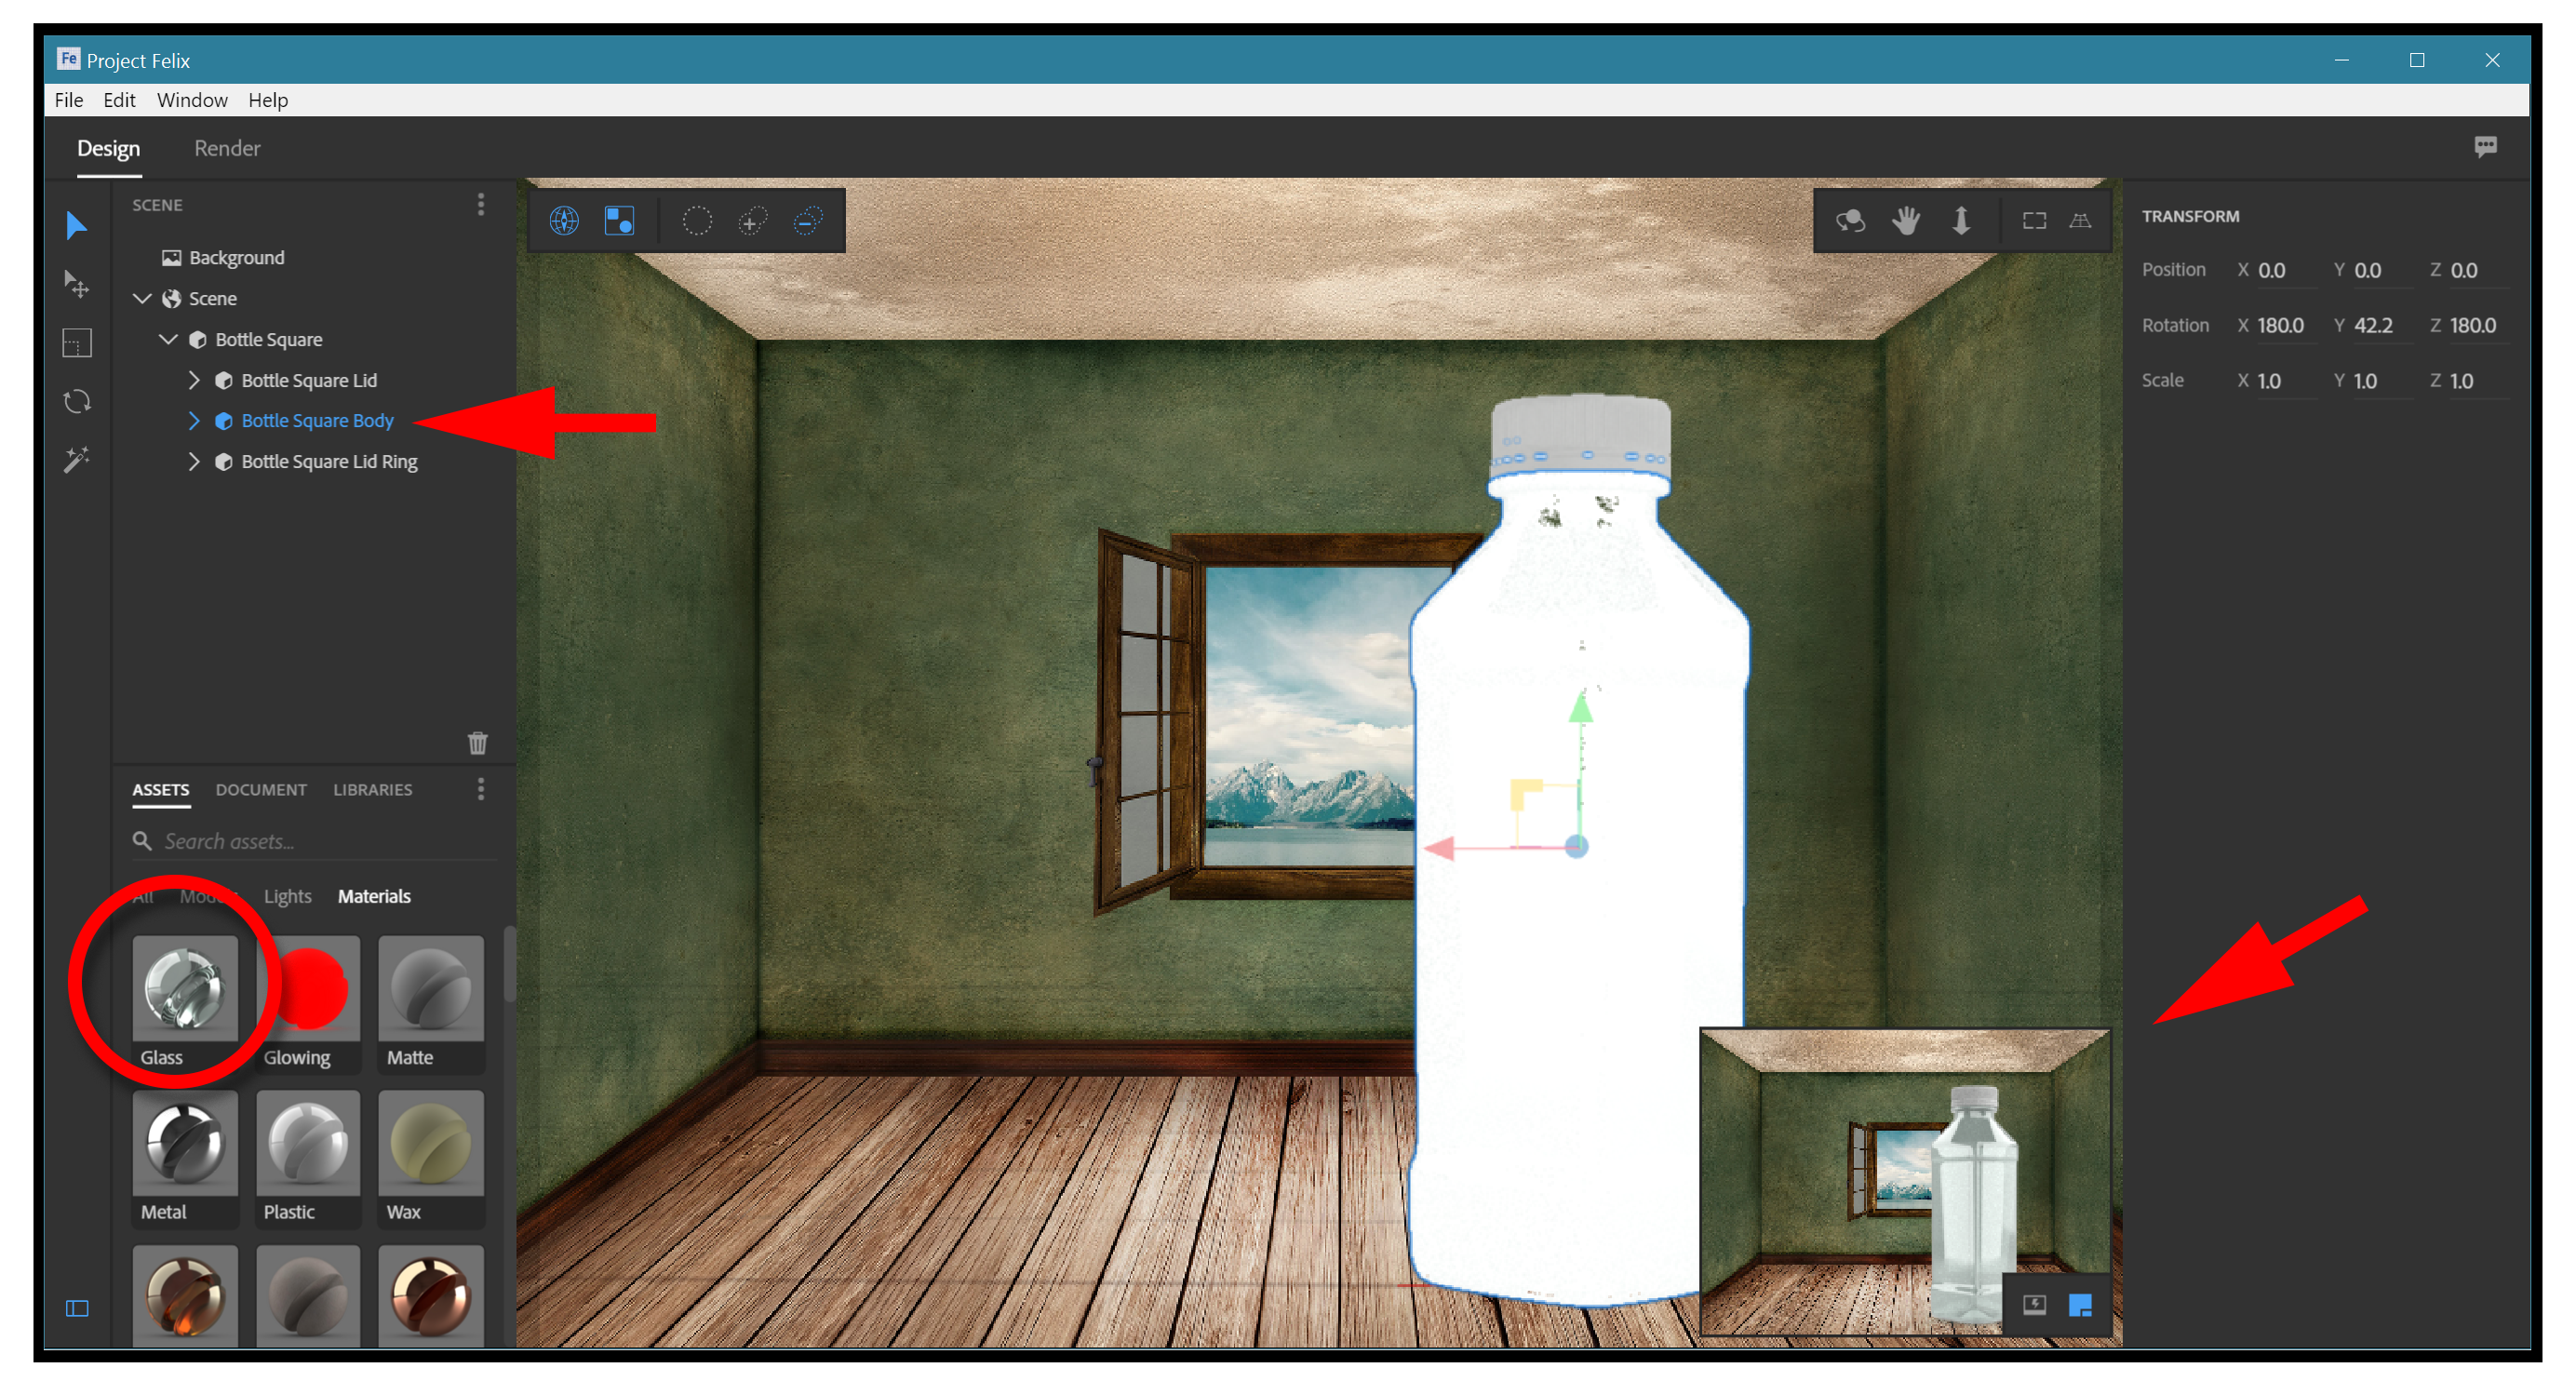
Now it’s time to apply materials to our model. In this model we actually have three independent models that are grouped together. You can see this in the Scene list. Since we’re working with a water bottle, the main bottle is transparent plastic, and the two other parts (the lid and lid ring) can be whatever colour plastic we want to make them.
Under ‘Assets > Materials’ you’ll find a variety of glass materials. Pick one of these for the bottle’s body. There’s also a white plastic material, which we will use the for the two lid models. Select a model in the work area or the list (often easier), and then click on the material to apply it.
05. Preview your work
When materials are applied, the work area representation will change to roughly indicate the new material. You will also see the small raytraced preview window begin to redraw and, in a few moments, give a decent (albeit very small) visual on what you have created. The Preview window can be made large, but that will take a lot more computer power to render.
06. Explore image-based lighting
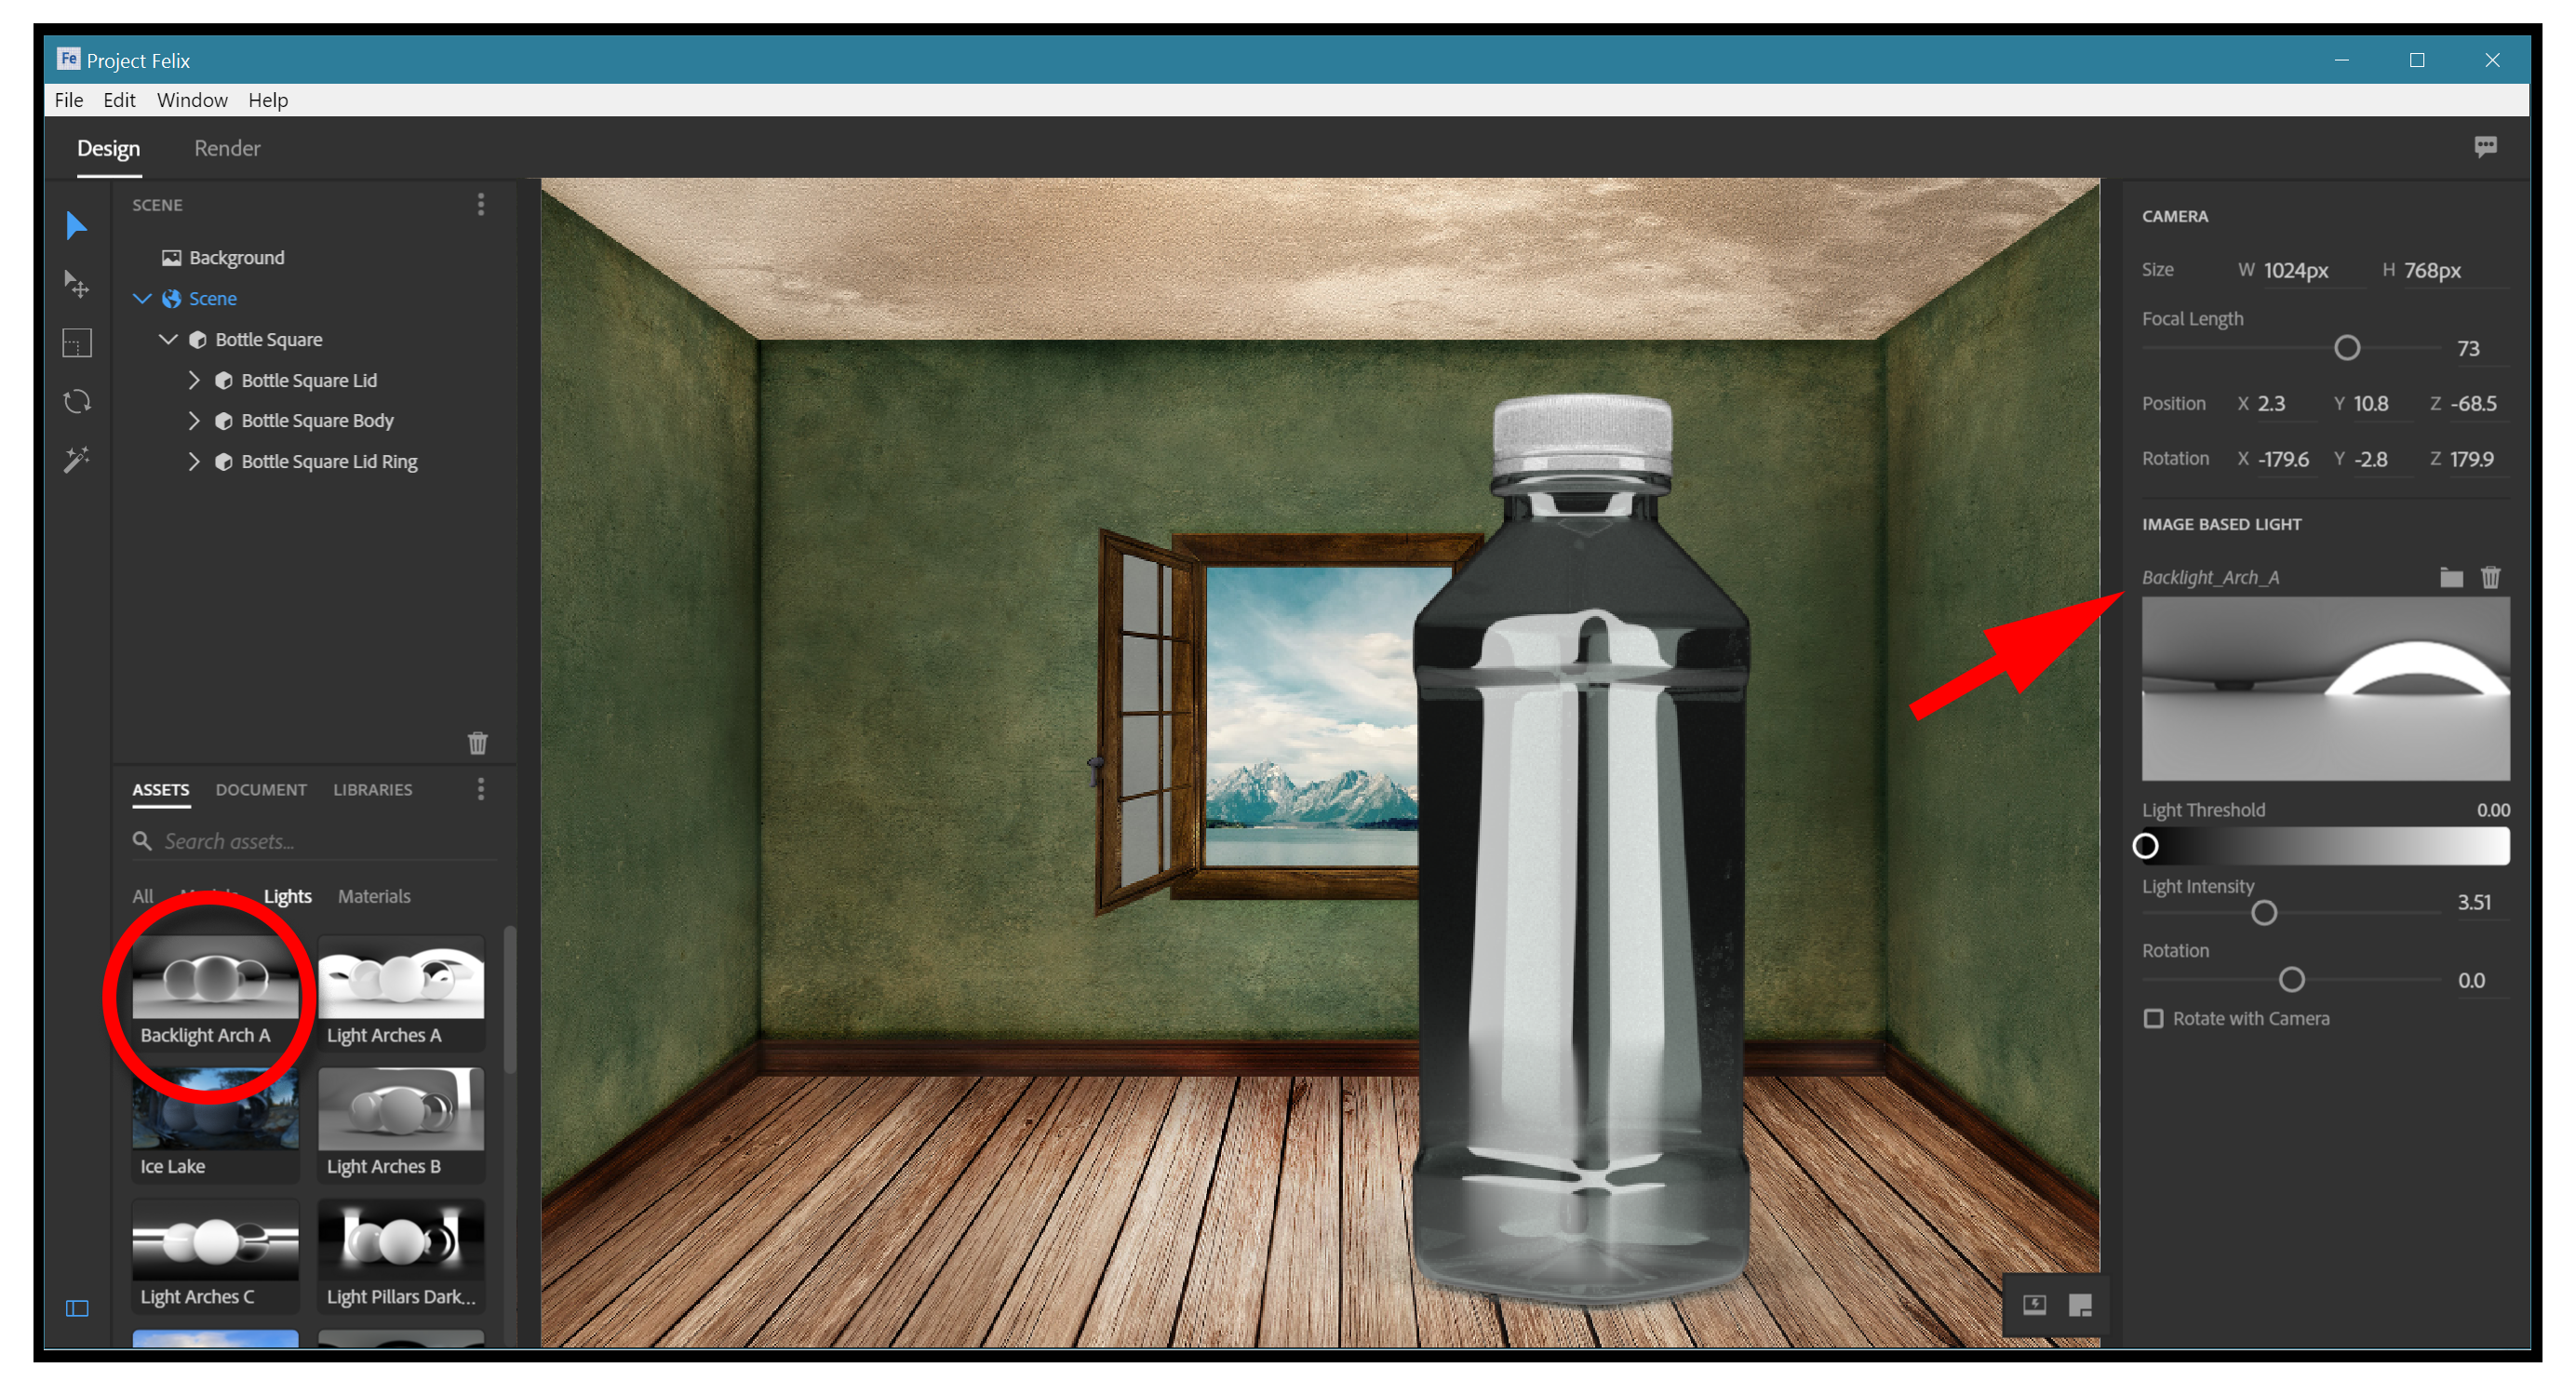
As mentioned, Felix uses something called ‘image-based lighting’, which means it takes an image and invisibly wraps it around the entire environment. It then takes both the brightness and hue values from this map and uses them as if they were lights, to illuminate the scene. It is a very sophisticated technique and can yield some great results without much effort... at least when it works. Unlike other 3D programs, there are no virtual lighting fixtures in Felix.
A few things are important to know about this lighting system. The first is that if you click on the Scene item in the List view, you will see some lighting controls appear in the right context panel. These will help make best use of your lighting maps.
Another thing you should know is that Felix prefers to use images with a high dynamic range. It is possible to use images with a more normal range, however, and I find most shortcomings can be compensated for in post production. Plus, you can modify the lighting map itself in Photoshop.
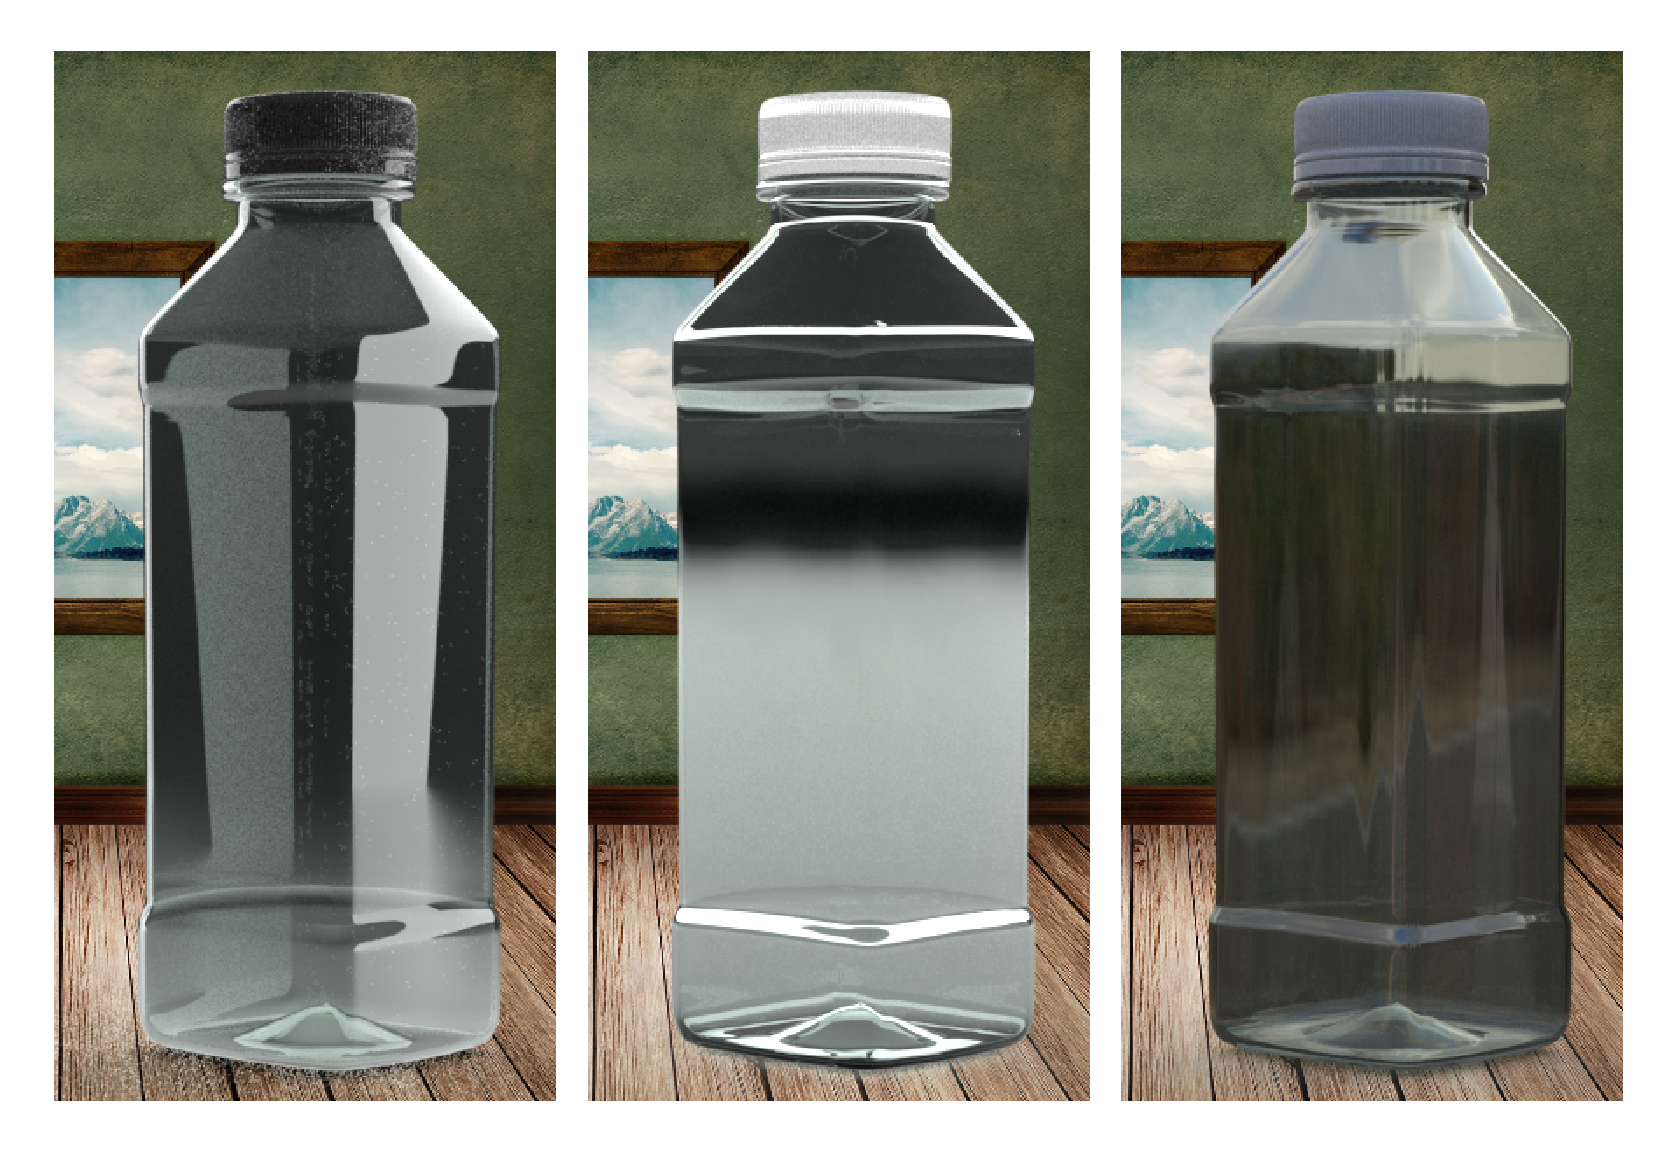
You can choose which image map to use in ‘Assets > Lighting’. Different images will create vastly different lighting and imagery, and the modification tools will create even more variations in final imagery. You can see some variables from different light maps in the accompanying bottle samples.
07. Render your image
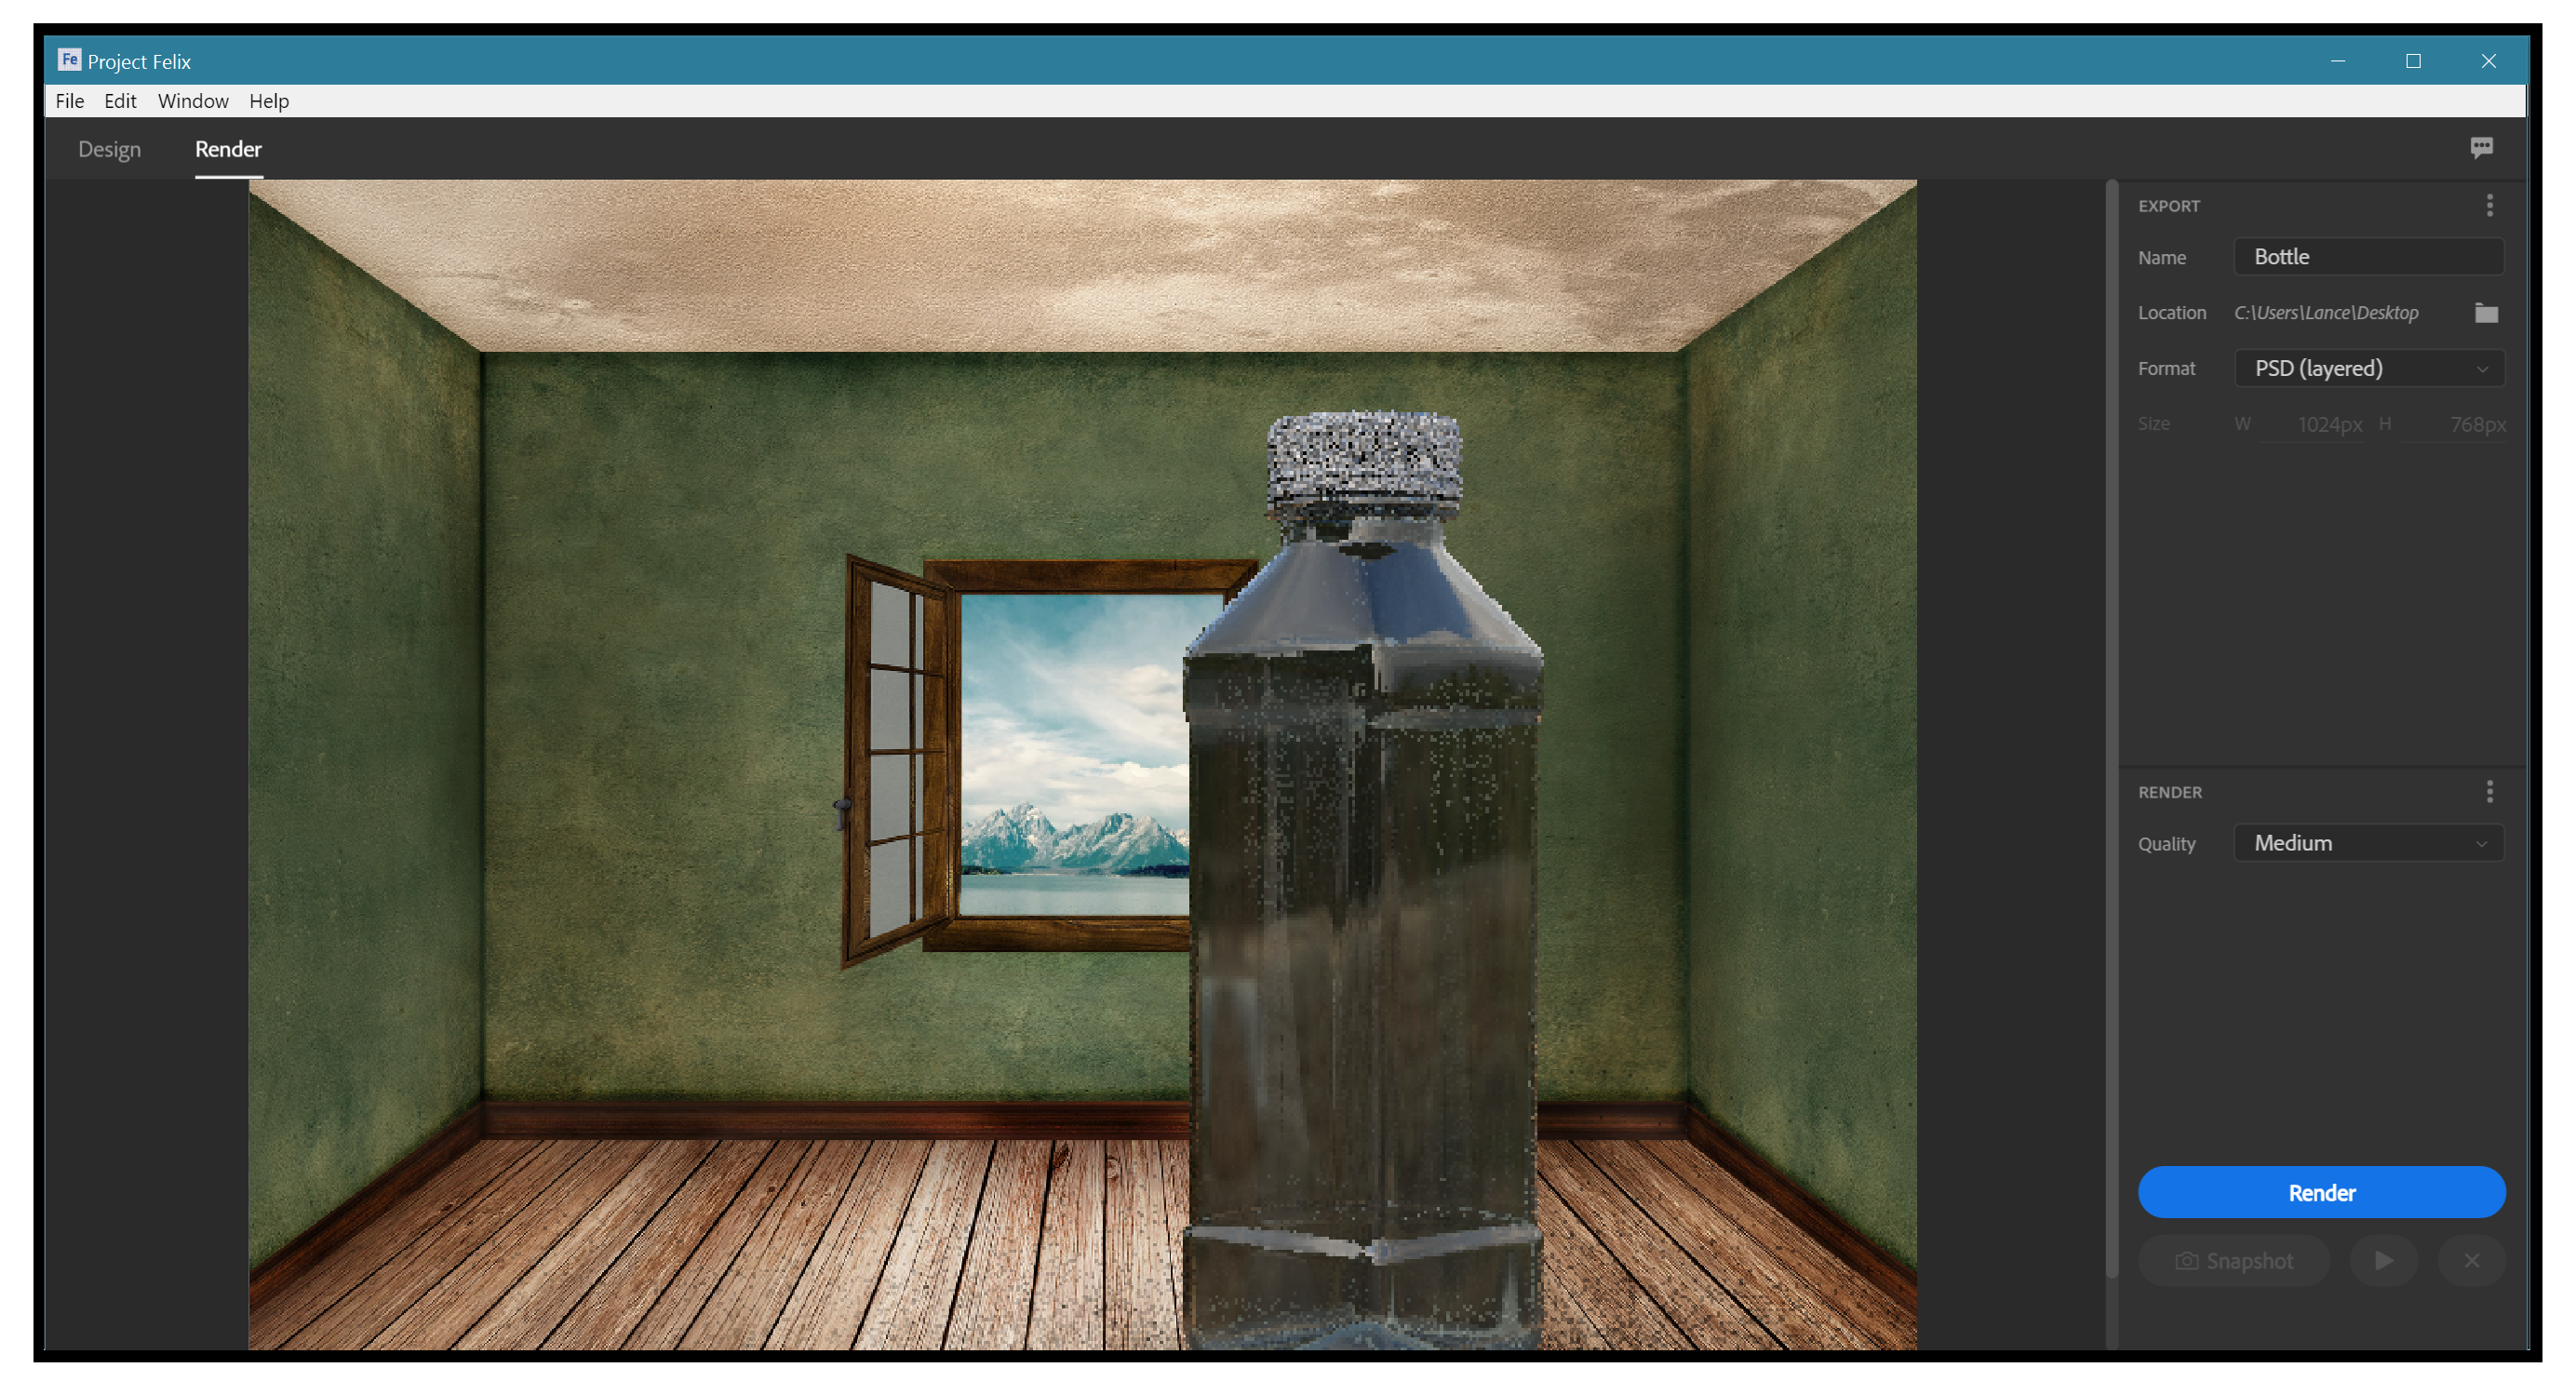
Once the scene and all of its parts are set, the final step is to go to the Render tab. The settings in this section are really quite simple and self-explanatory. The file name, and format (usually, go with the default of Photoshop). The final settings option is for quality. Resist opting for the highest quality settings, these can take a very, very long time to render.
08. Move into Photoshop
Open the rendering in Photoshop and, if you saved it as a PSD file, you will see that the rendering is wonderfully multi-layered: the bottle on the top layer, the imported backdrop next, and the ‘Background Color’ at the bottom (we can delete this). The file is also in 32-bit format. In theory, this is great thing. In regular use however it is a lot harder to work with, so you might consider converting it to 8-bit/channel (‘Image > Mode’).
09. Make final adjustments
The key thing to learn with 3D work is that almost nothing that gets rendered out from a 3D program is finished work. Animations then go and get composited with countless layers in a program like After Effects. And still renderings, like this, get all fixed up in Photoshop.
Here we are going to load the bottle’s outline by clicking on the layer’s icon in the Layer pallet while holding down the cmd or ctrl key. Then we go to Adjustment Layers and select Levels. We can then make any required tonal adjustments, and even shift the tint of the gamma towards the green tones.
Due to the lighting map we chose, the shadow under the bottle isn’t as pronounced as it should be. So on the final design, the shadow has been augmented on an additional layer below the bottle.
10. Get creative
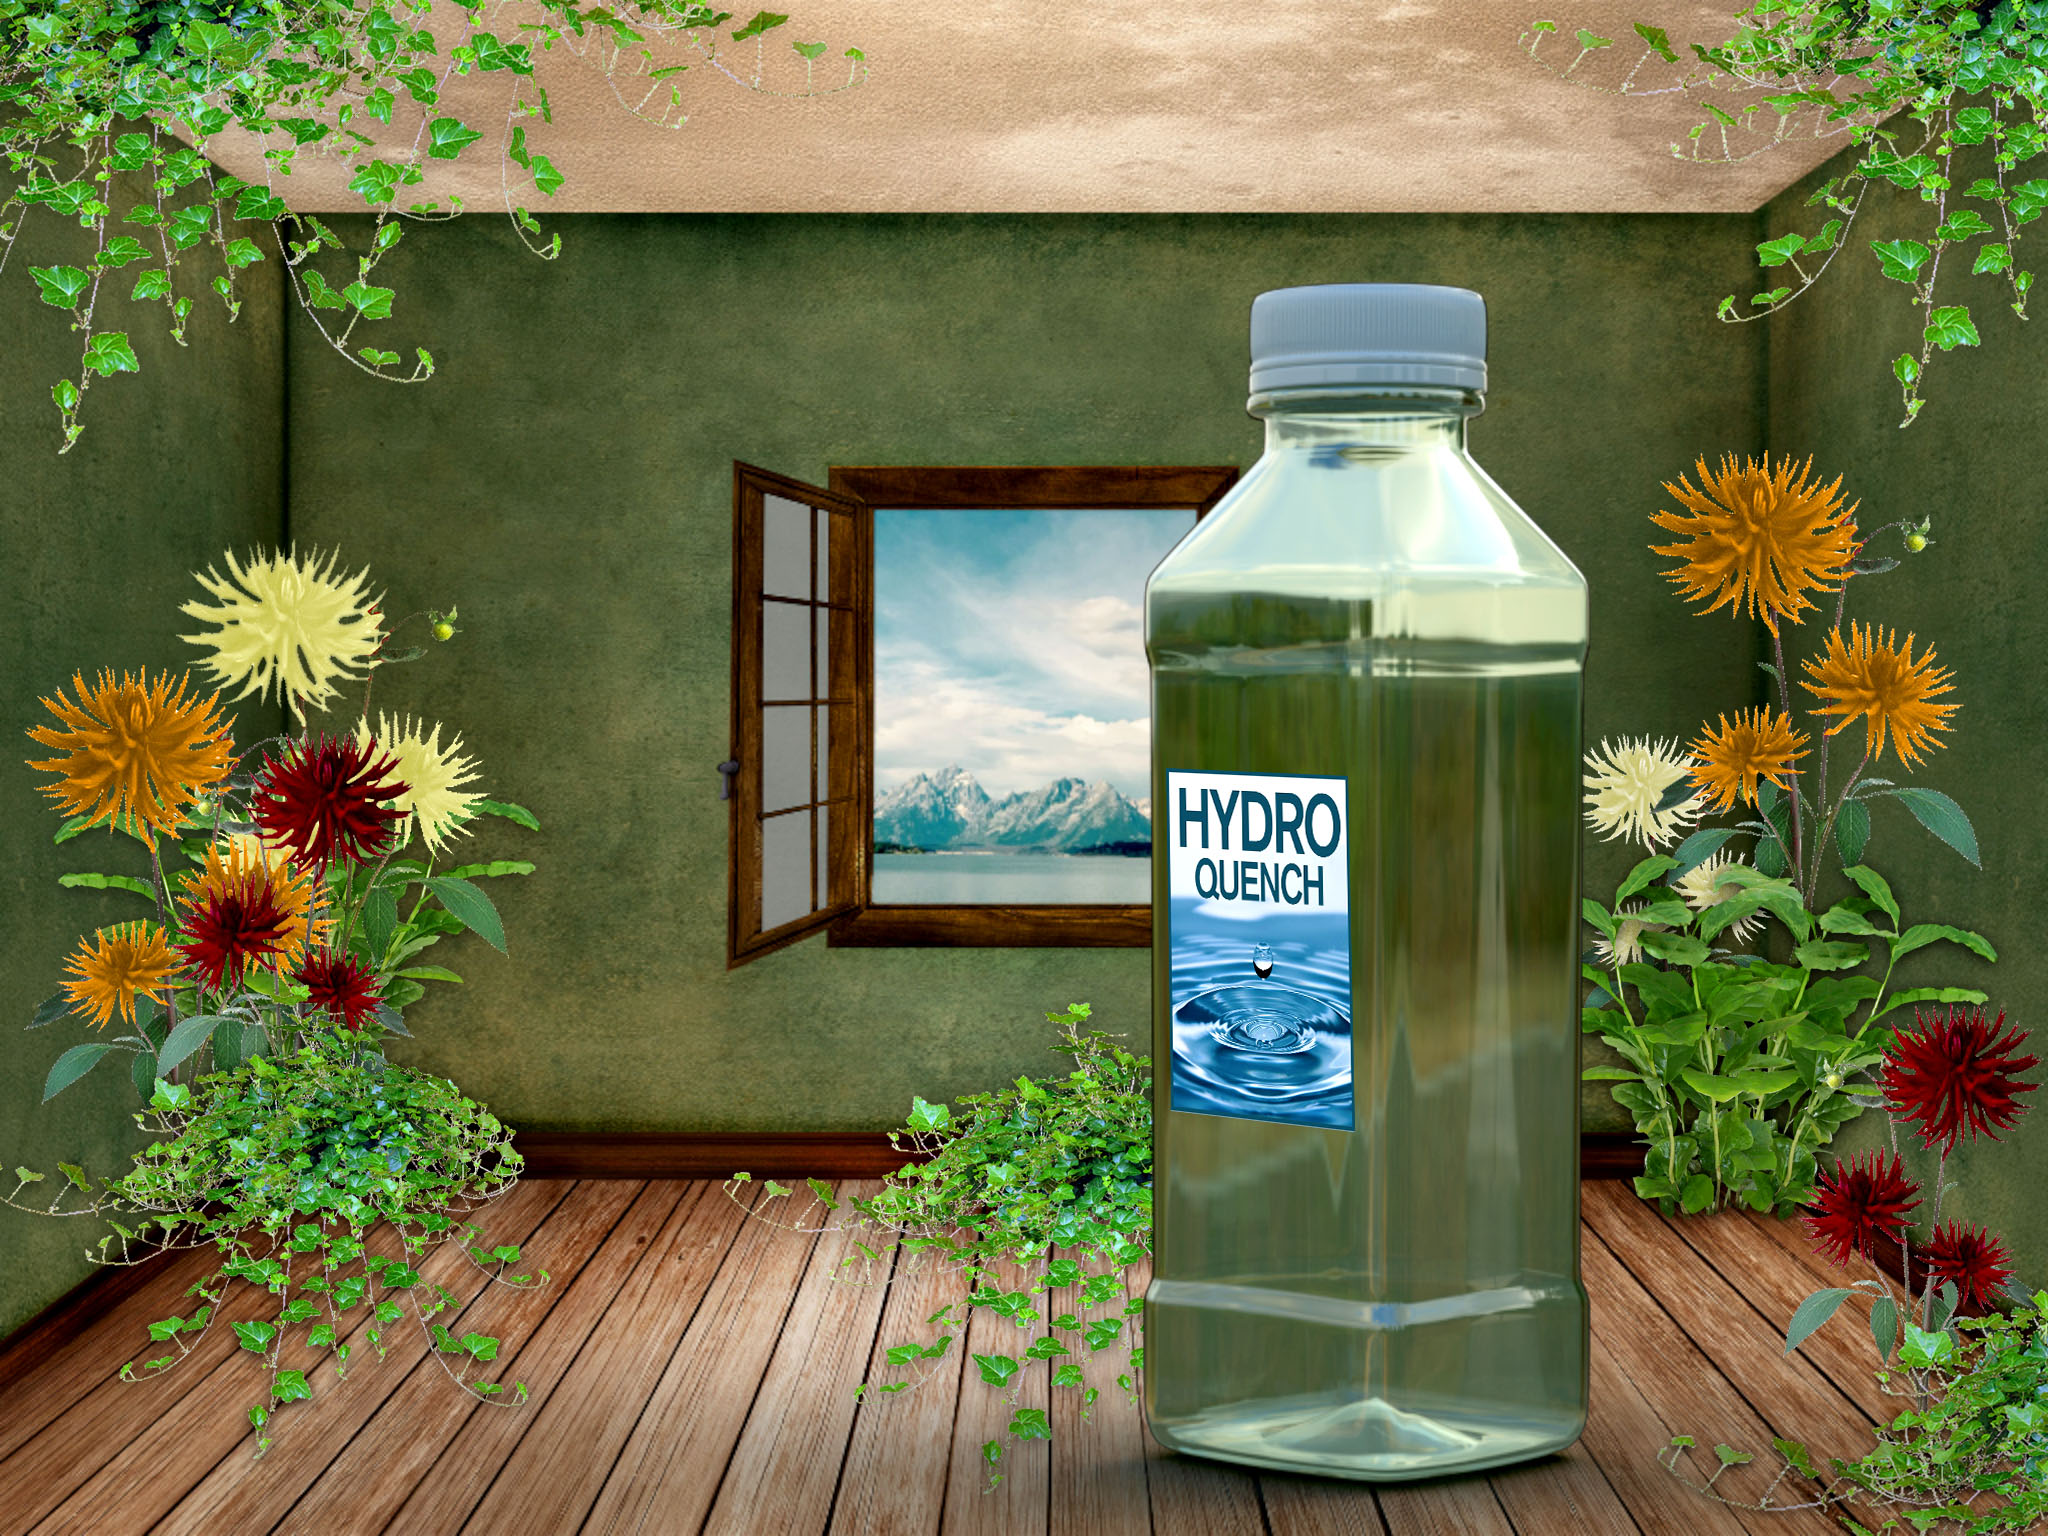
The 3D work and its corrections are finished. Now we can work in Photoshop a bit more to add the things that were less practical to create in Felix. For example, the current pre-release of Felix doesn’t give us an easy way to add a label to the model (later versions are sure to have this ability). But we can do it in Photoshop using some of its more advanced perspective tools, or just eye-balling it if you are good at that.
Finally, if this were an actual advertisement, we would need to dress it up a bit more. We've added a lot of happy-looking flowers and plants.
Related articles:

Thank you for reading 5 articles this month* Join now for unlimited access
Enjoy your first month for just £1 / $1 / €1
*Read 5 free articles per month without a subscription

Join now for unlimited access
Try first month for just £1 / $1 / €1

Lance Evans is creative director of Graphlink Media, a boutique creative marketing agency that specialises in building brands and has worked with such high-profile clients as Olive Garden, Miller Beer and AMEX. Lance was an early adopter of digital tools, and was on the original beta team for Photoshop. Lance has written for Creative Bloq on a wide range of topics, from technical photography tips to the ins and outs of branding.
