Speed up your texture workflow
Learn how to harness Quixel to quickly and easily texture your real-time game characters.
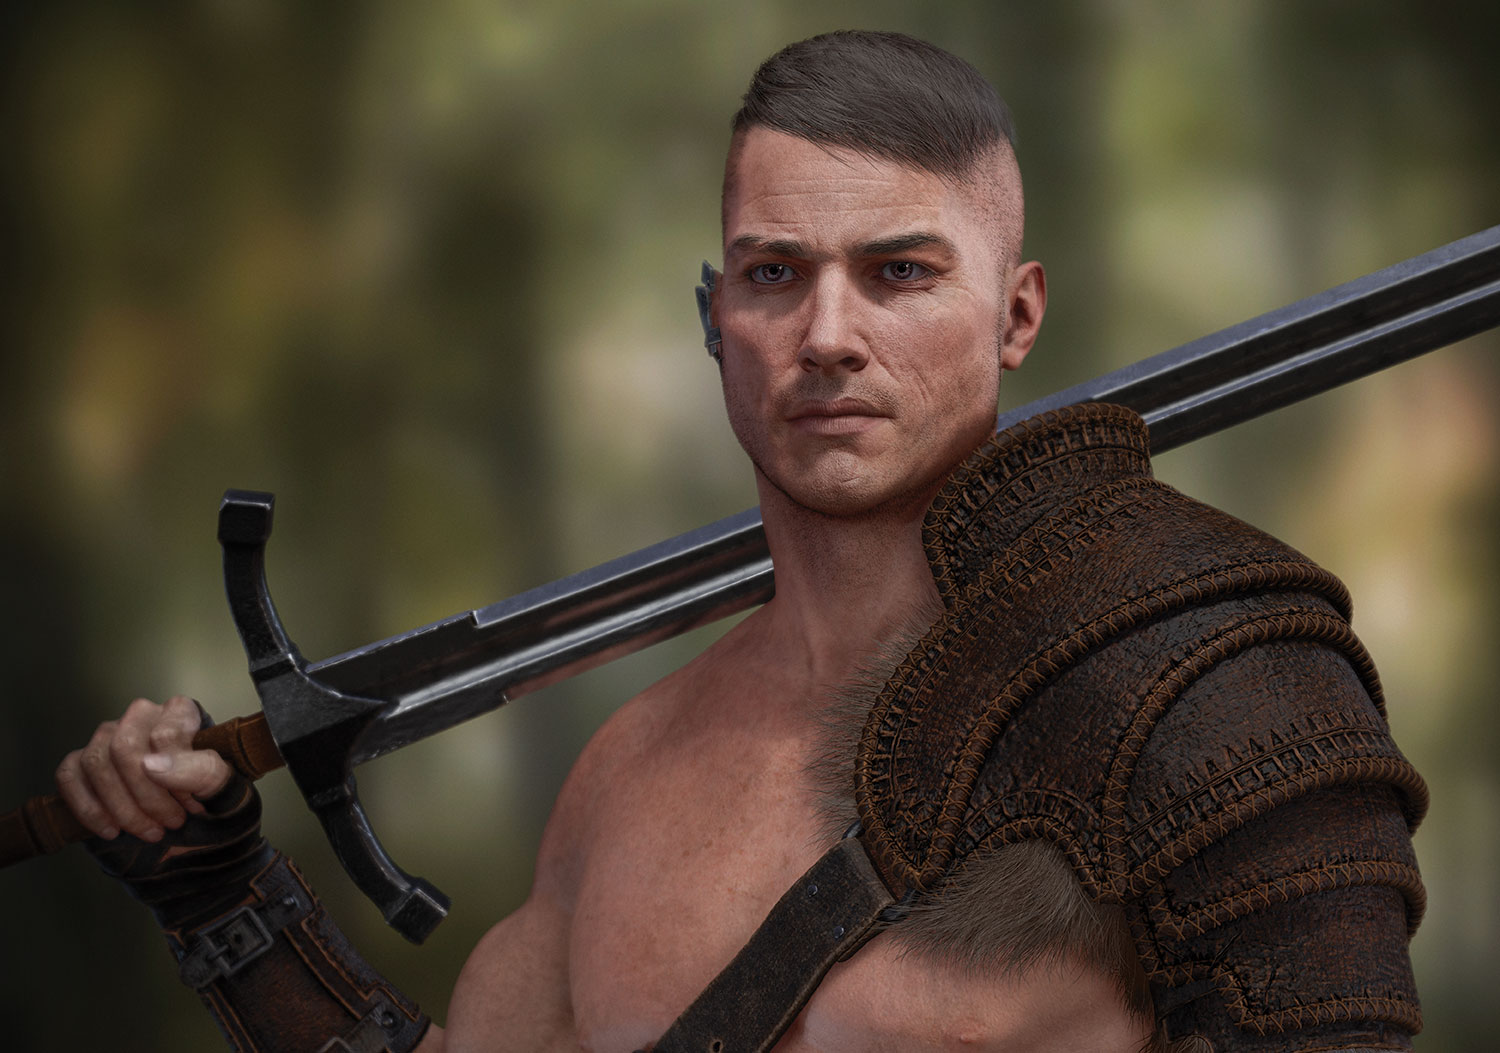
The Warrior is a personal project that I had the joy of concepting and designing. I wanted to create a character that embodies the spirit of a warrior fighting for righteousness and virtue. As a symbol, he carries with him the Sword of Honor.
To create this 3D art, I sculpted in ZBrush and modelled with 3ds Max 2014 and Modo. I used Quixel to texture all the armour and the sword, and Mari for texturing the skin. I chose to use Marmoset and rendered in real-time so that I had instant feedback for the final image. Using Quixel and Marmoset together allows me to spend more of my time focusing on the art.
Quixel is a fast and easy way to complete the Warrior's texture. I textured the entire armour and weapons in less than a day, which gave me time to do some experimenting and try new things.
In this tutorial, I'll walk through my process of using Quixel to texture, and provide insight on how it may be used in your projects.
Get all the assets you'll need here.
01. Get Started in ZBrush
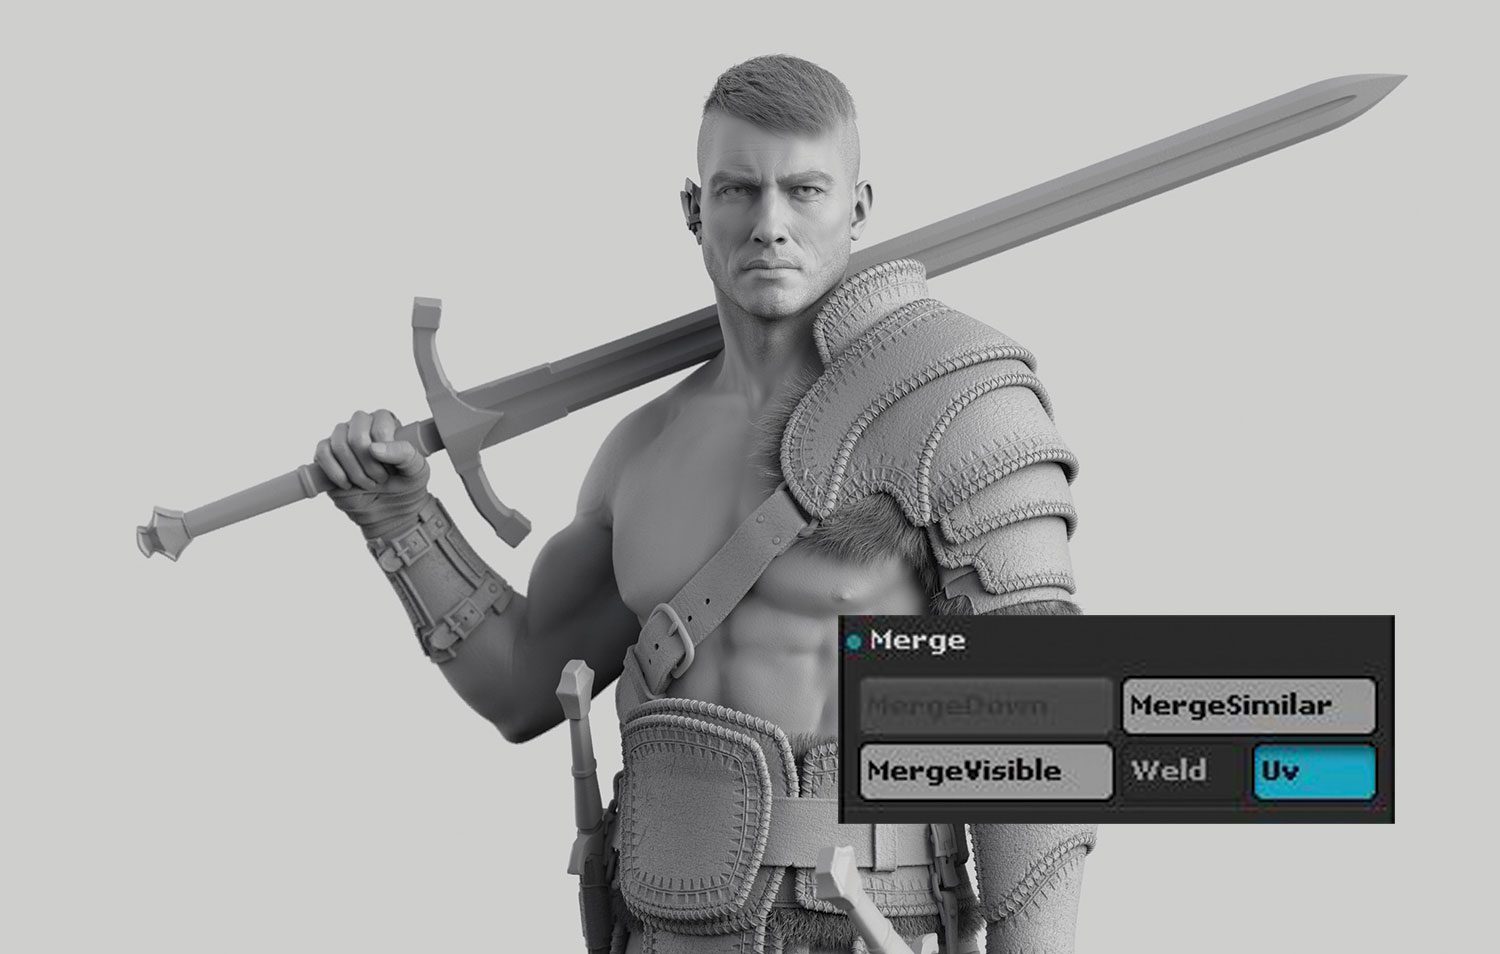
When sculpting the Warrior, I had about 150+ SubTools, so I need to clean my scene by combining related parts together before I begin texturing the character. I'm able to get it down to about 75 SubTools without losing subdivision detail. To combine SubTools with the same number of Subdivision Levels, make sure 'Merge with UVs' is checked ON.
02. Separate SubTools
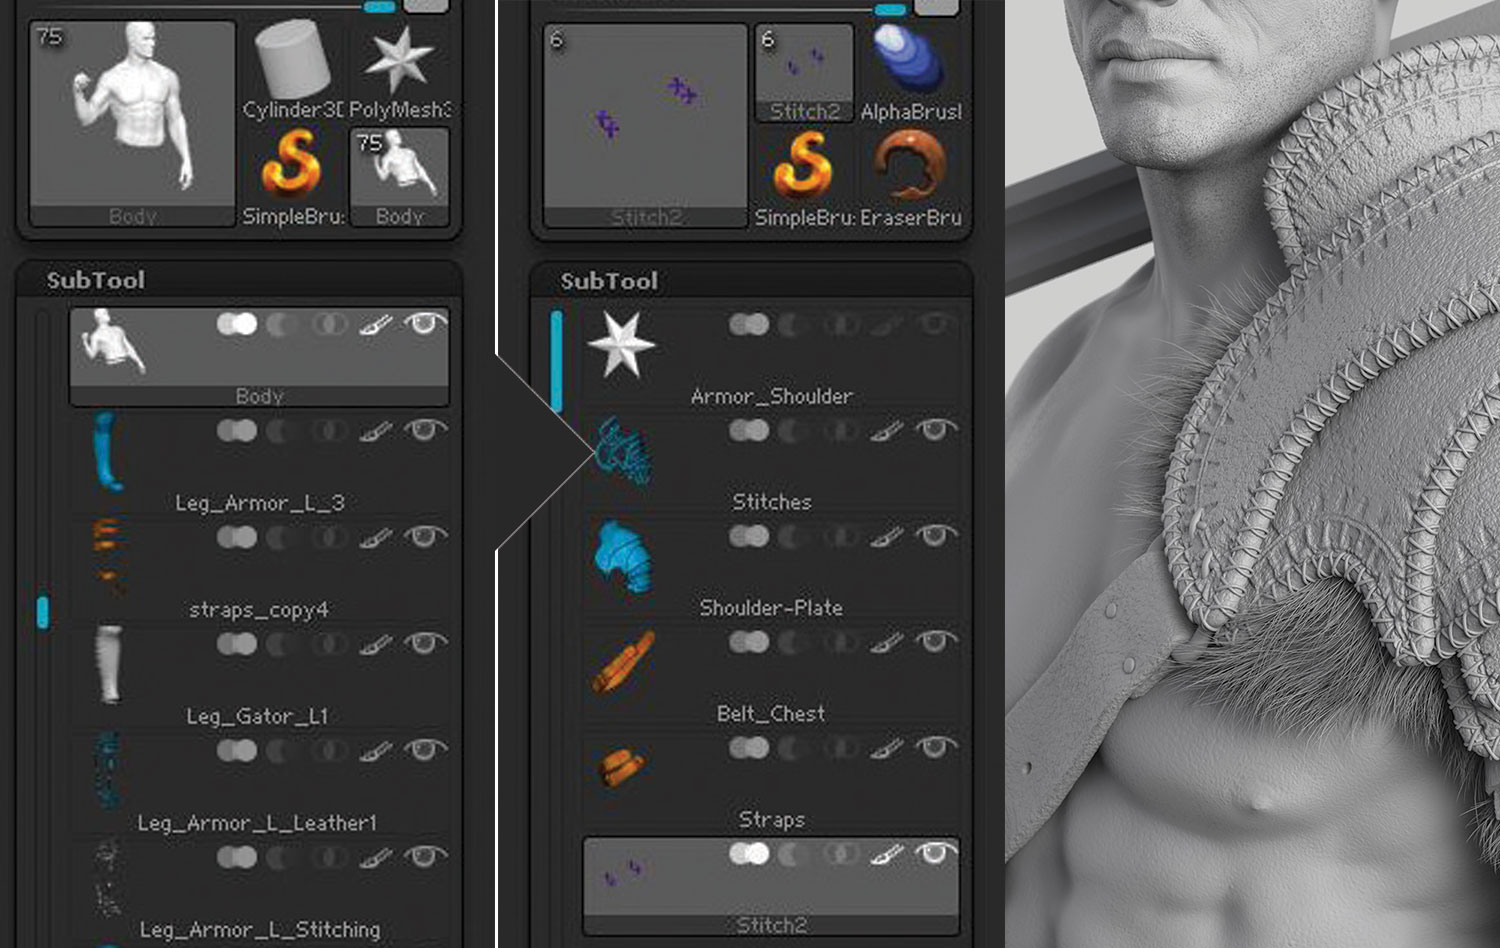
Once the master ZBrush scene has become more manageable, I separate SubTools by appending them into new ZBrush scenes (Tools). I put anything that belongs to an identical texture map together. I do this for each part of the armour, such as the shoulder plates, waist armour and bracers and so forth. In the image shown here I have separated the shoulder armour with its five SubTools.
Get the Creative Bloq Newsletter
Daily design news, reviews, how-tos and more, as picked by the editors.
03. Exporting Maps
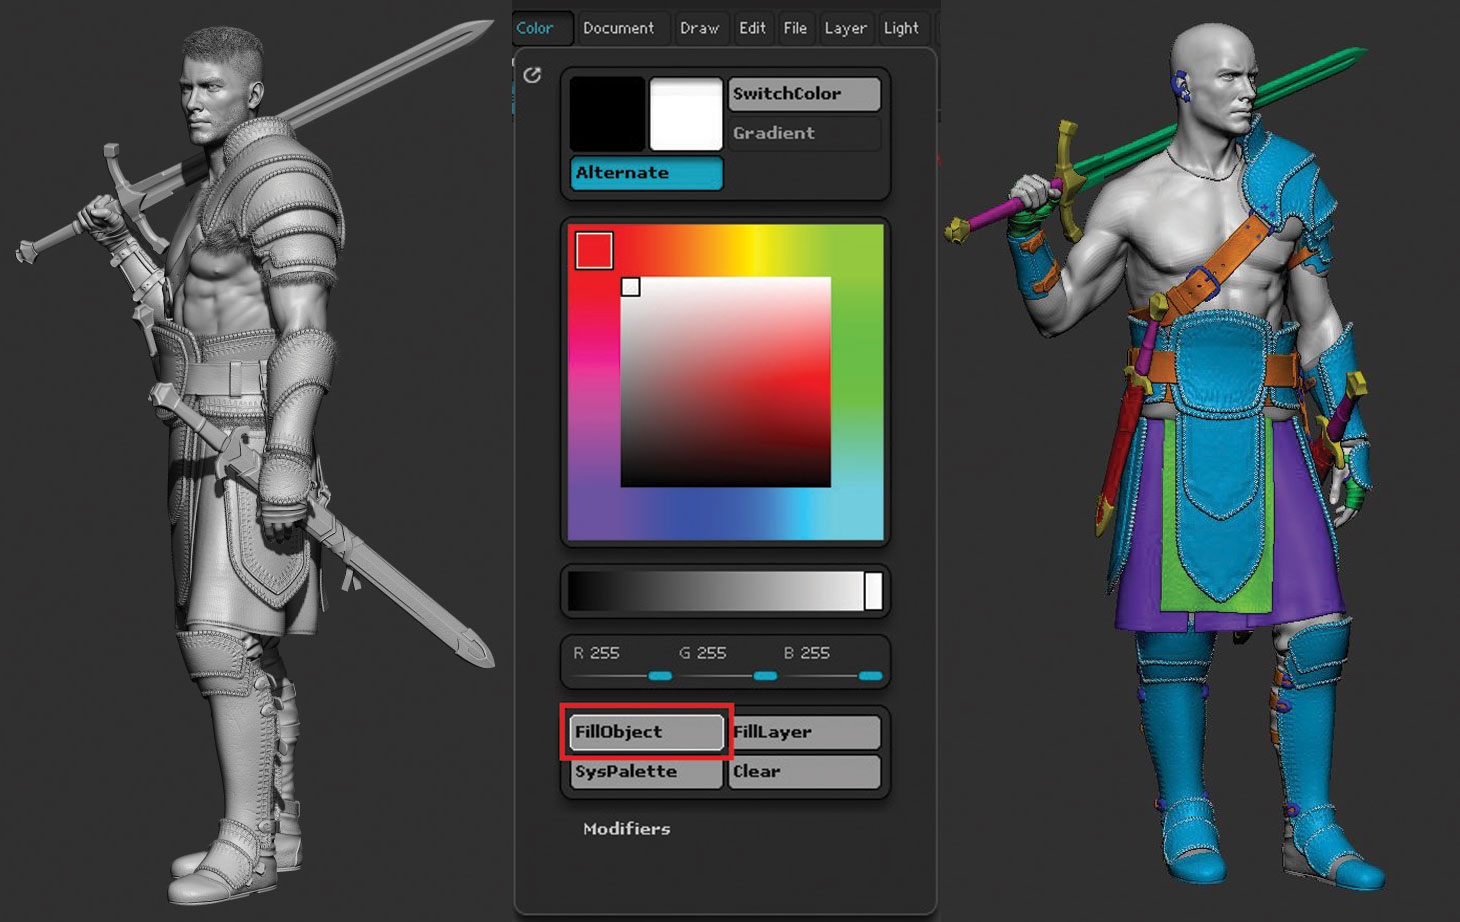
To prepare for Quixel, I need to export a Material ID, Tangent Normal and optional Object Space Normal maps. I put a lot of detail into my ZBrush model, so I choose to also create an Object Normal rather than have Quixel create one for me. To create Material ID textures, I use the Color Fill object in ZBrush. I make similar objects the same colour since they will share the same type of material in Quixel. So all of the armour is blue with orange belts.
04. Export settings
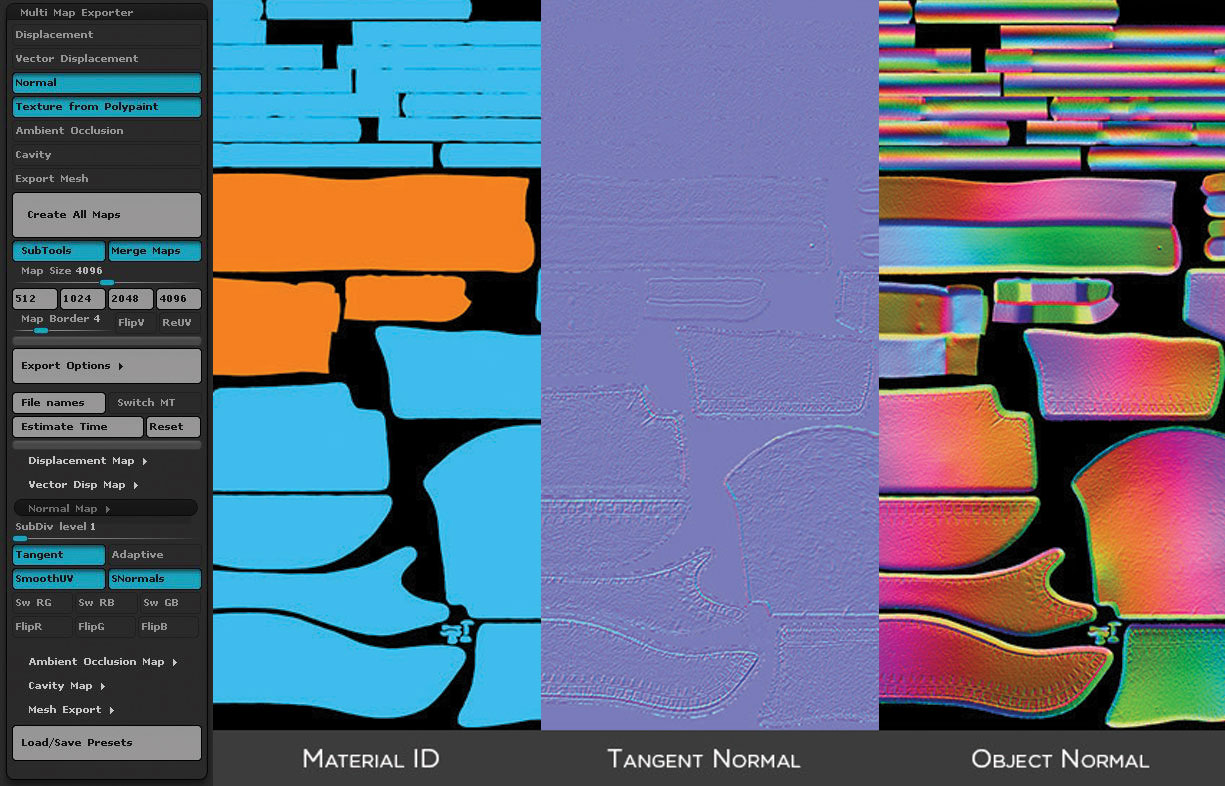
Using Multi Map Exporter, I confirm I have the correct boxes checked and any setting that I may need. Here is where it's important to have separated the parts by textures, as I now enable SubTools and Merge Maps in the Export Setting. This exports each of the visible SubTool maps and combines them into one map. The alternative is to hide everything but the shoulder armour SubTools, however, this method is too cumbersome when working with 75+ SubTools.
05. Modo to Quixel
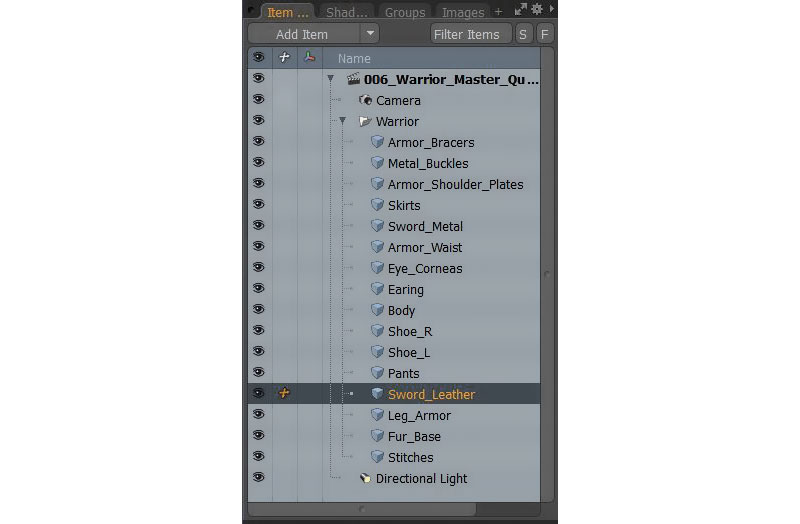
Using the FBX exporter in ZBrush, I import everything into Modo and continue to combine parts. Combining as many parts as possible is okay because the Material IDs will be used to apply different materials to different parts in Quixel. I bring the 75 SubTools down to 16 mesh groups. While 16 mesh groups are possible in Quixel with a fast computer, I suggest having even fewer and exporting .obj files as separate groups.
06. Exporting UVs
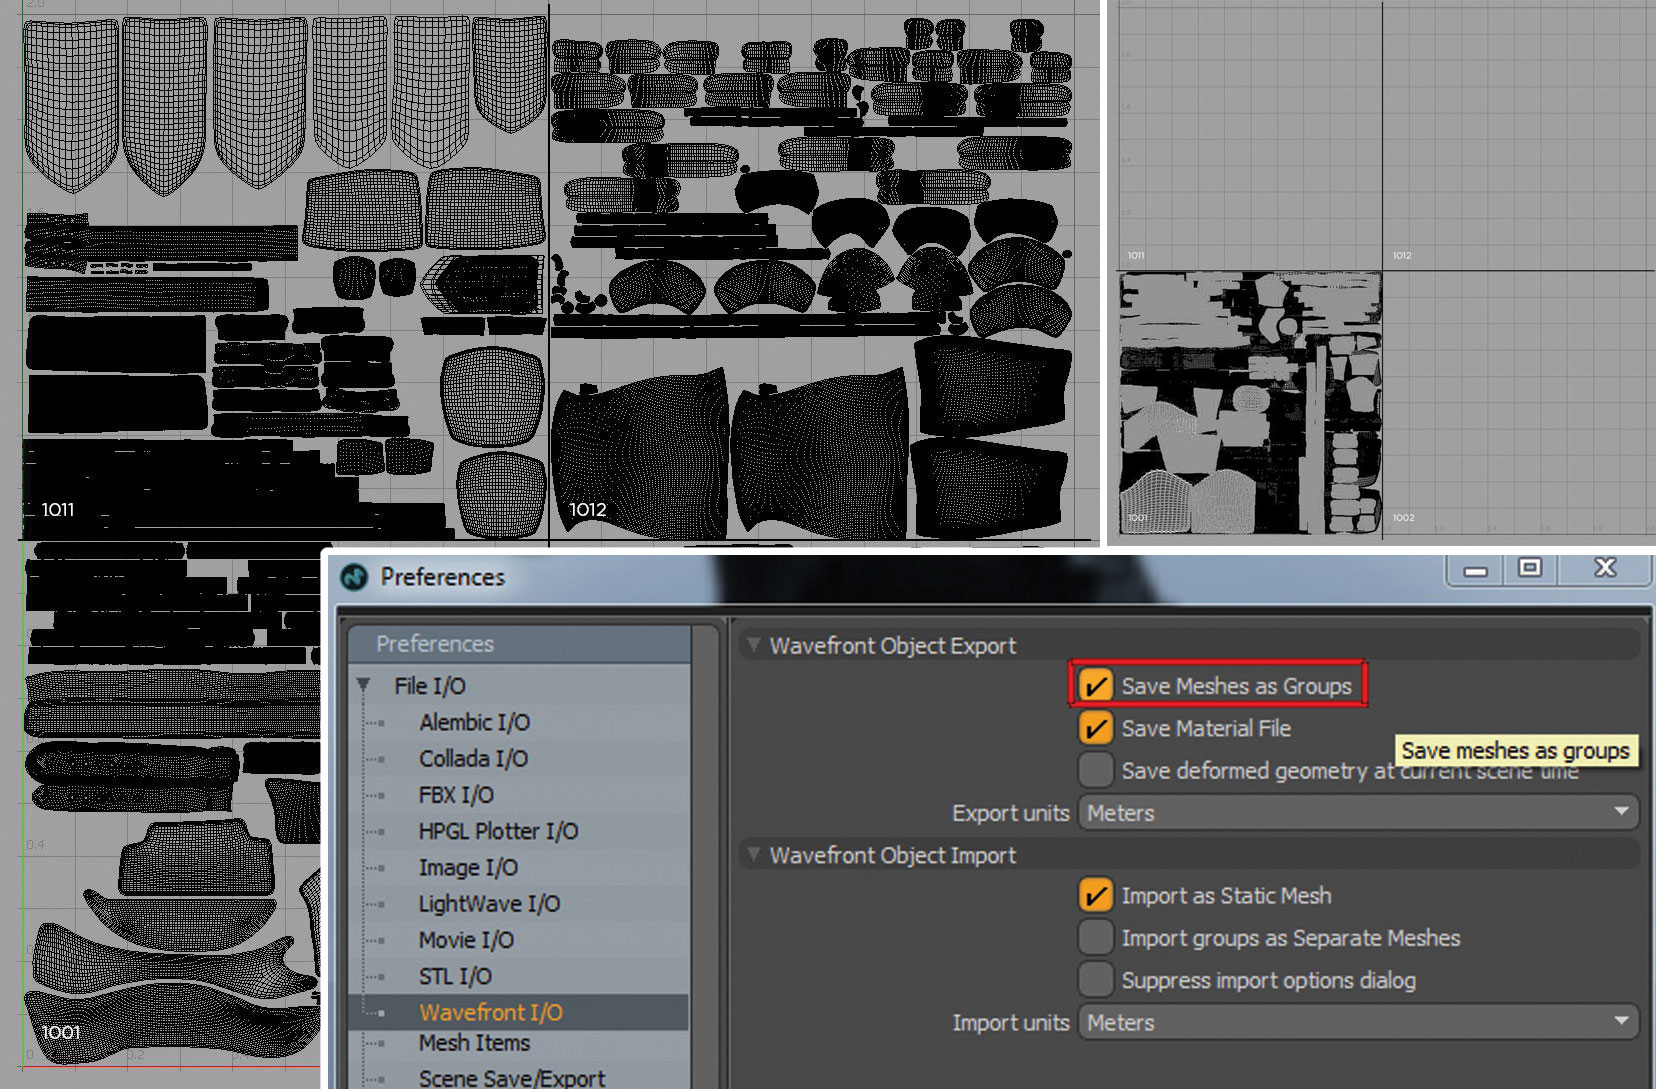
Quixel requires all UVs to be 0 to 1. If I'm using Mari UDIMs, I'll need to create a temporary scene with all the UVs 0 to 1. After exporting textures back out of Quixel, I can go back to using UDIM UVs by renaming and importing back to Mari. Before exporting an .obj in Modo, I need to change the Modo Preferences to Save Meshes as Groups. Otherwise, it will export every mesh island as a separate group, giving me hundreds of mesh groups in Quixel.
07. Import to Quixel
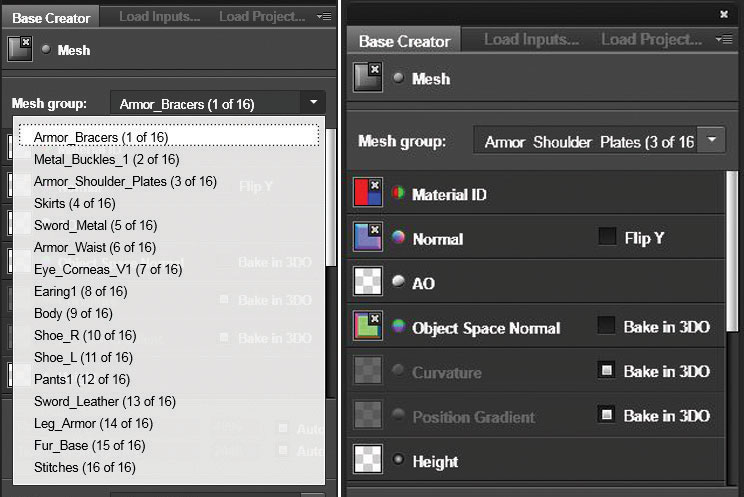
Once they're exported from Modo, I see all 16 mesh groups listed. Note that some, such as the body, are for visual reference only and won't be textured. I go through all the mesh groups and attach my Material ID, Normal and Object Normal maps. If you decide not to export an Object Space Normal from ZBrush, you can do so now by selecting Bake in 3DO. Click Create! If you forget to attach a map before this, you can go back after the project is started and add it.
08. Adding materials
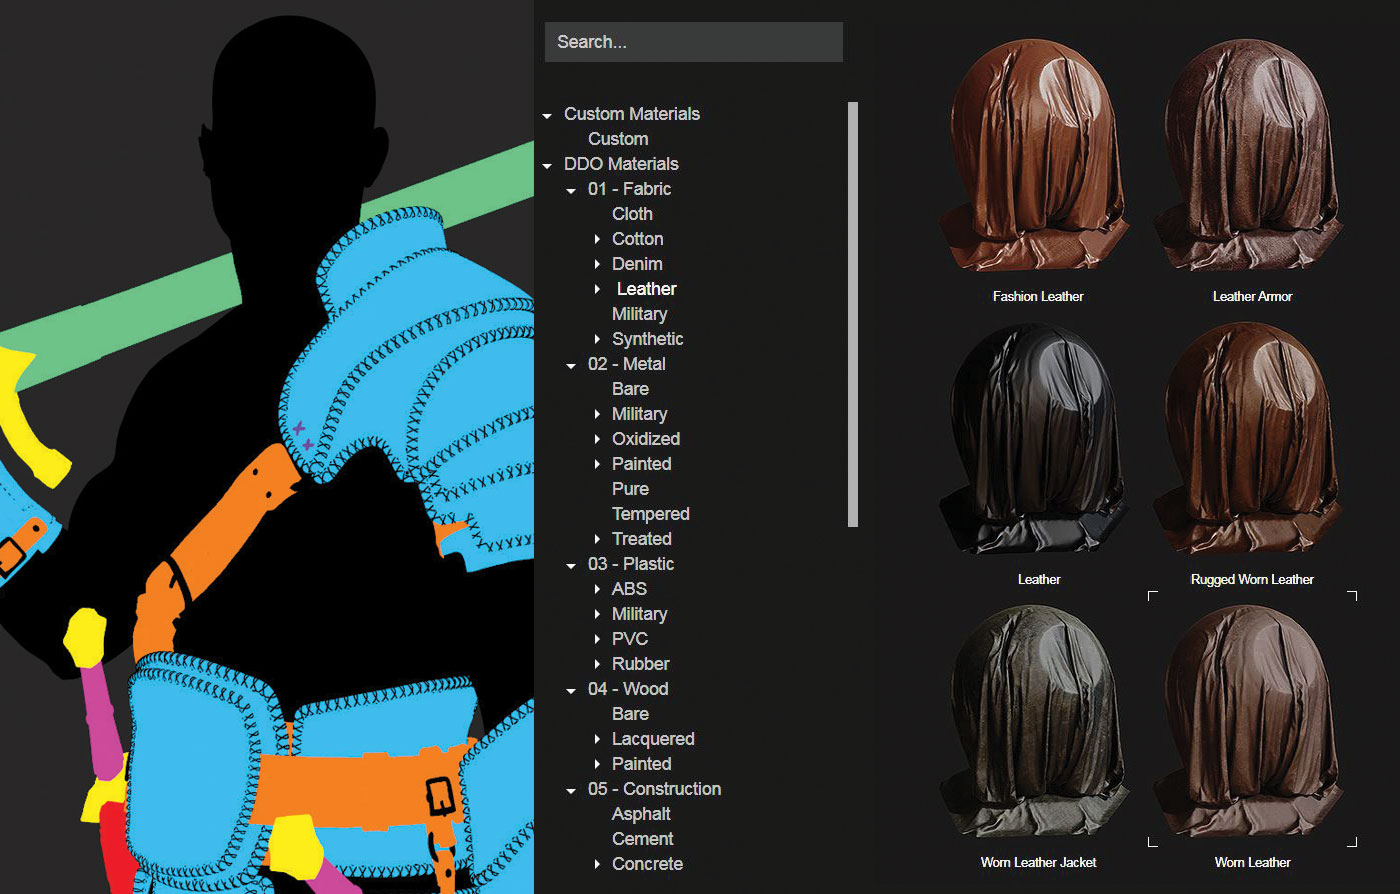
The power of Quixel is the preset PBR materials. I use these and add layers to differentiate the surface properties. This process of adding layers to a preset and modifying them will make the material unique. By holding down C on the keyboard, I can view my Material IDs. If I hold C+Shift and left-click on a colour, Quixel adds a material to that mesh group colour selection. I can also choose after creating a material which colour Material ID I would like to use.
09. The leather armour
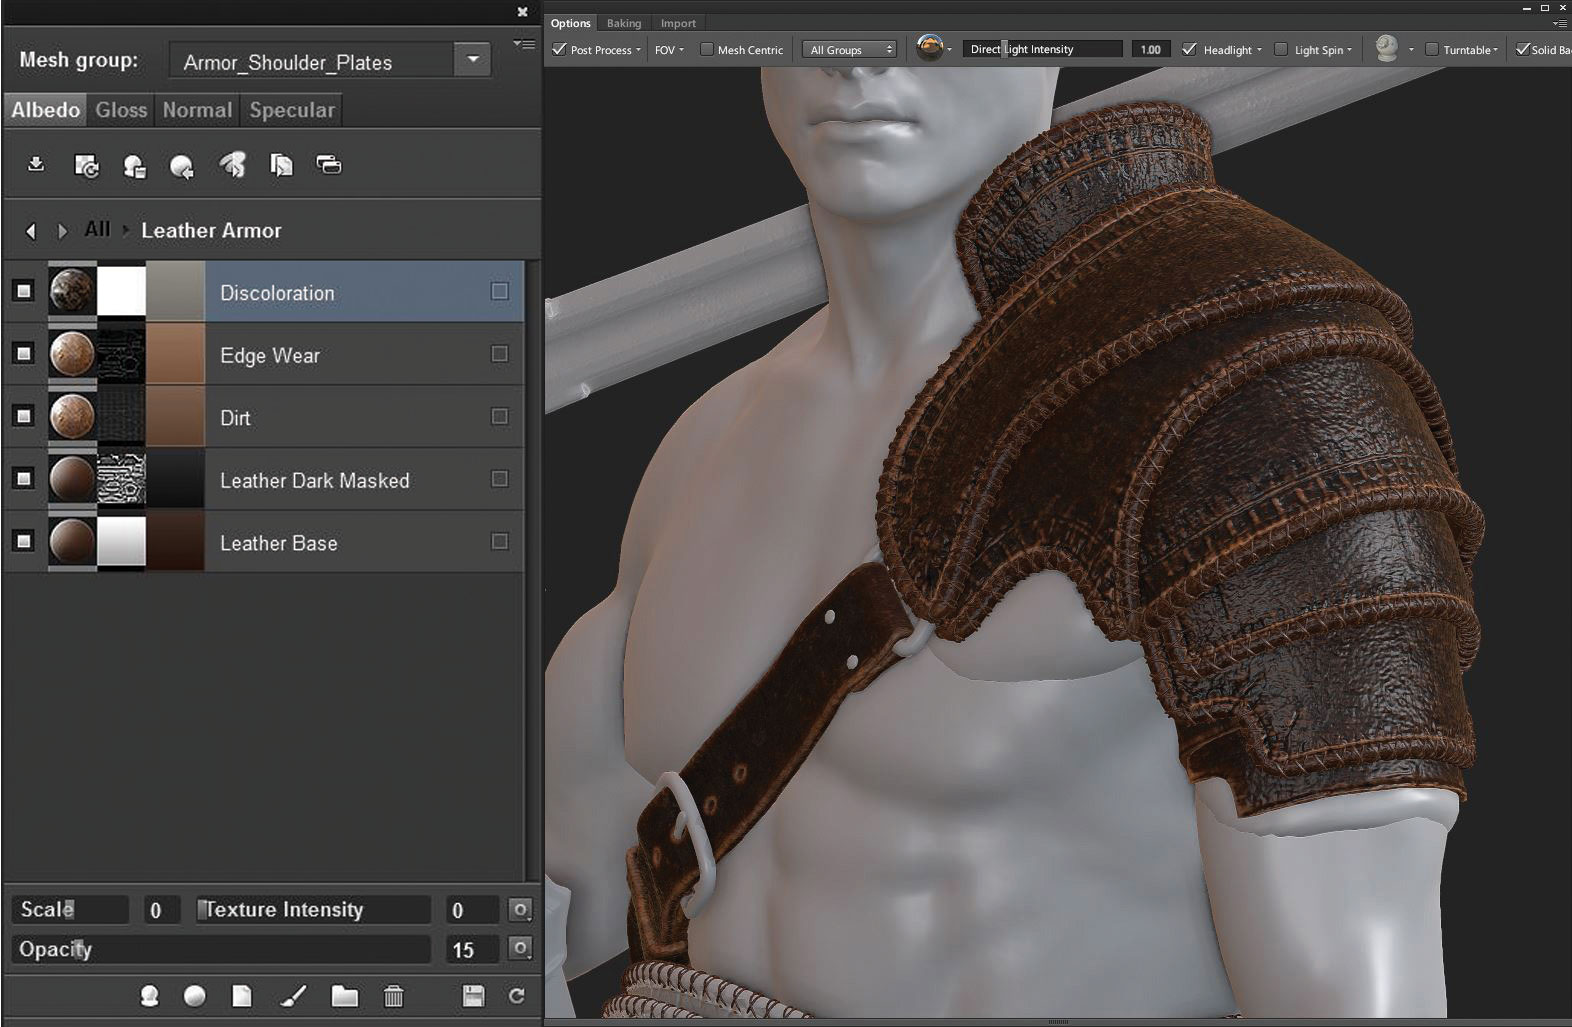
I select a base 'Worn Leather' material preset, and then add additional wear and tear layers to the material. To create believable leather I begin by adding a dark value variation over the base leather. Next I make a new dirt layer and select a texture map that randomly covers the whole surface. Selecting a texture rather than a blank solid colour will give my normal map variation and more realism. Then I add a wear layer to all the edges. The final layer covers the whole surface and gives a subtle colour variation.
10. Concepting materials
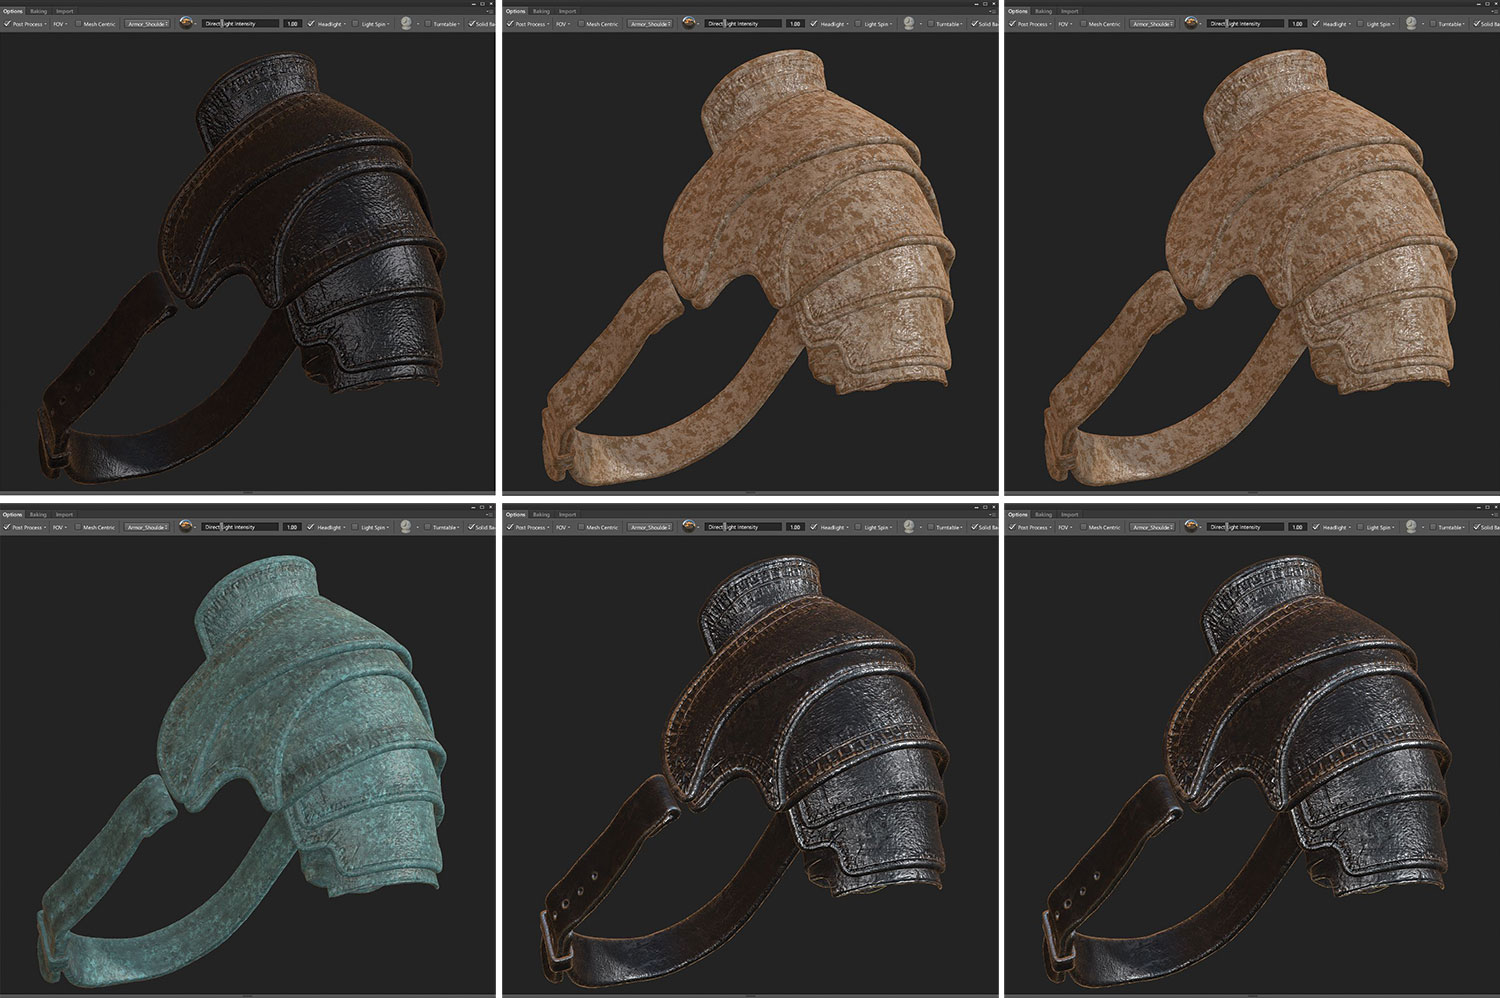
Another way to use Quixel is for concepting new materials on a character. Fast prototyping materials in Quixel means I can non-destructively try many different variations before making a final decision on which to use. In the images here are some examples of using preset materials; the only modifications I made to these were to adjust the scale of the texture to fit the armour.
11. Save and apply materials
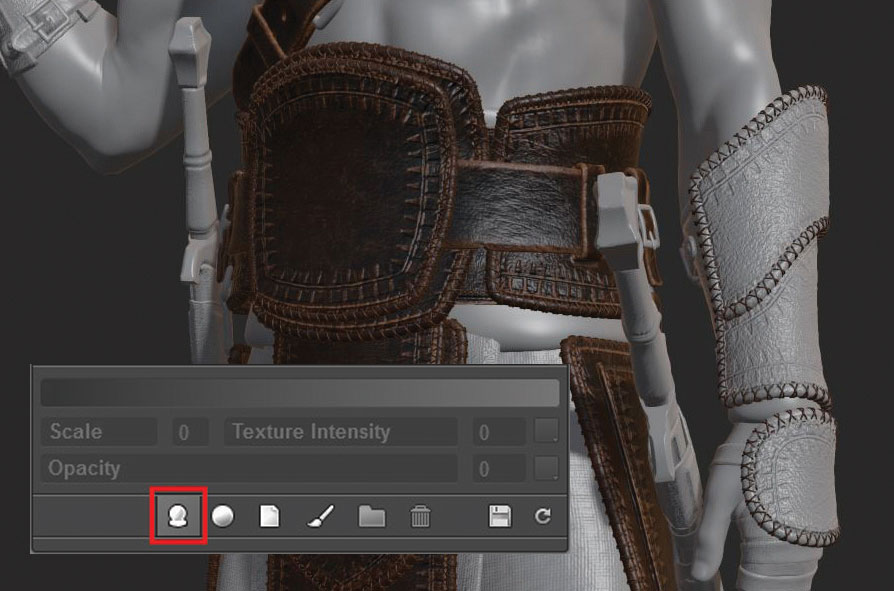
After creating the initial leather armour material, I click the Save Smart Material icon, so I can easily apply it to other armour parts. After saving a Custom Smart Material, I can quickly go through the model and apply the material. The Smart Material will remember which colour Material ID I used in the original and apply it correctly to the new objects. Since I made all the armour blue with orange belts, I'll have no problem getting the same results.
12. Export textures
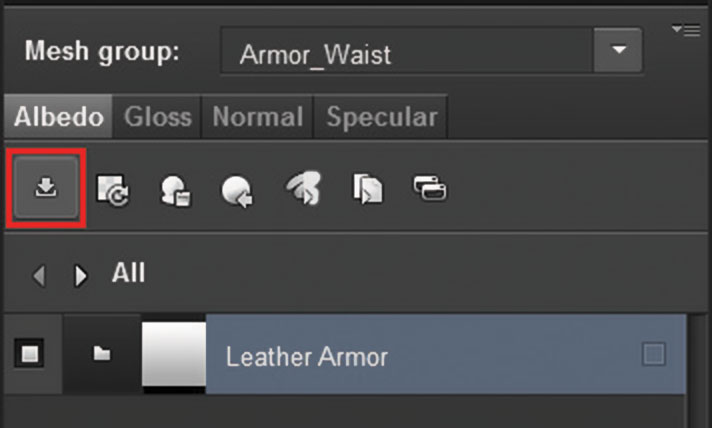
It's very easy to export texture maps from Quixel – just click Exporter! There are many preset Export Targets and so it's important to select the correct one for the render engine being used. If it is unclear which Target to select, try using the default option, Specular PBR. Since I'm using Marmoset to render, I choose the Toolbag 2 option. This option will export textures and a Marmoset material. Export the single Material or All Materials in the project.
13. Import into Marmoset
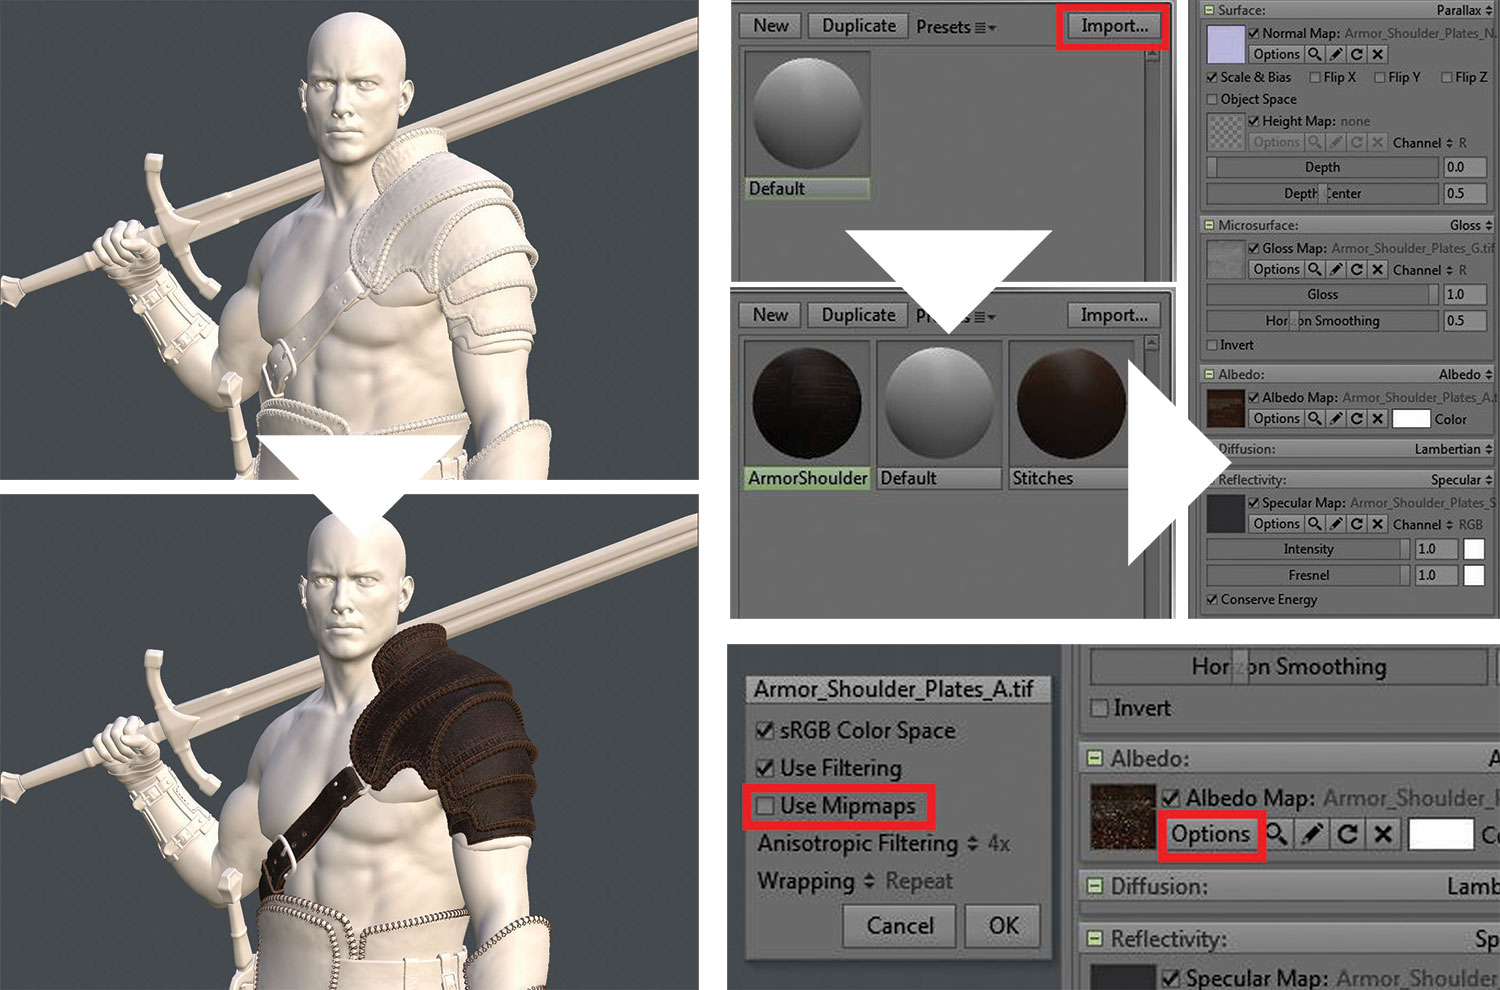
Import into Marmoset by clicking Import in the material box and select the exported .tbmat file. Once the material has been imported, I can drag and drop the material onto the mesh in the 3D viewer. The results are incredibly close to the Quixel 3DO viewer and would probably match exactly with the same HDR image. To get higher resolution renders in Marmoset, turn off Use Mipmaps.
This article originally appeared in 3D World issue 212; buy it here!

Thank you for reading 5 articles this month* Join now for unlimited access
Enjoy your first month for just £1 / $1 / €1
*Read 5 free articles per month without a subscription

Join now for unlimited access
Try first month for just £1 / $1 / €1
