Create a scene with RenderMan for Maya
Use RenderMan for Maya to create a beautiful winter environment, from concept to render.
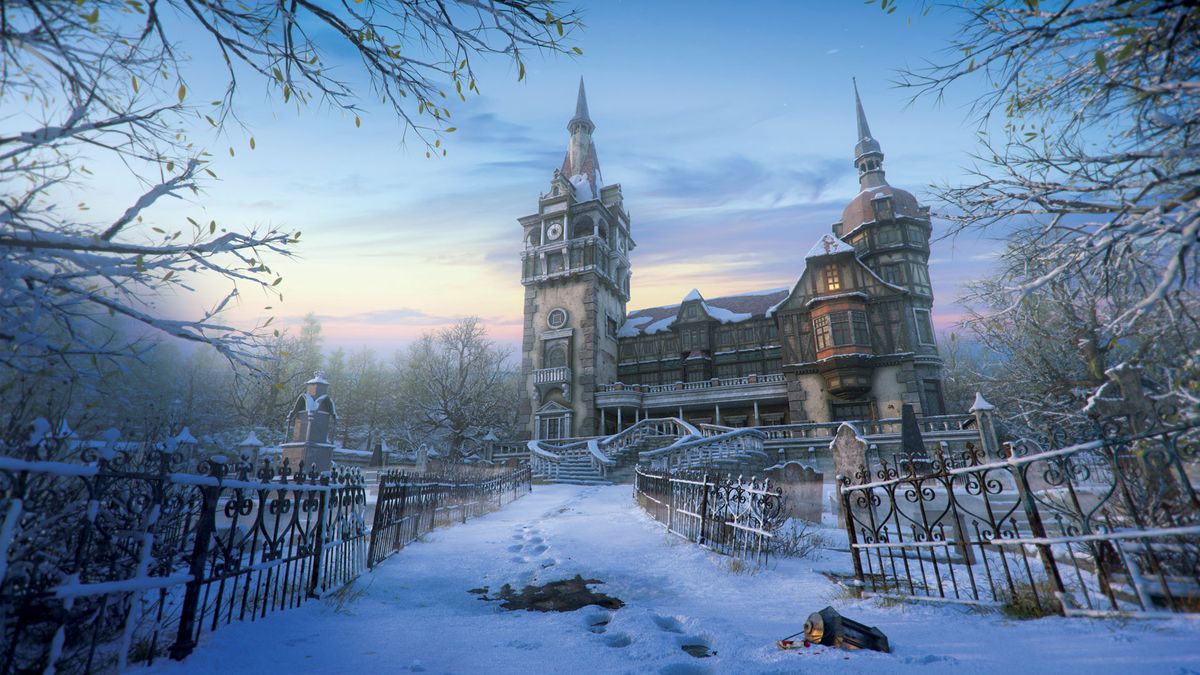
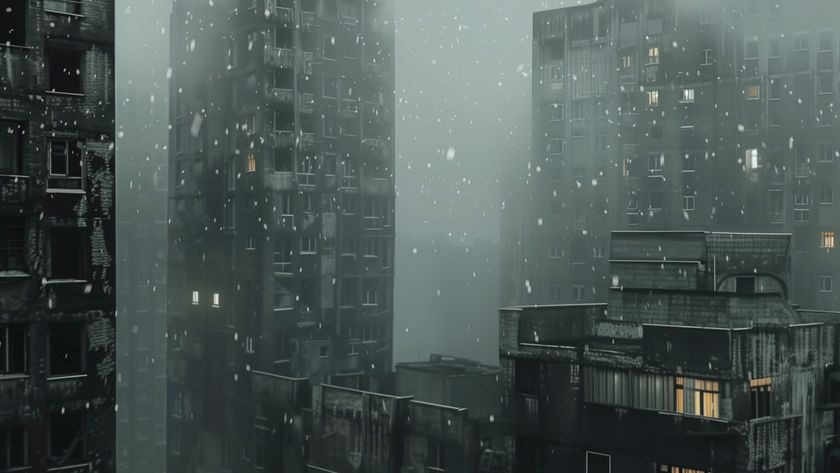
In this RenderMan for Maya tutorial, we'll cover a variety of topics starting from creating a compelling composition all the way through to shading, lighting and rendering a production-quality image.
We'll use polygon modelling techniques to create the environment, taking into consideration our camera position to avoid unnecessarily over-detailing our set. After preparing our models for shading, we'll explore how to use Substance Painter to create high-quality textures, as well as techniques for shading elements without UVs using RenderMan's texture projection manifold.
To add another level of detail and complexity to our scene, we'll look at a few methods of generating snow in Maya using displacement and Maya's nParticle system. Adding atmosphere is essential to any environment, and we'll look at what goes into creating environment fog using a combination of RenderMan shaders and Maya fluids.
Finally, we'll light and render our scene and output different render passes for composition in Fusion. And remember, if you're feeling stuck at any point, there are plenty of Maya tutorials out there to help you out.
Download the files for this tutorial.
01. Set your camera
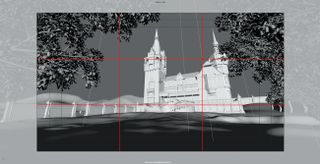
The origin of this piece came from Pixar's RenderMan Timeless Art Challenge, where they teamed up with Kitbash3D and SpeedTree to provide assets for participants to use to create a scene.
After familiarising yourself with the provided models, decide what the focus will be and find a camera angle that helps support your narrative. Fill the frame, but try to avoid letting the main assets stray too close to the edge of the image. Keep in mind the rule of thirds, breaking down the scene in thirds both horizontally and vertically, and find an interesting silhouette.
Get the Creative Bloq Newsletter
Daily design news, reviews, how-tos and more, as picked by the editors.
02. Block in shapes
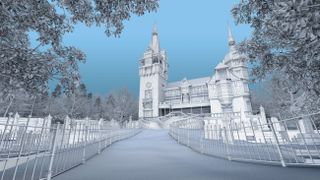
In this phase, you'll block out initial shapes and models to fill your composition and support your narrative. This will help you get a better feel for your final shot and where you need to spend your time adding details later. Don't worry about detailing your models at this point though, just keep it rough to iterate quickly.
Using a fence to create leading lines, the viewer's eye is drawn down the pathway to the focal point. Duplicate similar geometry to efficiently fill out the scene and create an interesting environment, such as adding trees for the background.
03. Refine models
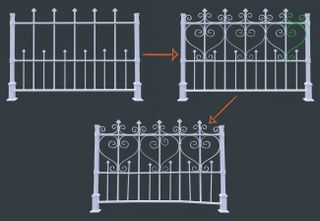
Once you're happy with your composition, you can now begin to refine the models by adding some extra variation and details. Try to spend most of your time on key objects, or ones closer to the camera. Objects in the real world seldom have perfect silhouettes and angles, and spending extra time in this phase heavily influences realism.
Maya's Soft Selection and sculpting tools are great for adding irregularities to objects. It's beneficial in this phase to add a simple Dome light with an HDRI to execute test renders. You can start to see how your models interact with light, even with a basic grey material.
04. Prepare for shading
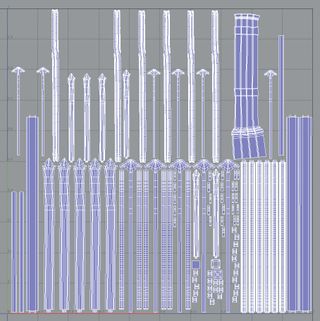
Now that you're satisfied with your models, it's time to prepare them for shading. For generating texture maps using Substance Painter, clean UV layouts are essential. Using Maya's UV tools, work through your scene and UV unwrap the models. Ensure all seams are facing away from the camera and avoid overlapping UVs.
For better organisation in Painter, assign a basic Lambert material to each texture set you'll want to be associated with your model and name it appropriately (e.g. iron, concrete). Each texture set will equate to a separate material in RenderMan.
05. Create textures using Substance Painter
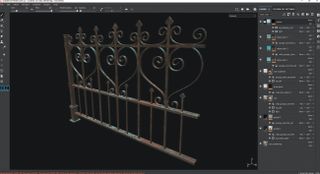
Make a new PBR – Metallic Roughness project, import your FBX and bake the mesh maps to start. Starting with a smart material or a substance from Substance Source can save you time, then work procedurally and stay non-destructive by utilising layers and masks to add details and wear.
Export a smart material of your procedural shader if you'll be shading other, similar objects, then add hand-painted and/or model-specific details towards the end to finalise your textures. For use with RenderMan's PxrSurface shader, export maps for Diffuse, Height, Roughness, Specular and Normal DirectX.
06. Set up RenderMan shaders
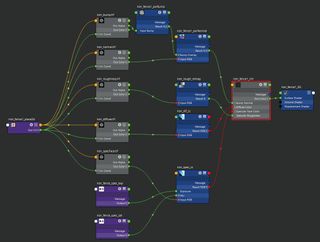
With RenderMan's uber shader, PxrSurface, load into Maya the Substance Painter textures and connect them to the appropriate inputs. All colour textures (diffuse, specular) should be loaded using sRGB colour space (linearised), and all data/numeric textures (height, roughness, normal) should be loaded as RAW (non-linearised).
The specular model for PxrSurface should be set to GGX and the Specular Fresnel Mode set to Artistic. You can overlay the height map over the normal map using the PxrNormalMap Bump Overlay input.
07. Create ground snow using displacement
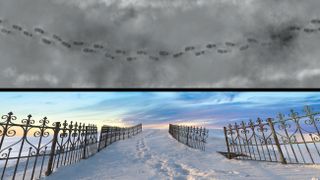
Using a displacement map, you can create detailed terrain with footprints and other realistic details to support your narrative. In Photoshop, start off with a 50% grey layer. As you paint, values above 50% will displace upward along the surface normal, and any values below 50% will displace downward.
In Maya, load this displacement map and connect it to a PxrDispTransform node with the Remapping Mode set to Centered. Then, using a PxrDisplace node, connect the displacement map to the shading group for the ground geometry. To ensure smooth and accurate displacement, add the RenderMan Subdiv Scheme attribute to the geometry to render it as a subdivision surface.
08. Generate snow using Maya nParticles
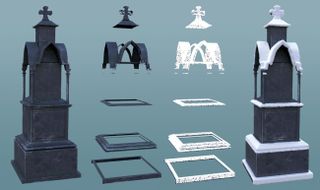
To generate snow on the surface of objects, Maya nParticles can be converted to polygons to create blobby, snow-like geometry. Duplicate the target object and delete all the faces except those facing upward. With the object selected, create a Surface type emitter and play the simulation to generate particles on the surface.
Once satisfied with the particle coverage, convert the nParticle object to polygons. Dial the Output Mesh parameters on the nParticle object until you're pleased with the snow geometry. You can also manually paint particles using the nParticle Tool to get more natural particle shapes.
09. Develop a snow shader
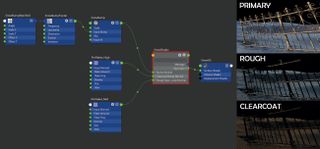
Much of the look of snow comes from the specular and the subsurface properties of the material. Start with a PxrSurface with an off-white diffuse and Jensen Dipole Subsurface enabled. Using the Primary Specular lobe, establish the overall, broad specular of the surface with high roughness.
Building on that, use two PxrFlakes patterns with a high and ultra-high frequency and assign them to the Rough Specular and the Clear Coat Bump Normal inputs, to produce the specular glints you often see on the surface of snow. Add a high-frequency PxrFractal to the bump input to break up the surface.
10. Let there be light
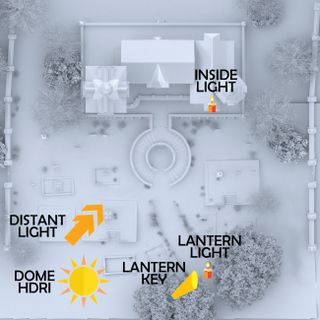
Add lights to the scene to bring it to life. Using a PxrDomeLight, add an HDR image that captures the general mood you're after. Using an HDRI without a strong direct light source provides more flexibility by allowing you to create a separate key light, such as a PxrDistantLight or a PxrEnvDayLight for sunlight.
Add other analytic lights throughout the scene where necessary, such as inside windows or lanterns. Running an IPR while establishing your lights provides real-time feedback and allows quick iteration.
11. Use fog to establish atmosphere
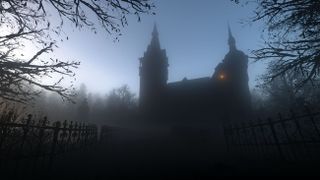
Introduce depth to your scene by adding atmospheric fog. Create a Volume Primitive and scale it to encapsulate the entire scene. Assign a PxrVolume shader to the primitive and, to get a constant fog, set the density very low (0.001).
To create a density gradient, or to control the density of the volume in world-space, assign a manifold with a 'world' Coordinate System to a PxrRamp and assign that to the volume's Density Float input. Using the ramp you can increase the density closer to the ground.
12. Add billowy fog using Maya fluids
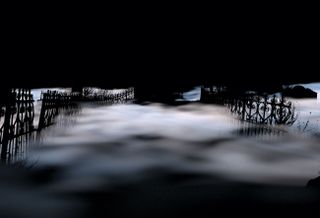
Use Maya fluids to simulate low-hanging fog or mist. Create a 3D fluid container and scale it to the appropriate size. Adjust the resolution of the grid to get a smoother simulation.
With a constant Density Gradient, enable the Texture Opacity and use Perlin Noise as the Texture Type. Run an IPR and adjust the texture parameters until you get a desirable patchy, billowy look. Adjusting the Shading parameters such as colour, transparency and opacity can further enhance the look.
13. Create falling snow
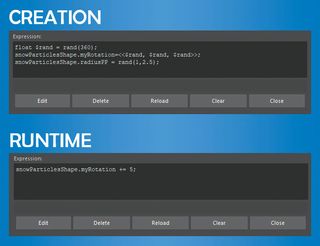
Add some falling snow to really sell the cold, winter atmosphere of the scene. Create an nParticle volume emitter, scale it up, set the desired particle rate and add some wind to the nucleus object. Since snowflakes are generally flat, create a small, snowflake-sized plane and use it as the source for a particle instancer.
Assign a double-sided snow material with a snowflake alpha cutout to the plane. Create a new Dynamic Attribute and set a random value for the creation expression. Using runtime expressions, increment the value to continue the rotation. Under the instancer, set your new attribute as the rotation source.
14. Prepare to render
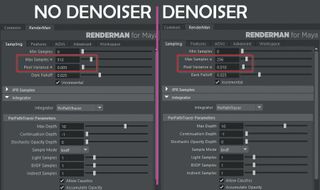
Since the snow shader contains tiny glints of reflections, using the denoiser isn't an option since it mistakes those glints for noise. The sampling will need to be slightly higher to accommodate – somewhere around 512 max samples with a 0.005 pixel variance results in a clean render.
Denoising can be enabled for the fog render passes, so you can utilise a lower sampling rate for those. Enable motion blur for the falling snow render pass, and add any AOVs you desire for the scene, including mattes for masking in post.
15. Composite in Fusion
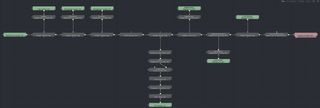
Load your render outputs into Fusion. Start by adding a background image or matte painting for the sky and add the beauty pass over it. Next add the constant fog pass, adjusting the exposure and gamma to dial it over the beauty.
Perform a similar merge for the billowy fog layer, then finally add the falling snow layer on top of everything. Perform any colour grading and add lens effects such as vignette, edge blur, chromatic aberration and film grain, if desired, to combat the 'rendered' look.
This article originally appeared in issue 133 of 3D Artist. Buy issue 133 here.
Related articles:

Thank you for reading 5 articles this month* Join now for unlimited access
Enjoy your first month for just £1 / $1 / €1
*Read 5 free articles per month without a subscription

Join now for unlimited access
Try first month for just £1 / $1 / €1
