How to melt a 3D object with three.js
Create an eye-catching effect to make objects melt.

The web as we know it, is constantly changing and evolving. What we still can remember as a simple and straightforward medium gained another dimension a few years ago, and it doesn’t look like it’s going to stop there either. For a website builder, what was once part of science-fiction movie visual effects is now possible on a tablet lying on your couch, and there are buildings covered in large-scale interactive installations that are actually just fullscreen Google Chrome windows.
Follow the steps below to find out how to create a realistic melting effect with three.js. Need some info for a new site? See our web hosting guide, and these top cloud storage options.
01. Set up the three.js scene
Go ahead and grab the three.js library and include it in your site. You’ll need to instantiate the WebGLRenderer, the Scene and PerspectiveCamera. After these are instantiated, you will need to render the scene on RequestAnimationFrame.
02. Add lighting to the scene
Next, lights need to be added to the 3D scene. In this example, two lights will be used: an ambient light and a point light. The ambient light serves as an overall global colour for the scene, while the point light will emit light that diminishes with distance. This will give the scene some contrast.
var ambientLight = new THREE.AmbientLight( 0xccccccc );
scene.add( ambientLight );
var pointLight = new THREE.PointLight( 0xffffff, 1);
pointLight.position.set( 10, 5, 0 );
03. Load the 3D model
Now that the scene has been set up, the 3D model needs to be loaded in. The model can be loaded using any supported format (JSON, OBJ, DAE, etc). Below is an example of loading a DAE model. In this example, it’s very important that the model has enough polygons to perform vertex modifications.
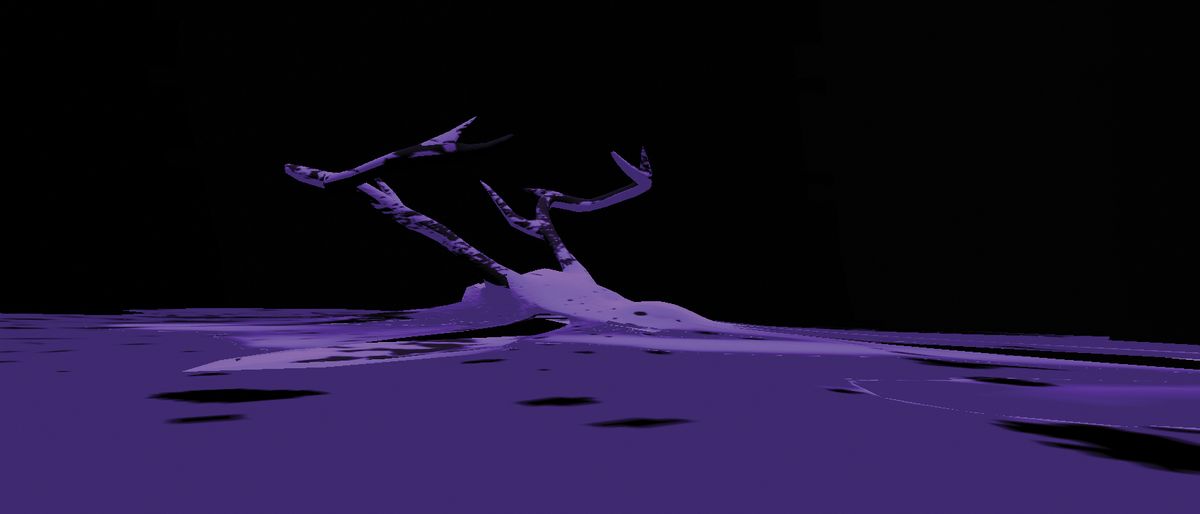
The deer skull that’s being used in this example has 3,500 polys. If the poly count is too low, the vertex animations will be too explicit and distorted.
loader = new THREE.ColladaLoader( );
loader.load( 'dae/deer_skull/deer_skull.dae', onLoadCompleteHandler );
04. Add a bump map
Bump maps are perfect for adding depth to your textures at a low cost. Once you’ve created your bump map image, you can implement it by simply applying it to the material like below. Also, you’ll need to adjust the scale of your bump map to fit the scale of your model.
Get the Creative Bloq Newsletter
Daily design news, reviews, how-tos and more, as picked by the editors.
material.bumpMap = 'img/deer_skull/deer-bump.jpg';
material.bumpScale = .008;
05. Use the vertex animator
Throughout his site, Johnny utilises a game extension by Jerome Etienne for three.js that makes it easier to do vertex animations. This extension allows easy access to each vertex of a model at the frame rate, making it straightforward to manipulate vertices using waveforms.
The Vertex Animation extension is available via Etienne’s GitHub. We’ll go further into how it’s used in the next steps.

06. Start melting
Melting a piece of geometry involves a few overall steps. First, each point is continuously pushed downwards. When a point reaches the ground, it’s pushed outwards using what we’ll call a ‘push vector’.
Next, we’ll give the points that gather along the bottom a thickness so the melted geometry isn’t completely flat. In order to achieve this, Johnny has ported code from Skeel Lee’s VFX shader in Houdini and modified it.
07. Start moving the vertices downwards
Below is an example usage of using the vertex animator to continuously push a model’s geometry towards the ground.
var vertexAnimation = new THREEx.VertexAnimation(geometry, function(origin, position, delta, now){position.y -= meltAmount * modelHeight;}This will push points down at the rate defined by the meltAmount. Remember to also call ‘update’ on your vertex animation in the render cycle.
08. Determine the push vector
When a point has reached the ground, it needs to be pushed outwards to achieve a melt effect. The code below is determining which direction in the X and Z axes to push the vertex so that you get a uniform displacement. The conditional ensures that only points that have reached the lowest bounds of the model (the ground) are pushed outwards.
if (position.y < bbox.min.y) {
  var centroid = bbox.max.clone().add(bbox.min.clone()).divideScalar(2.0);
pushVector = position.clone().sub(centroid);
pushVector.y = 0; }
09. Make the melt feel natural
The code below uses noise to create randomness in the movement so the melt feels organic. The noise variables can be tweaked to get the effect desired. The noise is then applied to the push vector along with meltAmount and spreadAmount to control the rate and size of the melted pool. This outward vector is finally calculated and then applied to the vertex itself.
var n = noiseAmplitude * generator.getVal( (position.x) * noiseFrequency + noiseOffset);
var outwardVector = pushVector.multiplyScalar( ((meltAmount * spreadAmount) + n) * outwardSpeed );
position.add( outwardVector );
10. Give the melted pool thickness
The code explained so far will achieve the melt effect, but two things are wrong with it. First, the pool will feel quite flat, because all of the points have melted to the same Y position. Secondly, since they all share the same Y, too many points will be stacked at the same height, which can cause flickering. To avoid this, a thickness is applied at the melt rate:
position.y += meltAmount * poolThickness;11. Try it out on other models
With the code above, any model with enough polygons can be melted. Download a zip file out the code here and swap out the model with anything you’d like. Have fun!
This article originally appeared in Web Designer issue 265. Buy it here.
Related articles:

Thank you for reading 5 articles this month* Join now for unlimited access
Enjoy your first month for just £1 / $1 / €1
*Read 5 free articles per month without a subscription

Join now for unlimited access
Try first month for just £1 / $1 / €1
Mark is a Professor of Interaction Design at Sheridan College of Advanced Learning near Toronto, Canada. Highlights from Mark's extensive industry practice include a top four (worldwide) downloaded game for the UK launch of the iPhone in December 2007. Mark created the title sequence for the BBC’s coverage of the African Cup of Nations. He has also exhibited an interactive art installation 'Tracier' at the Kube Gallery and has created numerous websites, apps, games and motion graphics work.
