How to create water simulations
Create an awesome animated beach diorama with Houdini FX.
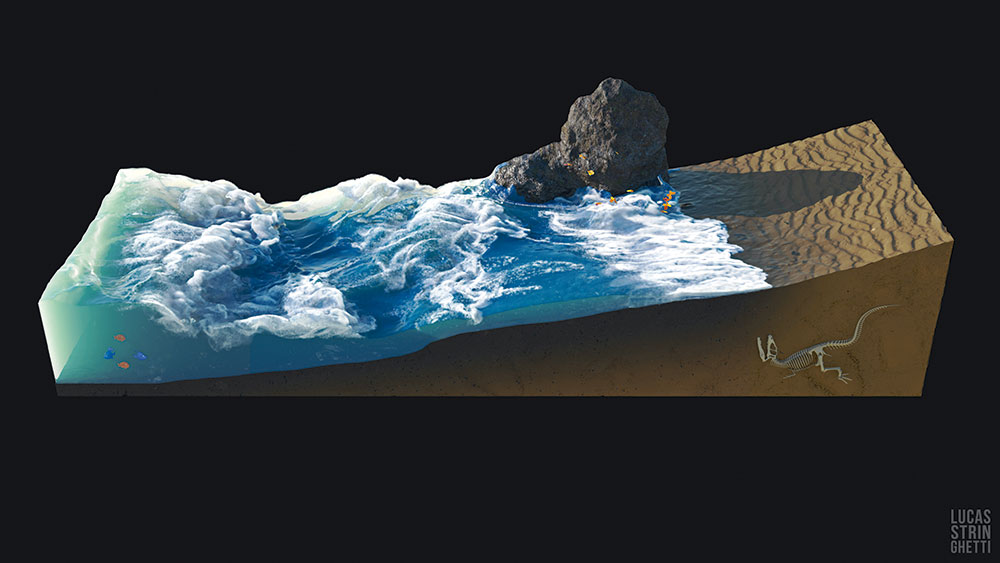
This tutorial will teach you to create an animated beach diorama from start to finish using Houdini FX. You will understand the entire workflow of the process, going through modelling, emitter creation, simulations, water mesh creation, foam, bubbles and finishing it with shader, lighting and render to create a stunning piece of 3D art.
I’ll introduce some of the advantages of working with Houdini, including some tips, shortcuts and important concepts. It is a very powerful piece of software and once you understand its logic, it becomes a completely intuitive and liberating tool where your creativity is the only limit. Getting there requires a little patience, though, because the simulations are usually time-consuming and, as it involves a lot of refraction and volume information, the rendering will probably not be all that fast, either.
If you finish this and it inspires you to try some different types of animation, check out our roundup of the best CSS animation examples to recreate.
But for now, let's get started!
For your first attempt, I recommend using the Houdini shelf, which can be found at Oceans > Beach Tank, since it will come with many links that will make your life easier. Don’t be ashamed to use it – it’s an excellent study tool and a good problem solver in many cases.
This tutorial is based on using the shelf. The most important thing to understand while using Houdini FX is what shelf has created for you as well as why and what you are doing.
01. Start with the shelf
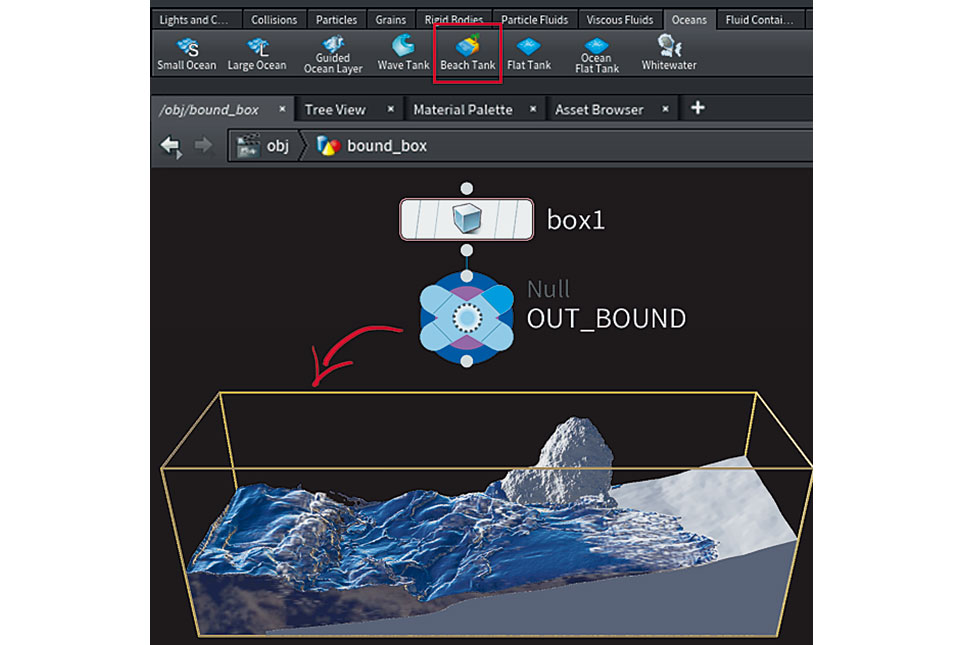
On the upper right side shelf, on the Ocean tab, click on Beach Tank. With the mouse cursor on the viewport, press Enter. It is now has created a beach segment and seven SOP Geometries. Now create a new SOP Geometry and call it ‘bound box’. Inside it, create a box and scale it to the size that you want your beach to be. This box will be a limiter and everything outside of it will be deleted, making our control much easier. You can use its Size and Center parameters to link to other SOPs later, but for now create a Null SOP by putting ‘OUT_BOUND’ after it.
Get the Creative Bloq Newsletter
Daily design news, reviews, how-tos and more, as picked by the editors.
02. Create beach model
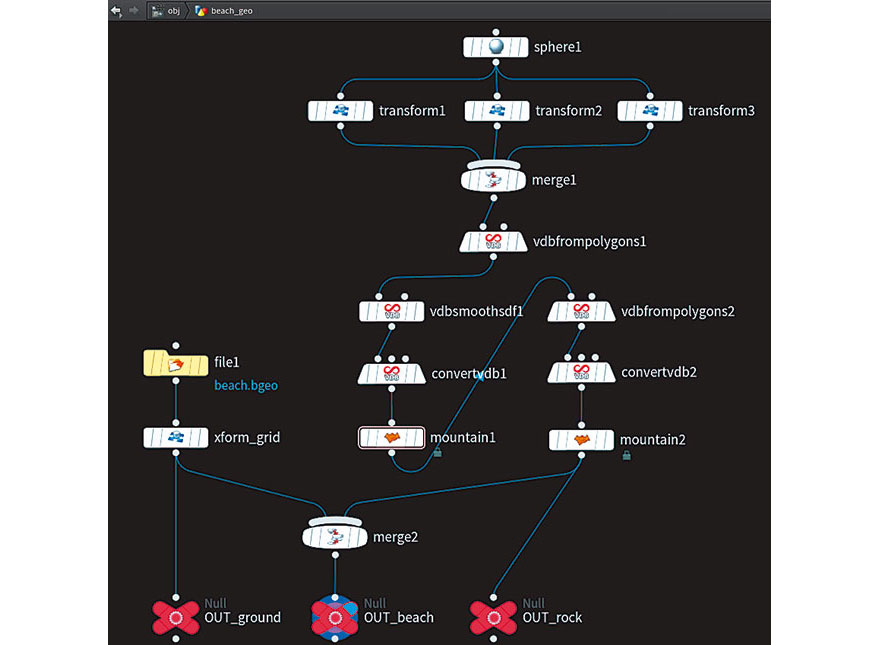
On beach_geo you will find the beach floor – feel free to make your own. The stone was made procedurally, using spheres in different positions, adding a Mountain SOP, converting VDB to join them and then converting them to polygons again. To do this, go to VDB from Polygons > Convert VDB. You can do this procedure as many times as you want to add more variations and details. In my case, I did it twice. Before OUT_beach, put a Merge SOP joining the ground plane with the stone you created. Finally, you need to create two Null SOPs, one for rock (OUT_rock) and another for the plane (OUT_ground). You will use this later.
03. Begin simulation
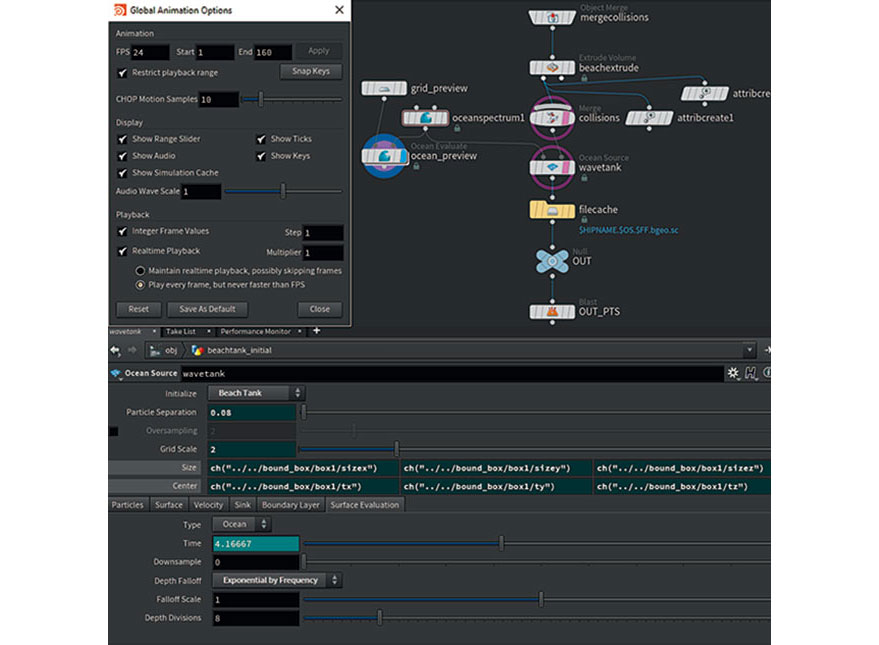
Next we need to set our animation time by pressing Opt/Alt+Shift+G, which opens the Global Animation Options. In my case, I decided to make my scene run 160 frames at 24fps. Remember that the animation will start getting interesting after the first 40 frames.
Inside the beachtank_initial, link, the Size and Center parameters of Ocean Source with the Size and Center values of box1 of the bound_box. Enter the beachtank_sim geometry and select the FLIP Object SOP. In Particle Separation, start off by setting it to 0.3, so you are able to have a better visualisation. In Closed Boundaries make sure to leave +X and +Y unchecked so that the liquid does not collide at either of these extremes.
04. Tweak FLIP sim presets
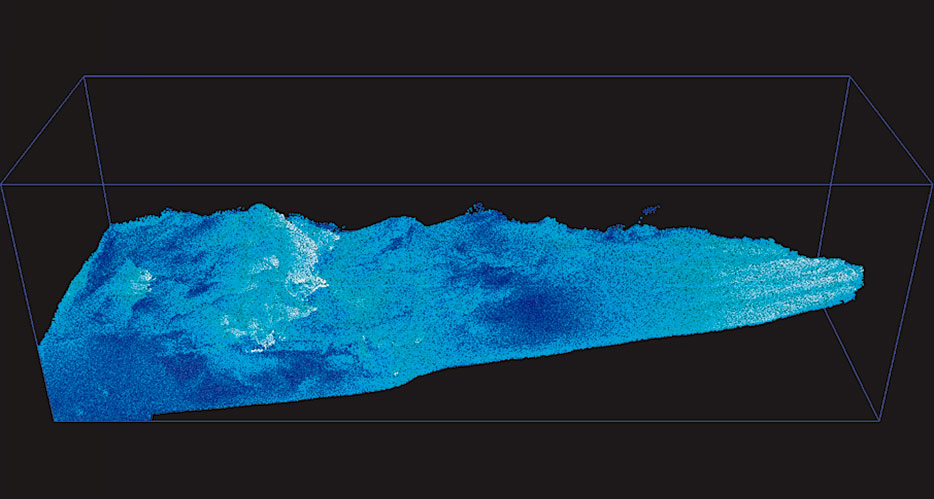
Sticking with the beachtank_sim geometry, there is a POP Advect by Volumes SOP (advect_by_ocean). It is responsible for applying the speed that was created by Ocean Source. You can play with this Velocity Scale – increasing it will give you a more violent sea. Make some tests by changing this value, simulating at least 120 frames and then make a Flipbook so that you can compare them. For this project, I left the Velocity Scale at 2. When you are satisfied with the movement, go back to the FLIP Object SOP and change the Particle Separation to 0.08. Then in the Creation tab, disable Allow Caching and move on to the next step.
05. Cache the simulation
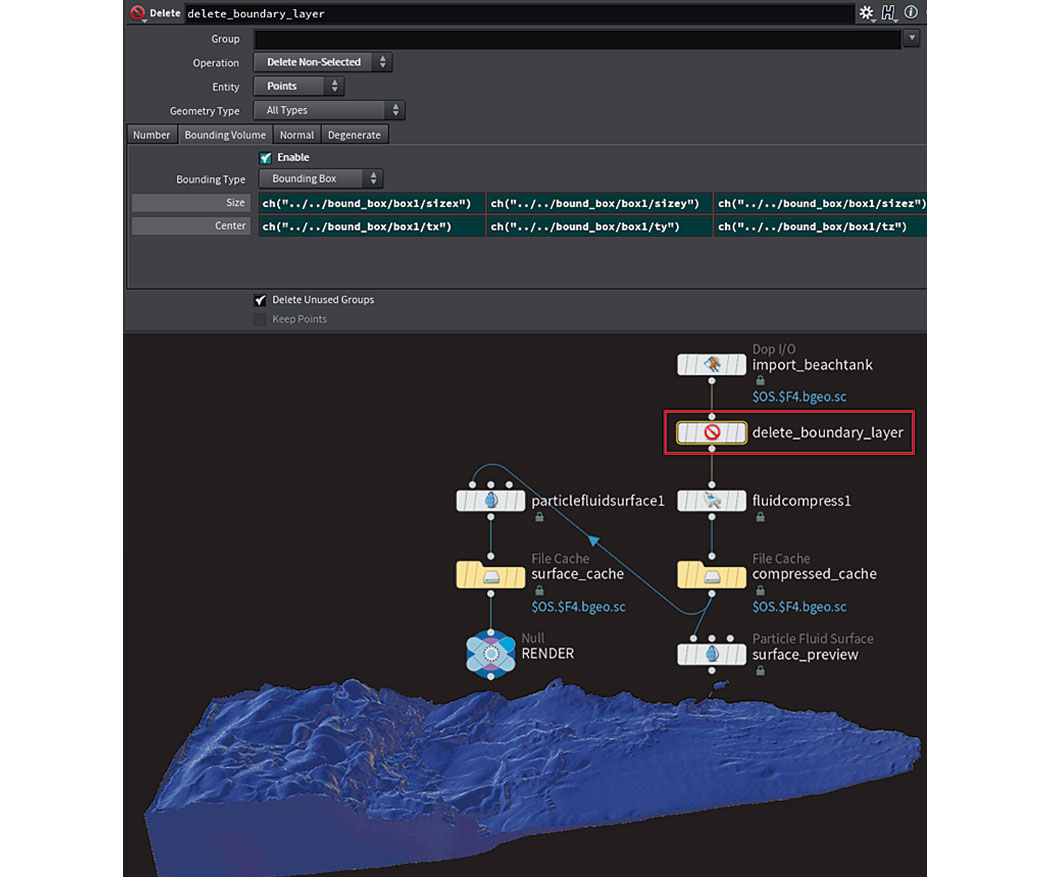
In the beach_fluid geometry is where you will cache the simulation and then generate the mesh of the water. Select the Delete SOP (delete_boundary_layer) and then, in the Bounding Volume tab, link its Size and Center with the Size and Center of the bound_box. Select File Cache SOP (compressed_cache) and click Save To Disk. Depending on your processor, this will probably take about two hours or so.
Once the cache is finished, enable Load From Disk. Select the Particle Fluid Surface SOP (particlefluidsurface1). In the Surfacing tab, change the Voxel Scale to 0.4, the Influence Scale to 2.8 and the Adaptivity to 0.001. In the Filtering tab, enable Dilate – Erode is enabled automatically as a result. Finally, cache the generated mesh, which will take approximately three hours.
06. Increase the emitter range
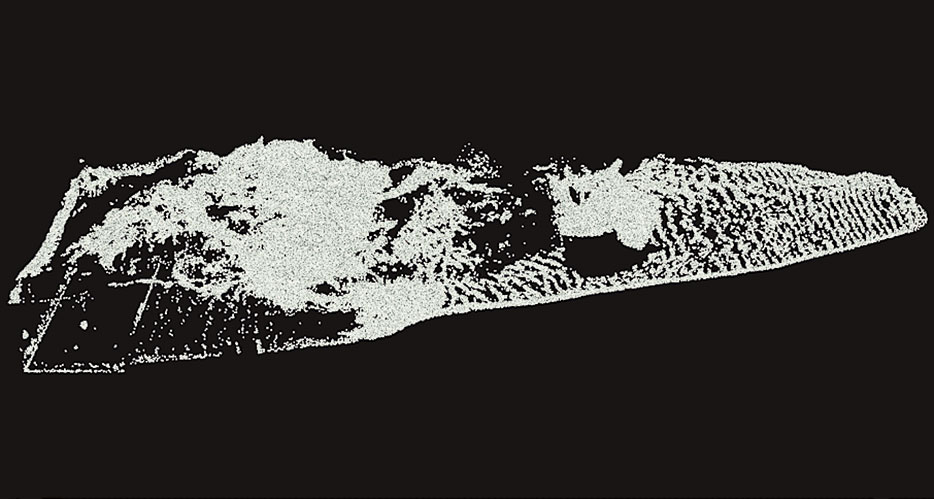
Select the whitewater_ source geometry and select the Whitewater Source SOP to change some parameters. On the Emission tab, set Min Speed to 1 and Max Speed to 5. On the Curvature tab, set Min Curvature to 2 and Max Velocity Angle to 80. On the Acceleration tab, set Min Acceleration to 19. Basically, with these changes you will be increasing the emitter range to make more of it visible.
07. Set up the whitewater simulation
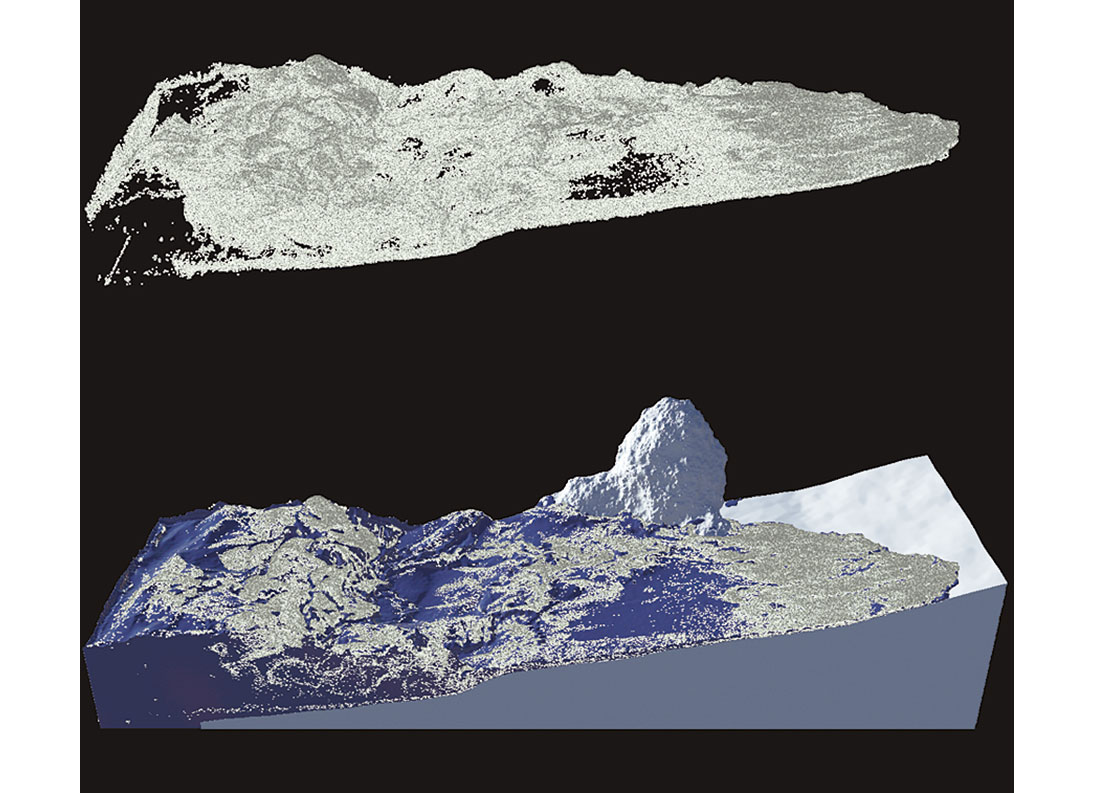
The whitewater simulation happens in whitewater_sim geometry. Select the Whitewater Solver SOP and in the Foam tab, change Depth to 0.01 and Max Lifespan to 10. As for the Spray tab, let’s disable it. On the Bubble tab, change Lifespan to 2.3. In the Solver tab, as usual, link the Volume Limits Size and the Volume Limits Center with the Size and Center of our bound_box. Now select the Whitewater Emitter SOP and on the Birth tab, change Const Birth Rate to 110. On the Shape tab, change Shape to Cone. And, finally, on the Attributes tab, change Radial Velocity to 0.30
08. Complete simulation/lighting set up
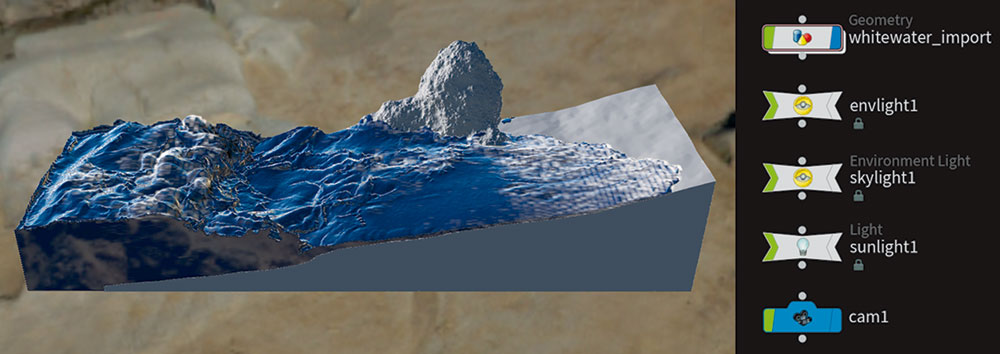
The whitewater is transformed into VDB to be rendered. Inside the whitewater_import geometry, select Volume Rasterize Particles SOP and change the Density Scale to 1.01 and the Particle Scale to 0.46. In VDB SOP, delete the Voxel Size link and type 0.01 to improve the resolution. The simulation is ready!
Now let’s move on to the lighting. I used Sky Light and an HRDI in the Environment Light, which is found by going to Shelf>Lights And Cameras>Sky Light/Environment Light. To get HDRI, I would suggest going to hdrihaven.com as it has a great free library with excellent quality. Finally, you need to create a camera by going to Shelf>Lights And Cameras>Camera, and then positioning it where you want it.
09. Unfold UVs
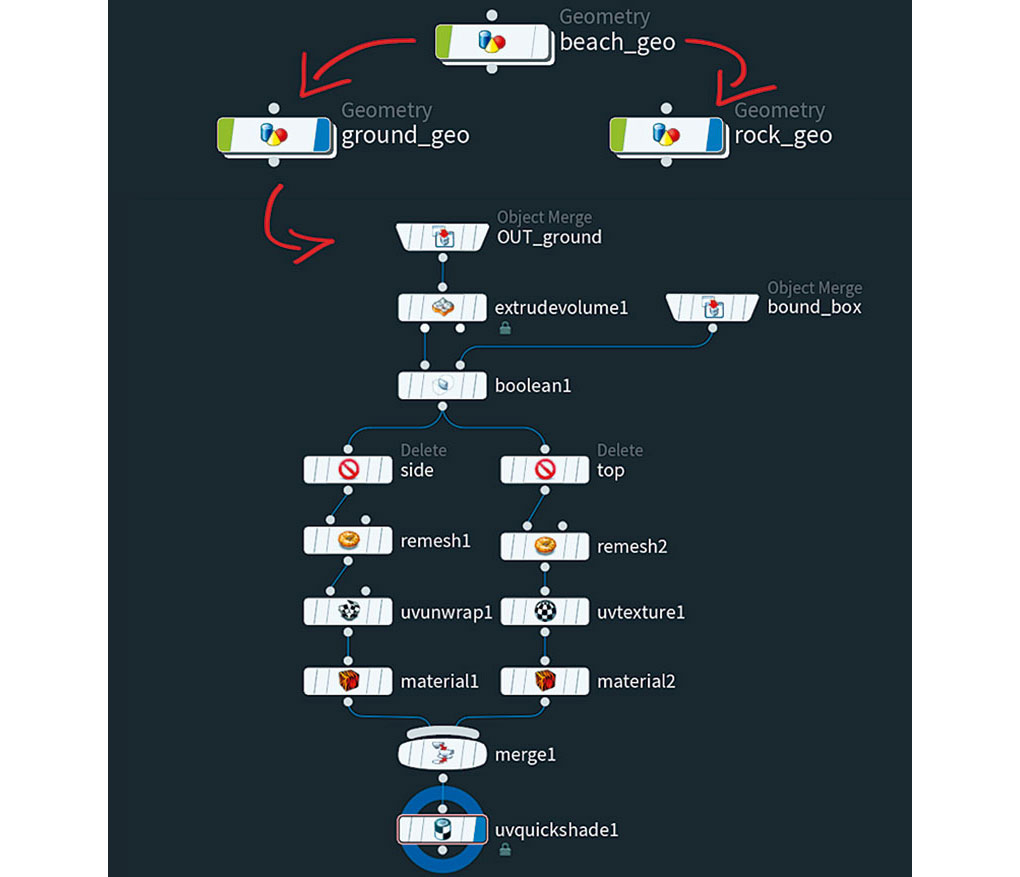
Turn off the Display Flag of the beach_geo geometry and create another two – ground_geo and rock_geo – just for organisation. On each, create an Object Merge SOP by pulling its respective OUT: OUT_ground or OUT_rock. In the ground_geo, after the Object Merge, create a Volume Extrude SOP, then a Boolean SOP (intersect) and check A Inside B to create a group. Create another Object Merge with the OUT_BOUND of the bound_box to connect in Boolean input 2. Create a Delete SOP. In Group, choose A Inside B. Duplicate it and change the Operation to Delete Non-Selected in order to separate top from side.
After the first delete, connect a UV unwrap SOP, and after the second, connect an UV Texture SOP. After each delete action, create a Material SOP and then merge with a Merge SOP. In rock_geo, create a UV Texture SOP, and in Texture Type, select Perspective From Camera and select your camera. To visualise its texture, use the UV Quick Shade SOP.
10. Set mantra and shade whitewater
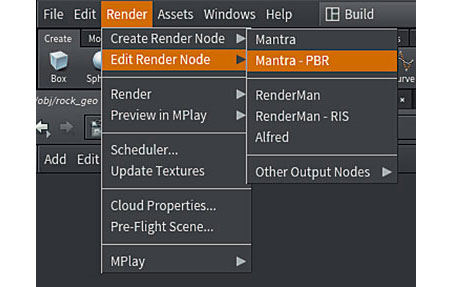
In the top menu, go to Render > Create Render Node > MantraPBR. In the Outputs, select the Mantra SOP and in the Rendering tab, reduce the Max Ray Samples to 7. On the Limits tab, reduce the Reflect Limit and the Refract Limit to 4. In materials, Houdini automatically will create three materials, one for liquid, one for internal volume of liquid and another for whitewater. I only changed the whitewater (spray) – in Smoke Density put 4.15, and in Shadow Density Multiplier put 0.126. Now it’s possible to make a simple render and readjust the light.
11. Add rock and send shader
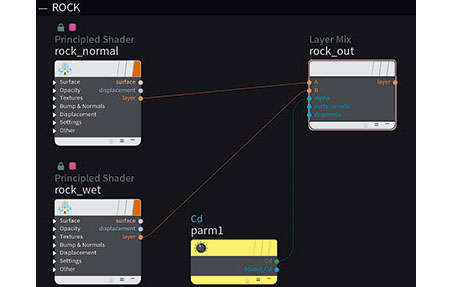
I used four types of textures – two for rock, one dry sand and one wet sand. I got the textures from Quixel Megascans, an excellent source but not free. Another great and free option is textures.com. In the materials you created two Principle Shaders, one dry and one wet, connect them (output layer) to a Layer Mix SOP and then create a Parameter SOP. In Name, type Cd and change Type to Color before connecting its output in the alpha of Layer Mix. This process is for sand as well as rock. Finally, just apply the Layer Mix shader to each object.
12. Begin final render
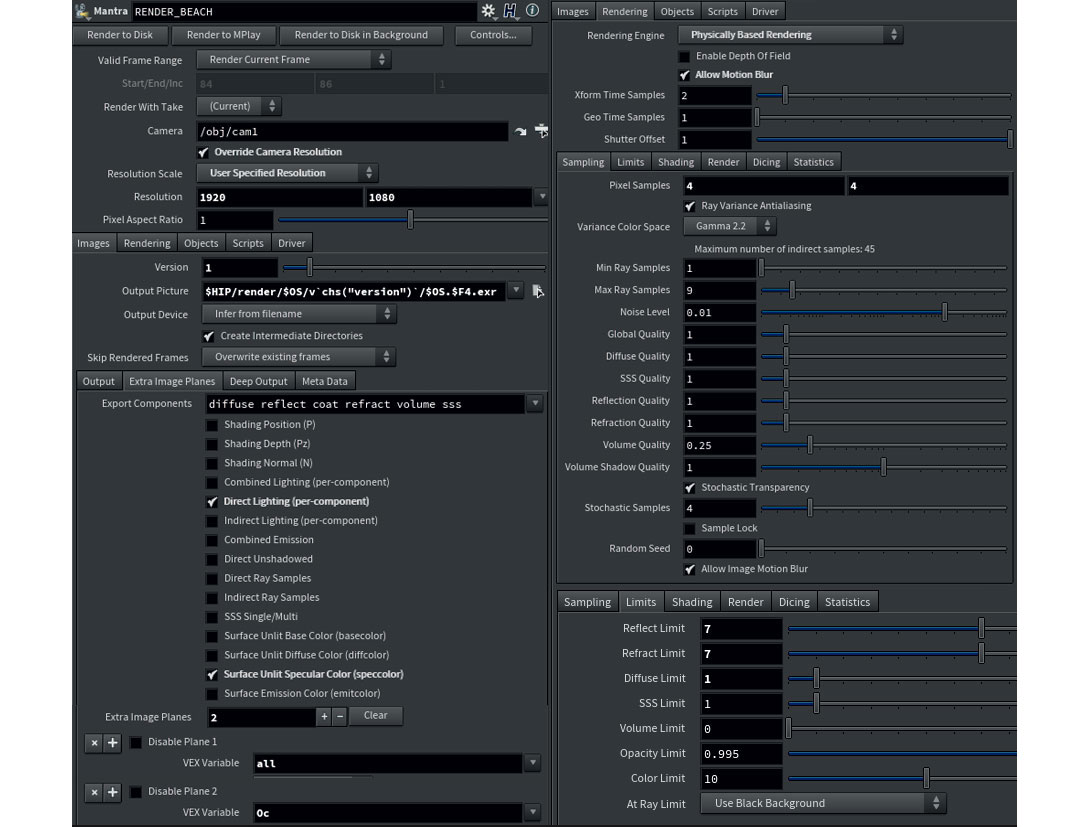
Create another Mantra-PBR, go to Outputs and select it. Choose the camera and resolution you prefer. In the Images>Extra Image Planes tab, check Direct Lighting, Surface unlit Specular Color. Click + and in the VEX Variable field, select Combined Lighting (Per-Light). Click + again and select Occlusion (Oc). This creates render layers. In the Rendering tab, check Allow Motion Blur, in Pixel Samples set 4x4, in the Limits tab set Reflect and Refract Limit to 7 and Diffuse Limit to 1. Specify the frame range, use the $F4.exr file extension and click Render to Disk.
This article originally appeared in issue 129 of 3D Artist. Buy issue 129 here or subscribe to 3D Artist.
Related articles:

Thank you for reading 5 articles this month* Join now for unlimited access
Enjoy your first month for just £1 / $1 / €1
*Read 5 free articles per month without a subscription

Join now for unlimited access
Try first month for just £1 / $1 / €1
