How to create 3D hair and fur
This tutorial demonstrates how to create a bearded pirate character and his furry monkey companion.
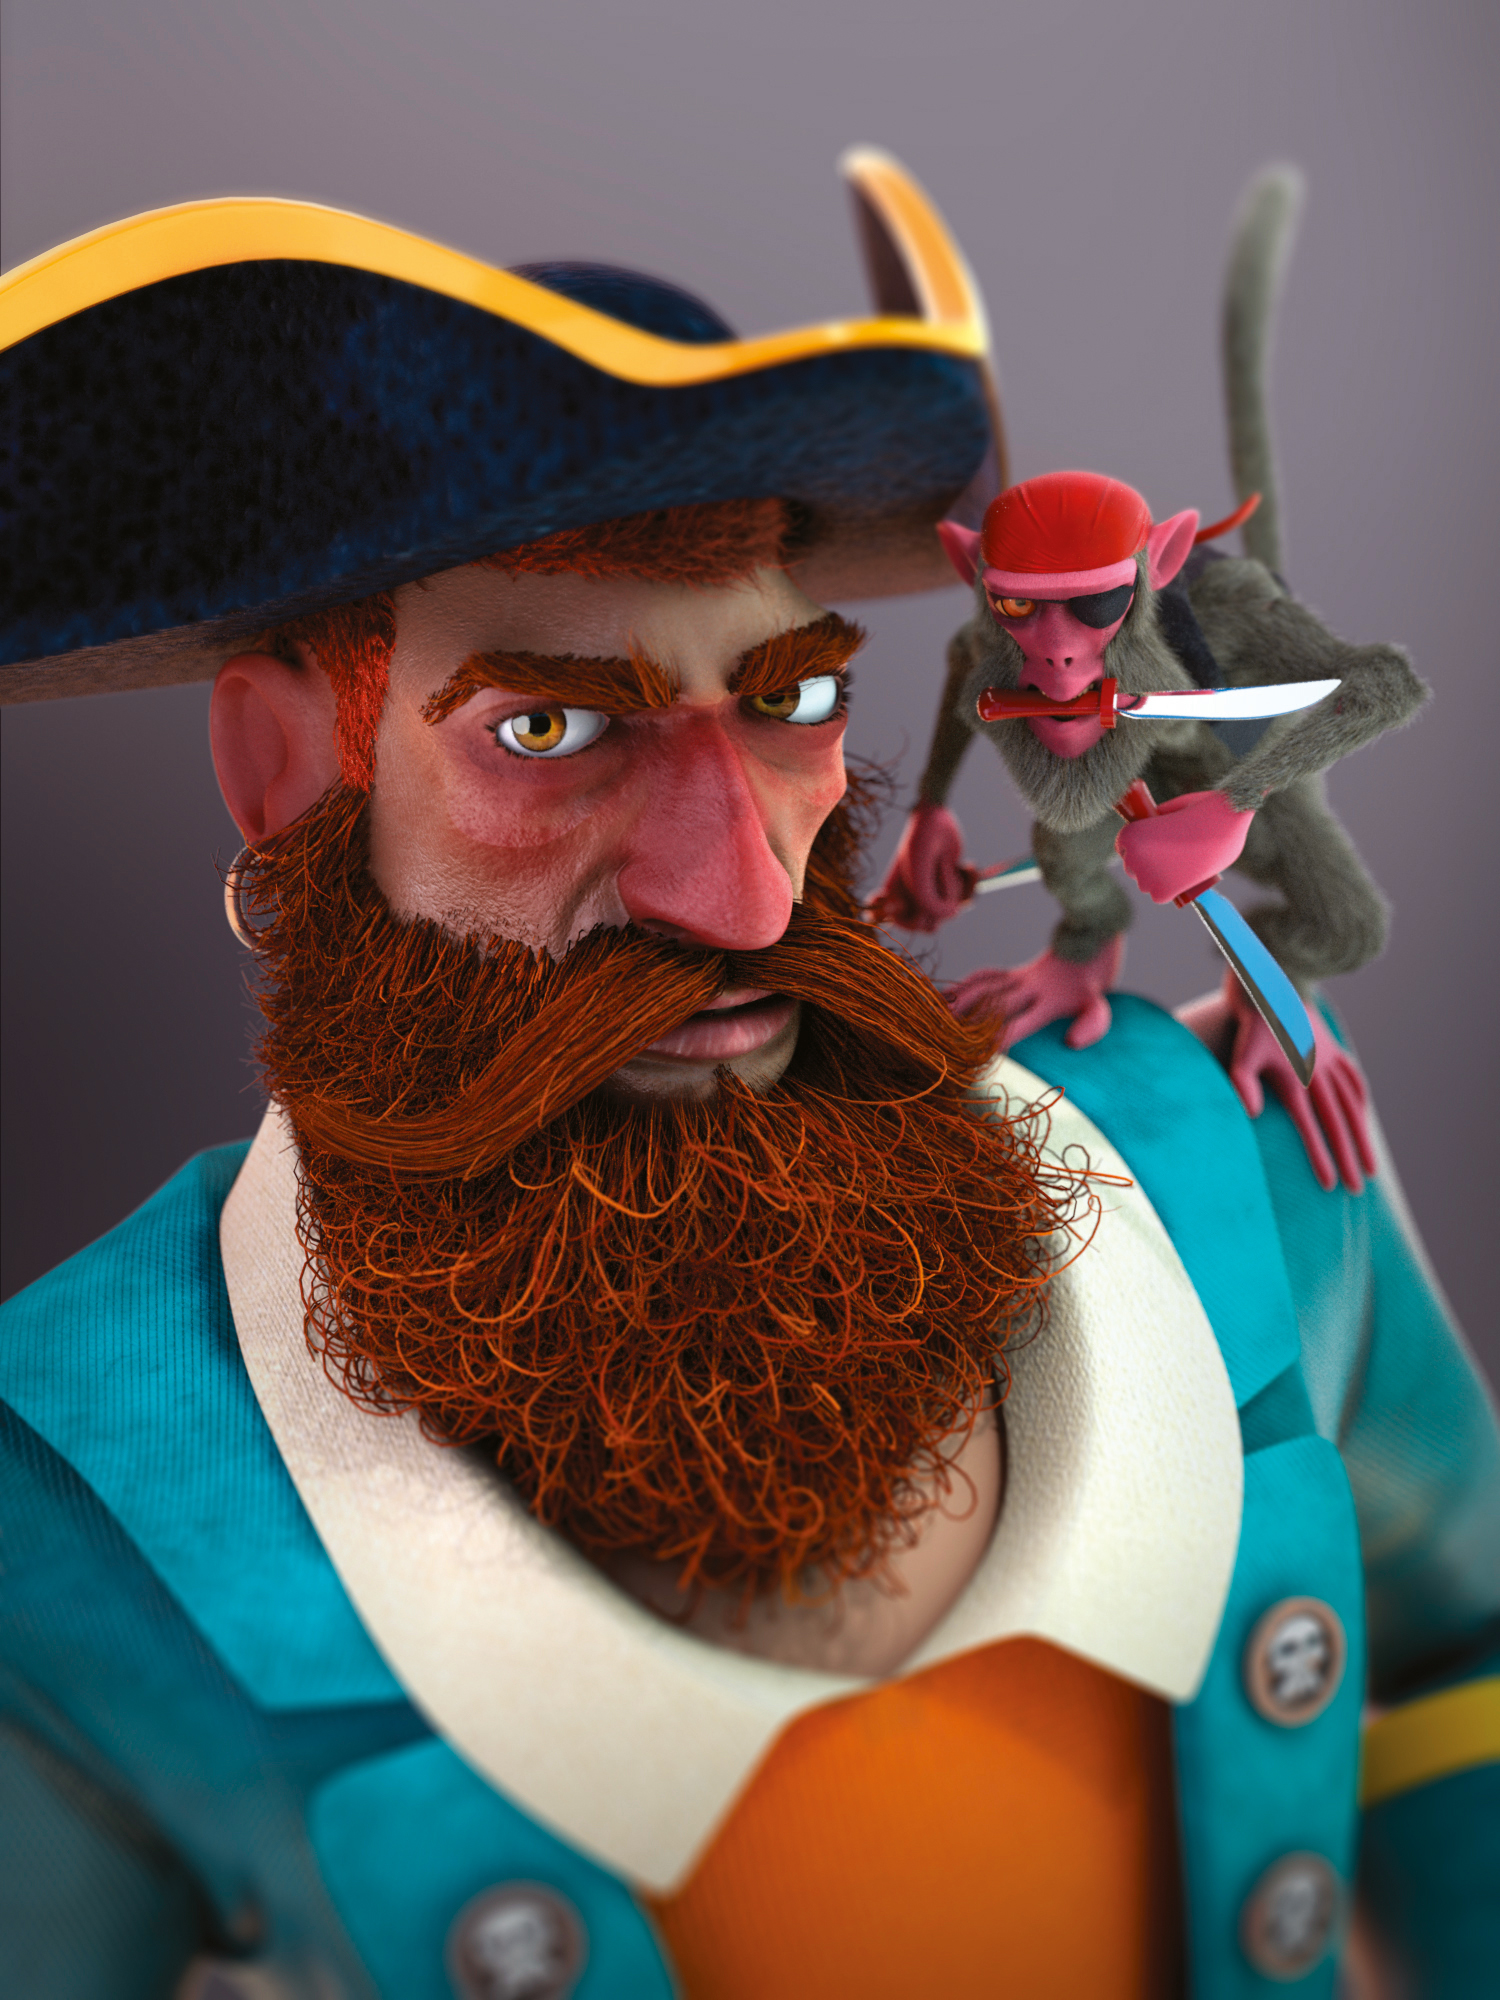
You can easily get overwhelmed the first time you work with fur in any 3D art software. In this tutorial I will take you step-by-step through the different options and techniques that Modo has to offer. Modo’s Fur tool is great, since it can also be used for creating other types of materials, such as feathers and tree leaves.
This time we will concentrate on modelling and tagging, but the principles we cover in this tutorial will be enough for you to apply in other projects as well. I chose to work with two different characters, which will give us a wide range of opportunities to work with the fur material for the use of guides, weight maps and other options, in order to control the length and direction of the hair.
We will not use a realistic style, instead we will go on a more cartoony direction, which is a good starting point for this complex topic.
With our first character, Pirate, we will work in more detail, learning the workflow and creating specific shapes. With the second character, Monkey, we will put into practise what we have already learnt.
In my daily workflow I use different scripts and assets, which can be found on The Foundry’s community site. I highly recommend you take a look at this. For this project in particular, we use a script to convert the edge loops into curves.
01. Setting the materials
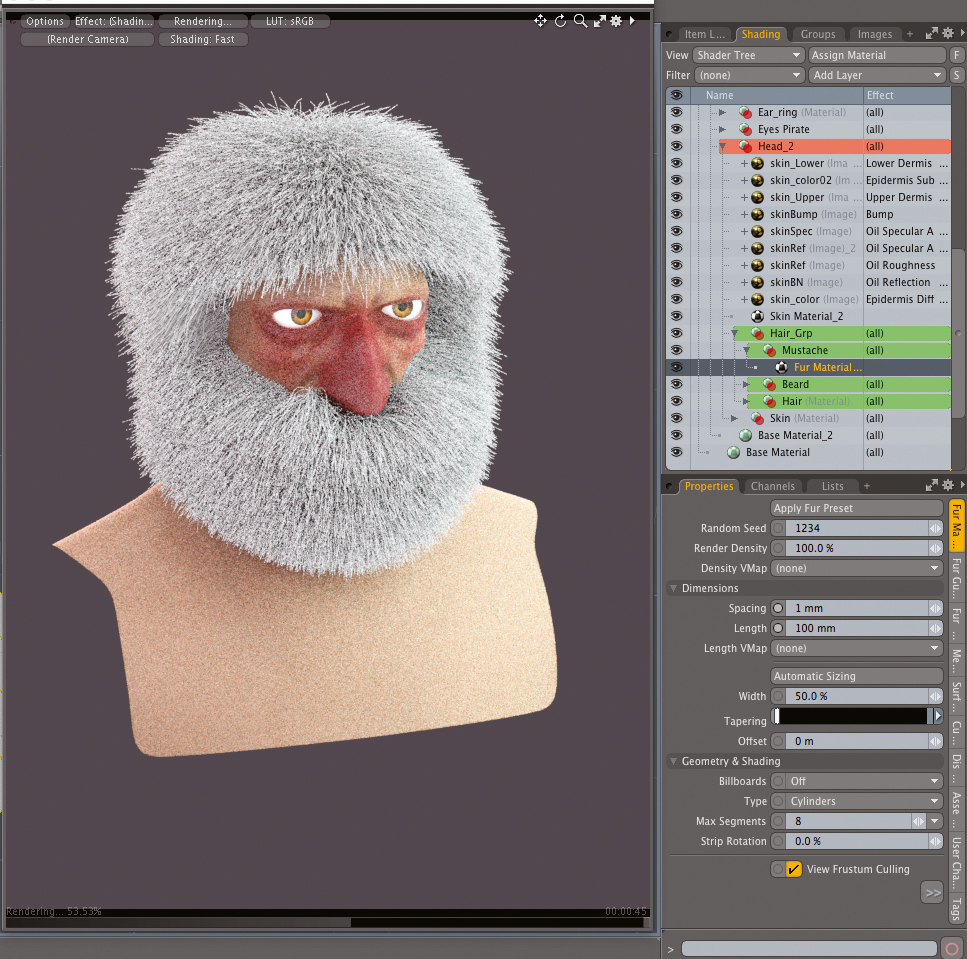
We need to create the materials for our hair, moustache and beard and add a fur material for each one of them. As a starting point, adjust the values for the fur to 1mm on the Spacing and 50 mm for the Length – we can leave the rest with the default settings and adjust them later. On the Shader Tree make a new group with the moustache, beard and hair and drop it into the Head group just below the Skin layer.
02. Preparing the guides
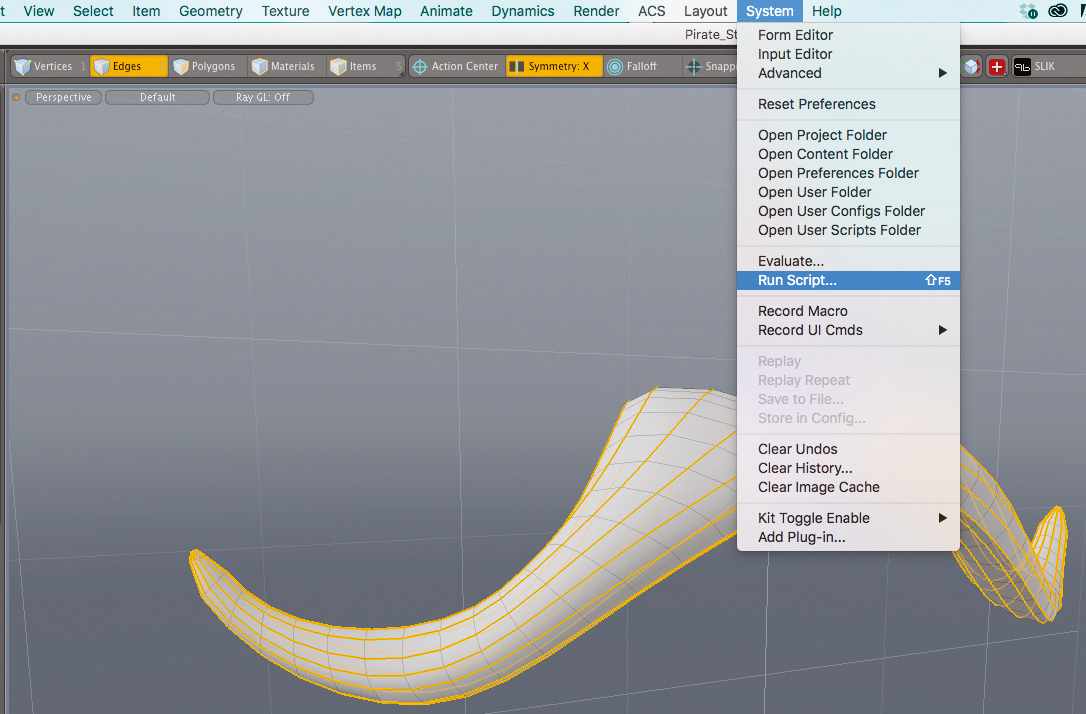
To create the guides that we will use for the moustache, go to the mesh named ‘moustache geo’. You then need to select all the edge loops and run the script to convert them into curves. Once you are done, copy the curves and paste them into your main mesh. You can download the script here.
Get the Creative Bloq Newsletter
Daily design news, reviews, how-tos and more, as picked by the editors.
03. Growing a moustache
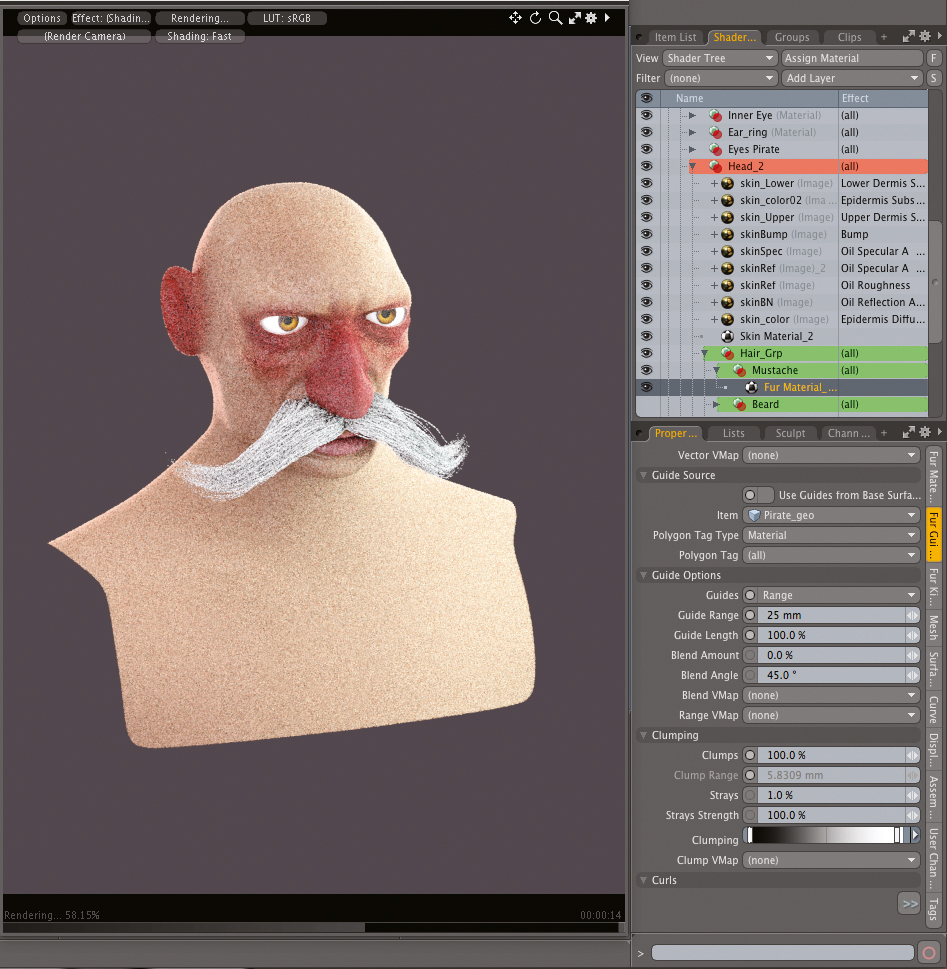
Set the spacing in the Fur Material properties to 1mm, the Length to 35mm and Max Segments to 120. Set a Key Value of 1.0 on the Tapering. On the Fur Guides tab select the Pirate_geo. Set the Guide option to Range and adjust the values from the Guide Range to 25mm and the Guide Length to 100%. On the Fur Kink tab adjust the Grow Jitter to 50%, Position Jitter to 10% and the Direction Jitter to 5%.
04. Growing a beard
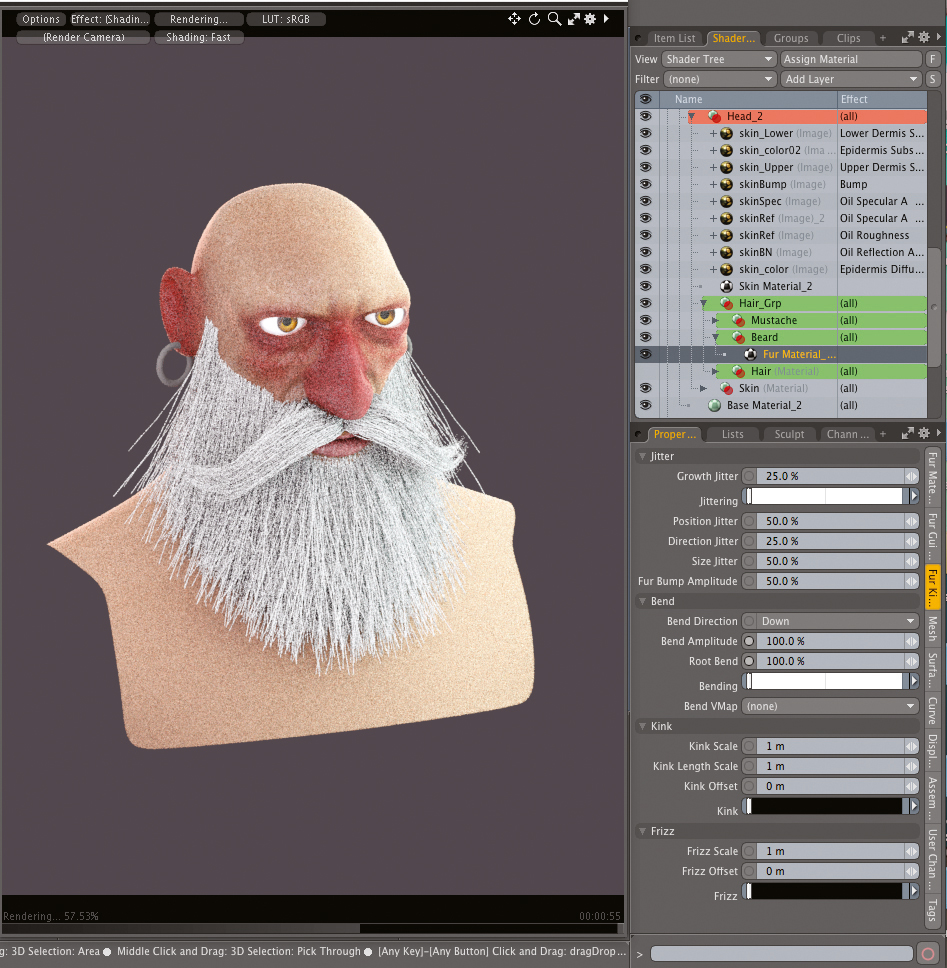
In the Fur Material properties for the beard, set the Spacing to 1.5mm and the Length to 200mm. On the Fur Kink tab adjust the values to 100% for the Bend Amplitude and 100% for the Root Bend. At this point in these settings, we only need to have a rough idea of what the beard will look like – later we will adjust these values again.
05. Fur length
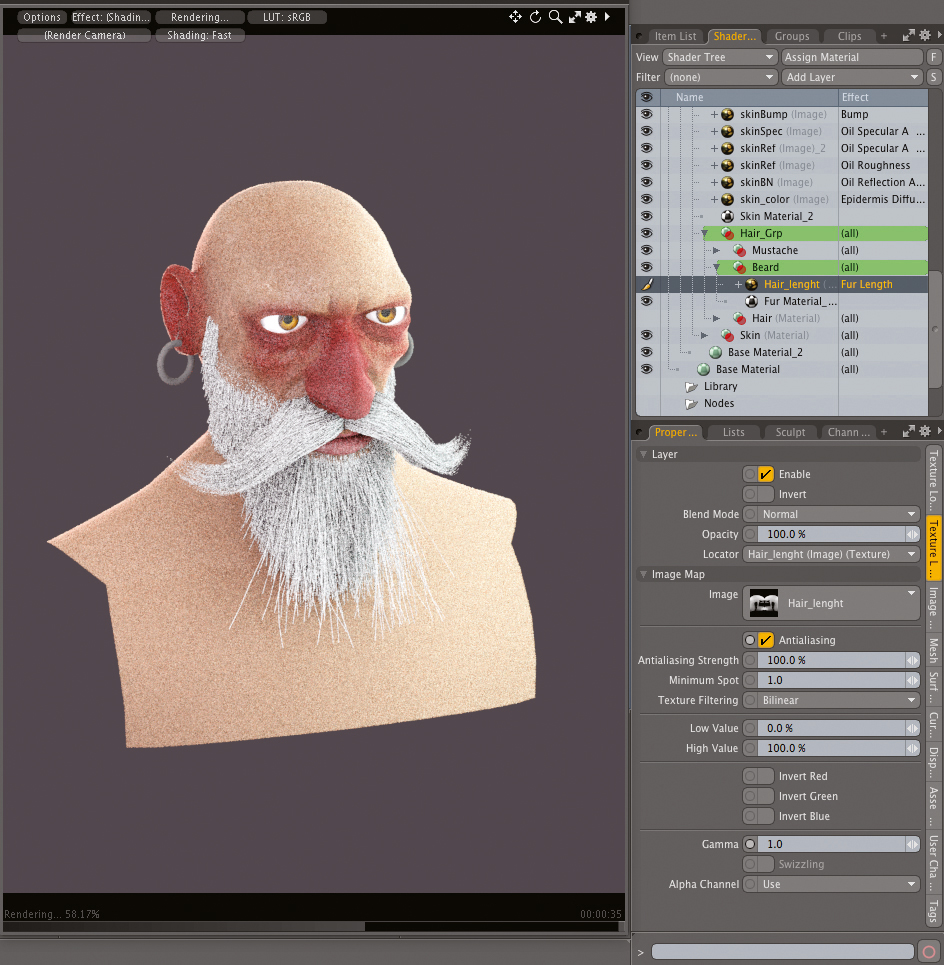
Move to the Paint Layout, add a new image and set the colour to 100% white, then place it on top of your hair group. Change the Projection Type to UV map and select the Face map. Change the effect from Diffuse Color to Fur Length. Start to paint the areas where you want to reduce the length, with the air brush – using black colour with 50% opacity. Create instances of this for other materials later on.
06. Fur density
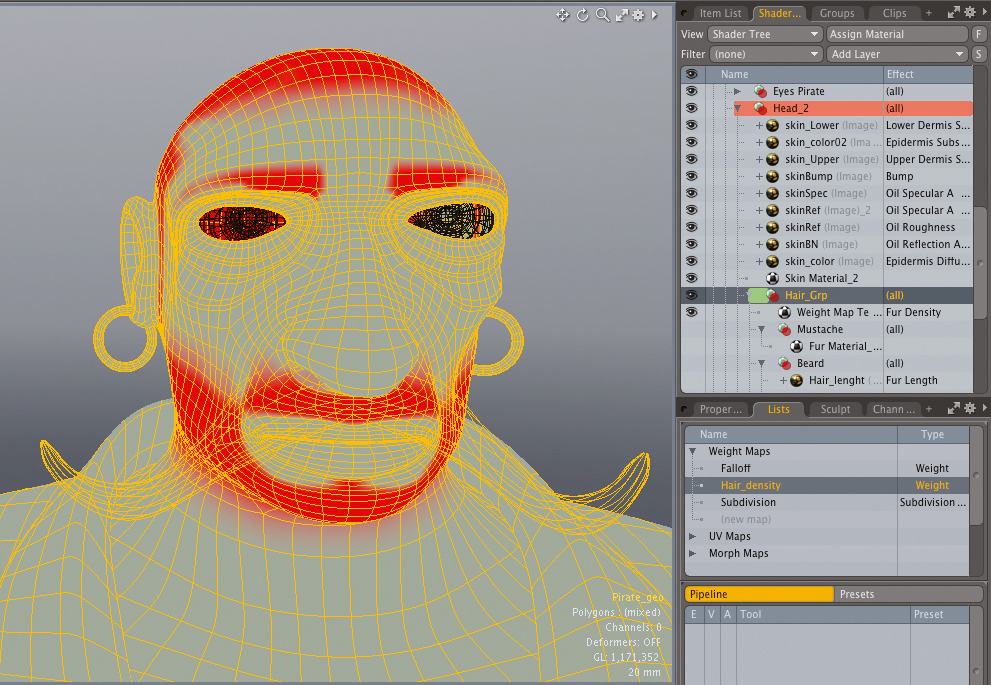
Go to Lists>Weight Maps>New Map to create a weight map. Name it ‘hair density’. Back in the Shader Tree add a Weight MapTexture on top of your Hair group. Change its effect from Diffuse Color to Fur Density. Adjust the Weight to 100% in all the polygons where the beard is growing, but smooth the edges where the hair stops growing – this will give a more organic feel.
07. Stylising the fur
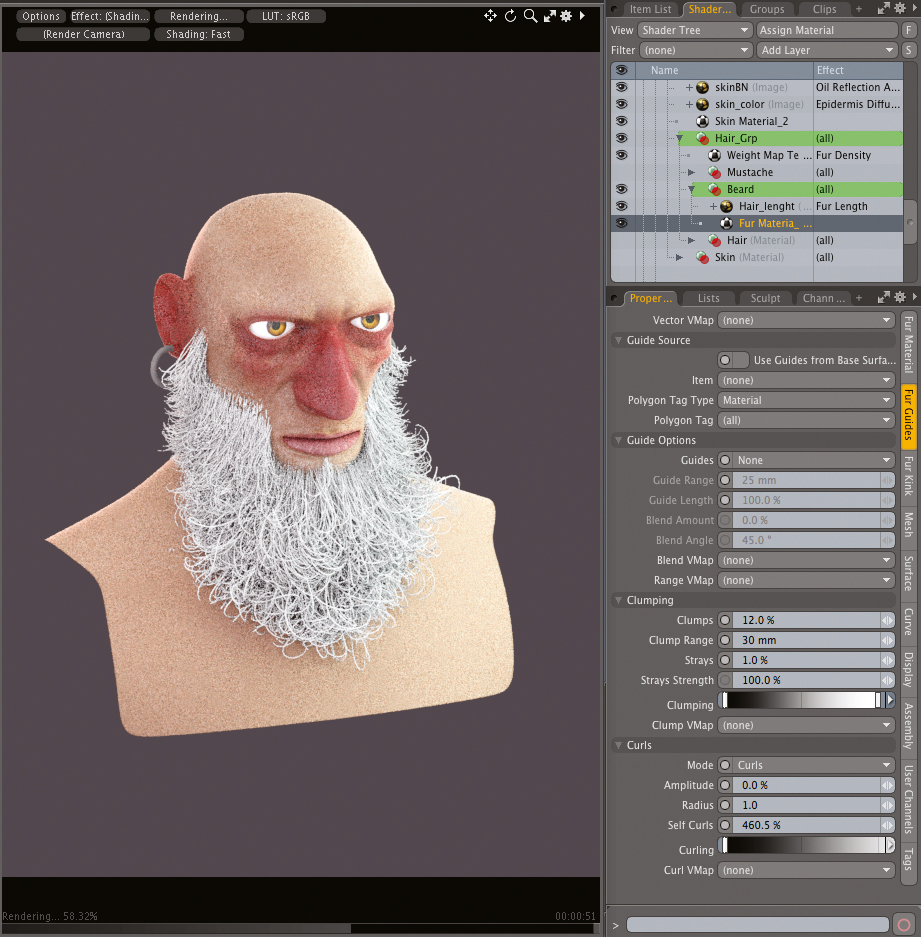
To make the stiff beard more messy, go to the Fur Material tab and increase the number of segments to 60 and play with the Width and the Tapering. In the Fur Guide tab, adjust the Clumps to 12%, Clump Range to 30mm and the Clumping Values from 0% to 100% to tighten the beard. Go to the Curl option and increase the Self Curls to 400% and adjust the Curling until you are happy with it. Go back to the Fur Material tab and adjust the length.
08. Hair guides
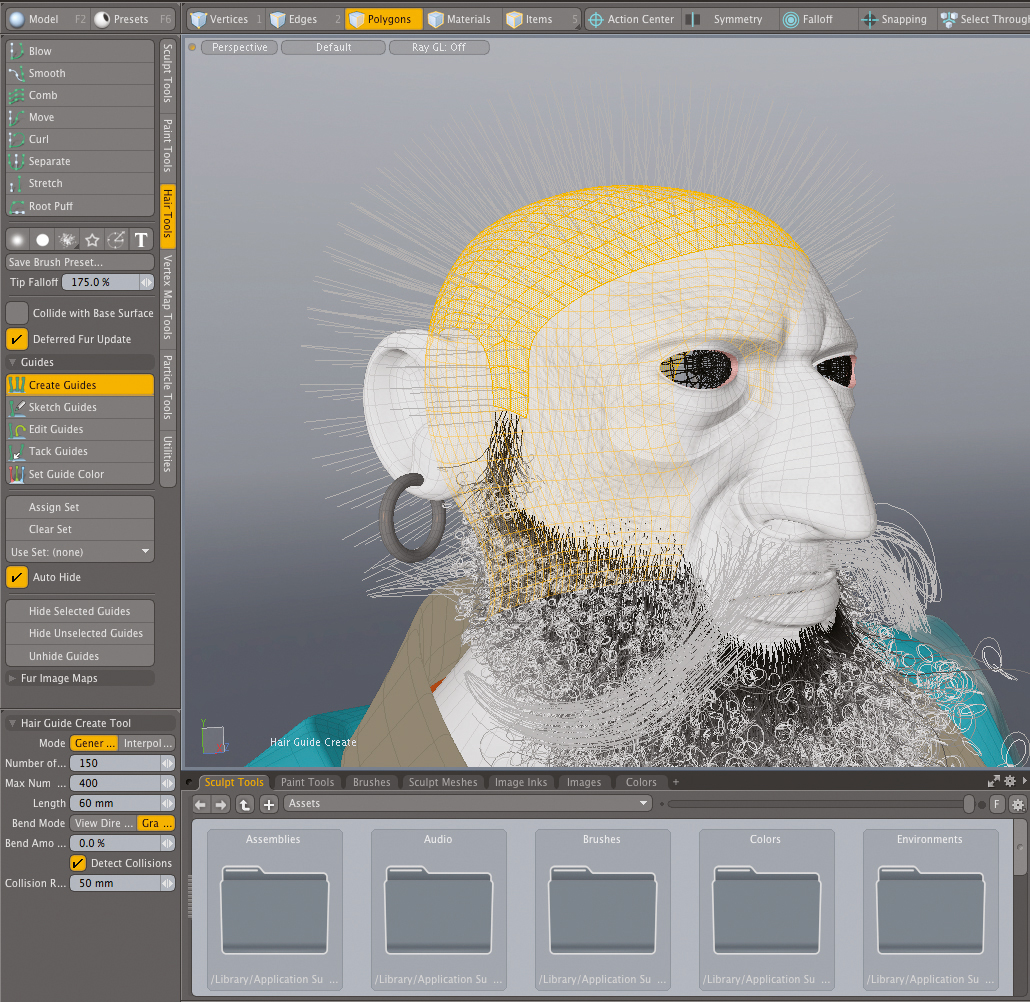
Assign selection sets for the top, back, left and right sides of the hair. Create the guides for those selections with the Hair Tools: number of segments 150, Max Number of Guides 400, Length 60mm and the Bend Amount to 0%. Use the Comb tool to move the guides. Go to Fur Guide tab, check the Use Guides from Base Surface and use the Shape option to follow the overall shape.
09. Hair material
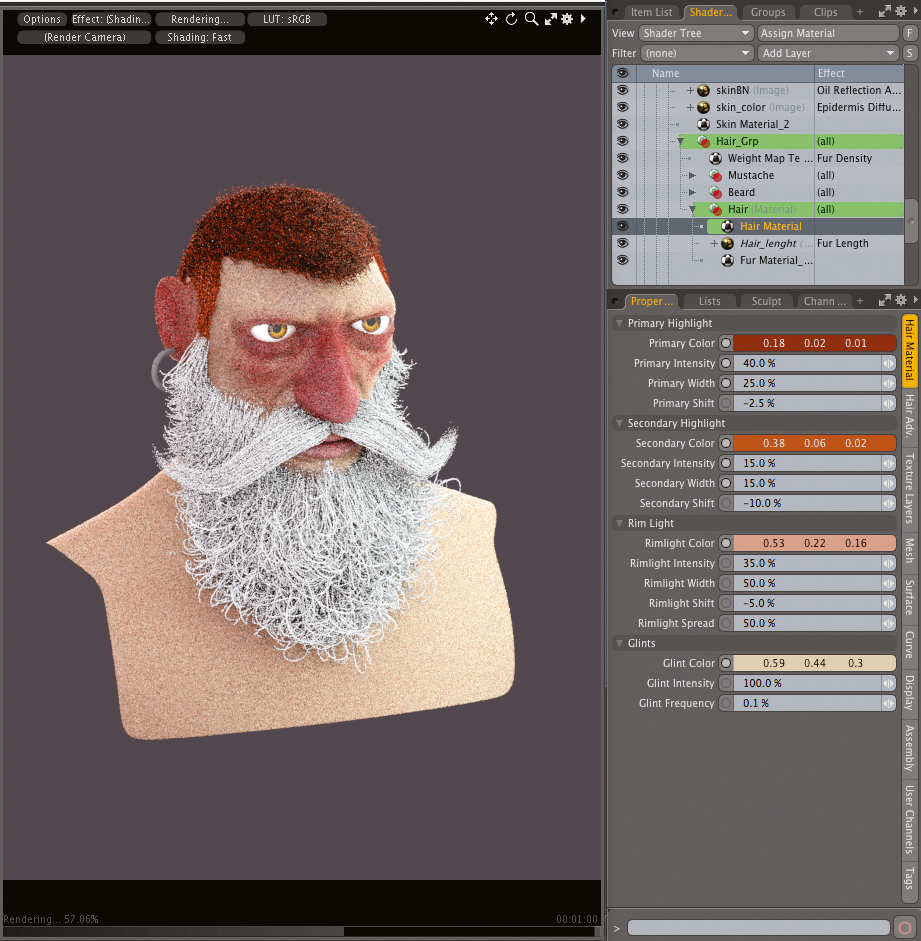
Unlike the rest of the fur materials, we want the hair to look softer and shinier, so we will assign a special material. In your Hair Group material to go Add Layer>Custom Materials>Hair. Play around with the values and colours of this material. When you are done, go back to the Hair Fur Material and make the final adjustments on the Fur Material tab. Set the Width to 100%, add three values to the Tapering: 100%, 0%, 100%.
10. Eyebrows
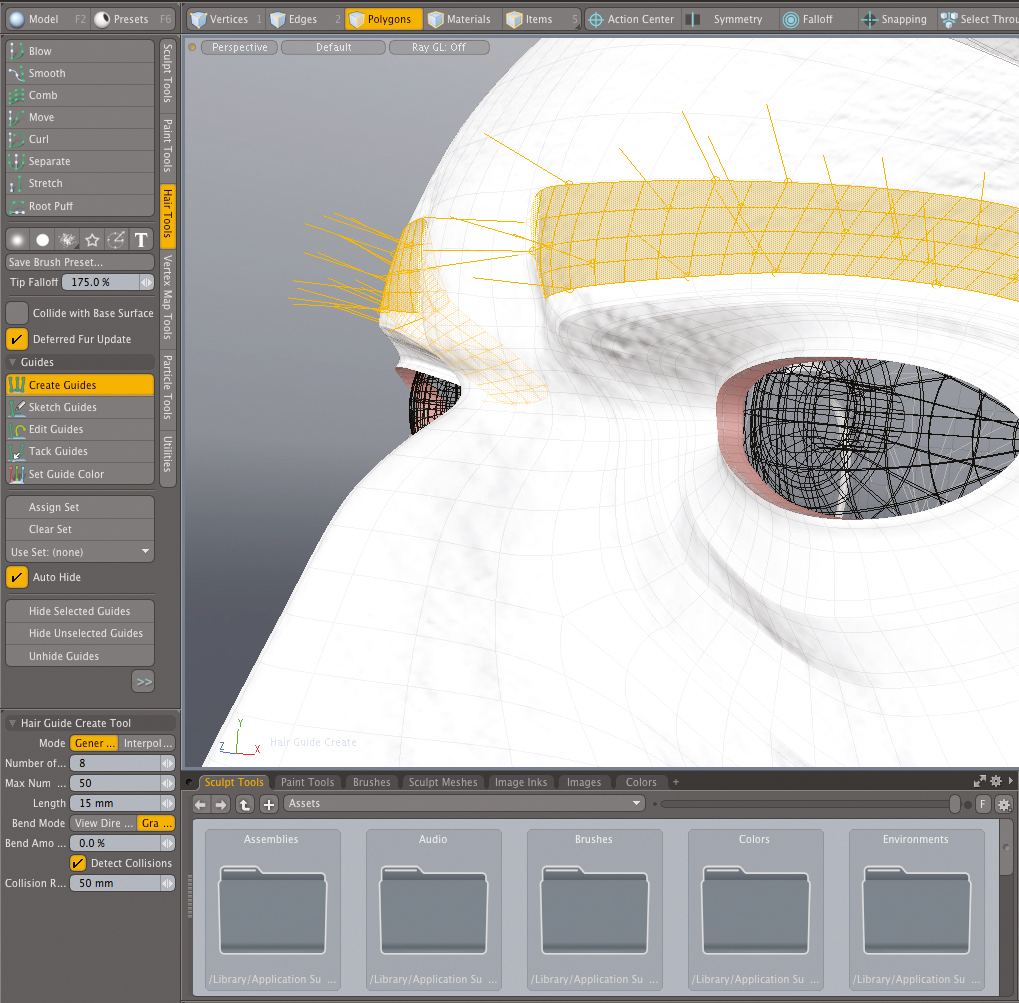
Create a new fur material, and an instance from the Hair Length and place it above the Hair Group. Set new guides: Numbers of Segments eight, Max Number of Guides 50, Length 15mm, Bend Amount 0%. Use the Comb tool to model the eyebrows. In the Fur Guides tab set Guides to Shape, Guide Length 50%, Blend Amount 100%, Clumps 25%, change Curls to Wave mode with 200% for Self Curls. In the Fur Material tab set Spacing to 700um, Length 100mm, Segments 24.
11. Eyelash control
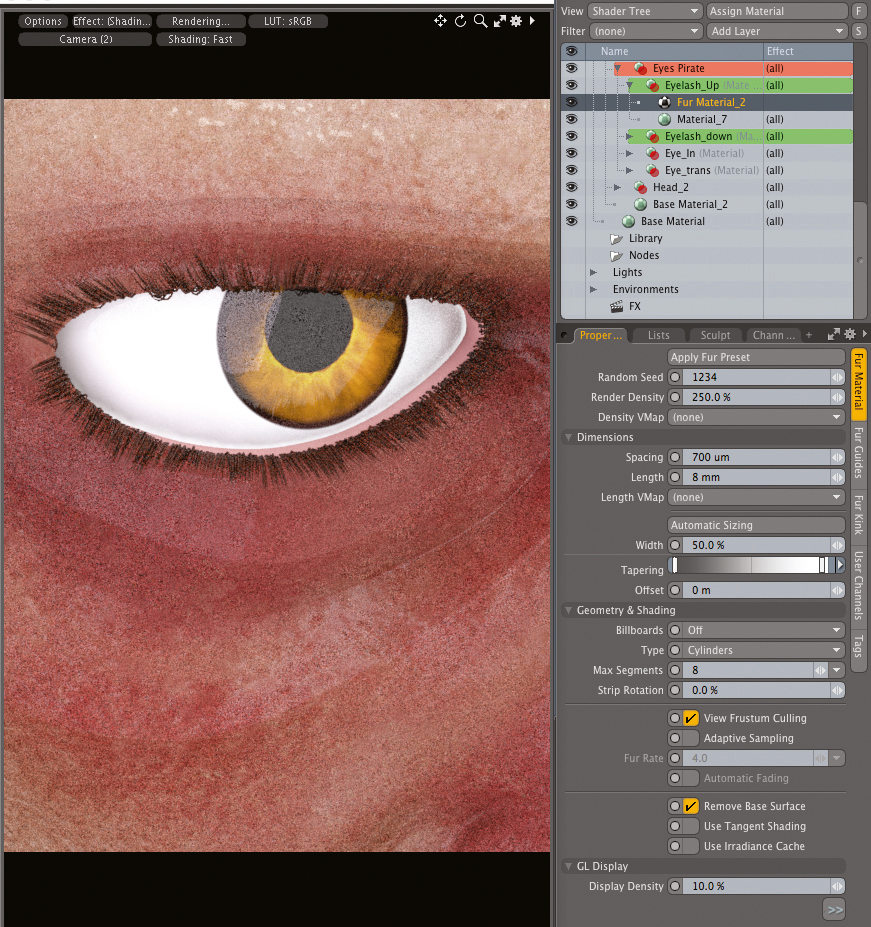
For more control over the eyelashes, create two different materials; one for the upper eyelashes and one for the lower eyelashes. If you don’t want to share the same attributes with the rest of the hair, place these materials in the Eye Pirate group and play with the material values. Add a new Fur Material to each group and create their guides, then set the Guides to Shape. Adjust the Clumping values to make the fibres closer and tighter.
12. Setting fur colour
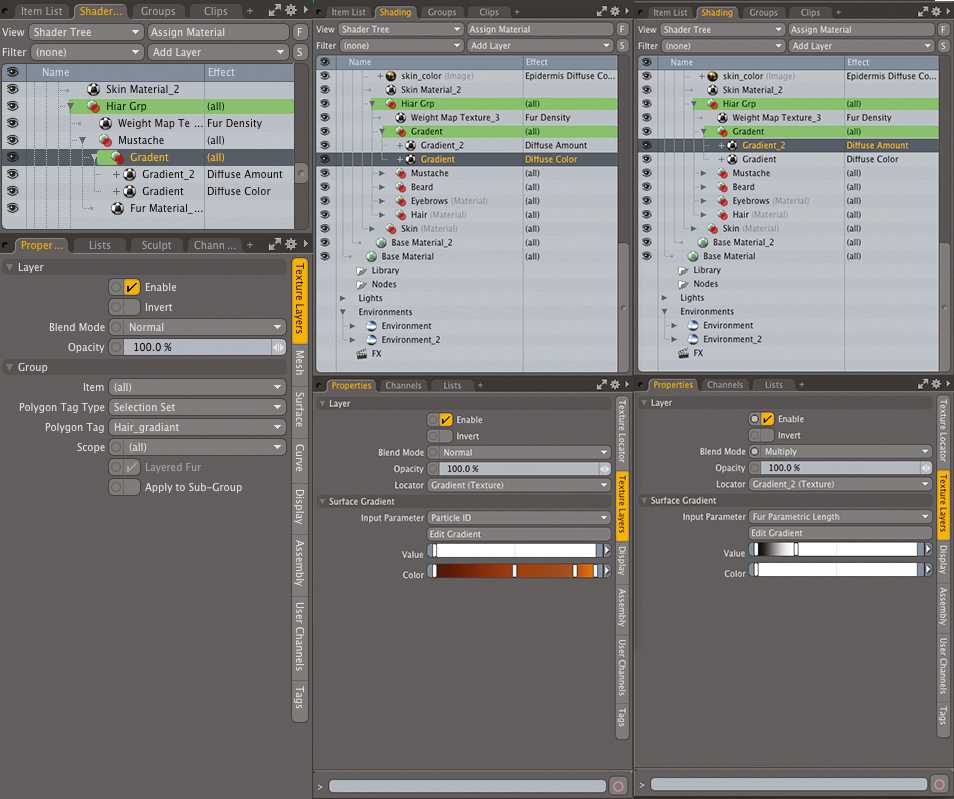
Create a set with the polygons from the beard, eyebrows and moustache – name it Hair Gradient. Create a new group and tag it to Hair Gradient. Add two gradients inside this new group; the first should be a Diffuse Color with the Input Parameter set to Particle ID and set the colours you want. Make the second gradient a Diffuse Amount. Change the Blending Mode to Multiply, set the values from 0% to 100%. Change the Input Parameter to Fur Parametric Length.
13. Scale down parameters
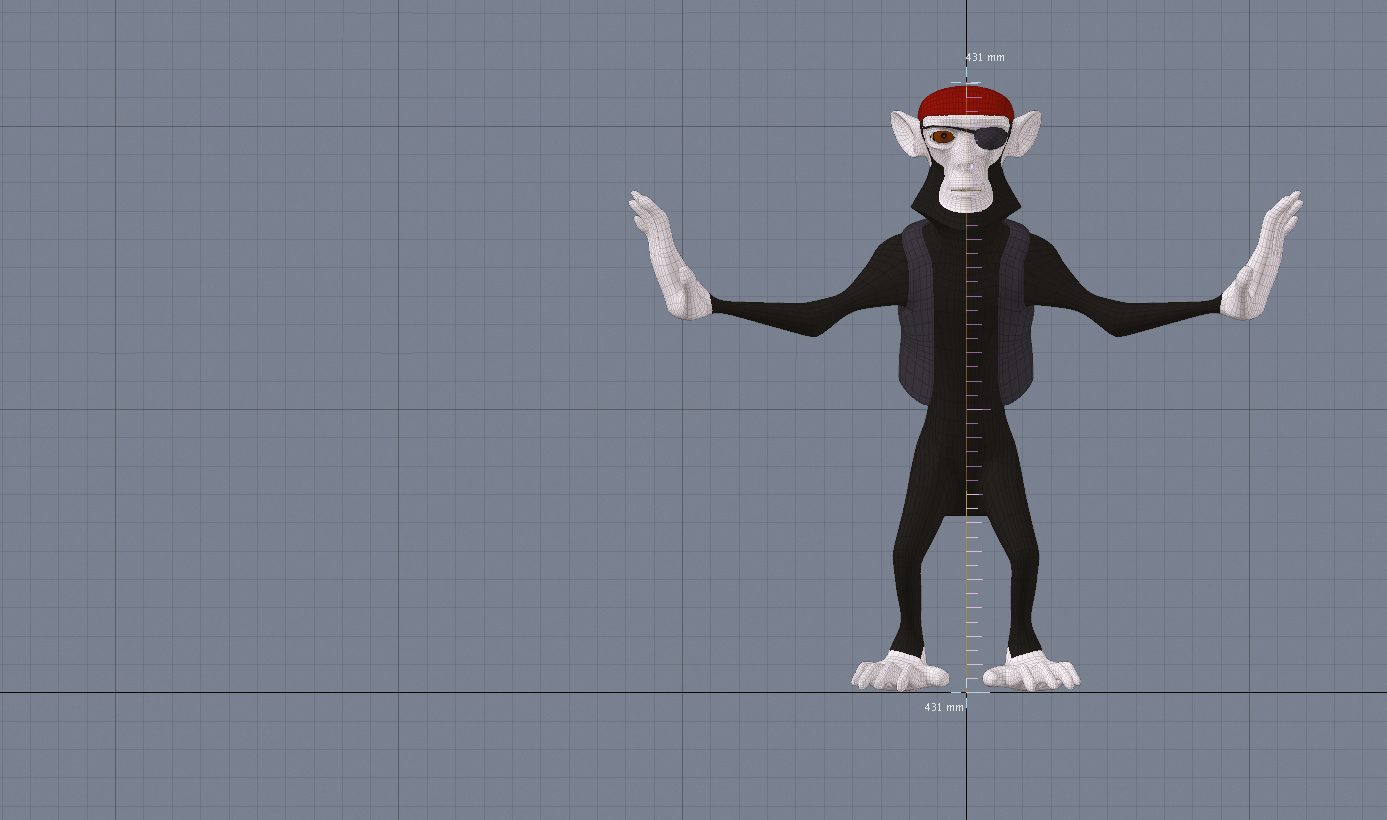
Now let’s apply everything we have learnt from working with the pirate to the monkey. Remember, with this one being a smaller object, you should scale down your parameters. Create a Length Map and a Weight Map to control the hair over the bandana and the vest. Use guides for the body, but not for the head; let the gravity do the work for you. You only have to adjust the bending options. You can use my files as a reference.
This article was originally published in 3D World magazine issue 211. Buy it here.

Thank you for reading 5 articles this month* Join now for unlimited access
Enjoy your first month for just £1 / $1 / €1
*Read 5 free articles per month without a subscription

Join now for unlimited access
Try first month for just £1 / $1 / €1
