How to craft an ad in Photoshop CC using 3D models
Take your designs to a new dimension using Adobe Stock 3D models. Why be a square – when you can be a cube?
Designing in 3D can be a daunting task for anyone used to working solely in two dimensions, but the great potential to open new creative horizons makes it a step well worth taking.
Luckily for beginners, Photoshop CC presents a helpful middle ground that lets you create and edit 3D scenes without needing any real experience in other software.
In this tutorial we will be downloading a 3D model from the Adobe Stock library and using it to create a bespoke advert in Photoshop CC.
Click the icon in the top right of each image to enlarge it
01. Select your object model
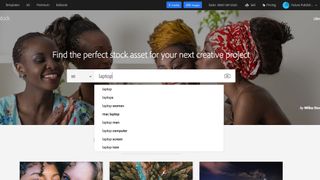
3D models allow you to light, manipulate, and freely reposition objects without the need for a real-life photography studio. This is particularly useful for smaller businesses where editable images can be reused multiple times, over a range of marketing material. In this scenario I have imagined an IT company called ‘Techfixa’, looking to create an advert using a 3D laptop model.
Open a web browser and go to the Adobe Stock website (stock.adobe.com), where you can browse the collection of royalty-free 3D models, lights and materials. Select 3D in the drop-down box and search for ‘laptop’. Then hover over the desired image and choose License & Save to My library. This will download a folder containing the model as an obj. file, as well as .png files for textures (we will get on to these later).
02. Place model into document
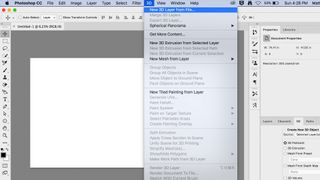
All great designs begin with a single step; open Photoshop and create a new document. The dimensions will depend on the intended destination of your design – for this project I used an aspect ratio of 16:9 for use in digital.
You can insert the model into your file by simply dragging the .obj file from the downloaded folder onto your canvas. Alternatively you can open it from within Photoshop, by selecting 3D > New 3D Layer From File and opening the .obj file. This should automatically switch your workspace into 3D mode, but you can also do this manually through Window > Workspace (this will be more important when you want to switch back to Essentials).
03. Create a background
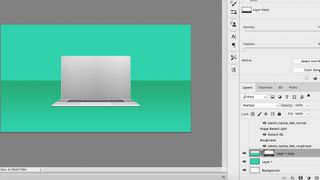
Adding a horizon will make it easier to realise the structure of your design and where to position your model. While it is possible to create backgrounds in 3D or integrate models into flat images, I used basic 2D Photoshop tools to create a simple coloured background.
Create a new layer and use the fill tool to colour it turquoise. Duplicate the layer, set it to a ‘multiply’ blend mode, add a mask and use the gradient tool to draw a horizon, from halfway up to the bottom. This is a simple method for making a basic horizon.
04. Add text
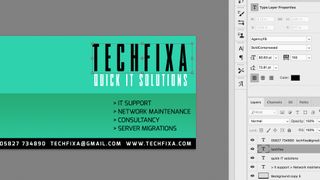
Adding text at this stage will give you an idea of how much space will be left for your laptop. Use the Type tool to draw text boxes onto the canvas and add your copy. I employed a combination of AgencyFB and Exo typefaces to adopt a ‘future-techno’ style. The introduction of a black strip at the bottom of the frame helps make the contact information stand out.
05. Position your model
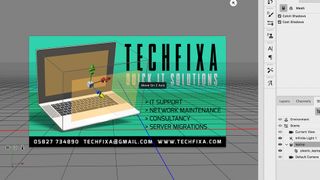
Using 3D in Photoshop can be a fiddly business, requiring you to constantly switch between different panels (3D, Layers and Properties), but with a little practice it can quickly become like second nature.
Once the laptop layer is selected, a perspective grid should appear and you will have access the 3D tools in the Options bar. You can use these to rotate, move and scale the object, as well as changing the floor and camera view. Click on the laptop in the canvas window and you will see its frame, as well as the axis that allows you to move, rotate and scale. Experiment with the controls, moving the object around the canvas until you are happy with its position – it can always be changed later on.
If you intend on having two laptops in the same scene, you can duplicate the layer and combine the two layers. This will render the two objects together, saving you the effort of consistently altering the settings for each.
06. Customise textures
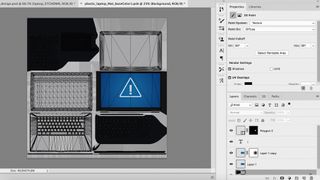
Click the drop-down arrow on the laptop layer to reveal the textures applied to that object model. Double-clicking on the Diffuse layer ‘plastic_laptop_Mat_baseColor’ will open the texture file in a separate Photoshop document. This is viewed as an unwrapped net, each seam marked by a black line. You can edit the texture in this file and the original document will be updated once saved.
I drew a blue rectangle on a new layer over the area that represents the laptop screen. I then used the shape tool, combined with Select > Modify > Smooth to create a rounded triangle error warning on top of that.
07. Check the lighting
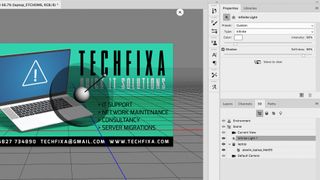
Click on the light source, in this case ‘Infinite Light 1’, under the 3D panel. You can alter the lighting settings in the Properties panel, controlling the type, colour and shadow softness. Switching to ‘spot’ or ‘point’ lights can instill a more interesting or dramatic atmosphere to the scene, but in this instance a soft ‘infinite’ lamp suits the purpose. Use the control sphere in the canvas window to adjust the angle of the light source.
08. Render and export
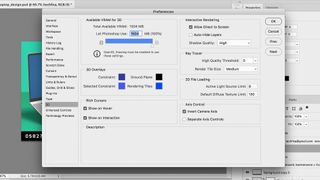
Right click on the 3D layer and render. Don’t be surprised if this takes some time; the longer it takes, the better the final render. You can change the render settings in Preferences > 3D. Finally export the file in whatever format you require, in this case I used RGB jpg for web.
09. Final image

Try it yourself with free 3D assets available on Adobe Stock.

Thank you for reading 5 articles this month* Join now for unlimited access
Enjoy your first month for just £1 / $1 / €1
*Read 5 free articles per month without a subscription

Join now for unlimited access
Try first month for just £1 / $1 / €1
Get the Creative Bloq Newsletter
Daily design news, reviews, how-tos and more, as picked by the editors.

Matt has worked for various publishing houses and design agencies, covering studio photography, video production, editorial design, branding, illustration and motion graphics. He currently works for Future PLC with brands such as T3, Woman&Home, Marie Claire, Music Week, TechRadar, Golden Joysticks, Cycling Weekly, Brand Impact Awards, Horse&Hound and Tech&Learning. In the past he has designed titles including Mac|Life, IQ, Bow International, Drummer, iDrum, Acoustic, Clay Shooting, Sea Fishing and GunTradeNews. He has experience across the full Adobe Suite and is currently spending a lot of time creating projects in Blender and After Effects.