Get your head around React with these five factors
Five important things to consider in order to master and fall in love with React.

Learning React, the JavaScript library for creating user interfaces from Facebook and Instagram seems nuts until you give it a chance. Things get much easier when you understand five key concepts. I call these the five mind shifts. They are: components, JSX, state, lifecycle methods and one-way data flow.
01. Components
Components are chunks of code that can be combined to provide more complex functionality. When you divide your application into components, it makes it easier to update and maintain. In React, components are even more important: you don’t just program them, you design your app by thinking about how these components fit together.
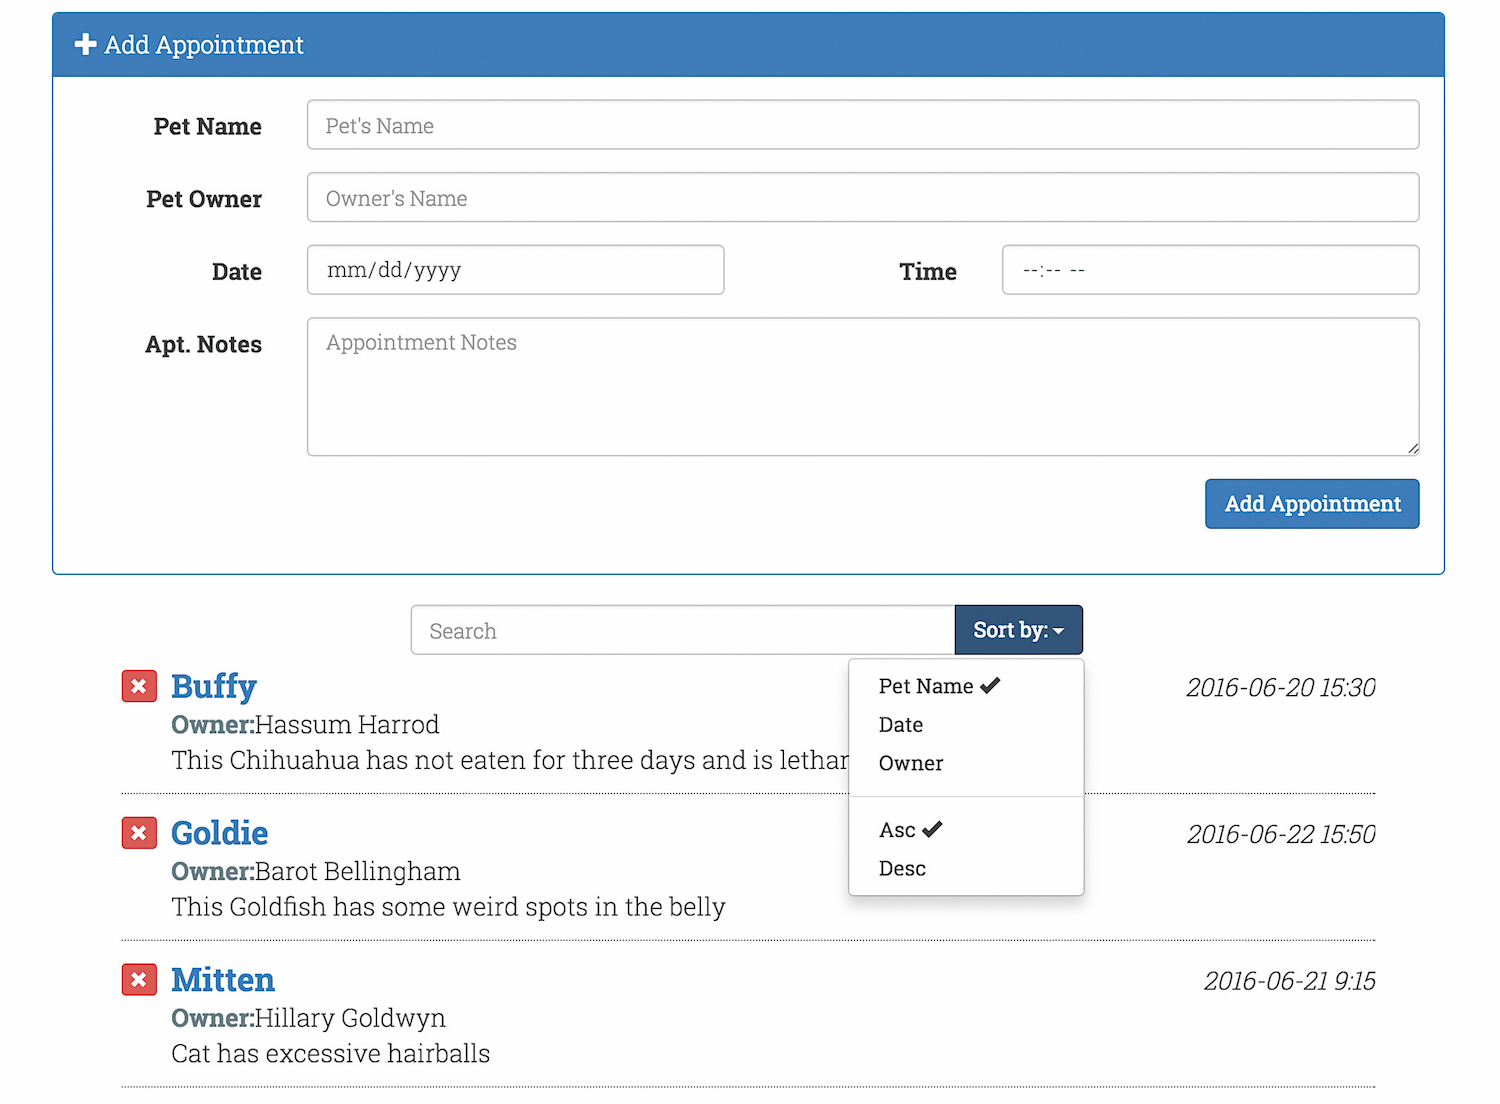
Let’s use the interface below as an example. You can see how it can be divided into three pieces: a box for booking a new appointment, a list view that lets you view the existing appointments, and a search box for looking through them.

In HTML, you might think of this application as a series of elements, like this:
<div id="petAppointments">
  <div class="addAppointments"></div>
  <div class="searchAppointments"></div>
  <div class="listAppointments"></div>
</div>
And that’s also what you’d do in React. You create a single tag ( <div id="petAppointments"> ) that calls a petAppointments component, which then calls the other sub-components as needed. To pass along a configuration object like this, you use the createClass method of the React object.
var MainInterface = React.createClass({
  render: function() {
    return (
      <div className="interface">
        <AddAppointment />
        <SearchAppointments />
        <ListAppointments />
      </div>
    )
  } //render
}); //MainInterface

ReactDOM.render(
  <MainInterface />,
  document.getElementById('petAppointments')
); //render
There are two render methods. In the MainInterface class, we declare the items that will be sent to the browser and the ReactDOM.render method replaces the <div id="petAppointments"></div> element in your HTML with React’s code. We would then write the code that handles each of our three sub-components.
Components make code easy to write and maintain. Once you learn to think of and organise your apps as a series of composable components, building complex applications becomes simpler.
Get the Creative Bloq Newsletter
Daily design news, reviews, how-tos and more, as picked by the editors.
02. JSX
JSX is probably one of the biggest mind shifts and one of the reasons why the library seems so weird. JSX is an extension to JavaScript that allows you to combine XML code with JavaScript.
This is sort of what happens with templating languages like Mustache, which let you include JavaScript within HTML. But JSX gets translated (transpiled) into JavaScript. So you are not just building a template but a structure that gets converted into a series of JavaScript statements. Unlike templating languages, it doesn’t have to be interpreted at runtime. Let’s look at an example.
<li className="pet-item media" key={index}>
  <div className="pet-info media-body">
    <div className="pet-head">
      <span className="pet-name">{this.state.data[index].petName}</span>
      <span className="apt-date pull-right">{this.state.data[index].aptDate}</span>
    </div>
    <div className="owner-name"><span className="label-item">Owner:</span>
    {this.state.data[index].ownerName}</div>
    <div className="apt-notes">{this.state.data[index].aptNotes}</div>
  </div>
</li>
We can use this code to output our appointments. This feels a lot like using a regular templating language, so other than learning a few minor idiosyncrasies about JSX, you can pick it up quickly.
The odd part about using JSX isn’t learning the language itself; it’s getting over the fact that putting HTML within your JavaScript code just seems ... well, wrong. But it’s really nice to have all the code for each component living in a single place.
03. State

The third mind shift is learning to work with state in React. State is stored on the topmost component of your application and manages what’s happening in your app. There’s a special method called getInitialState where you can configure what happens when your application starts.
In my sample application, the initial state is set up like this:
var MainInterface = React.createClass({
  getInitialState: function() {
    return {
      aptBodyVisible: false,
      orderBy: 'petName',
      orderDir: 'asc',
      queryText: ''
    } //return
  }, //getInitialState
It looks like I’m setting up global variables for my application but modifying these variables actually controls how components render. If something in my app changes the value of a variable, my components will re-render. If the value of orderBy changes, for example, the list of appointments will reorder.
When you write a component, it’s easy to modify the application’s state. Writing components is easier since you’re only focused on what the component does. Here is my app’s final list component:
var React = require('react');
var AptList = React.createClass({

  handleDelete: function() {
    this.props.onDelete(this.props.whichItem)
  },

  render: function() {
    return(
      <li className="pet-item media">
        <div className="media-left">
          <button className="pet-delete btn btn-xs btn-danger" onClick={this.handleDelete}>
          <span className="glyphicon glyphicon-remove"></span></button>
        </div>
        <div className="pet-info media-body">
          <div className="pet-head">
            <span className="pet-name">{this.props.singleItem.petName}</span>
            <span className="apt-date pull-right">{this.props.singleItem.aptDate}</span>
          </div>
          <div className="owner-name"><span className="label-item">Owner:</span>
          {this.props.singleItem.ownerName}</div>
          <div className="apt-notes">{this.props.singleItem.aptNotes}</div>
        </div>
      </li>
    ) // return
  } // render
}); //AptList

module.exports=AptList;
The component is only concerned with two things. First, showing the list of appointments based on the current state of the application. Second, handling a click on one of the red ‘X’s.
Clicking on the ‘X’ will push a change to the application state, causing this component to re-render. I’m not worried about what’s happening with the data, simply with how the current data will be displayed.
The list component is only concerned with listing things. It doesn’t have to worry about what’s happening elsewhere. It’s a brilliant way to build applications and once you get the hang of it, you’ll see why it’s a superior way to code.
04. One-way data flow

The next mind shift is to learn to love a one-way data flow. In React, the state of your application resides in the topmost component. When you need to change it in a sub-component, you create a reference to the topmost component and handle it there. This is a bit hard to get used to. Here’s an example:
var React = require('react');
var AptList = React.createClass({
  handleDelete: function() {
    this.props.onDelete(this.props.whichItem)
  },
  render: function() {
    return(
      <li className="pet-item media">
        <div className="media-left">
          <button className="pet-delete btn btn-xs btn-danger" onClick={this.handleDelete}>
          <span className="glyphicon glyphicon-remove"></span></button>
        </div>
      </li>
      ...
    ) // return
  } // render
}); //AptList

module.exports=AptList;
This is a simplified version of the module that creates a list of appointments. Our list has a Delete button, which we manage through an event handler. This is a special React version of onclick. Our event handler calls the function handleDelete, which is local to the sub-module. Our local function simply creates a reference to another function in an object called props. Props are how main modules communicate with sub-modules.
In the main module you’d create an attribute to the tag you’re using to represent the module. It looks just like passing an attribute to an HTML tag:
<AptList onDelete = { this.deleteMessage } />And then you create your own method in the main component to handle the change to the application’s state. Keeping state in the main module helps make your sub-modules more efficient. It’s also easier to maintain code because most of the action happens in one place.
05. Lifecycle methods
One of the best things about React is the way it manages the rendering of your modules. Your modules don’t have to worry about updating the DOM, only about reacting to the state of your application. When state changes, React re-renders your application’s components. It does this by creating its own version of the DOM called a Virtual DOM.
But sometimes you need to be able to do things in response to the rendering lifecyle. Enter lifecycle methods. These are ways to ask React to handle tasks at different points in the application’s execution.
There are, for example, lifecyle methods that allow you to load external data through AJAX requests:
componentDidMount: function() {
  this.serverRequest = $.get('./js/data.json', function(result) {
    var tempApts = result;
    this.setState({
      myAppointments: tempApts
    }); //setState
  }.bind(this));
}, //componentDidMount
Here, componentDidMount enables you to execute something after the initial rendering is complete. This is a great place to load AJAX contents, set up timers and so on. There are lots of other lifecycle methods that allow you to trap the execution of the application at different points. They are necessary because of React’s Virtual DOM, which is a great timesaver when building apps.
Rethinking react
React requires a rethinking of the way you work with web applications but if you focus on mastering the benefits of these five mind shifts, you’ll quickly learn why the library has become so incredibly popular and is a fantastic way to build interfaces.
This article – illustrated by Ray Villalobos – was originally published in issue 286 of net, the world's best-selling magazine for web designers and developers. Subscribe to net.
Want to further refine your React skills?

If you're interested in learning more about React, make sure you've picked up your ticket for Generate London from 19-21 September 2018. Having founded React Academy to teach React around the world and launched sizzy.co and ok-google.io, Kristijan Ristovski will be delivering his workshop – Learn How to Think in React – in which he will explore React best practices and teach you solutions to real problems that you might encounter in the process of building an app.
Generate London takes place from 19-21 September 2018. Get your ticket now.
Related articles:

Thank you for reading 5 articles this month* Join now for unlimited access
Enjoy your first month for just £1 / $1 / €1
*Read 5 free articles per month without a subscription

Join now for unlimited access
Try first month for just £1 / $1 / €1
