How to edit a video on TikTok
Learn how to edit a video on TikTok and make it shine with this step-by-step visual guide.

Learning how to edit a video on TikTok probably wouldn't have been something you wanted to do a couple of years ago, but in one of the most chaotic years for society, TikTok has benefitted. As one of the most downloaded apps on the App Store and Google Play, its popularity has steadily increased throughout the year. It’s provided not just entertainment, but also comfort and in-jokes for many, creating a feeling of unity for its users. Social media monetisation success stories have also increased over the last year, therefore it’s no surprise that so many people have taken the plunge into creating TikTok videos themselves.
Don’t worry - you don't need to be a video-editing professional to edit videos on TikTok. Like the best video editing apps, TikTok’s user-friendly video creating and editing services make it easy to make any video come to life, and it’s not difficult to get the hang of. To get you started, below is the ultimate guide to how to create and edit a video for TikTok. If you're still not convinced TikTok is for you, then see our guide to what TikTok is all about, or else check out our top video editing apps for YouTube.
01. Adjust the camera settings

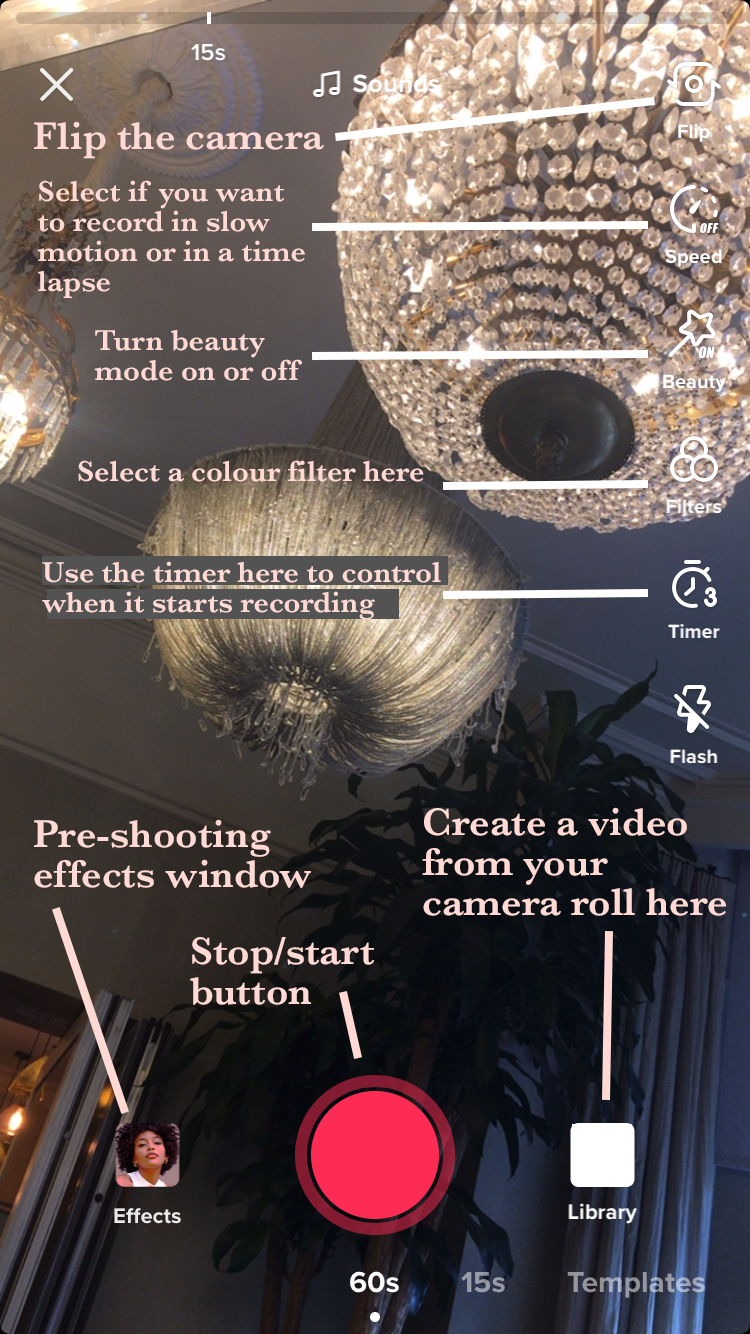
Tap the plus button at the bottom of the TikTok home screen when you open the app, which brings you to the camera. In the camera, there are several settings you can adjust before you start shooting.
If you know what music you want to use, then tap the sounds icon at the top of the screen, and either search for the music here, or use a featured sound that is advertised as popular on TikTok at the moment. But if you want to record your video first, music can always be added in later.
The TikTok camera also includes a beauty mode feature, which softens your face to make you look more photogenic. There are also several colour adjustment filters that can be chosen from, which you can change depending on what type of scene you are filming. The G6 filter is flattering on faces, and B5 tends to be good for landscapes. These include a slider which lets you adjust how strongly the filter will be applied to the video.
For the most flattering lighting, you'll probably want to invest in one of the best ring lights to get a diffuse light source at an affordable price.
02. Add effects

There are several different effects available to use on the TikTok camera, which include using a background of your choice from your camera roll, or even making several clones of you to dance next to you. Usually, specific effects are trending, but you can also save effects to use later without having to search through them all again.
03. Record your video
Now you can start recording your clips! You can choose to shoot either a 15 second or 60 second video, so that the camera will automatically stop recording after this time. There is also a timer which can be set to start recording after three or ten seconds. Tapping on the record button will let it film video normally until it reaches the end of the 15 or 60 seconds, but holding down on it will allow you to also zoom in and out as the video is recorded, by sliding your finger up or down the screen.
When you have finished recording one section, either take your finger off the screen or tap the record button to stop it, and then repeat until you have finished recording all the sections of your video. If you mess up a section, then don't panic – just hit the delete button and it will get rid of the last recording.
04. Adjust your clips

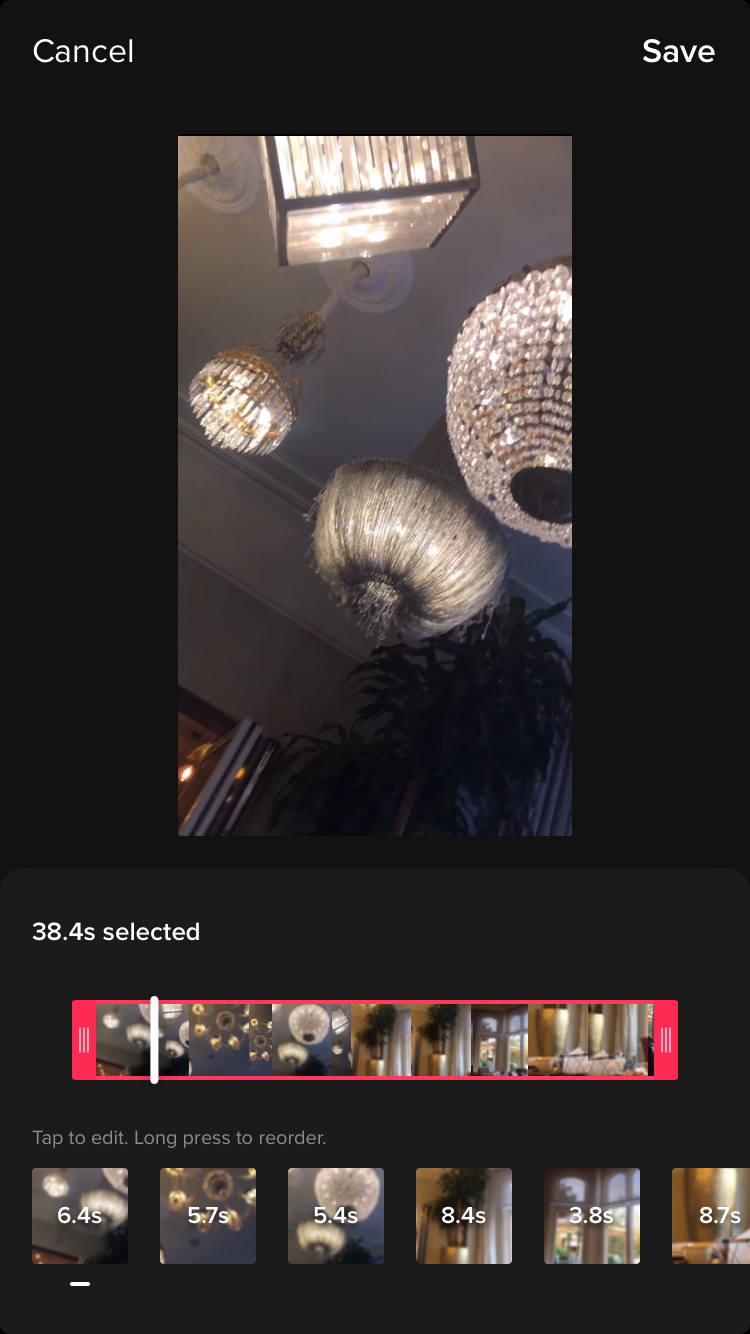
Once you have recorded all your video, tap the tick next to the record button. This will take you to the initial editing screen, where the whole thing will be played through on a loop. This is where text can be added and clips can be adjusted. Start by tapping on the adjust clips button in the top right hand corner. Here, you can select each of your clips and adjust their lengths individually. Clips can also be rerecorded by tapping on start over when the video is selected. Once you have finished here, click save.
05. Edit the sound
If you didn’t add music before recording, now is your chance. Just tap on sounds in the bottom left hand corner, and search for the sound you want to use or find one in recommended. You can choose from several different choices of sections of each song, ranging from 15 to 60 second sections. You can also favourite a sound so that it is easy to find for next time under your favourites button next to the discover button on the sounds window.
Next you can adjust the volume of your originally recorded clips in comparison to the sound you added from TikTok. To do this, just tap on volume, and to record a voice over over your video, go to the microphone icon on the right hand side of the screen. If you want to edit the sound of your voice, just tap on voice effects to choose from a selection of different atmospheres.
06. Add a post-shooting effect
The same filters can be added in the top right of the screen if you didn’t add them before recording, and the effects button allows you to add different looks over the top of your video, such as with the popular rainbow strobe effect, which creates the look of multicoloured flashing lights. You can also add backgrounds - see our guide to how to use green screen on TikTok.
Choose the effects you wish to use, play the video, and simply hold down on the effect in the part of the video you want it to be applied to. You can carry on adding more effects to different parts of the video as well, until you are happy with what you have created.
07. Add transitions

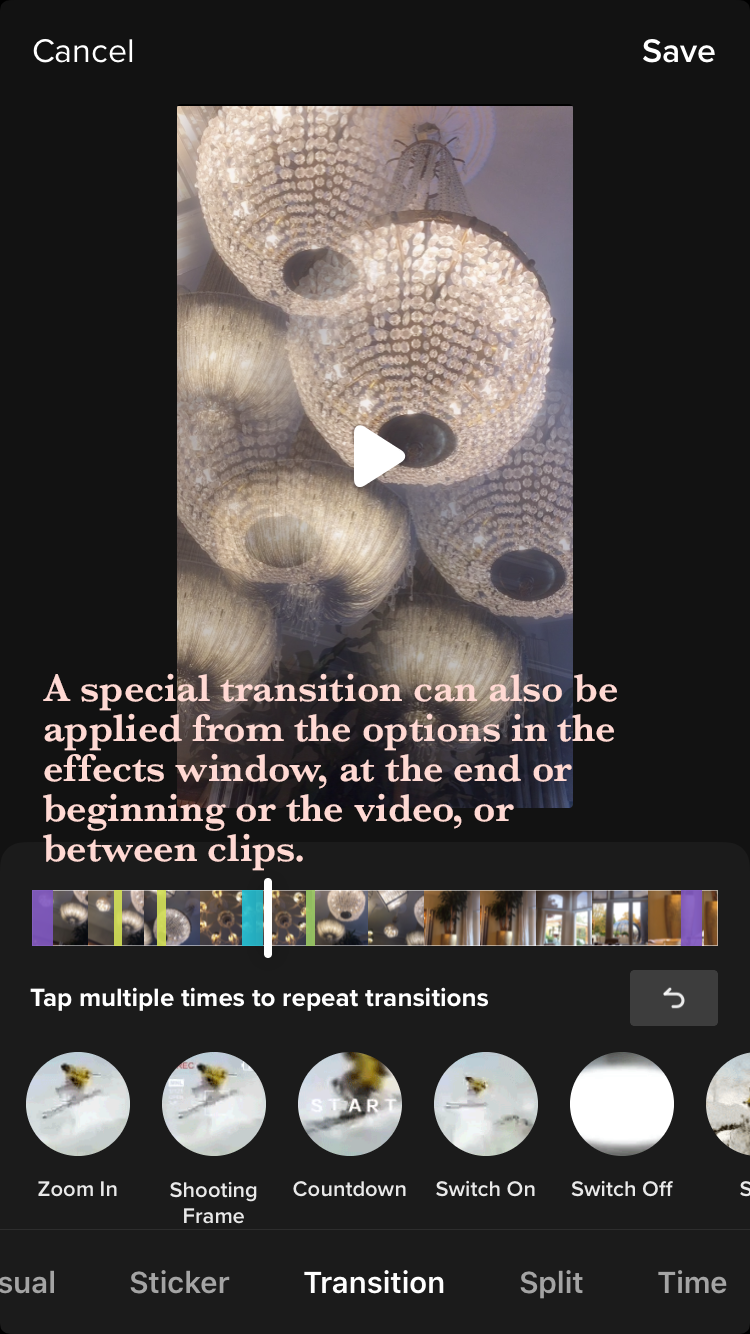
Clicking on transitions lets you choose from an array of stylish ways to smoothly transition from one clip to another in your video, for the duration you hold down the transition for as you apply it to the video.
Any effects applied can be erased with the undo button underneath the timeline, allowing you to start added them in again. Any section of your video can be put into slow motion, reverse speed, or on repeat in the time section of the effects window, and the split section allows different options of duplicating a part of your video into any number of squares or effects. Save at the top when you are finished with the effects window.
08. Add stickers

The stickers icon at the bottom of the editing window has a large array of graphics and emojis to add to your video for you to browse. This includes options such as a time, trending stickers, the ability to include a poll in your video, and all of the emojis included in your keyboard.
Also in ‘stickers’, you can manually apply a face zoom, and zoom in on a face in any part of the video.
09. Post your video on TikTok

Once you are happy with your editing, tap the red next button, which will take you to the posting screen. You will see a thumbnail of your video in the top right corner - tapping on this will show you the finished video on a loop, and tapping on select cover will allow you to select the 2-3 second portion of your video that will be shown as a preview on your profile. Adding in hashtags gives your video the opportunity to be seen by a wider audience, and you can also tag friends in the video – like on Instagram.
TikTok gives your video three options of visibility; public; private (only you can see it and it will not appear on your profile); or friends (comes up on your profile for people you follow who follow you back). The allow duet option means that other TikTokkers can react to or interact with your video by recording a video next to yours on their screen, and then post this on their profile.
The allow stitch option is a new feature which also allows other TikTokkers to interact with or react to your video, but your video appears as the first section of their video, which they can cut at any moment, instead of simultaneously running next to theirs, as with the duet option.
Once you are satisfied with all your posting settings, go ahead and click post! Videos usually take one to three minutes to upload, at which point they can come up on anyone’s ForYou page, and will come up on your followers Following page. Congratulations – you have created a TikTok video!
Read more:
- The best video editing software
- The best computer for video editing
- How to edit videos: best tips for beginners
Get the Creative Bloq Newsletter
Daily design news, reviews, how-tos and more, as picked by the editors.

Thank you for reading 5 articles this month* Join now for unlimited access
Enjoy your first month for just £1 / $1 / €1
*Read 5 free articles per month without a subscription

Join now for unlimited access
Try first month for just £1 / $1 / €1

Mabel is a freelance writer, artist and filmmaker. When she's not writing about the arts industry, books or culture, she's working on writing and illustrating her stories or developing experimental filmmaking projects. Working in journalism, poetry, documentary-filmmaking, illustration and fiction, storytelling is at the heart of what she does. She started writing articles in online magazines when she was seventeen. After training at the BFI Academy and then studying at UAL, she is now continuing to write articles while she works on creating and launching her first books and films.
