How to create 3D grass
Learn to make realistic fields of grass with HyperGrass.
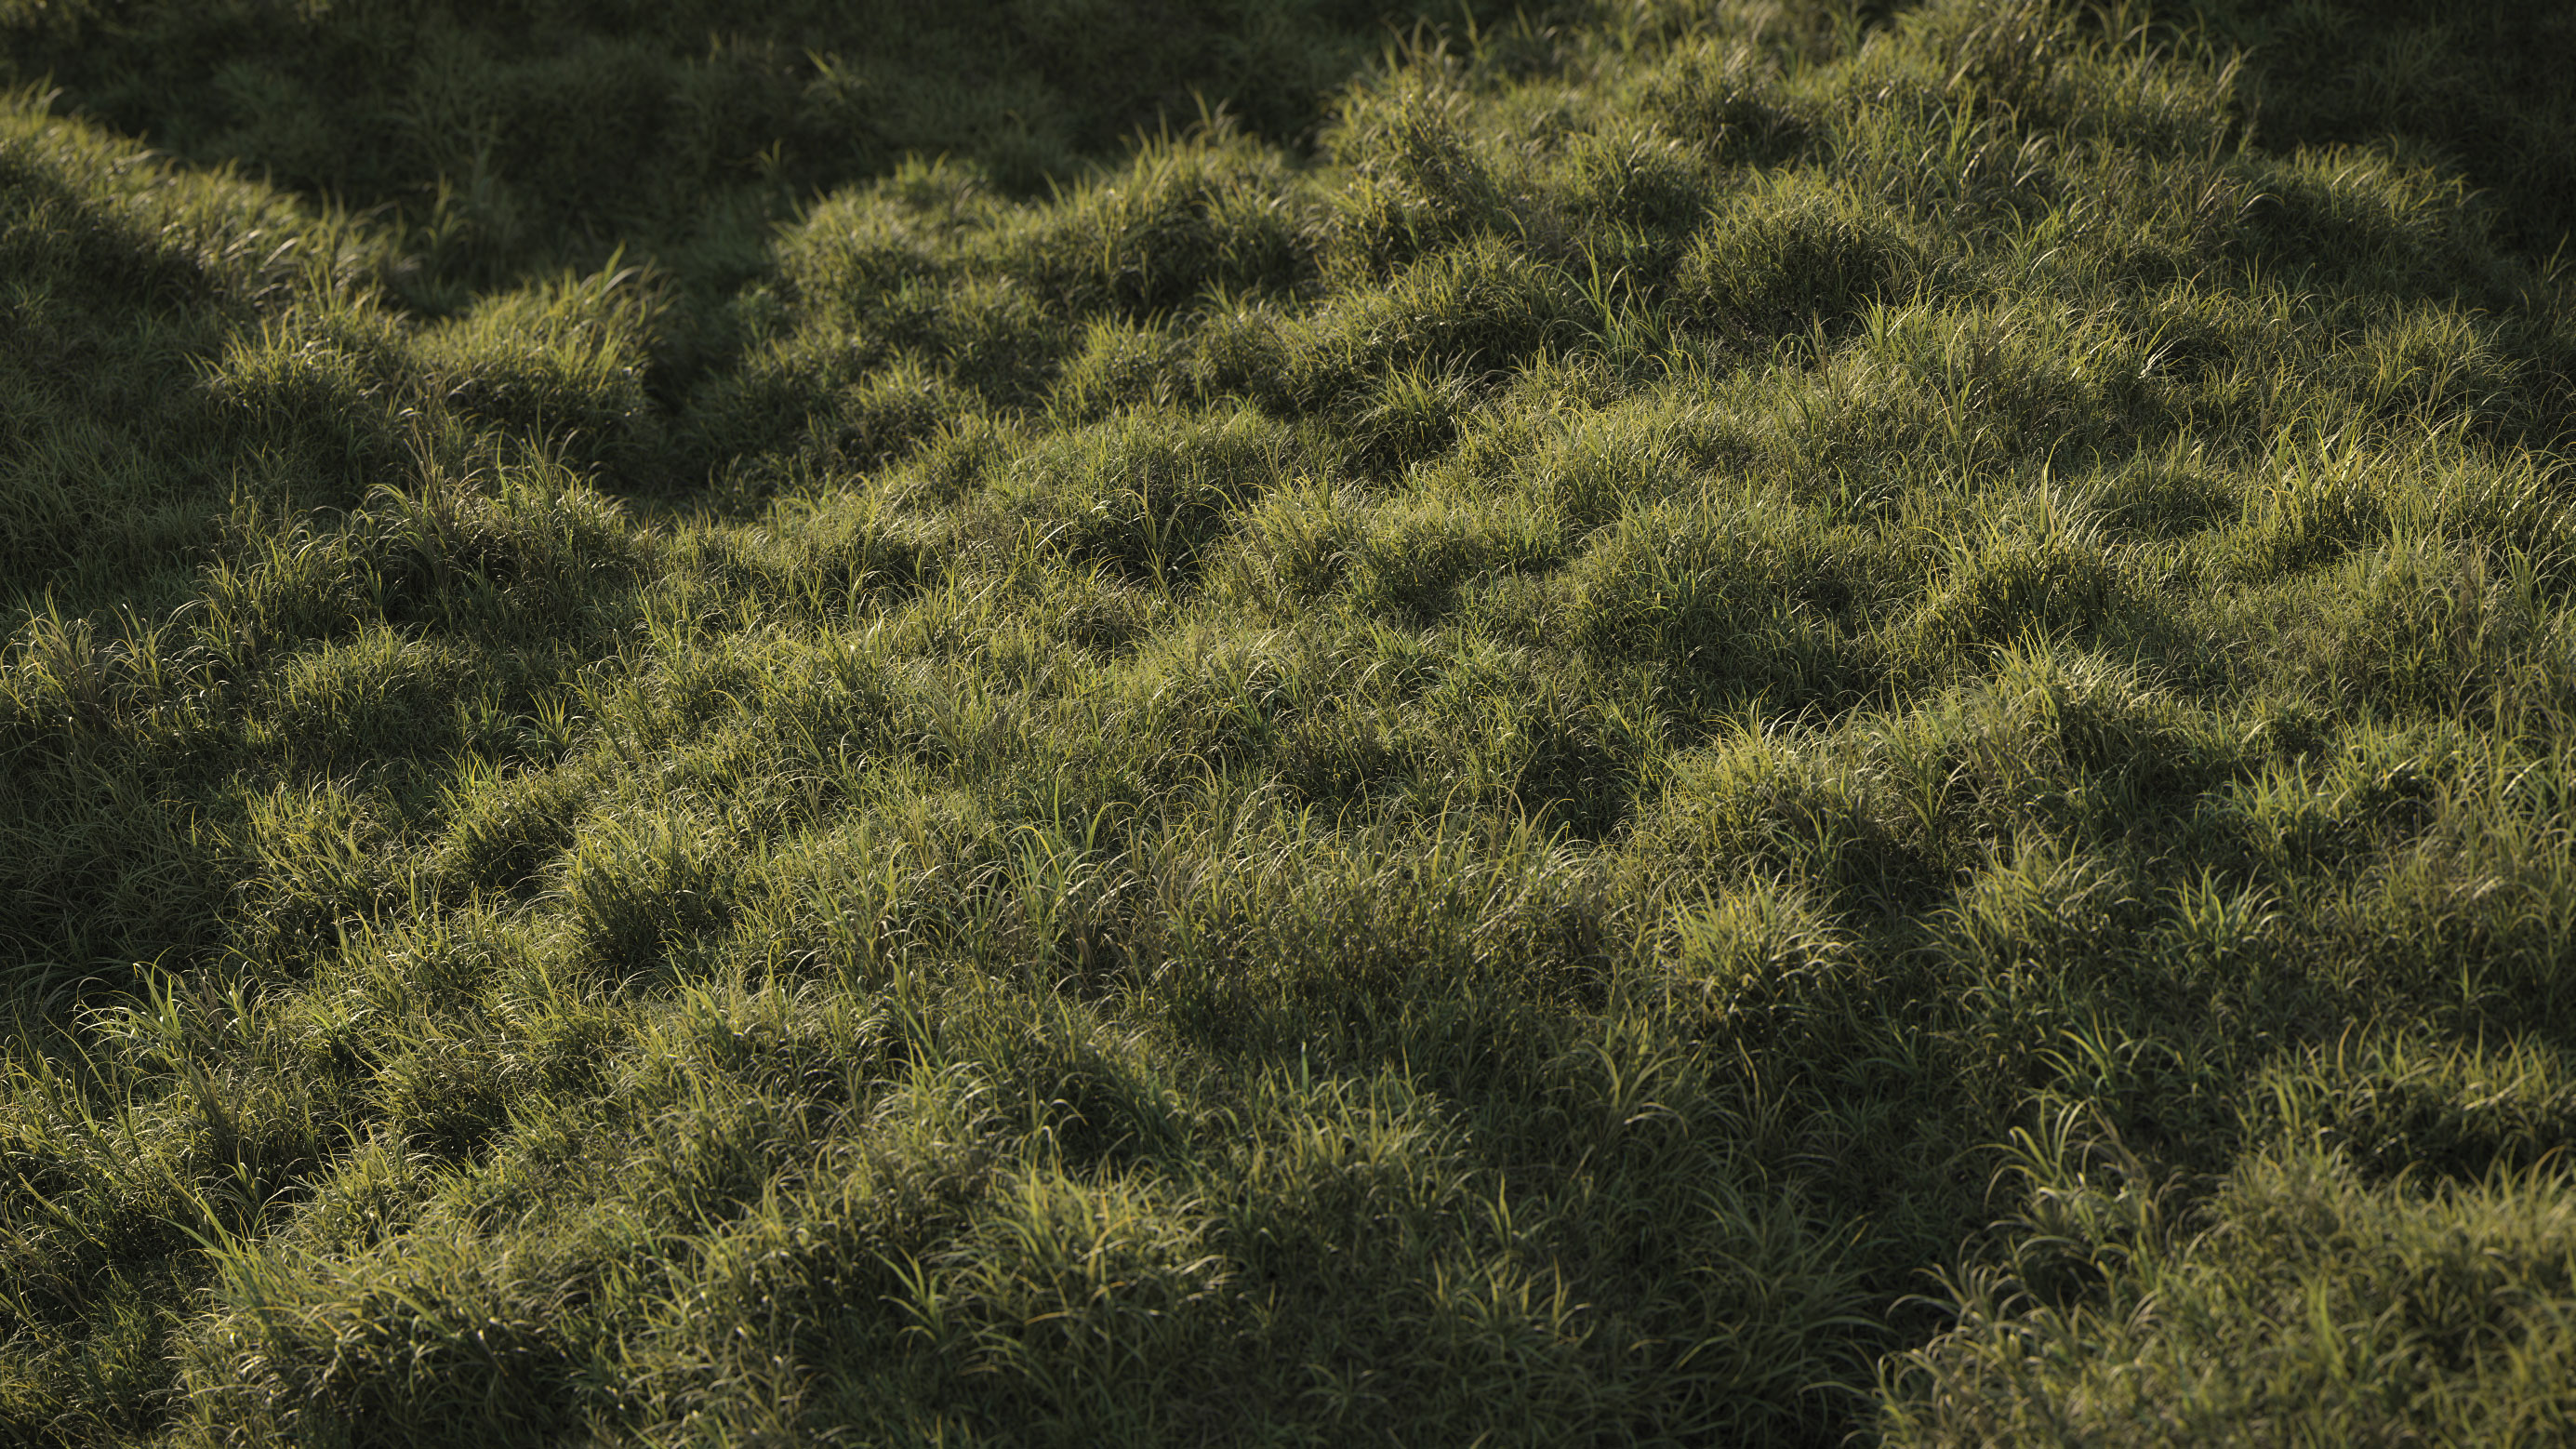
3D grass can be created in a variety of different ways and is an essential asset to any natural environment or arch-vis rendering. One of the most common techniques to create this piece of 3D art is to scatter individual blades of grass across a surface or use a hair system to generate grass geometry.
In this tutorial we will take a different approach. In the following steps we will use the procedural power of Houdini to instance and layer the HyperGrass assets across a terrain and use Redshift to render a realistic field of grass. HyperGrass is a modular 3D grass library designed around the growth patterns of real grass. It is divided into a number of growth categories that can be layered and combined together for incredible detail and realism. The complete HyperGrass collection is available from Vertex Library.
If you'd like to explore more textures for your environments, then don't miss our post on free textures.
Download the files you need for this tutorial from FileSilo (signup required)
01. Set up the scene
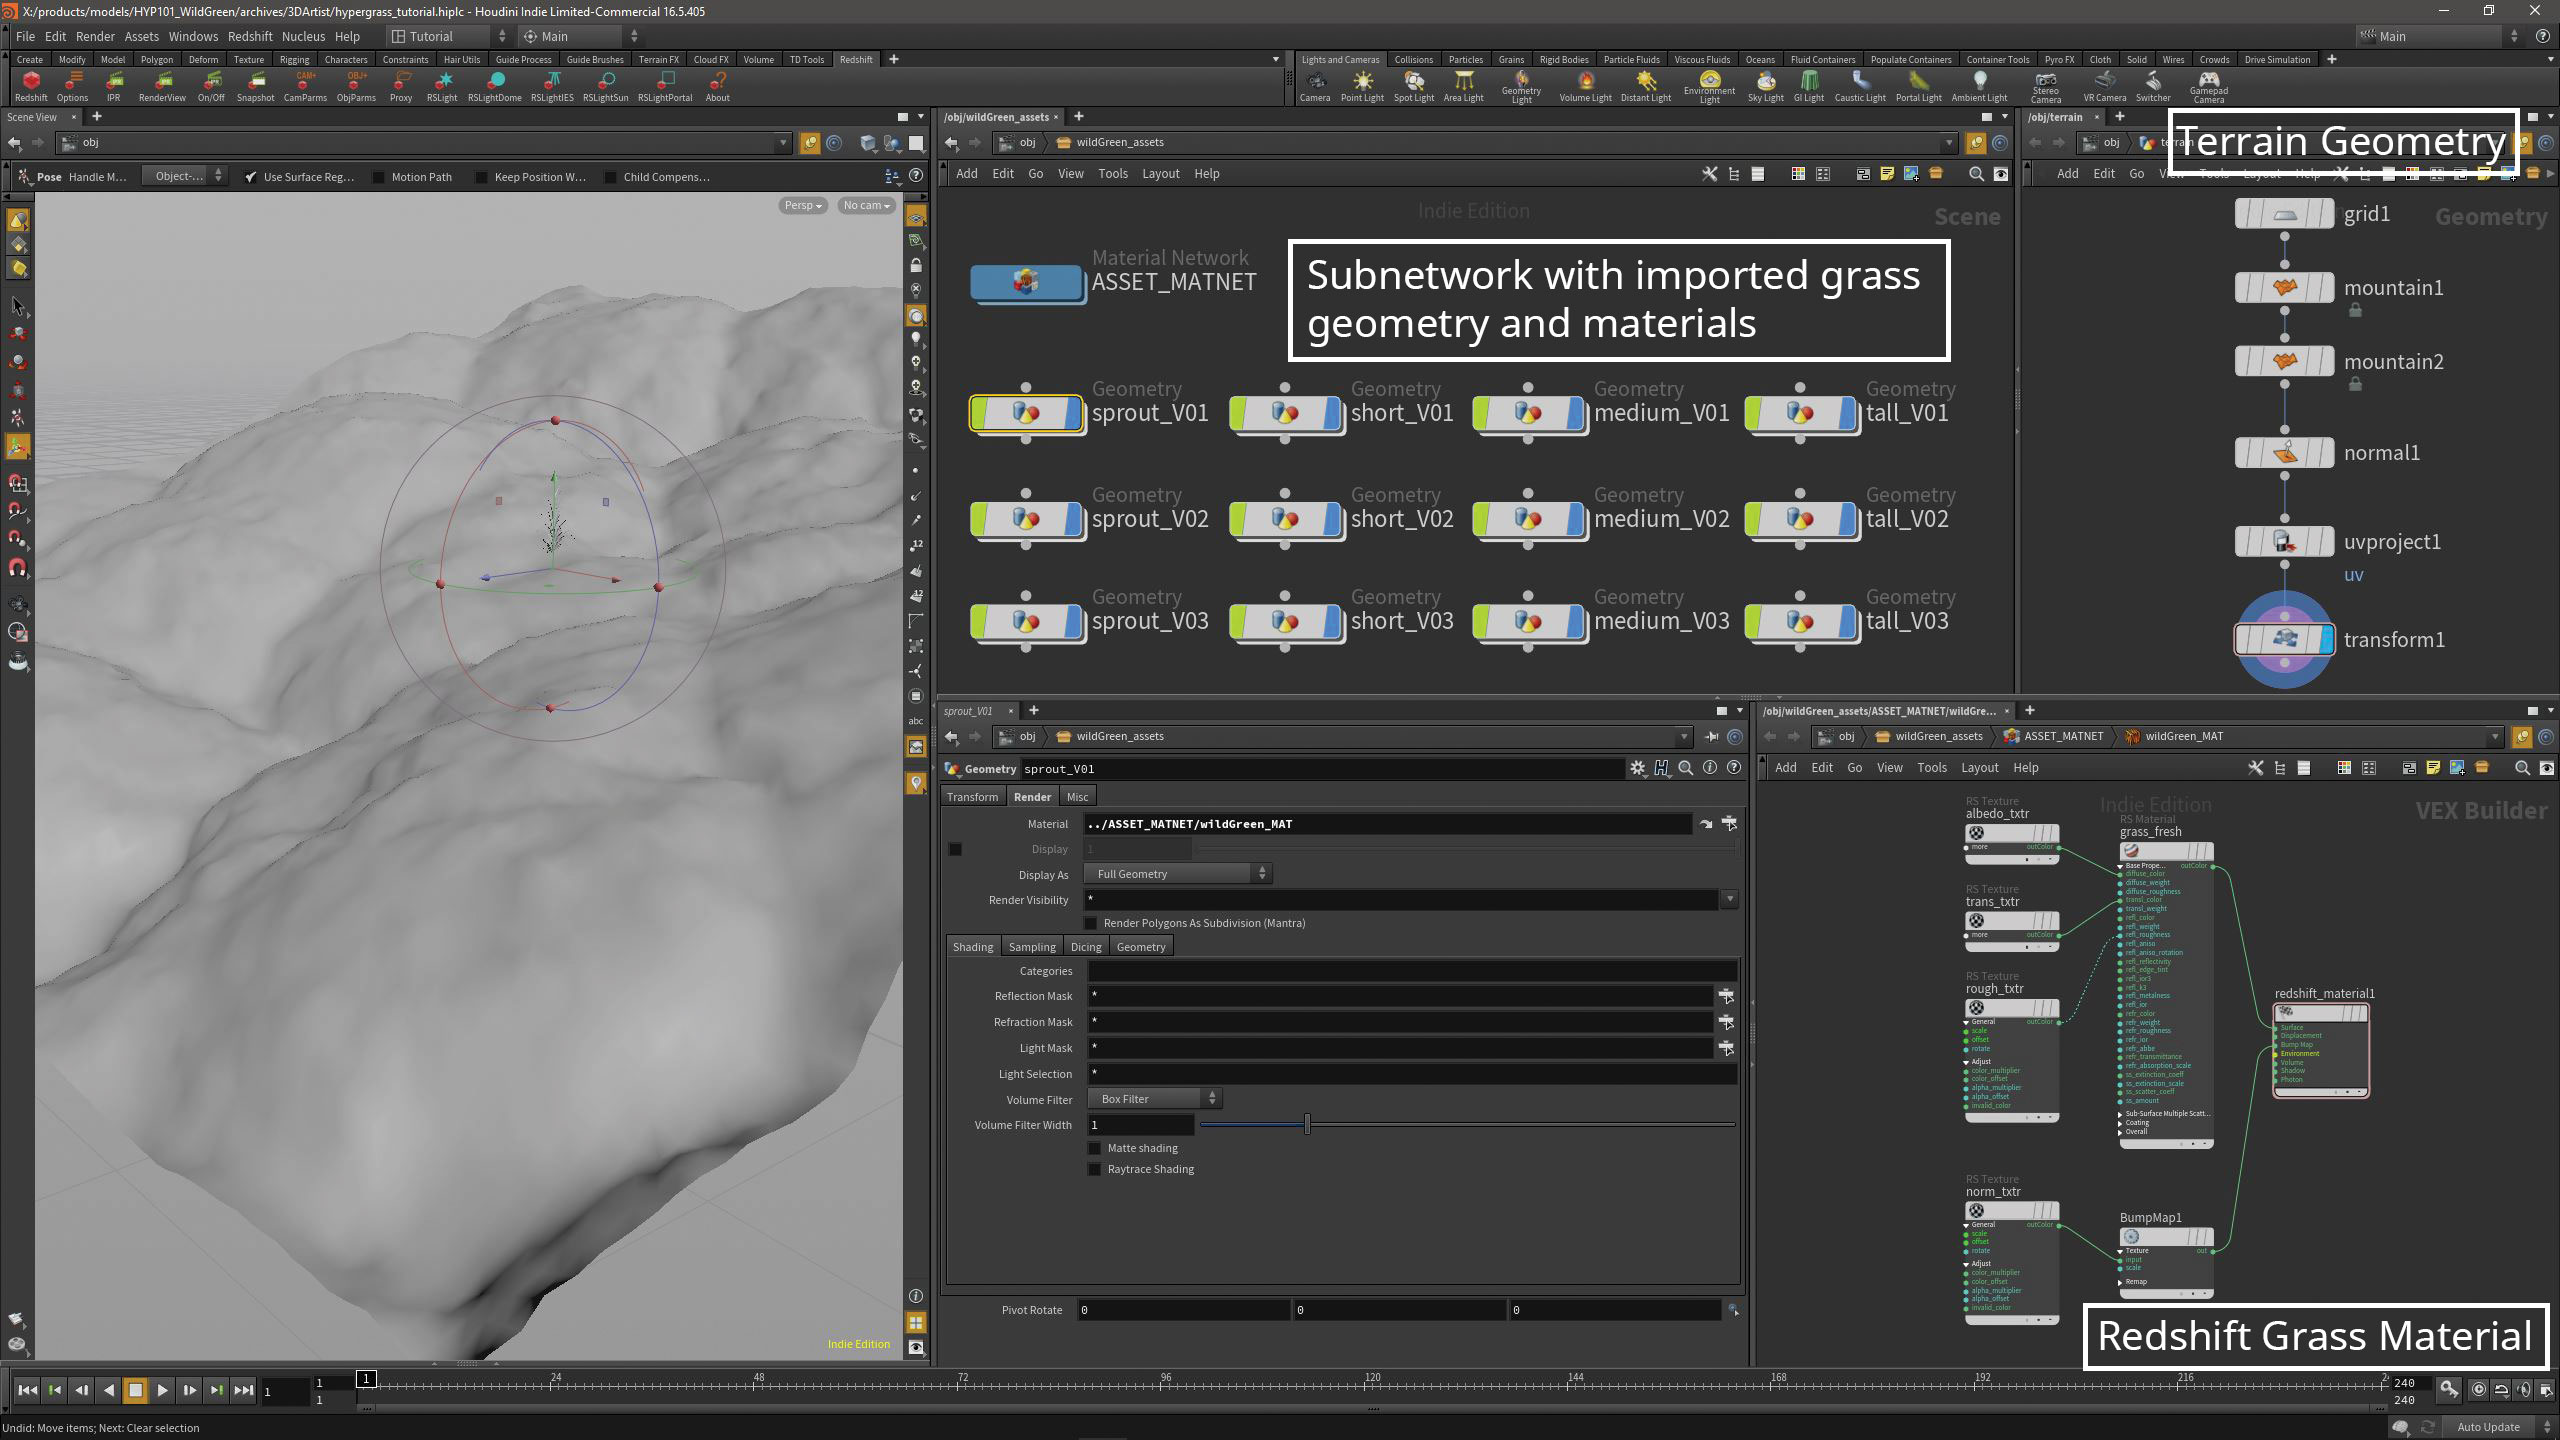
To get started we will first use the File > Import > OBJ menu in Houdini to load in all the unique HyperGrass models. It’s important that each model is contained inside its own geometry node at the object level, with a unique name that represents the category and variation, such as short_V01.
These geometry nodes can be grouped in a subnetwork to stay organised. We will also use Redshift materials with the HyperGrass PBR textures and assign them to all the grass objects. To create the scatter surface we can use a Grid and Mountain node to generate a terrain, making sure to add normals to points with a Normal node.
02. Utilise layer instances
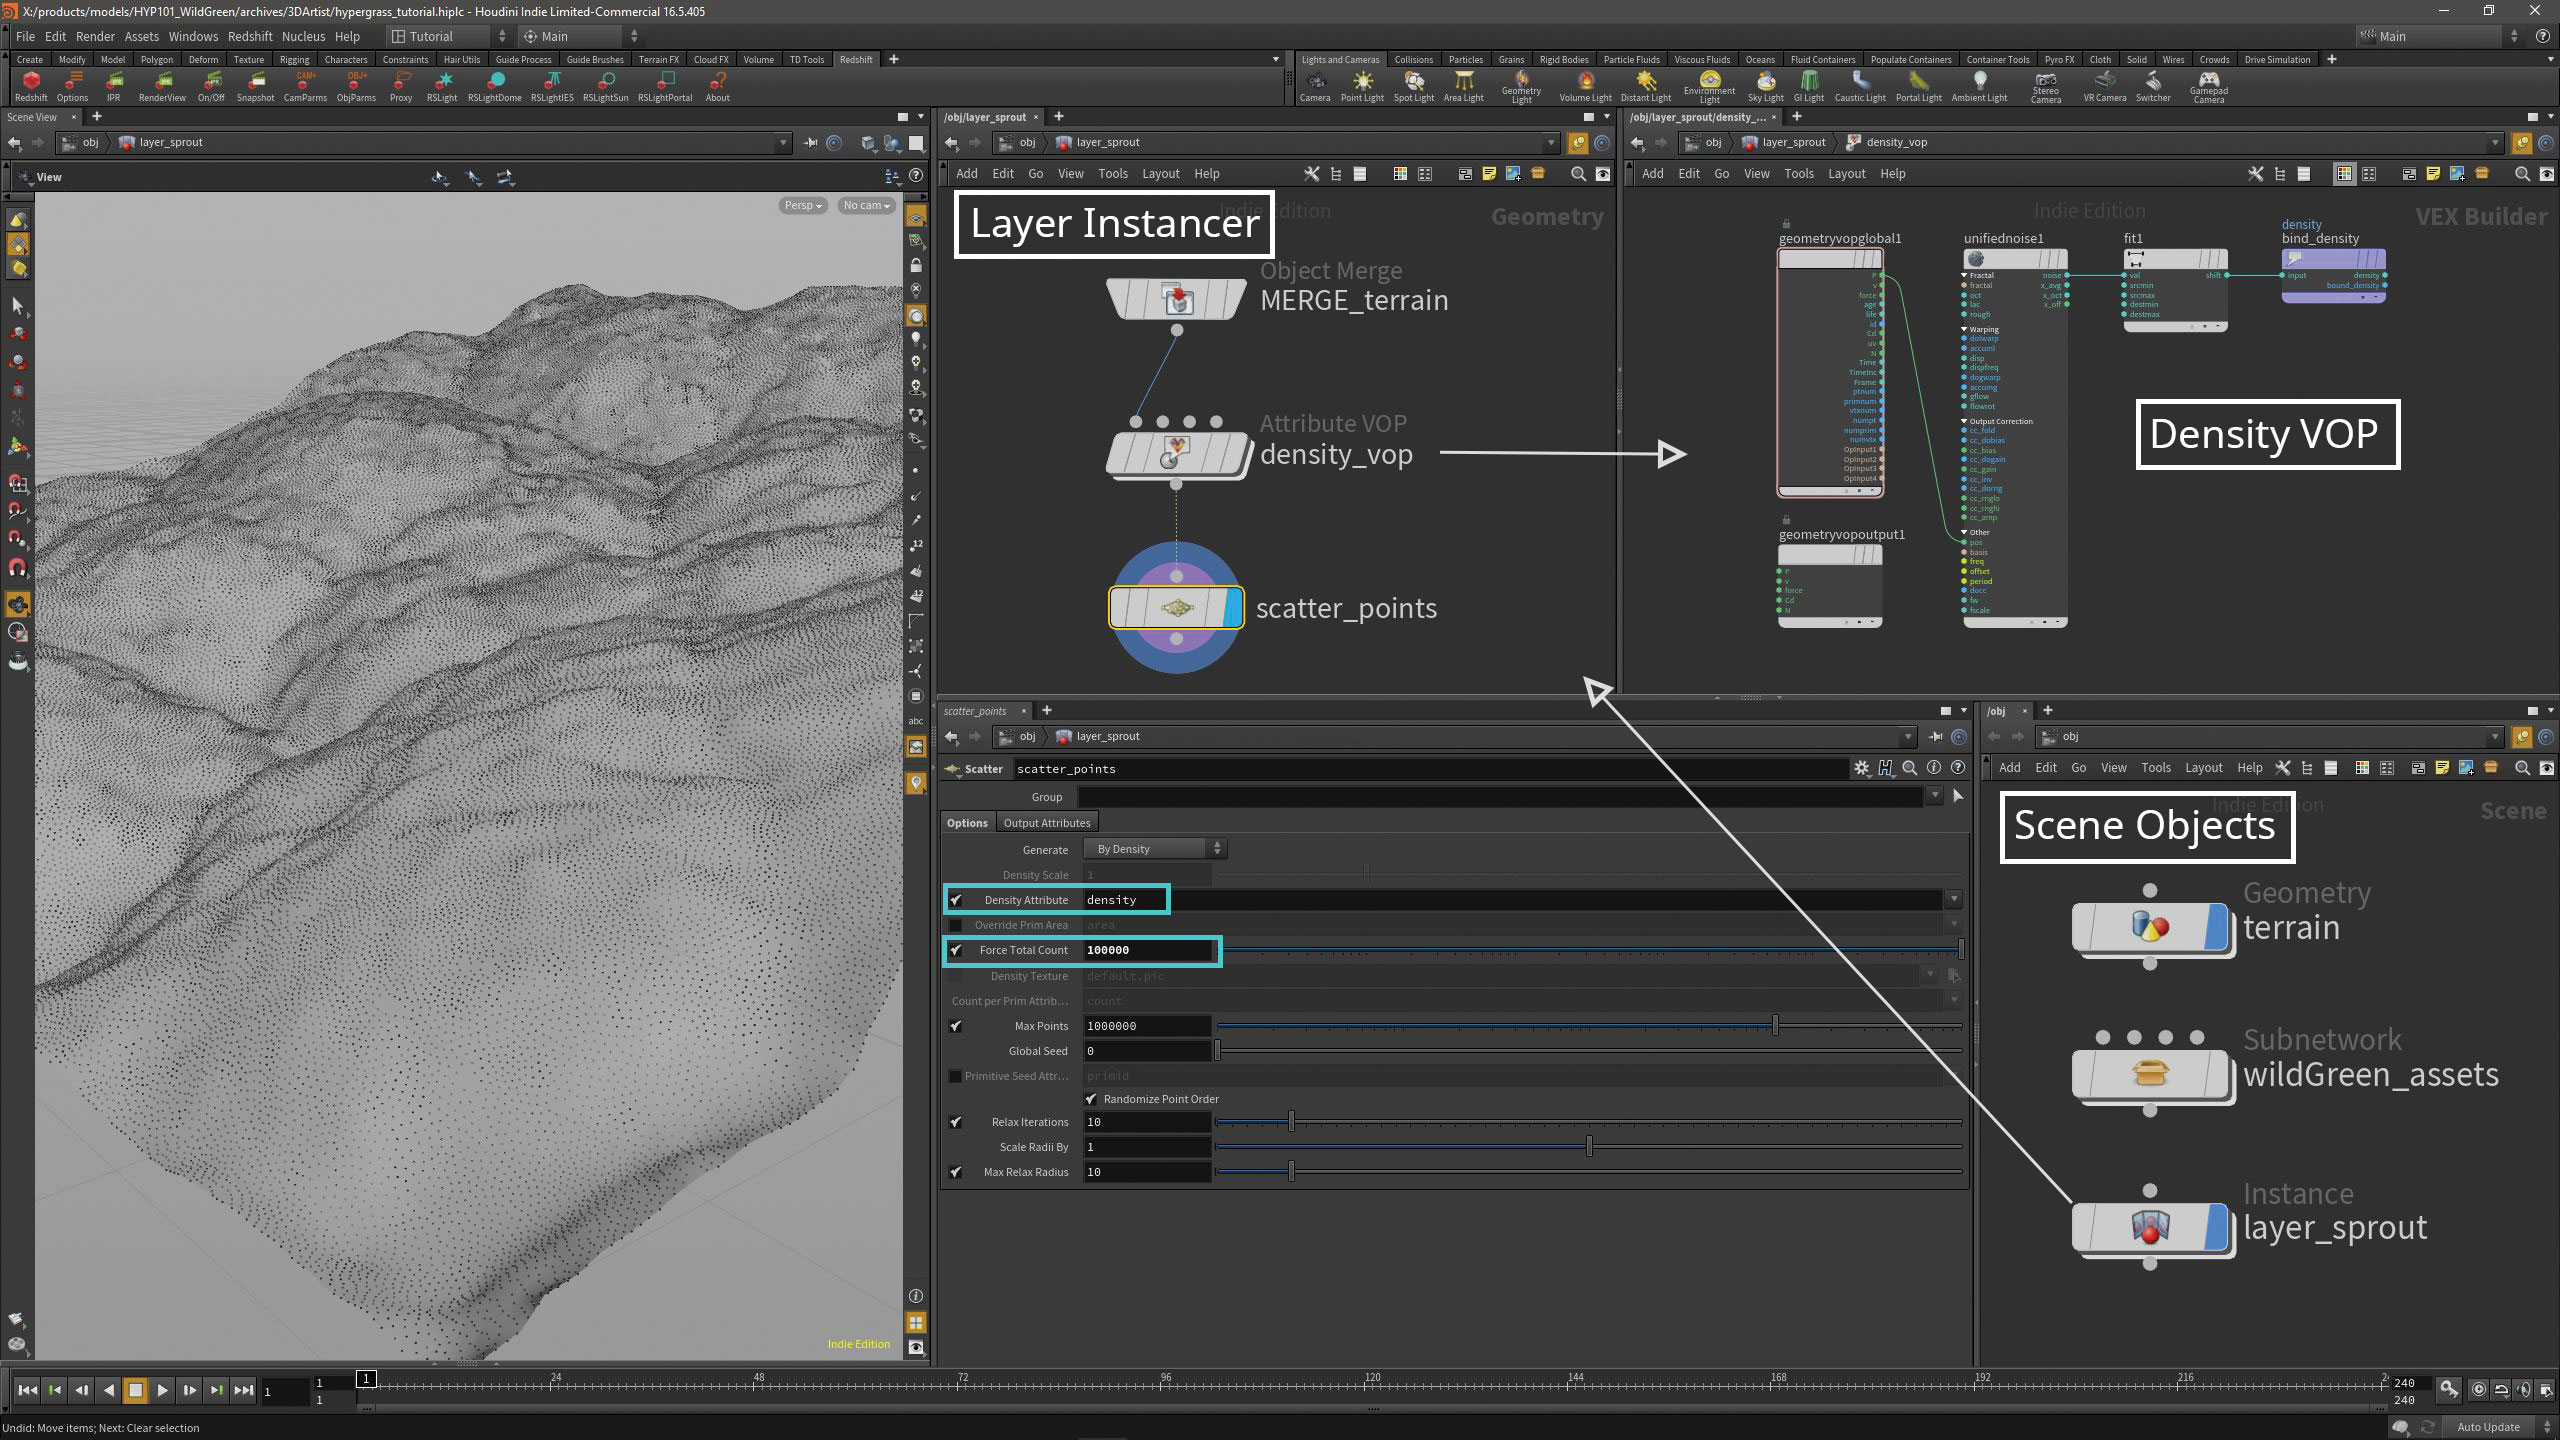
To create the first layer, we will use an Instance node with fast-point instancing enabled. Inside the instancer, merge in the terrain with an Object Merge node. Then create a Point VOP to set up a density attribute. Inside the VOP, create a UnifiedNoise and use Simplex noise. Connect its pos attribute to global P and the output noise to a FitRange node. Then connect a BindExport node with the name set to density. Outside the VOP, add a Scatter node and enable Density Attribute. Lastly, increase Force Total Count to control the amount of scatter points.
Get the Creative Bloq Newsletter
Daily design news, reviews, how-tos and more, as picked by the editors.
03. Set random instancing
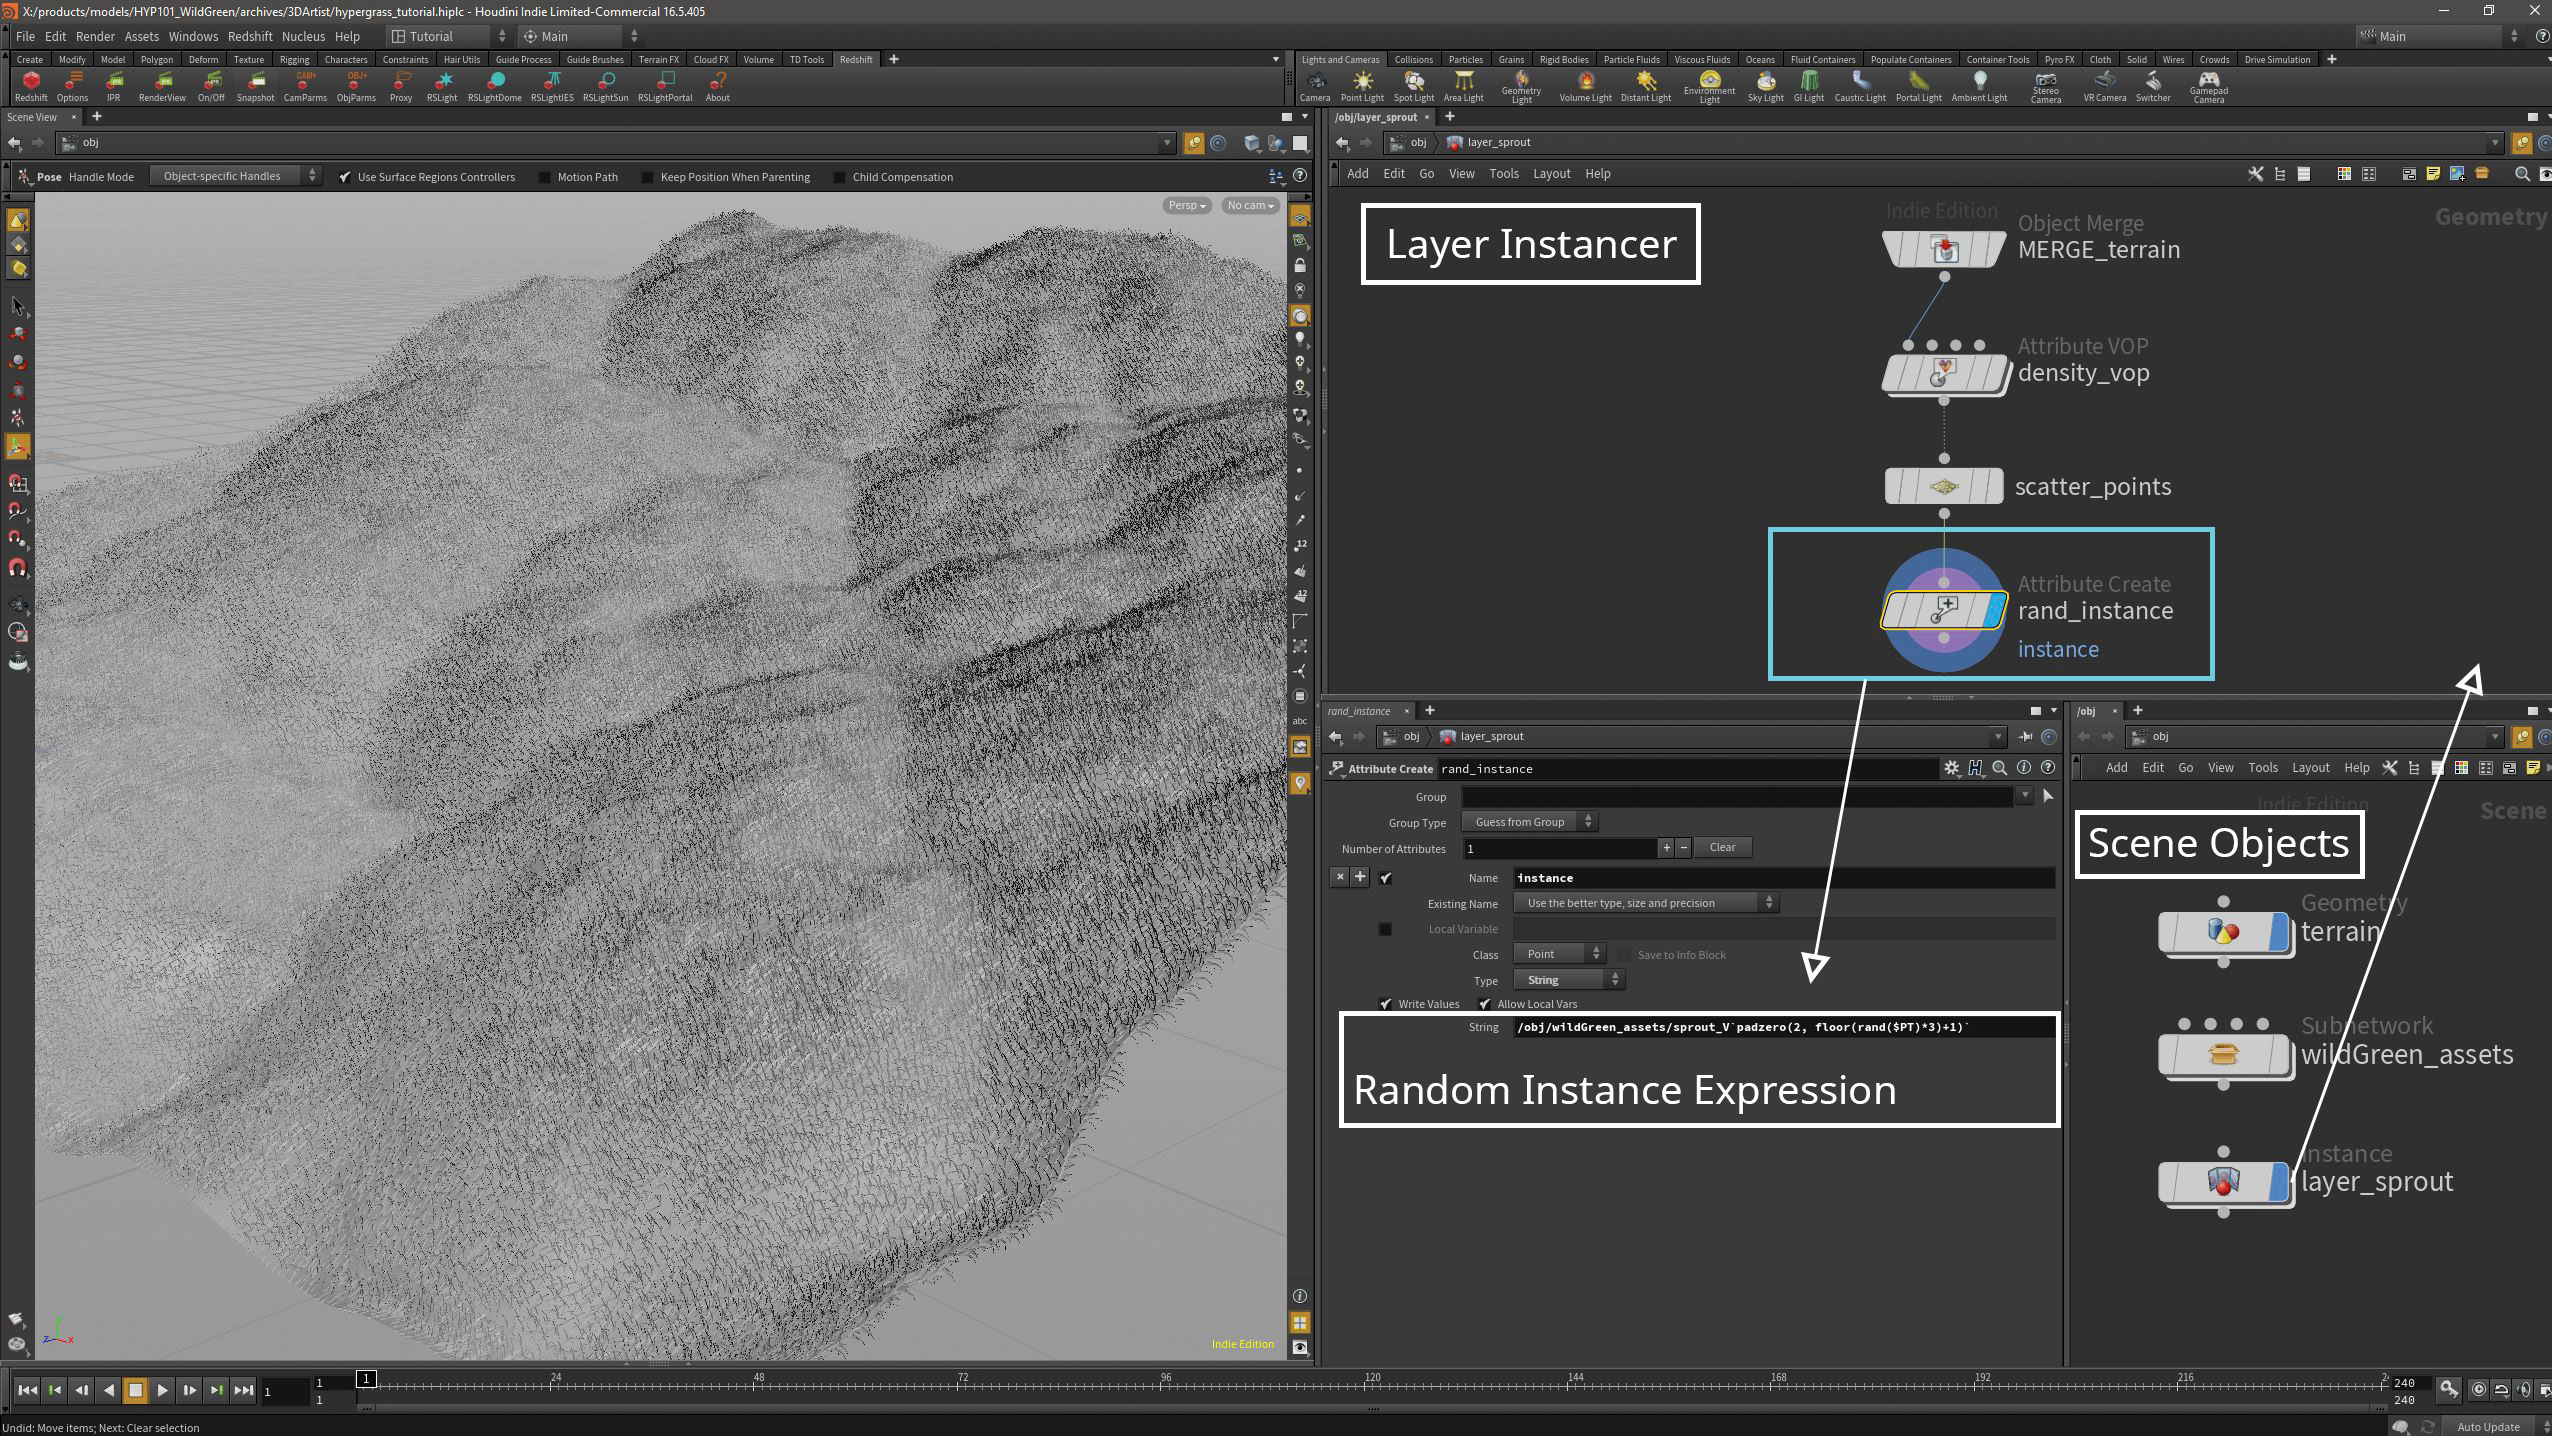
We can now reference the unique names of each grass variation we imported earlier to specify the instance object. Add an AttributeCreate inside the instancer, and set the name parameter to instance and the type to String. The first layer will instance the sprout models. In the String value enter the full path to the first sprout object. Replace the variation number with `padzero(2, floor(rand($PT)*X)+1)` including the backticks. Replace the X with the number of sprout variations you have. This expression will create a random integer for each instance point, which correctly refers to a specific grass variation.
04. Tweak the random Y rotation
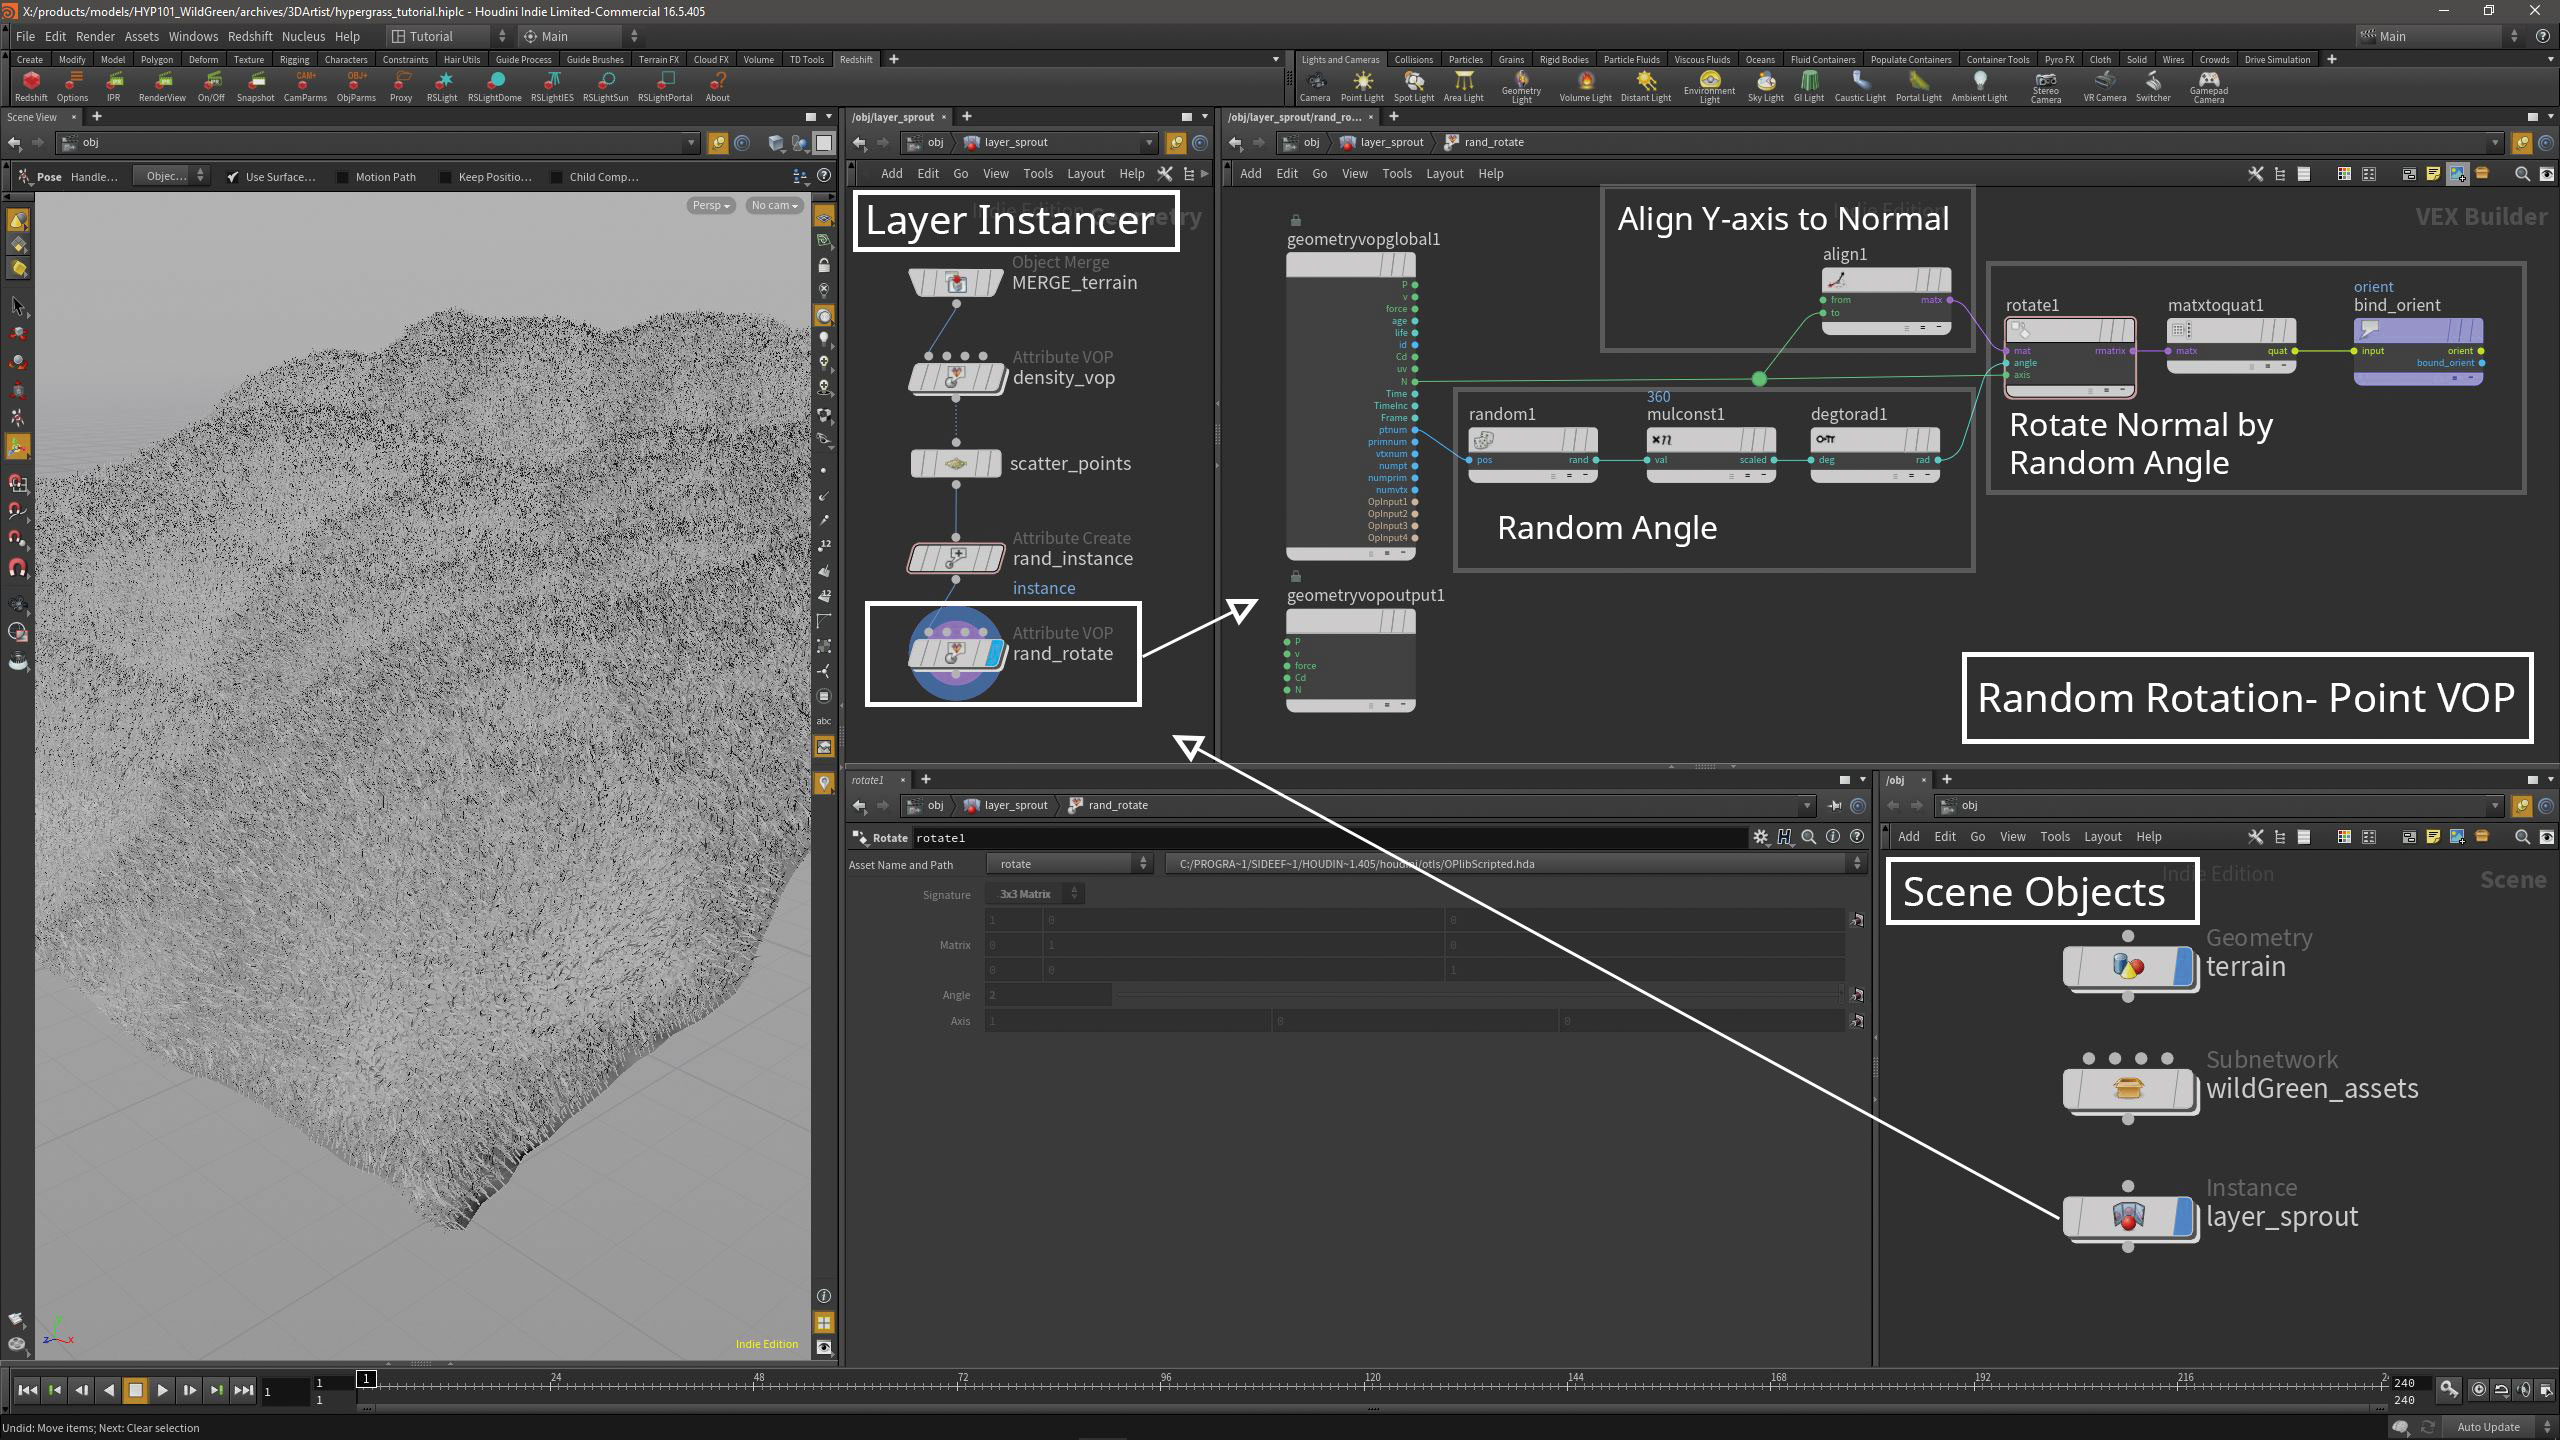
We will use a Point VOP to randomise rotation around the scatter point normals. Create a Random node inside and connect its pos input to global ptnum. Multiply the output by 360 with a MultiplyConstant, followed by a DegreesToRadians node. Create a separate Align node. Set the From vector to (0, 1, 0) and connect global N to the To input. Connect the output matrix to a Rotate node. Also connect the previous DegreesToRadians output to the Rotate angle, and global N to the Rotate axis. Lastly, connect the Rotate output to a Matrix3toQuaternion node, followed by a BindExport with its name parameter set to orient.
05. Create random scale
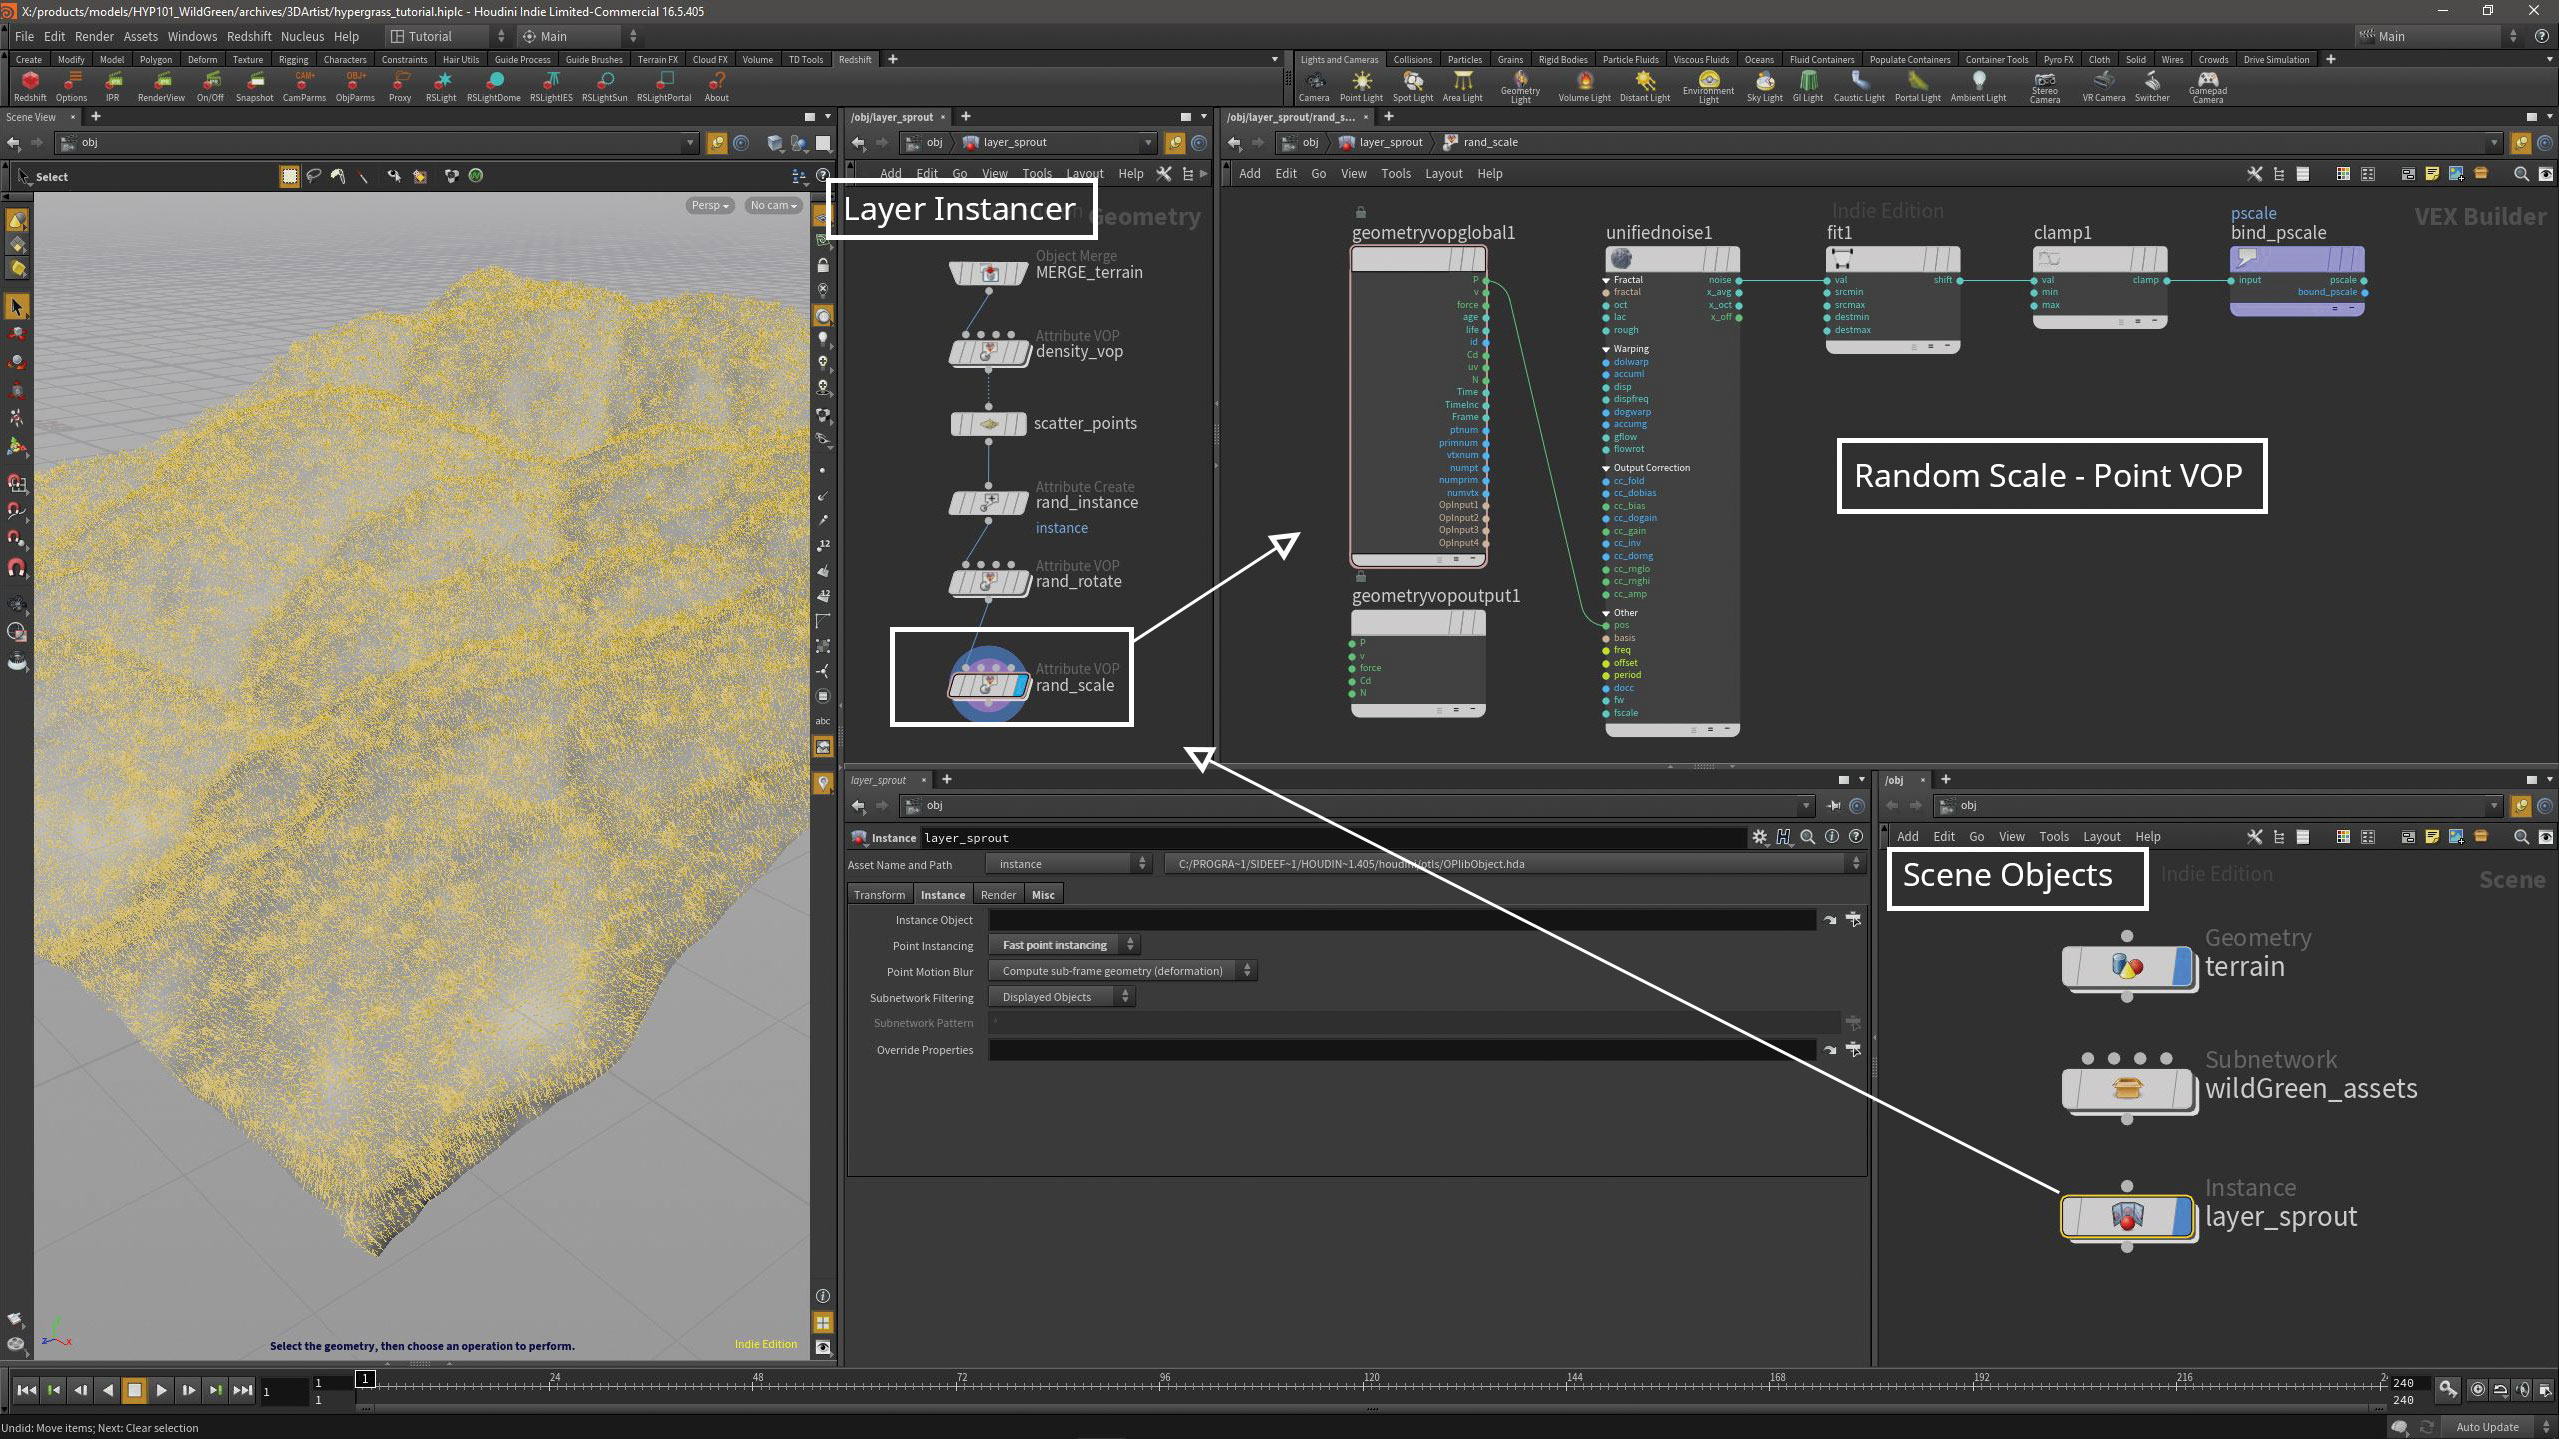
To randomise scale we will use another Point VOP. Inside the VOP create a UnifiedNoise and use Perlin or Simplex noise. Connect the noise output to a FitRange node. We can remap the noise value with the destination Min and Max parameters. We also want to prevent negative or zero scale, so add a Clamp node and set the Min parameter to at least 0.1. Finally, add a BindExport node and set the name parameter to pscale. Much like how we set up density, we can control the randomisation with the noise frequency and FitRange node.
06. Layer the grass
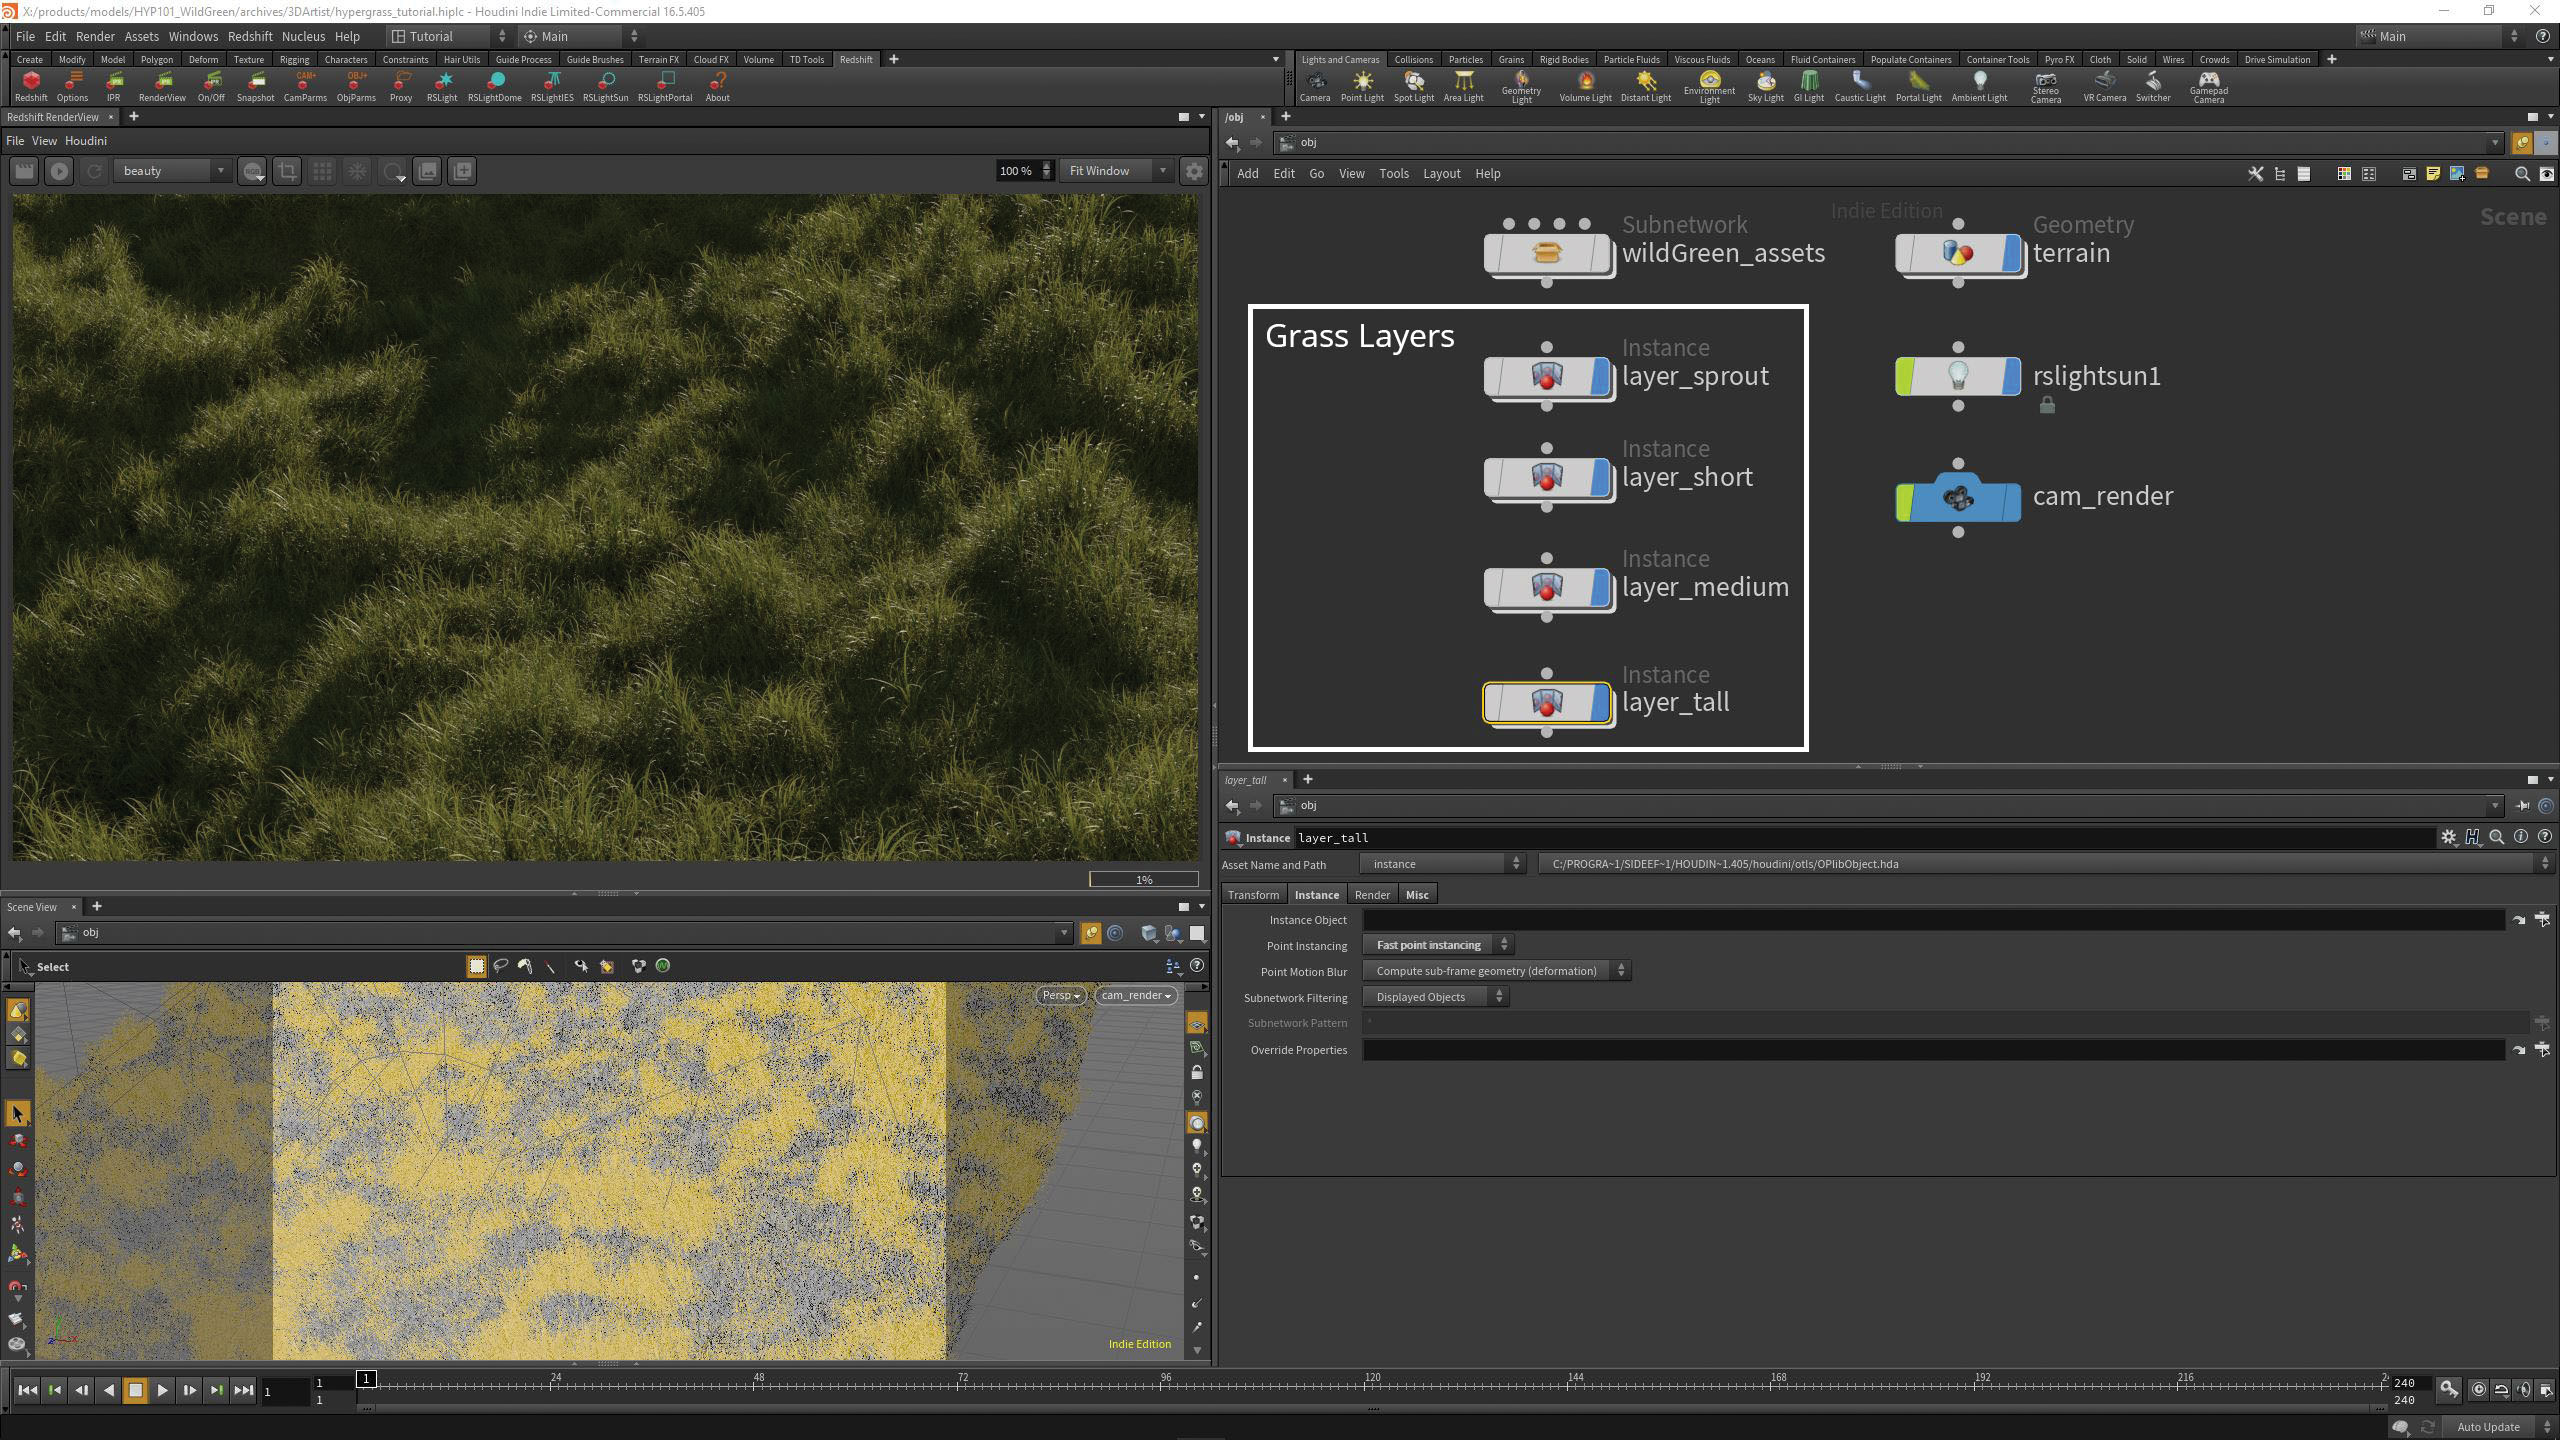
With our layer instancer complete, we can duplicate the setup and adjust the random instance expression for the short, medium and tall grass variations. At this point we can add a camera and lights to our scene. While we use Redshift in the tutorial files, you can use any other renderer supported in Houdini. Finally we can get creative and experiment with different types of noise and tweak the parameters of each layer. Using different noise frequencies and ranges on the density and scale is an easy but powerful way to shape the look of each grass layer.
This article originally appeared in issue 120 of 3D Artist; subscribe here.
Read more:

Thank you for reading 5 articles this month* Join now for unlimited access
Enjoy your first month for just £1 / $1 / €1
*Read 5 free articles per month without a subscription

Join now for unlimited access
Try first month for just £1 / $1 / €1
