Build a client portal with WordPress
Create an area to keep all of a client's documents easily accessible in one place.
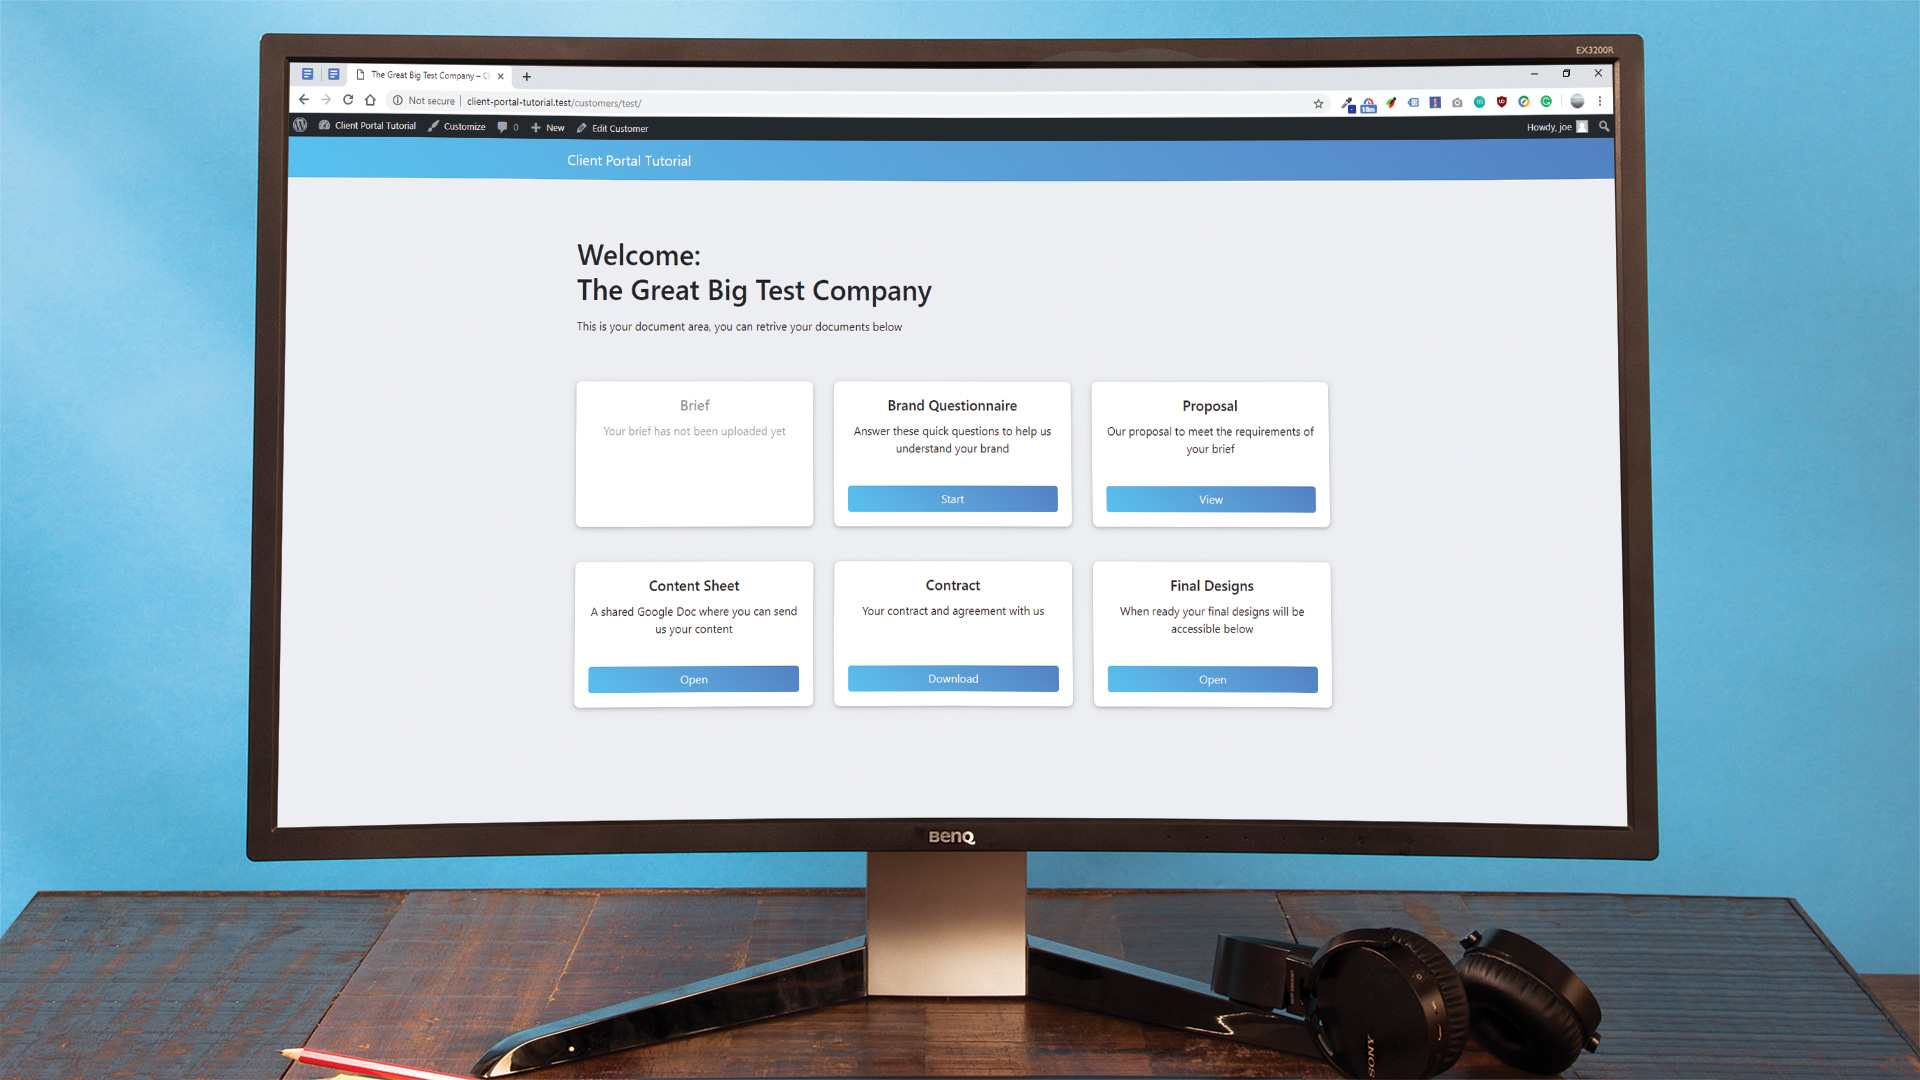
Having an area that allows users to login and download or view documents has become expected by consumers, from phone contracts to utilities.
When designers work with their clients, however, everything can quickly break down into a muddle of emails, links to mockups and attachments.
This WordPress tutorial will show how to extend WordPress (other web hosting services are available) into a client portal capable of storing documents, videos and drawings, so a client can access them all in one place. The portal will serve each customer with a unique and password-protected link that doesn't appear in the regular navigation.
Custom post types and fields will be used to store the data, and these will be added through plugins, to avoid data loss should the theme change. The theme will be modified slightly.
Having a client portal gives customers the convenience of accessing their files all in the same place, whenever they need them, much like when using cloud storage. It has an array of business advantages, including showing available up-sells, or can be used to give an overview of the work process from the beginning by visually outlining the deliverables.
Download the files for this tutorial.
01. Install a fresh copy of WordPress
A fresh copy of WordPress is installed on the development server, and the "understrap" theme has been chosen to give a boilerplate foundation in order to quickly start work. The Custom Post Type UI plugin will be used so our custom post types are independent of the theme.
Daily design news, reviews, how-tos and more, as picked by the editors.
02. Remove default plugins
If any default plugins came with the copy of WordPress, delete those. The plugins needed for this tutorial are "Advanced Custom Fields" and "Custom Post Type UI". "Classic Editor" has also been installed.
03. Add a custom post type
Using the Custom Post Type UI interface, add a new post type called "customer". When entering the "Post type slug", use underscores instead of spaces and write in the singular form, as this will make it easier to create templates later. The prefix tu_ has been added to reduce the chance of a conflict.
04. The add/edit custom post type interface

Add a plural labelled "customers" and singular "customer", as this will appear in the WordPress admin menu. Capitalisation is accepted in these fields, which will make the WordPress menu tidier.
05. Create a custom rewrite slug

Using a prefix for the post type slug will mean customers added to the portal will be created with a link that looks like "/tu_customer/example-company". This doesn't look tidy, and the custom rewrite slug is used to improve this. Setting the rewrite slug to "customers" allows the custom post type to appear as /customers/example-company.
06. Add support for custom fields
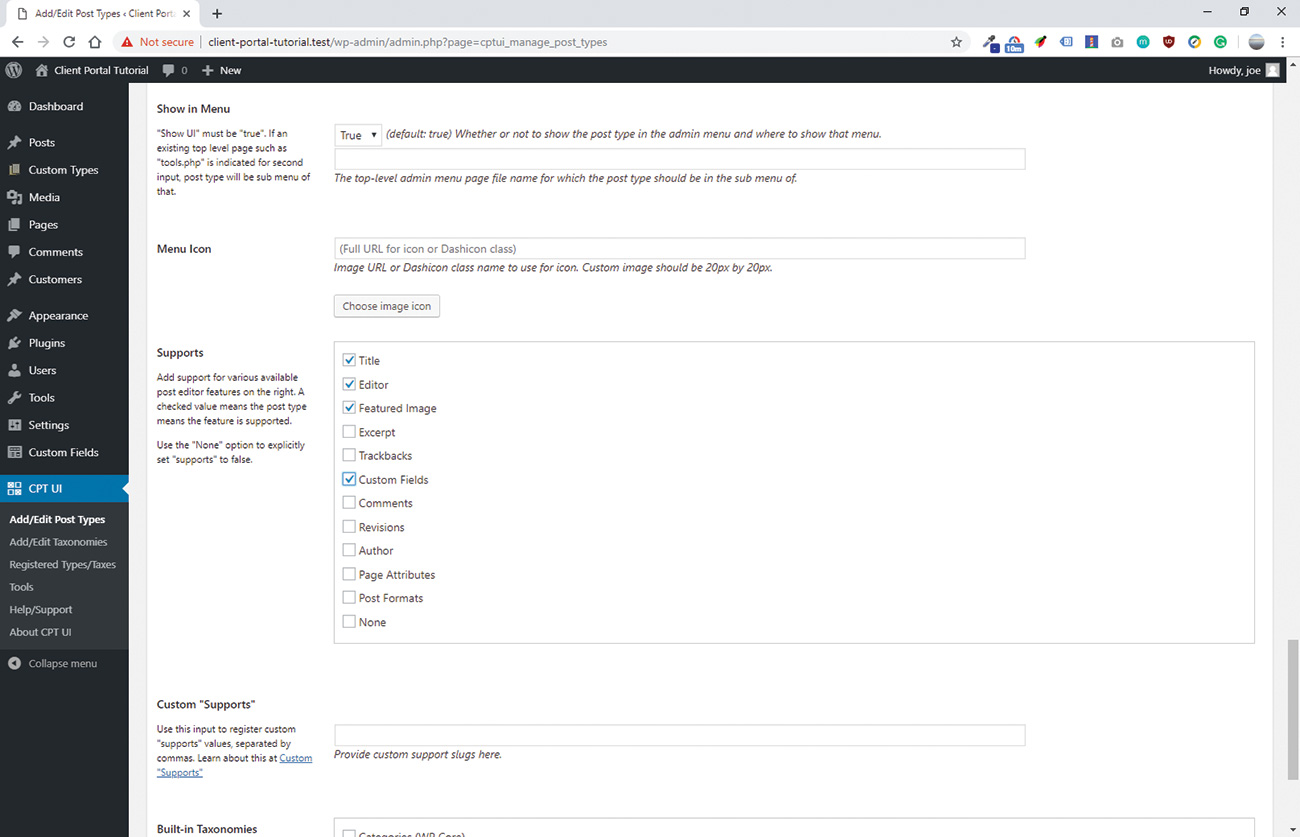
The last option that is enabled for the custom post type is "Supports > Custom field" which is found near the bottom of the page. Tick this, and then "add post type" at the bottom of the page. This submits the changes and registers the post type.
07. Add custom fields
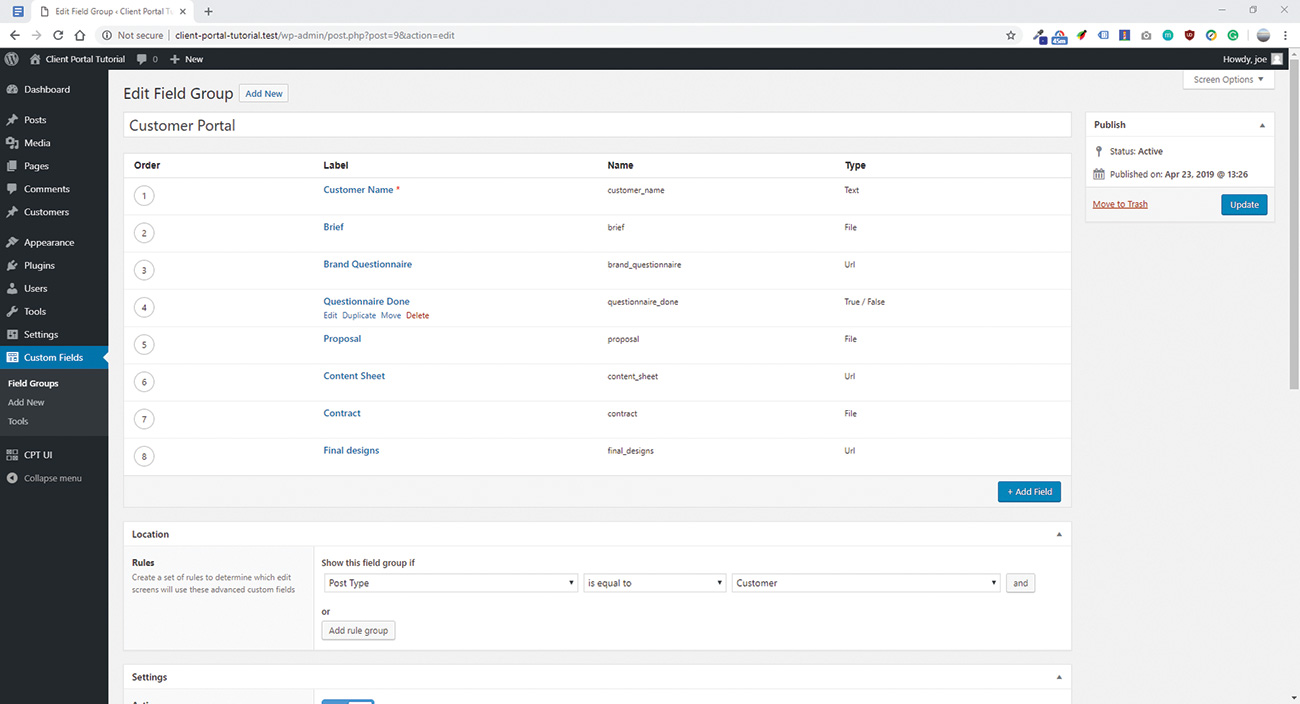
Custom fields now need to be added and assigned to the post type that was just created. Adding a field group named "customer portal" is the first step, followed by adding custom fields to it with the add field button. The first field "brief" will be set as the field type "file," which allows the admin to upload a file in this location. Set the return value to "file url".
08. Set up the fields
The next field to be added is "brand questionnaire." This will consist of a link to a google form that the customer should fill out. The most suitable field type for this is "URL". This same method can be used for all fields that will link to an external service. When finished, scroll down to the "location" box and use the logic "Show if Post Type" = "Customer". Then publish the field group.

09. Create the WordPress template file
WordPress needs to know how to display a customer dashboard. For this, the WordPress template hierarchy is followed to create a template file for this specific post type. Create a file called single-tu_customer.php in the root theme directory.
10. Create a full-width single post layout

Open the single-tu_customer.php file and add the get_header and get_footer WordPress functions. Between those functions, create a full-width layout to hold the content that works with your theme.
<?php get_header();?>
<div class="wrapper" id="single-wrapper">
	<div class="container" id="content" tabindex="-1">
	<div class="row">
		 <div class="col-md content-area" id="primary">
						 <main class="site-main" id="main"><--! Content --></main>
</div>
	 </div><!-- .row -->
	</div><!-- #content -->
</div><!-- #single-wrapper -->
<?php get_footer();?>
11. Start the loop and create the content
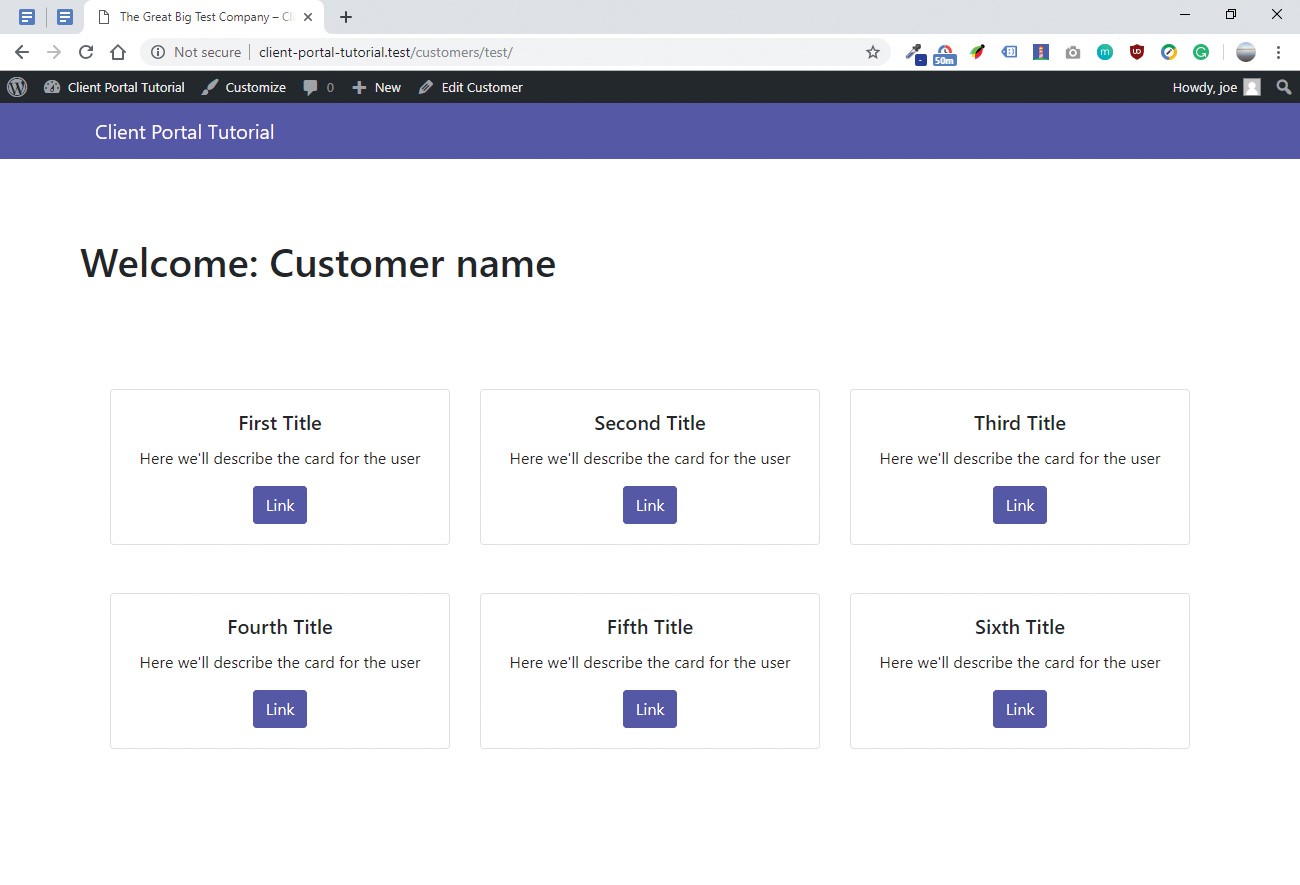
Within the <main> element, call the_post and create the container elements to hold information. Use placeholder information in order to get an idea of the layout, and begin to style the elements. The card elements will be bootstrap cards with a header, description and a link.
<main class="site-main" id="main">
<?php while ( have_posts() ) : the_post(); ?>
<div class="container">
<div class="row">
<div class="col-sm-4">Content</div>
<div class="col-sm-4">Content</div>
<div class="col-sm-4">Content</div>
</div>
</div>
<?php endwhile; // end of the loop. ?>
</main><!-- #main -->
12. Use PHP to call in dynamic values
Using the function "the_field", a function that comes with the advanced custom fields plugin, the dynamic content from the custom fields is entered into the customer template. The 'field_name' is the value that was entered in step 3.
<div class="card text-center">
<div class="card-body">
<h5 class="card-title">Brief</h5>
<p class="card-text">This is your original brief document</p>
<a href="<?php the_field('brief'); ?>" target="none" class="btn btn-primary">Open</a>
</div>
</div>
13. Make a test customer with some dummy data
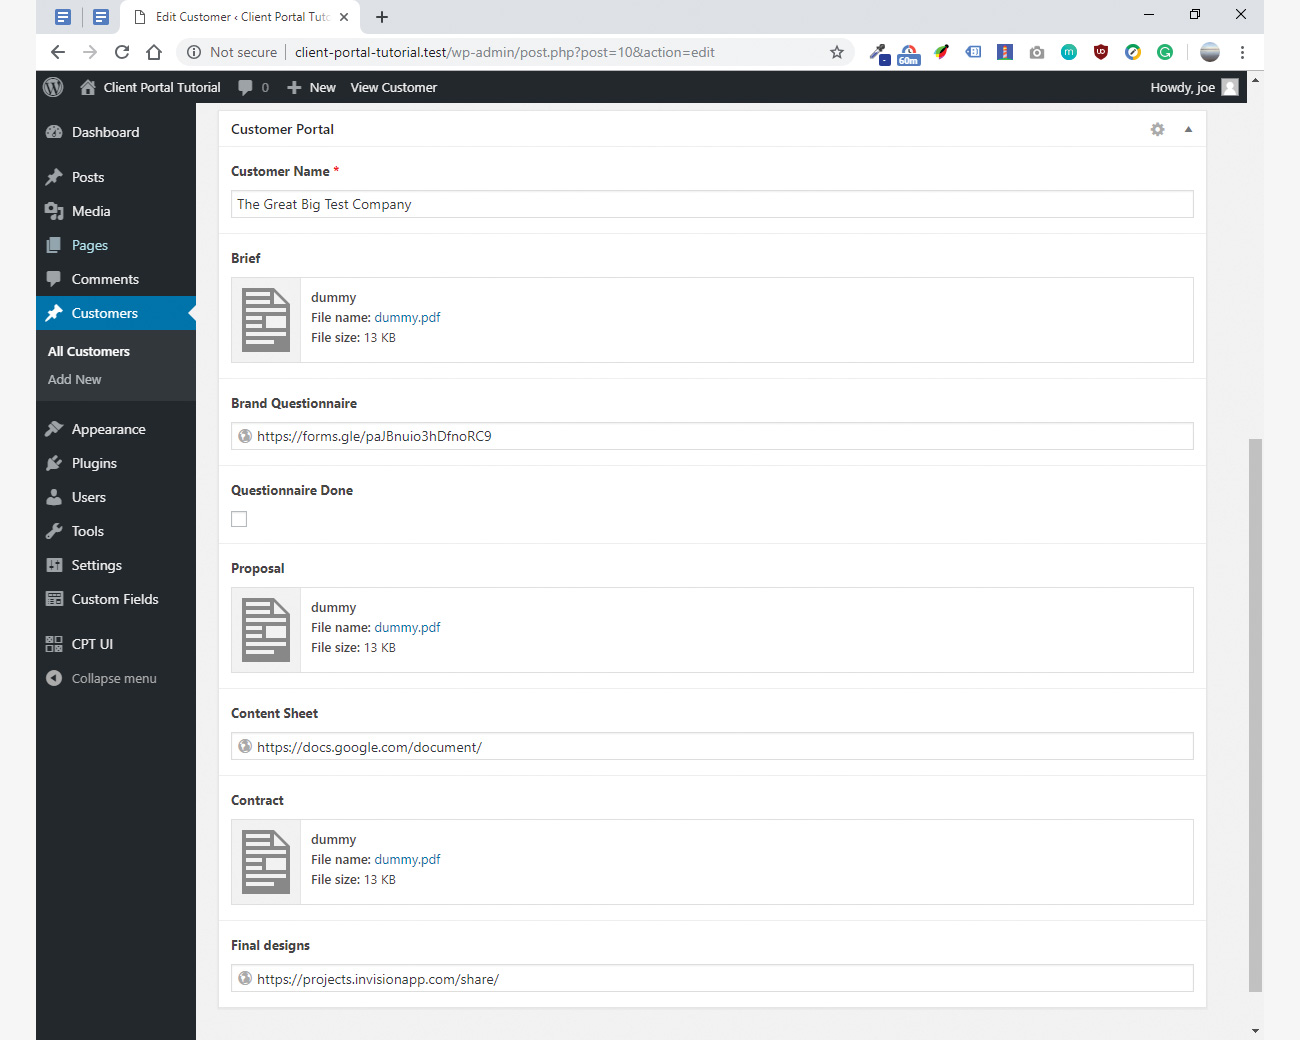
Accessing the WordPress dashboard, a new customer can be added from the left-hand bar. Customers > Add new Customer. The post view will be familiar, but scrolling down will reveal all of the new custom fields. Enter some test data to make sure everything is working correctly.
14. Handle errors for any missing data

If a document is forgotten, or it's simply too early in the process for that document to be available, it could be confusing for a customer when the button does not work. Adding a check that a value exists before showing it gives a chance to show a "missing field" variation of the card. Adding a class "disabled" to the card when the value is missing will allow us to style unavailable cards.
<?php if ( get_field( 'field_name' ) ): ?>
displayed when the field_name has a value
<?php else: // field_name returned false ?>
displayed when the field does not exist
<?php endif; // end of if field_name logic ?>
15. Tidy up the interface
Now that the structure of the interface is finalised, it can be styled properly. Using CSS, the look of the cards and colours on the page can be improved. The colour for the navigation has been changed to a lighter blue, and user direction has been improved by adding introduction text.
16. Exclude it from the sitemap
The custom post types shouldn't be found in search engines results. The post type needs to be excluded from the website's sitemap, either through an SEO plugin, or manually using a meta tag and robots.txt.
<meta name="robots" content="noindex, nofollow" />
User-agent: *
Disallow: /customers/
Want to design a new website? Use a brilliant website builder to make the process super-simple.
Related articles:
Joe has been building websites his whole life, and he now runs Corebyte Ltd, a small web development company in Southampton.
