Adobe Fresco tutorial: Create a portrait in the painting app
This Adobe Fresco tutorial shows how you can can bring expression, life and texture into your portraits.
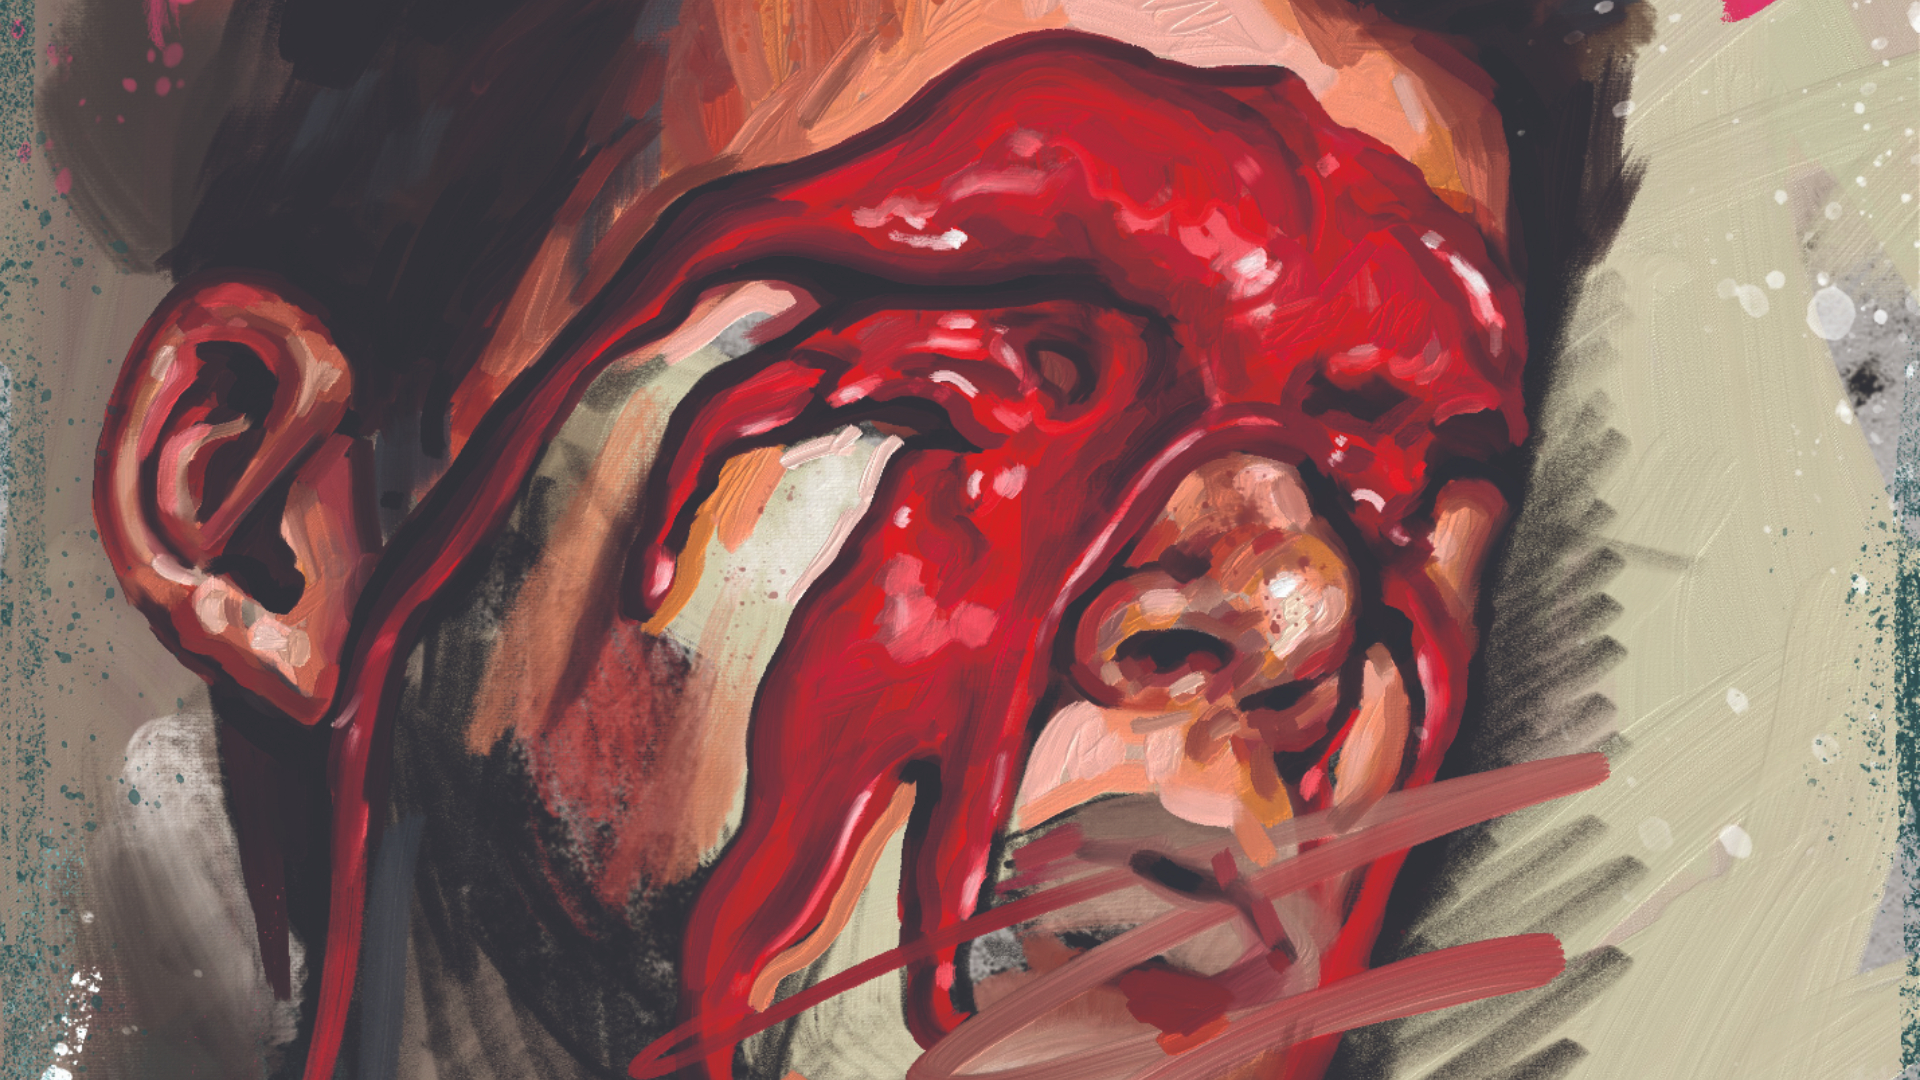
For this Adobe Fresco tutorial, I’ll be creating a vibrant and emotive portrait, showing how different techniques and textures can be used in the app to bring life and realism to your art. From rough pencil sketch through to splashy loose brushwork, I’ll reveal how you can get the most from Fresco’s fantastic brushes.
I’ll be painting a man with paint running down his face, but the basic sketching and painting techniques can be applied to any subject of your choice. The array of brushes in Fresco can be initially daunting, but do experiment and have fun with each brush and their settings. Just like Bob Ross used to say, it’s all about those happy little accidents!
To find out more about Fresco, see our Adobe Fresco review, and also check out our reviews of Photoshop 2020 and Illustrator CC while you're at it.
01. Open a new file
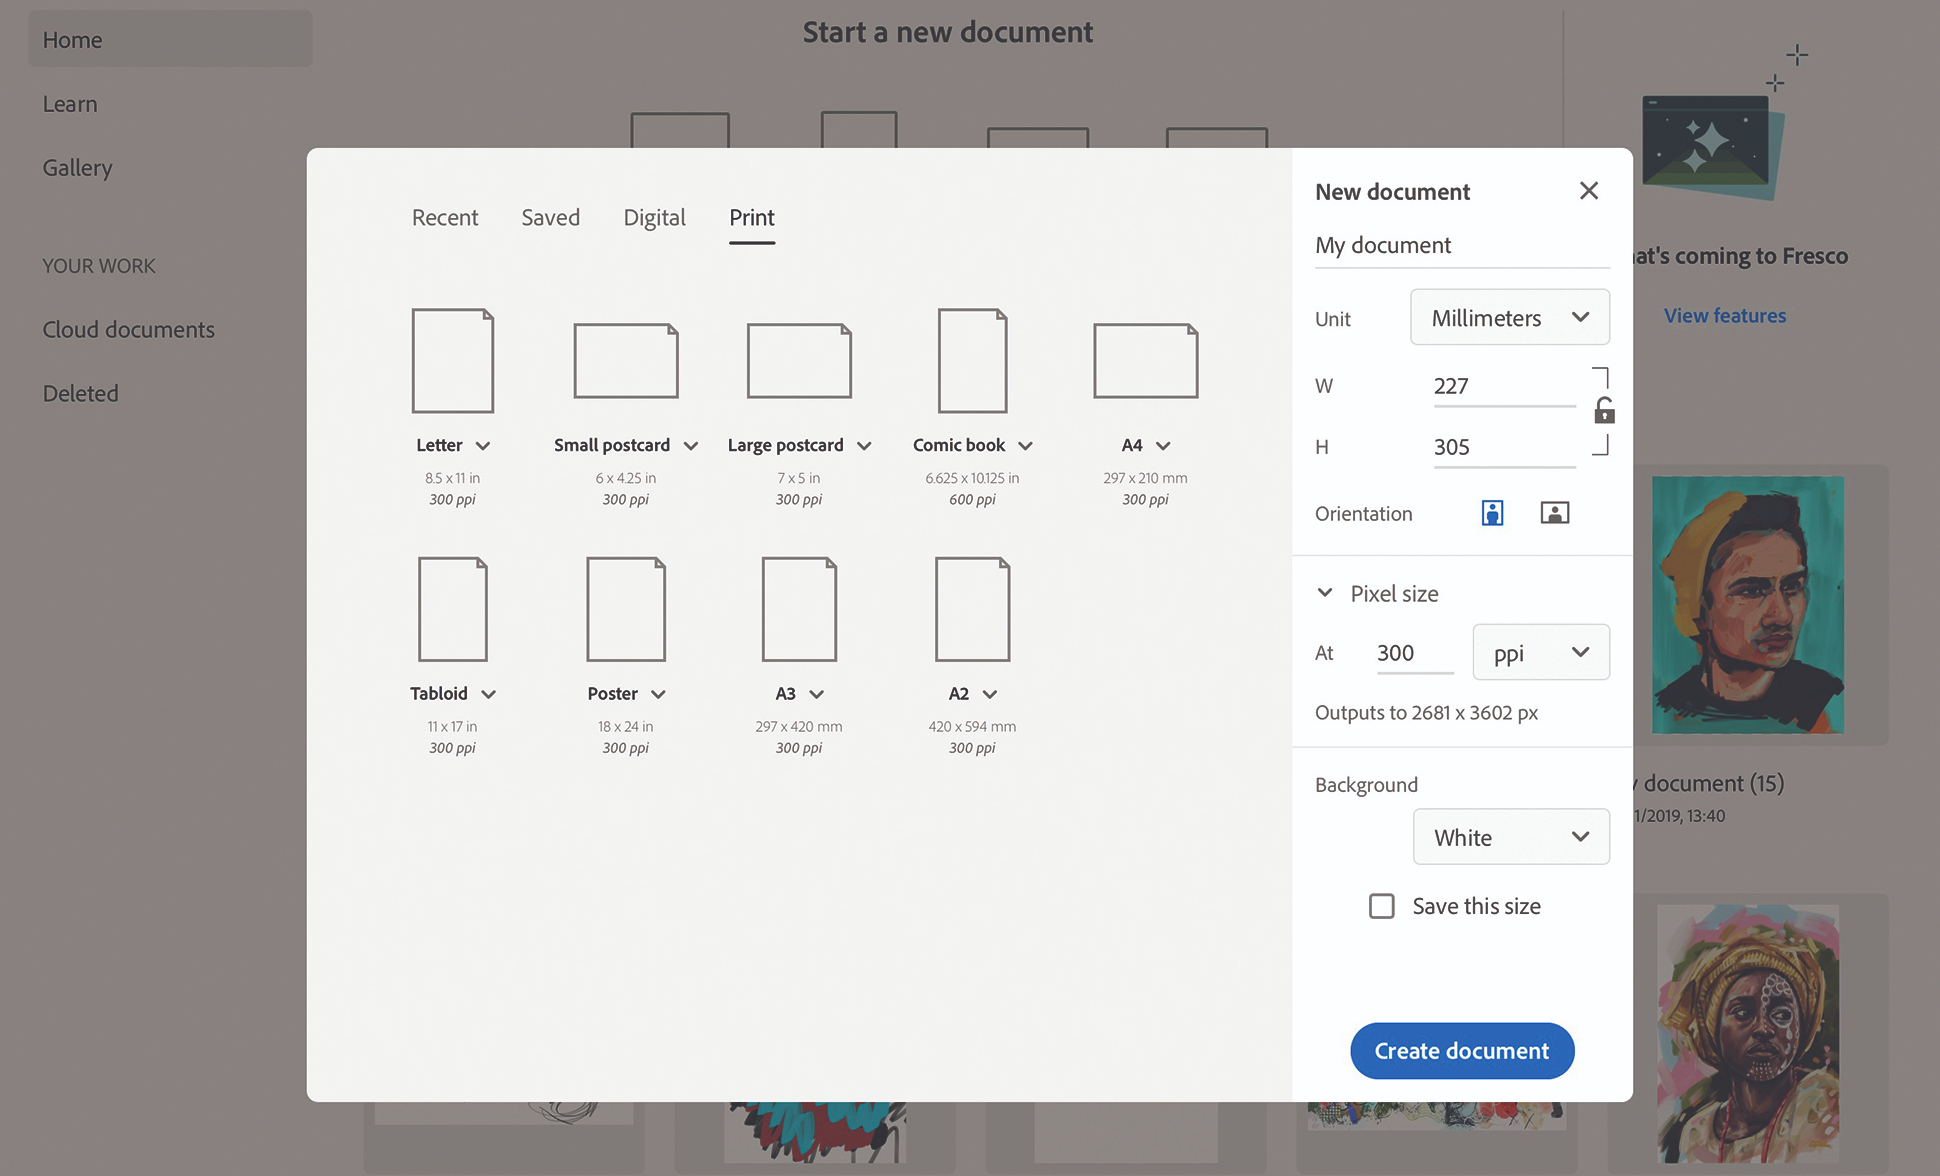
The Fresco home screen and interface are easy to navigate even when using for the first time, so setting up my document is no problem. I first choose Custom Size under the ‘Start a new document’ header and am offered a plethora of canvas sizes by Fresco. Pick the one suited to your needs, but for this workshop, I set my Units to Millimetres and Paper Size to 227x 305mm. I then change the Pixel size to 300ppi to ensure the finished result is detailed enough and could work for both online purposes and print. After clicking Create document my fresh canvas is made ready for working on.
02. Sketch in your pencil rough
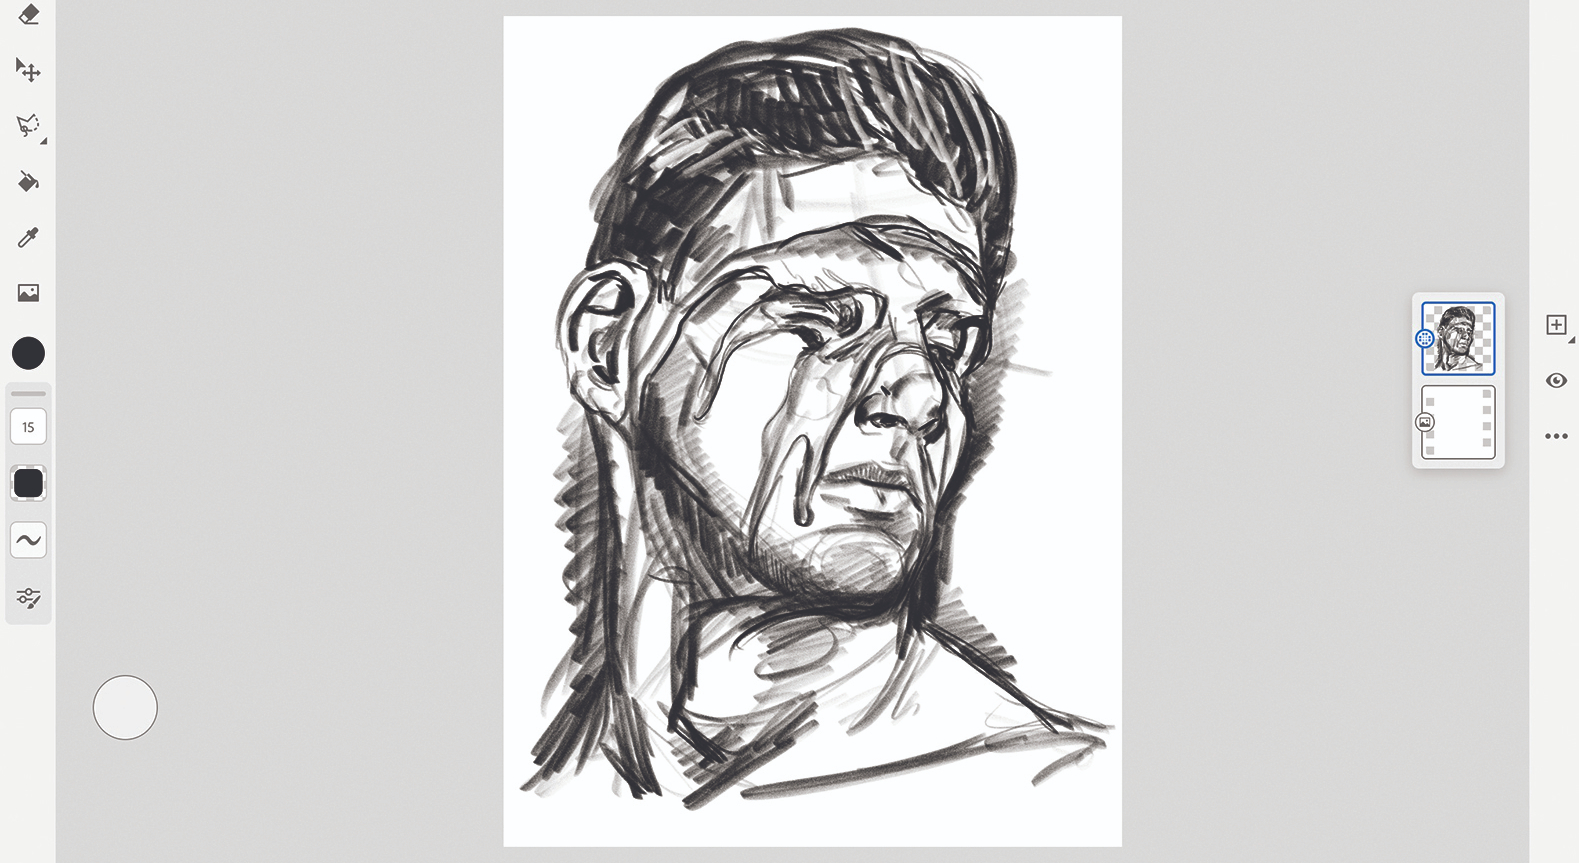
I like to work fast and loose with the Pencil Tool, feeling out the shapes and forms as I go. I select the Pixel Brushes, scroll down to select the Sketching tab and choose the Pencil Tool. In the Brush Settings panel, I set the width to around 15px and leave all other settings as they are. I then begin to sketch in the head marking out the top and bottom of roughly where I’d like the portrait to sit in the canvas. I don’t worry about mistakes: these will be left in, adding texture to the piece.
03. Refine your sketch
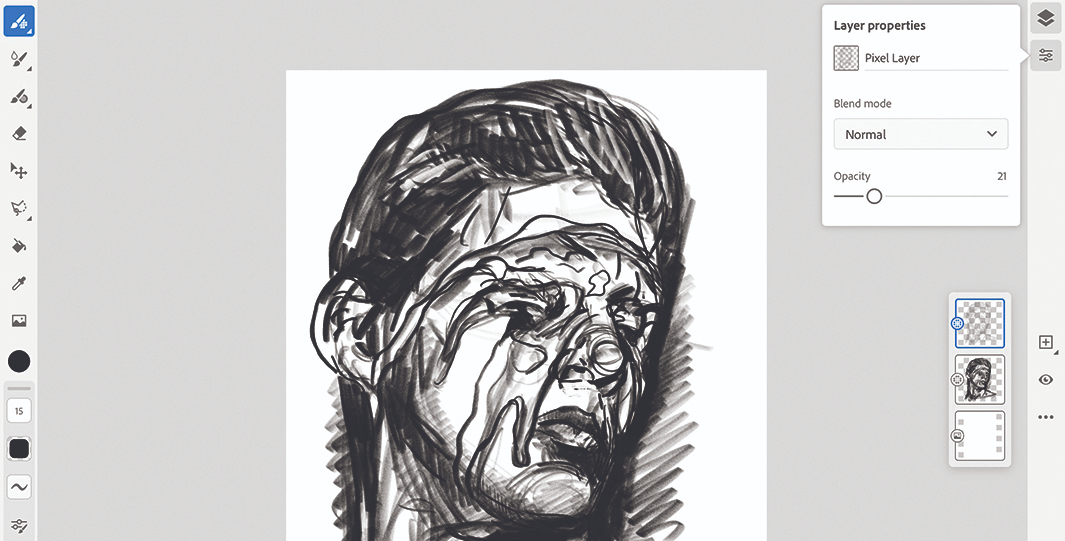
Once I’ve roughly sketched in the basic shapes, I begin to hone the detail and emphasise the shadow areas that will help me when I come to paint the face. I then click the Layer Actions tab and select Duplicate Layer; another copy of my current layer is created on top of the layers stack. I then select the top new layer, click the Layer Properties button and reduce the Opacity of the top layer to around 40 per cent. This means when I come to add paint I can keep this pencil guide visible on top as I work and not just cover up my pencil work with loose paint.
04. Develop a custom background
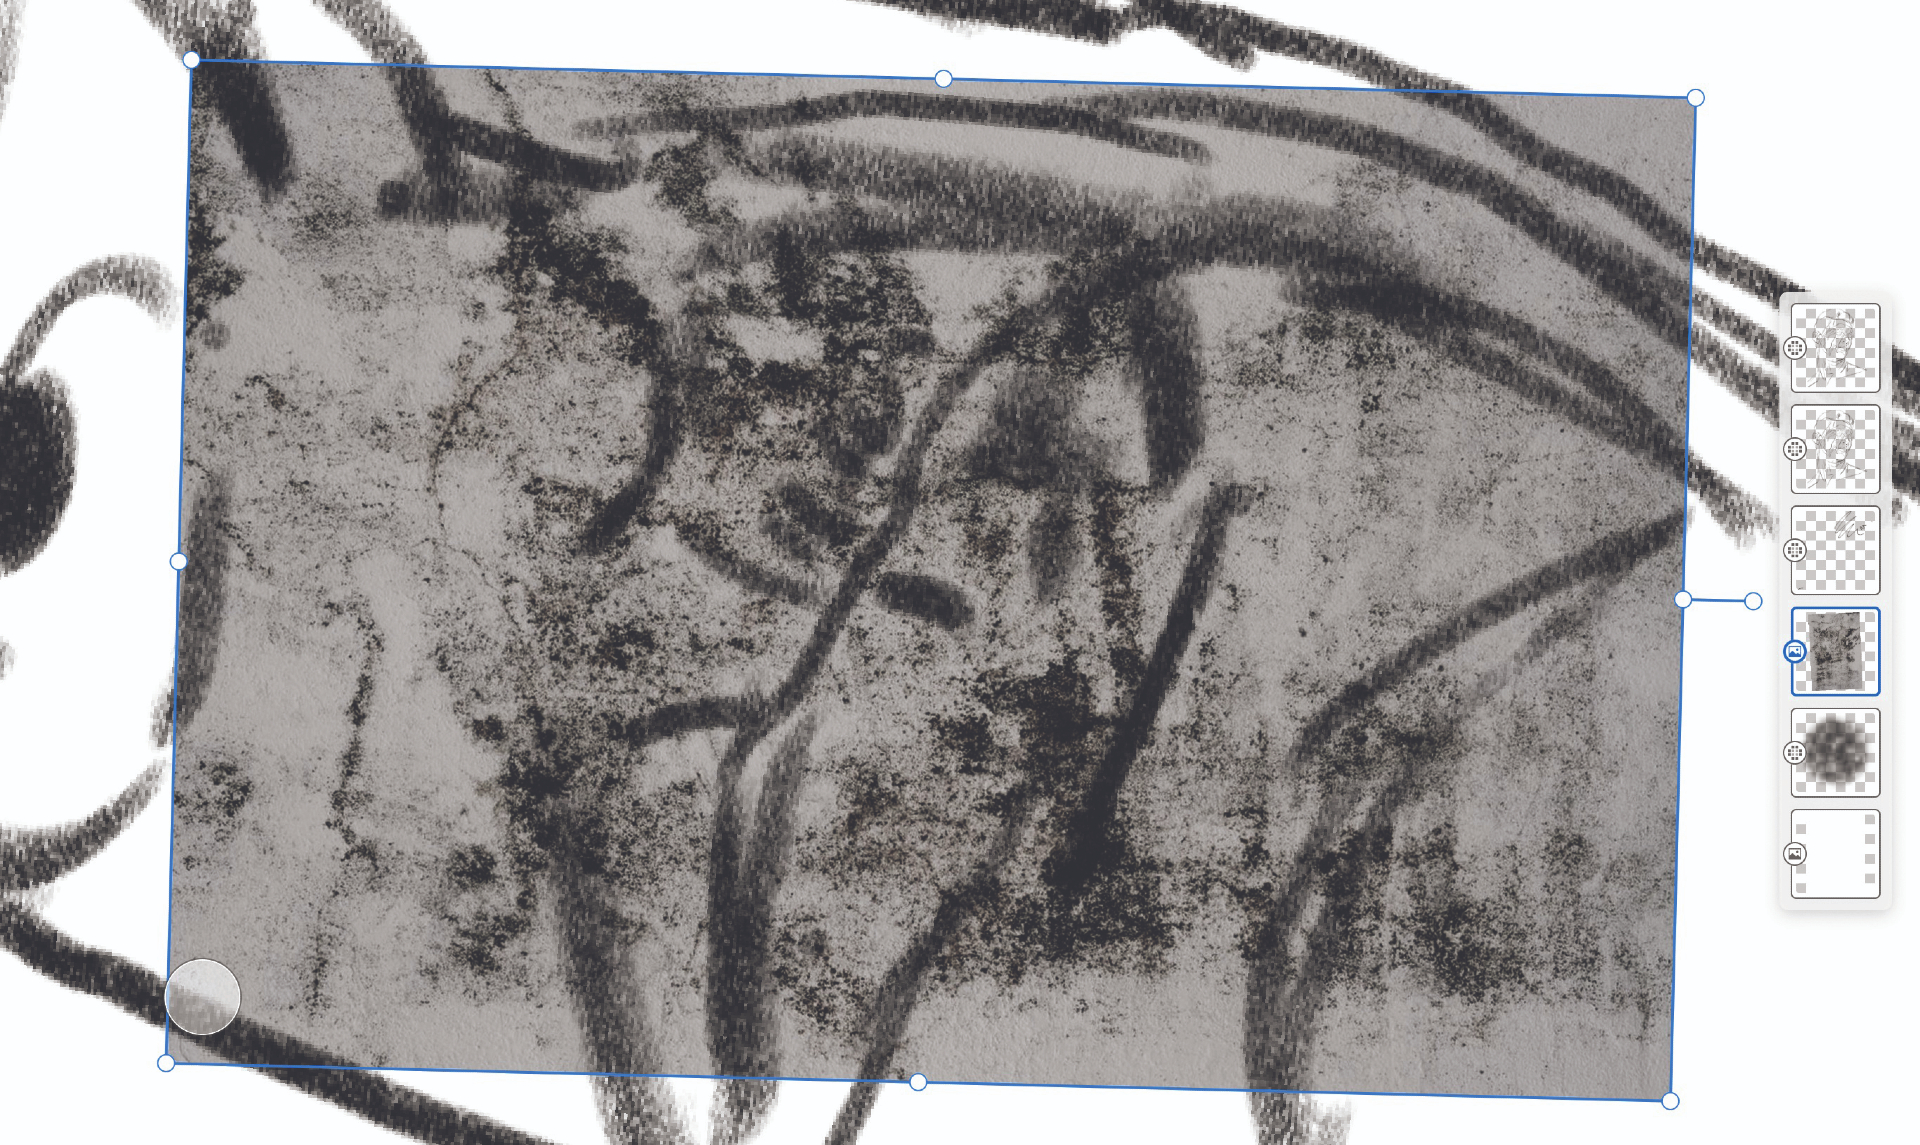
Fresco doesn’t enable users to set their canvas to a chosen texture, so I must create my own ‘ground’ to work on. I select the bottom layer in the layer stack and then click the Plus button, which creates a new layer underneath all the others. I want the finished painting to be gritty so I import a textured background from the royalty-free stock texture photo website Pixabay. I import my photo by clicking the image icon on the left-hand tab, selecting Photos and choosing the texture. I then size up my image to fit my canvas.
05. Build up a colour base
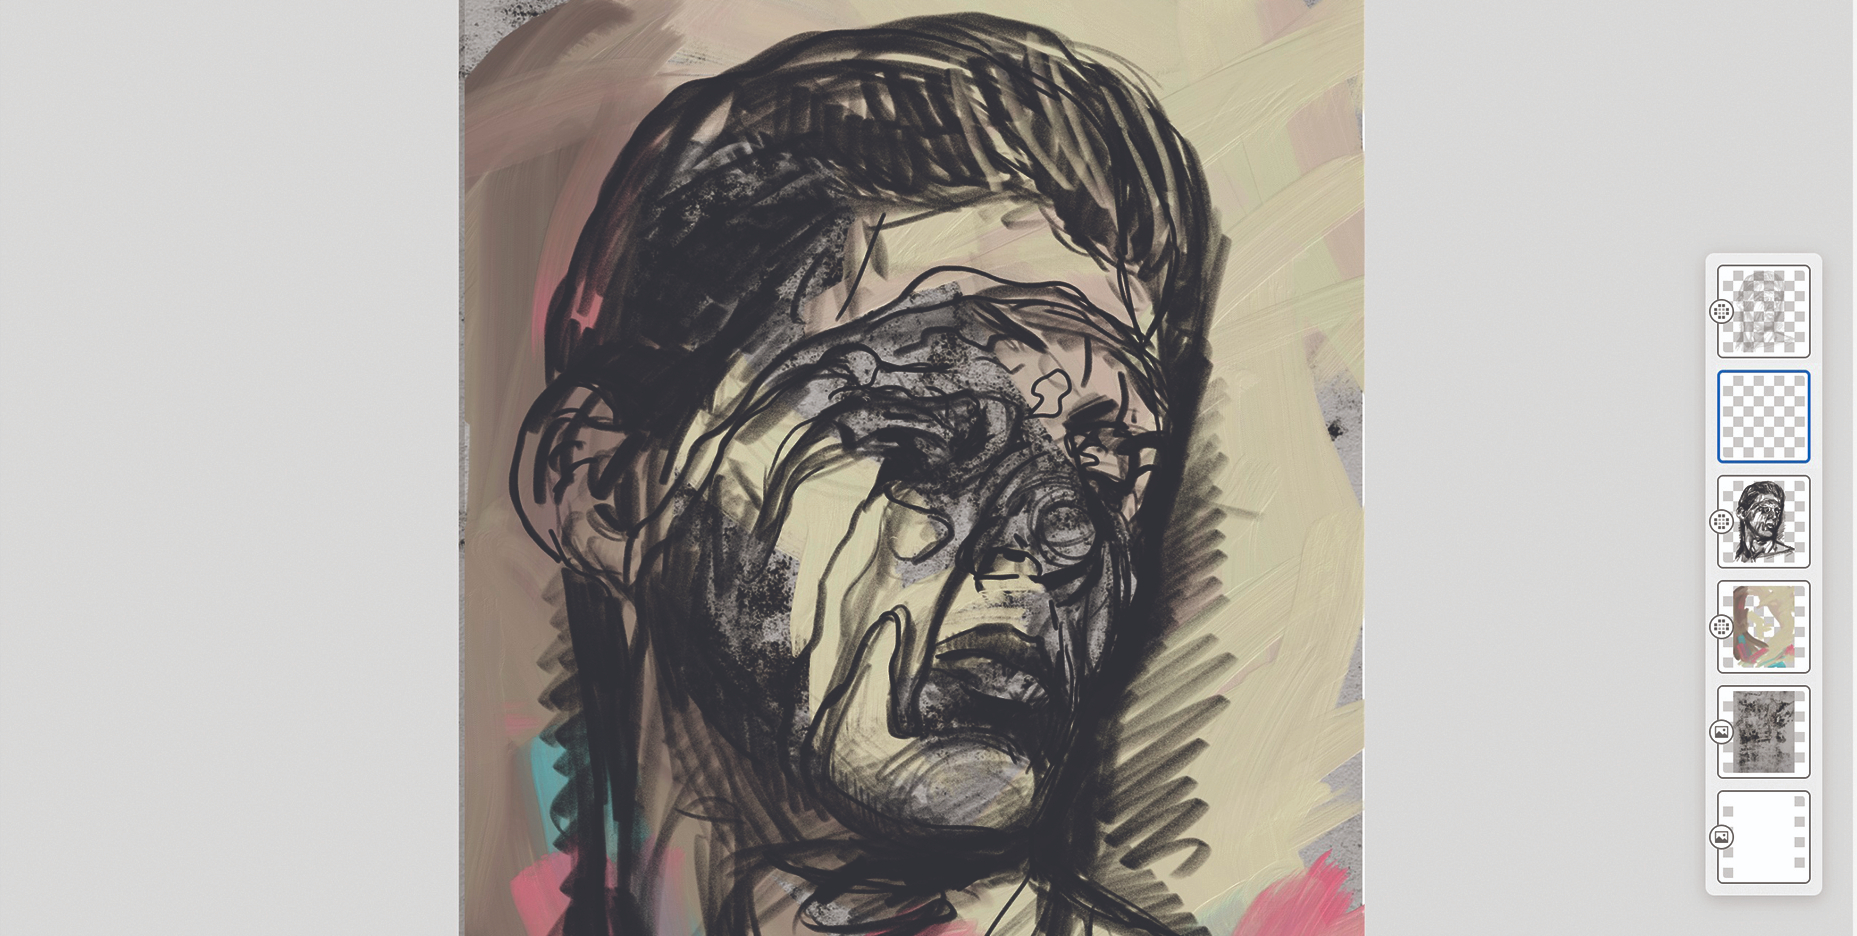
I need to add some splashy brushstrokes that not only add interest and vibrancy but also make painting a little easier than simply working on a bare white canvas. I create a new layer just above the textured grunge one, then select the Live Brushes. I pick Oilpaint Short, increase the size of the brush and select my colours using the Color Wheel by tapping on the colour spot on the left. I try to work loosely and swiftly because this stage is all about building the work up rather than detailing.
06. Block in your colour
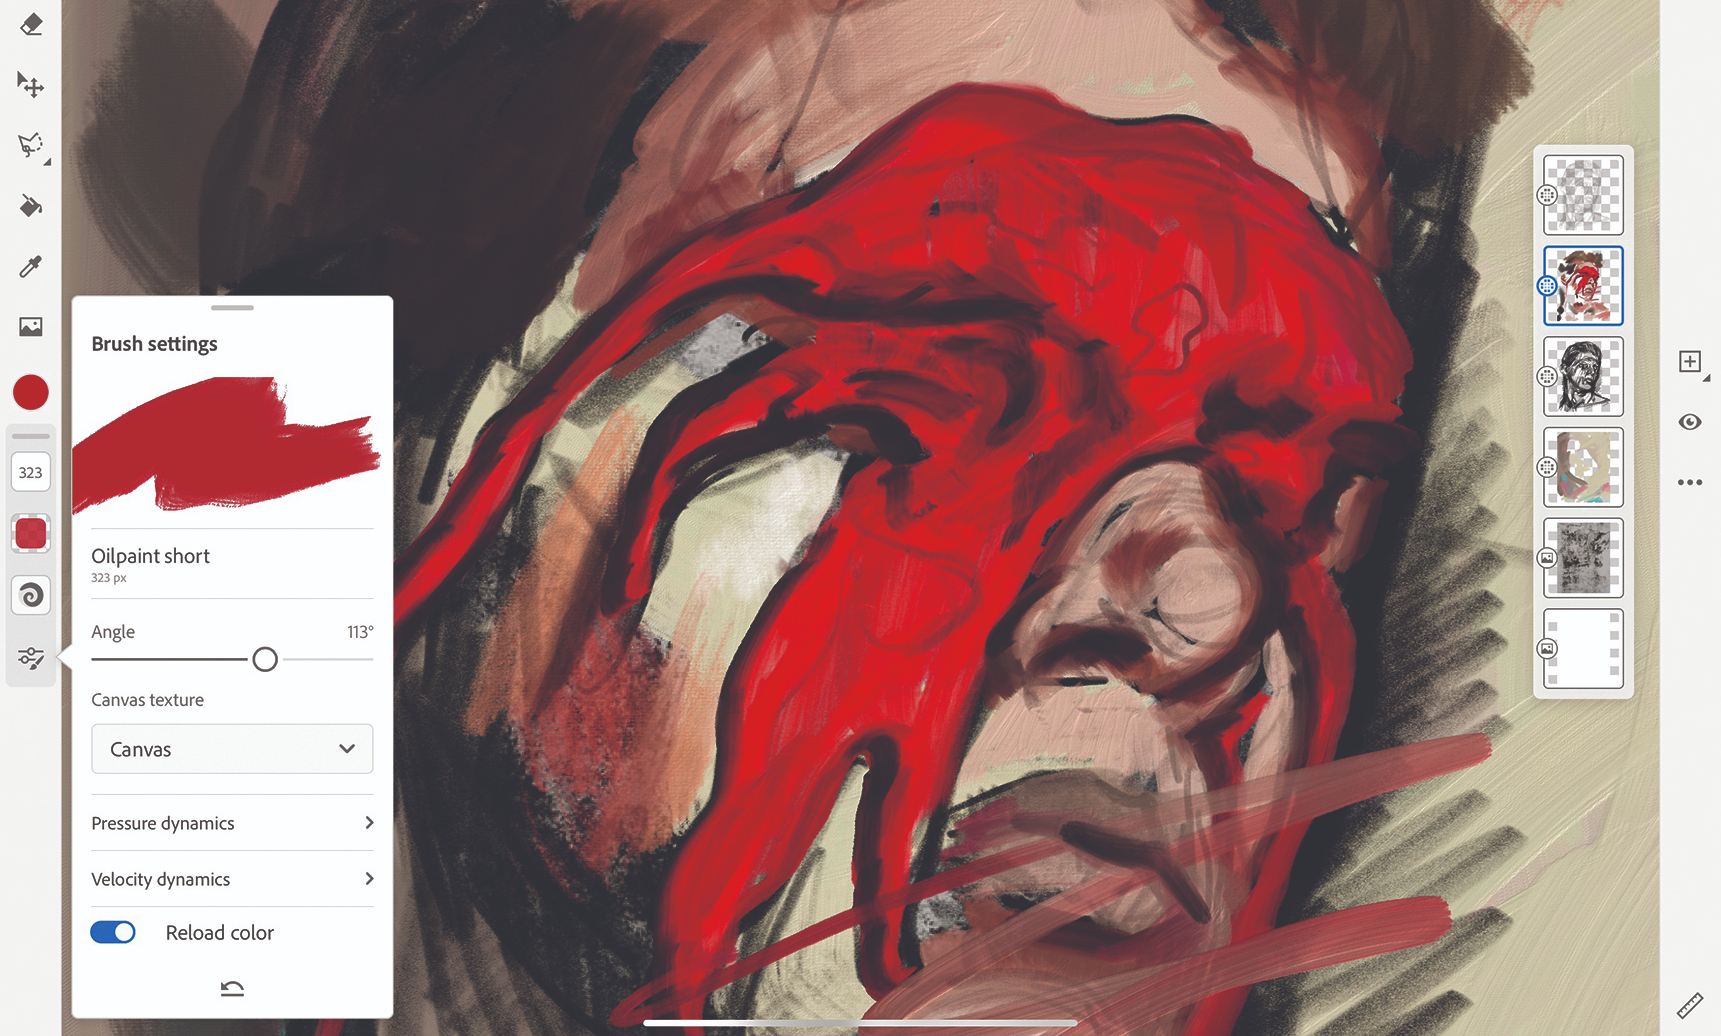
I create a new layer between my two pencil layers and select the Oilpaint Short tool again, this time reducing the size a little so I have more control. I loosely block in colour values, basic shapes and shadows. Then I switch to the Oilpaint Filbert brush and lift the pressure off my stylus towards the end of each stroke to create a wispy, paint running-out effect. I work swiftly during this stage because my pencil layer is still on top to guide me for the more detailed work that’s to come.
07. Add detail and texture
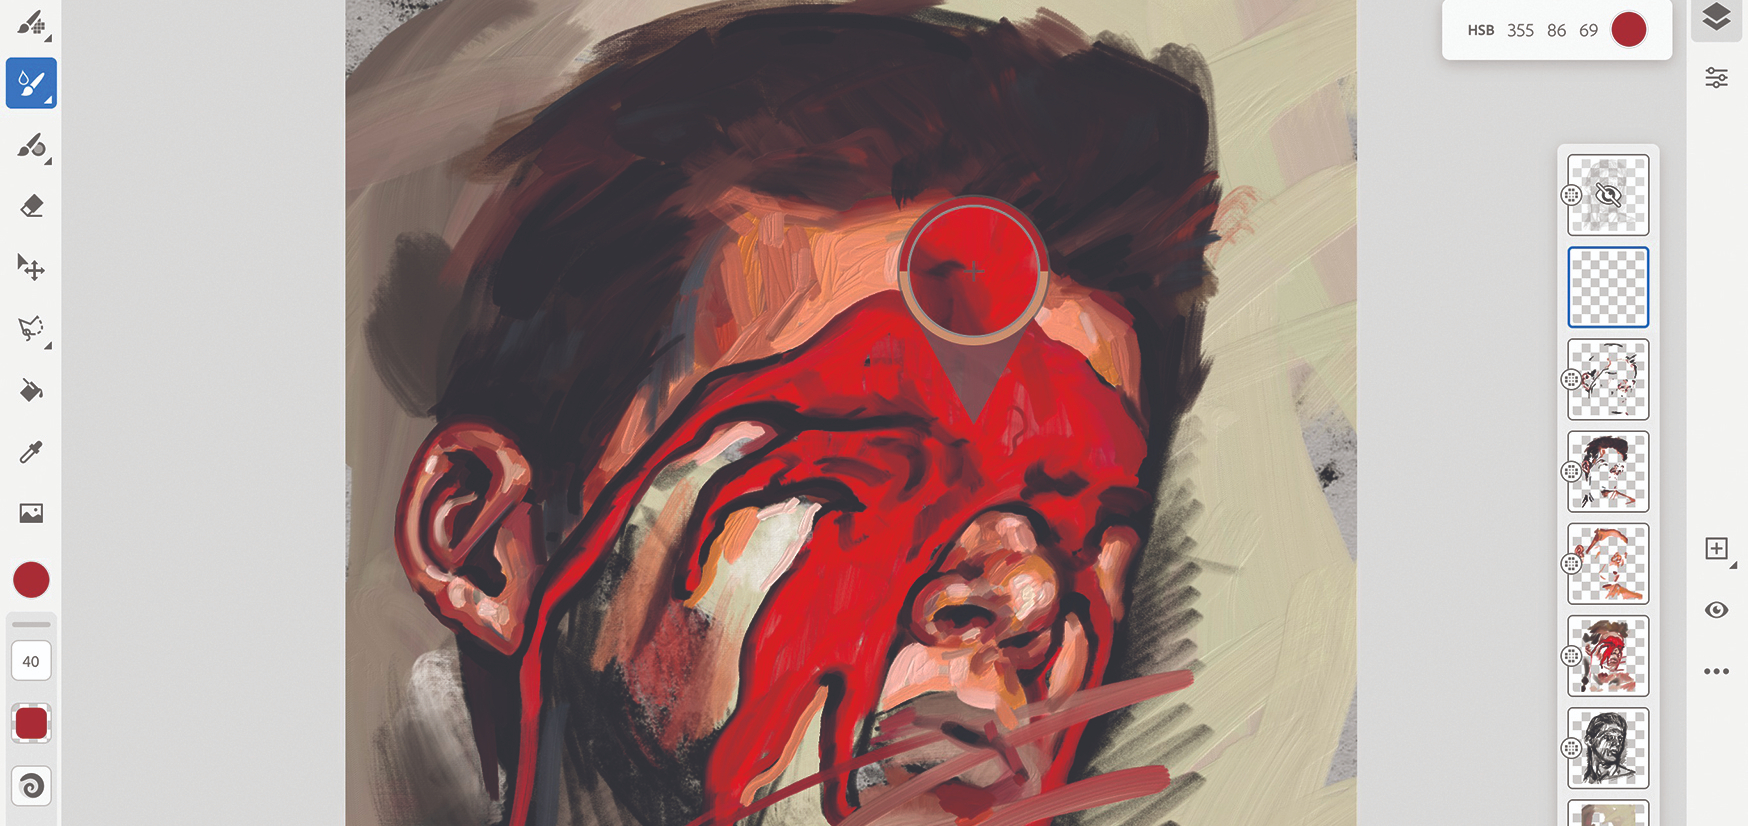
I create a new layer on top of the blocking-in layer. Then I pick the Oilpaint Chunky brush and use the Color Picker tool by pressing down on the area of colour I wish to select. Next, I add more structural and detailed brushstrokes that have a lot more texture to them. I also adjust the angle of the brush head. This alters the strokes’ direction of texture and blending, giving the impression that I’m painting from different angles on a real canvas.
08. Enhance highlights and shadows
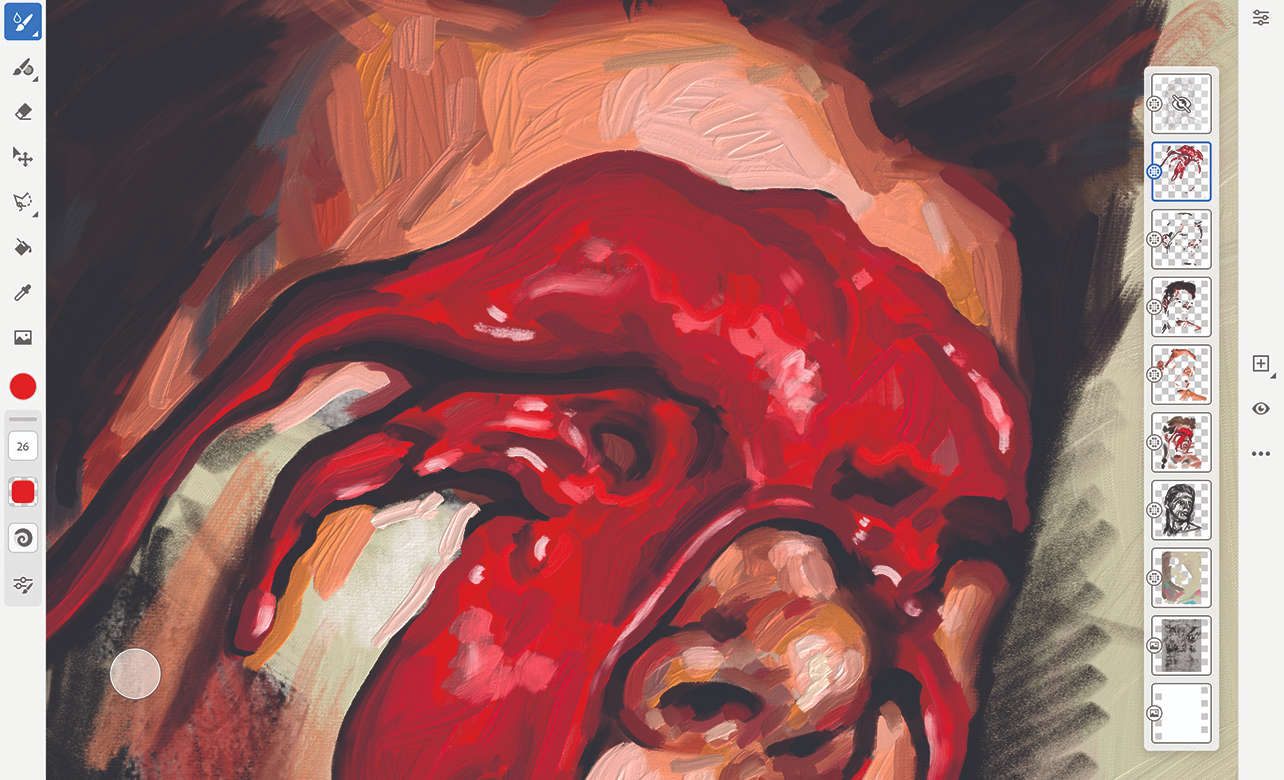
Now I have my detail I can hide the top pencil layer. I’ll keep it there just in case it comes in handy at some point, but it’s done its job for now. I create a new layer on top of the detailed paint and select the Oilpaint Chunky brush with Flow turned down a little. Then I begin to pick out the shadows and darkest elements of the painting along with dabs of white and pinks to highlight the brightest areas.
09. Multiply shadows
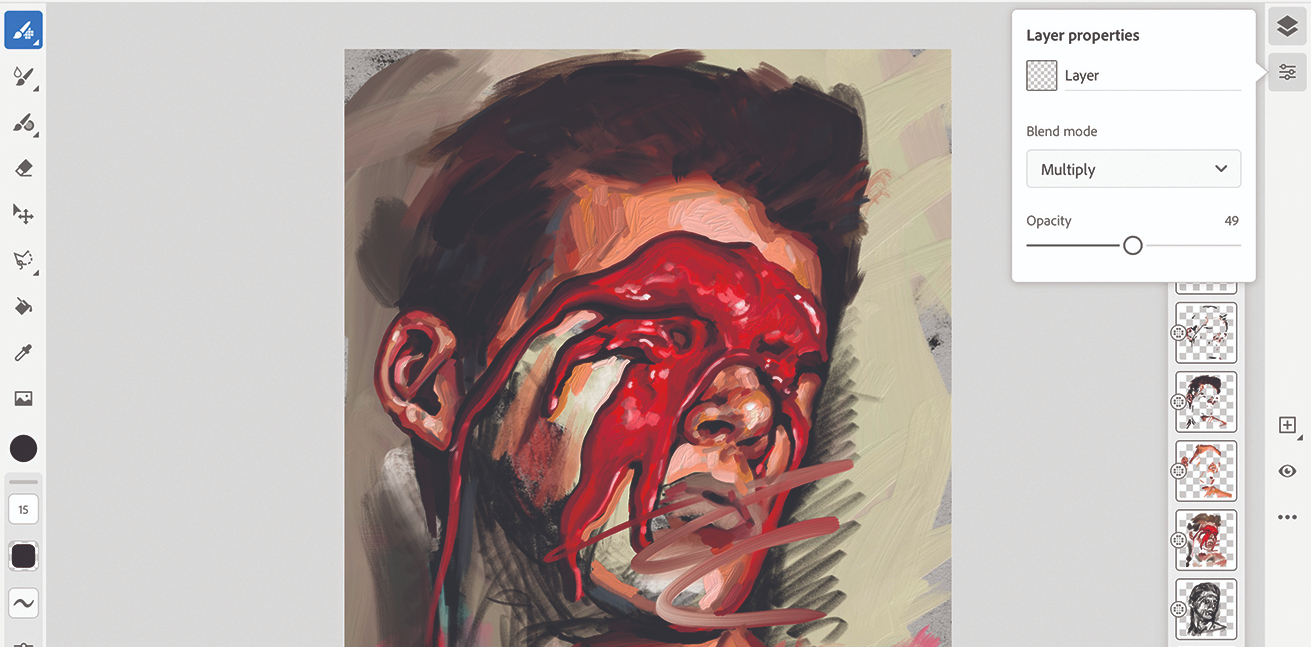
The main structure of the portrait is looking good and I’m happy to let my textures, pencil strokes and base colours poke through in certain areas. However, I want to add more depth to the work and make the face look more three dimensional, so I create a new layer and change its mode to Multiply. I then set its Opacity to between 40 and 50 per cent. I select a medium tone for each element of the picture – brown for the hair, ochre for the skin and crimson for the red paint – and begin to paint in the shadow areas again with the Live Oilpaint brushes.
10. Add paint splashes and chaos
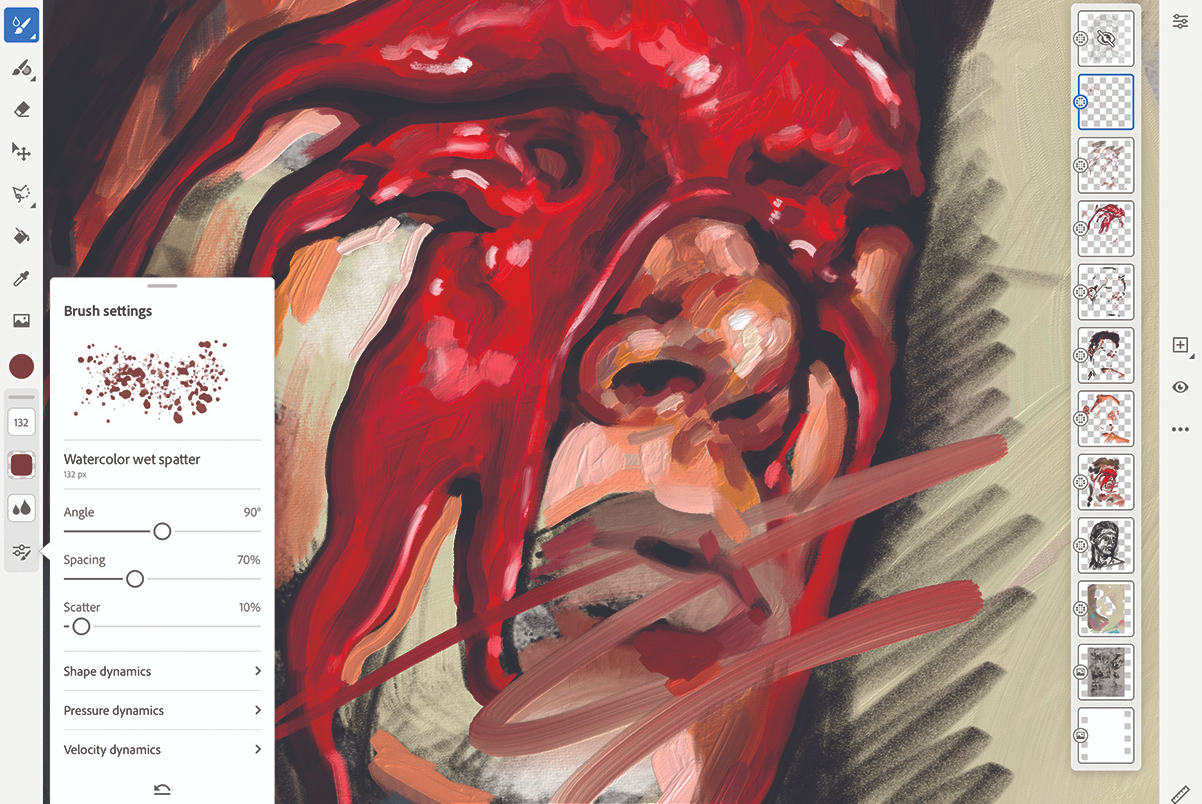
I decide to convey the looseness of my brushstrokes and add a little randomness to the piece with splashes, so I select the Live Watercolour Wet Splatter brush and increase the Spacing and Size in the Brush Setting panel on the left. Then I delicately apply splashes and drops to areas that may have caused a splash if I were painting this in real life (and no doubt creating a bit of a mess in my home studio in the process).
11. Create grunge textures
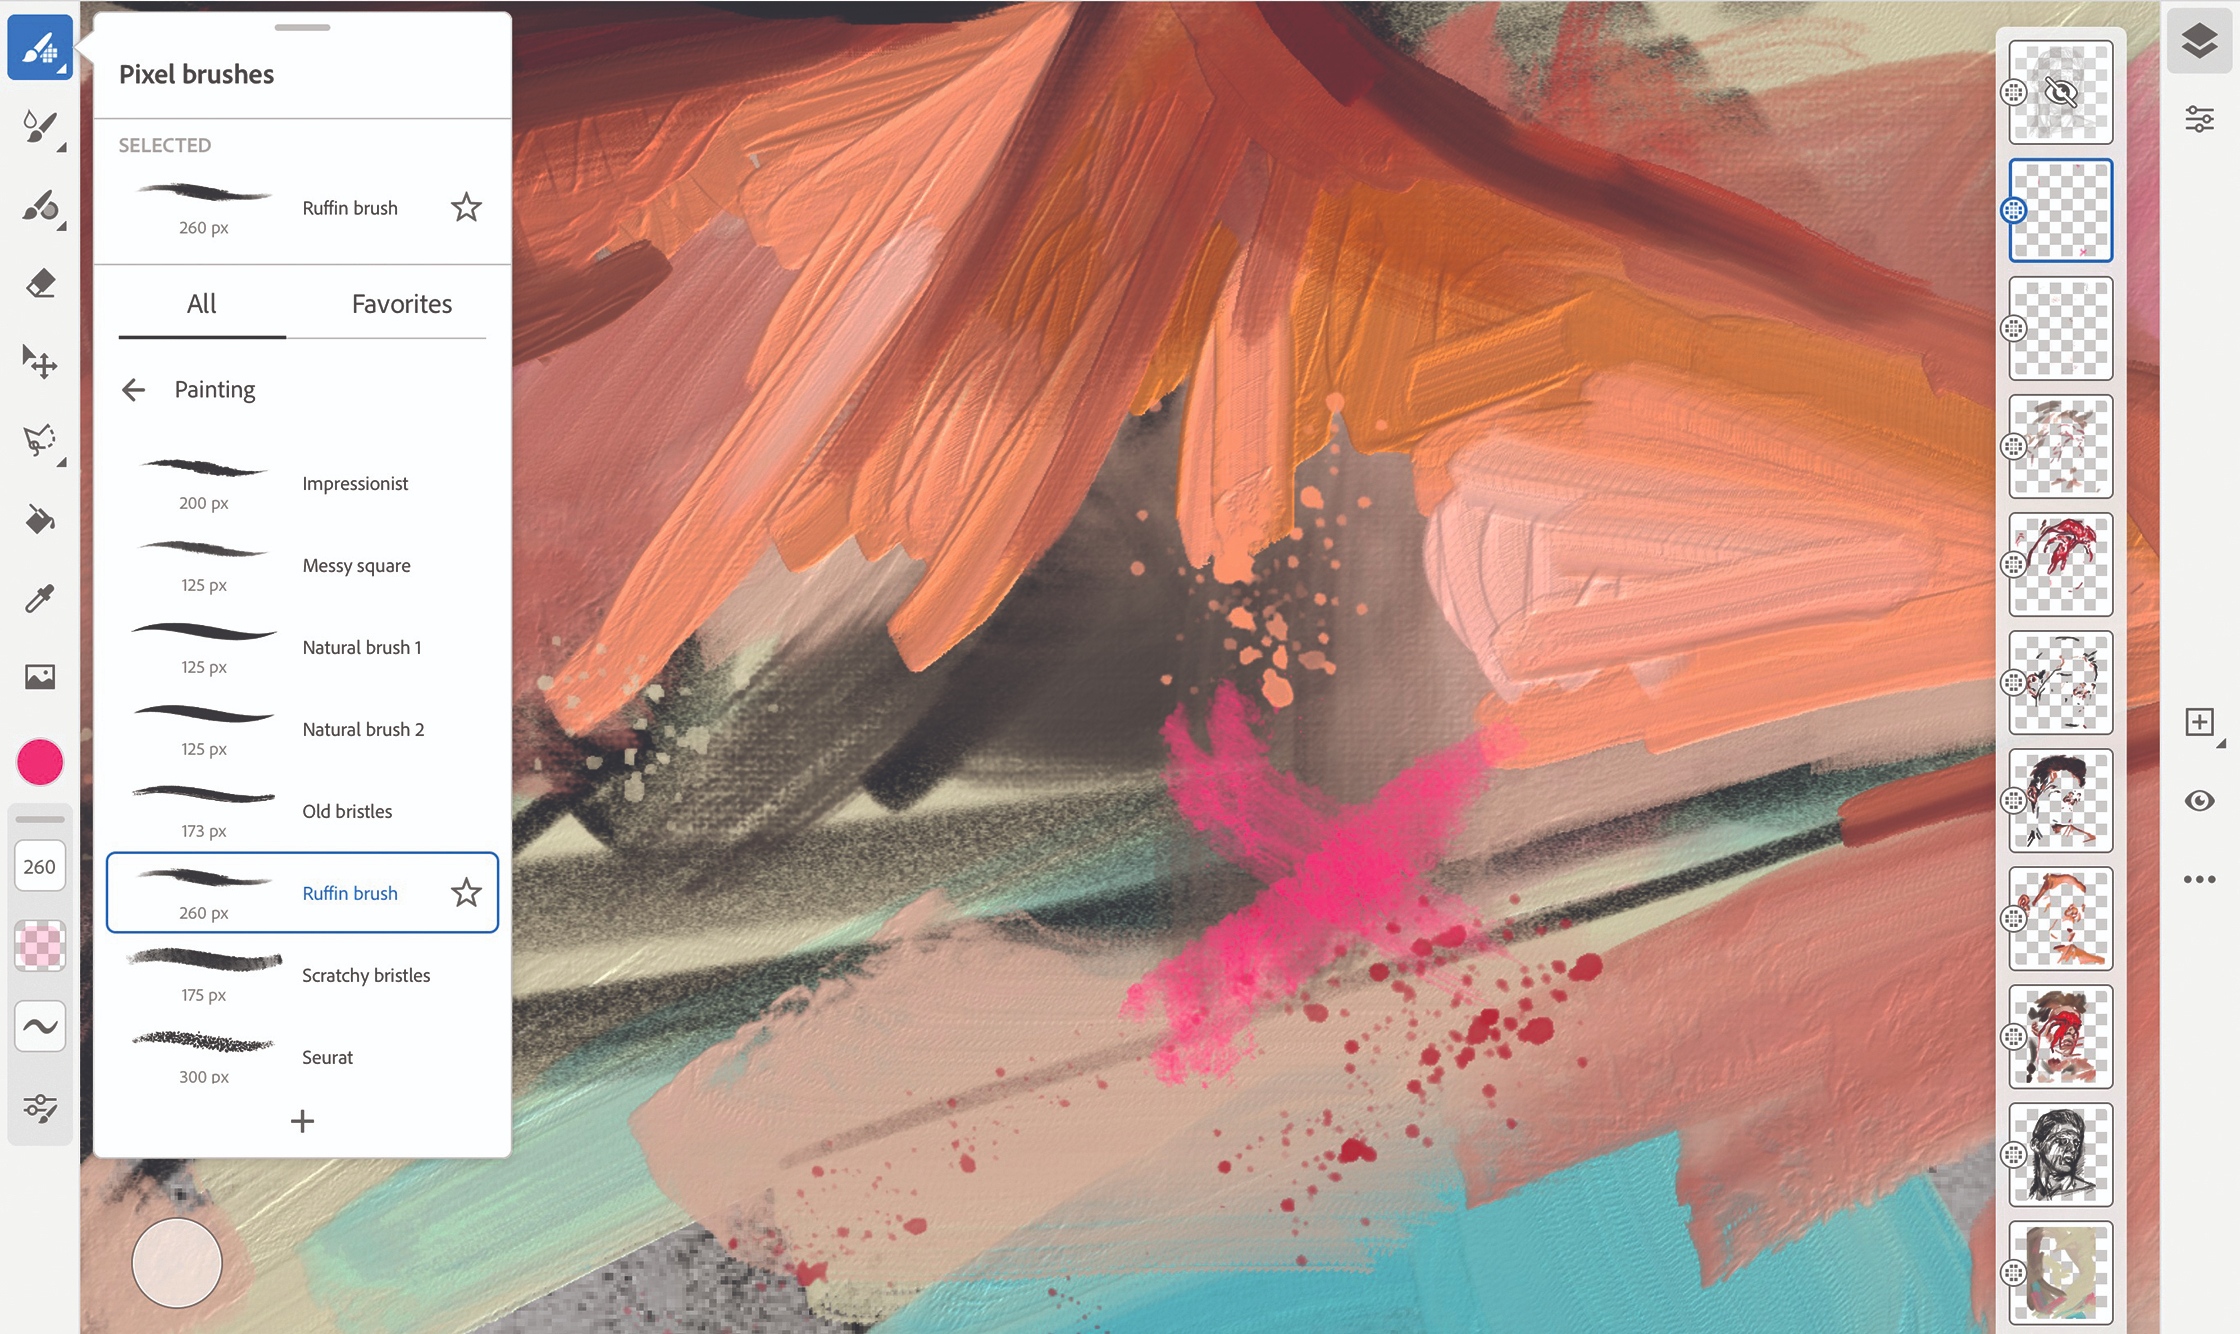
To ramp up the texture and movement I create a new layer and click the Pixel brushes, selecting the Painting tab. I choose the Ruffin brush, which creates a dry brush effect with no impasto – perfect for quick emotive shapes. I loosely draw and flick paint around the canvas, adding interesting shapes and pulling the pressure off at the end of the stroke to add the painterly effect. Again, within the Pixel brush tab, I select the FX > Inksplat brush. I set this brush to be huge and paint in from just off the side of the canvas. This enables drop of ink and paint to splash on to my canvas without revealing the stroke that made them.
12. Erase using the Touch Shortcut tool
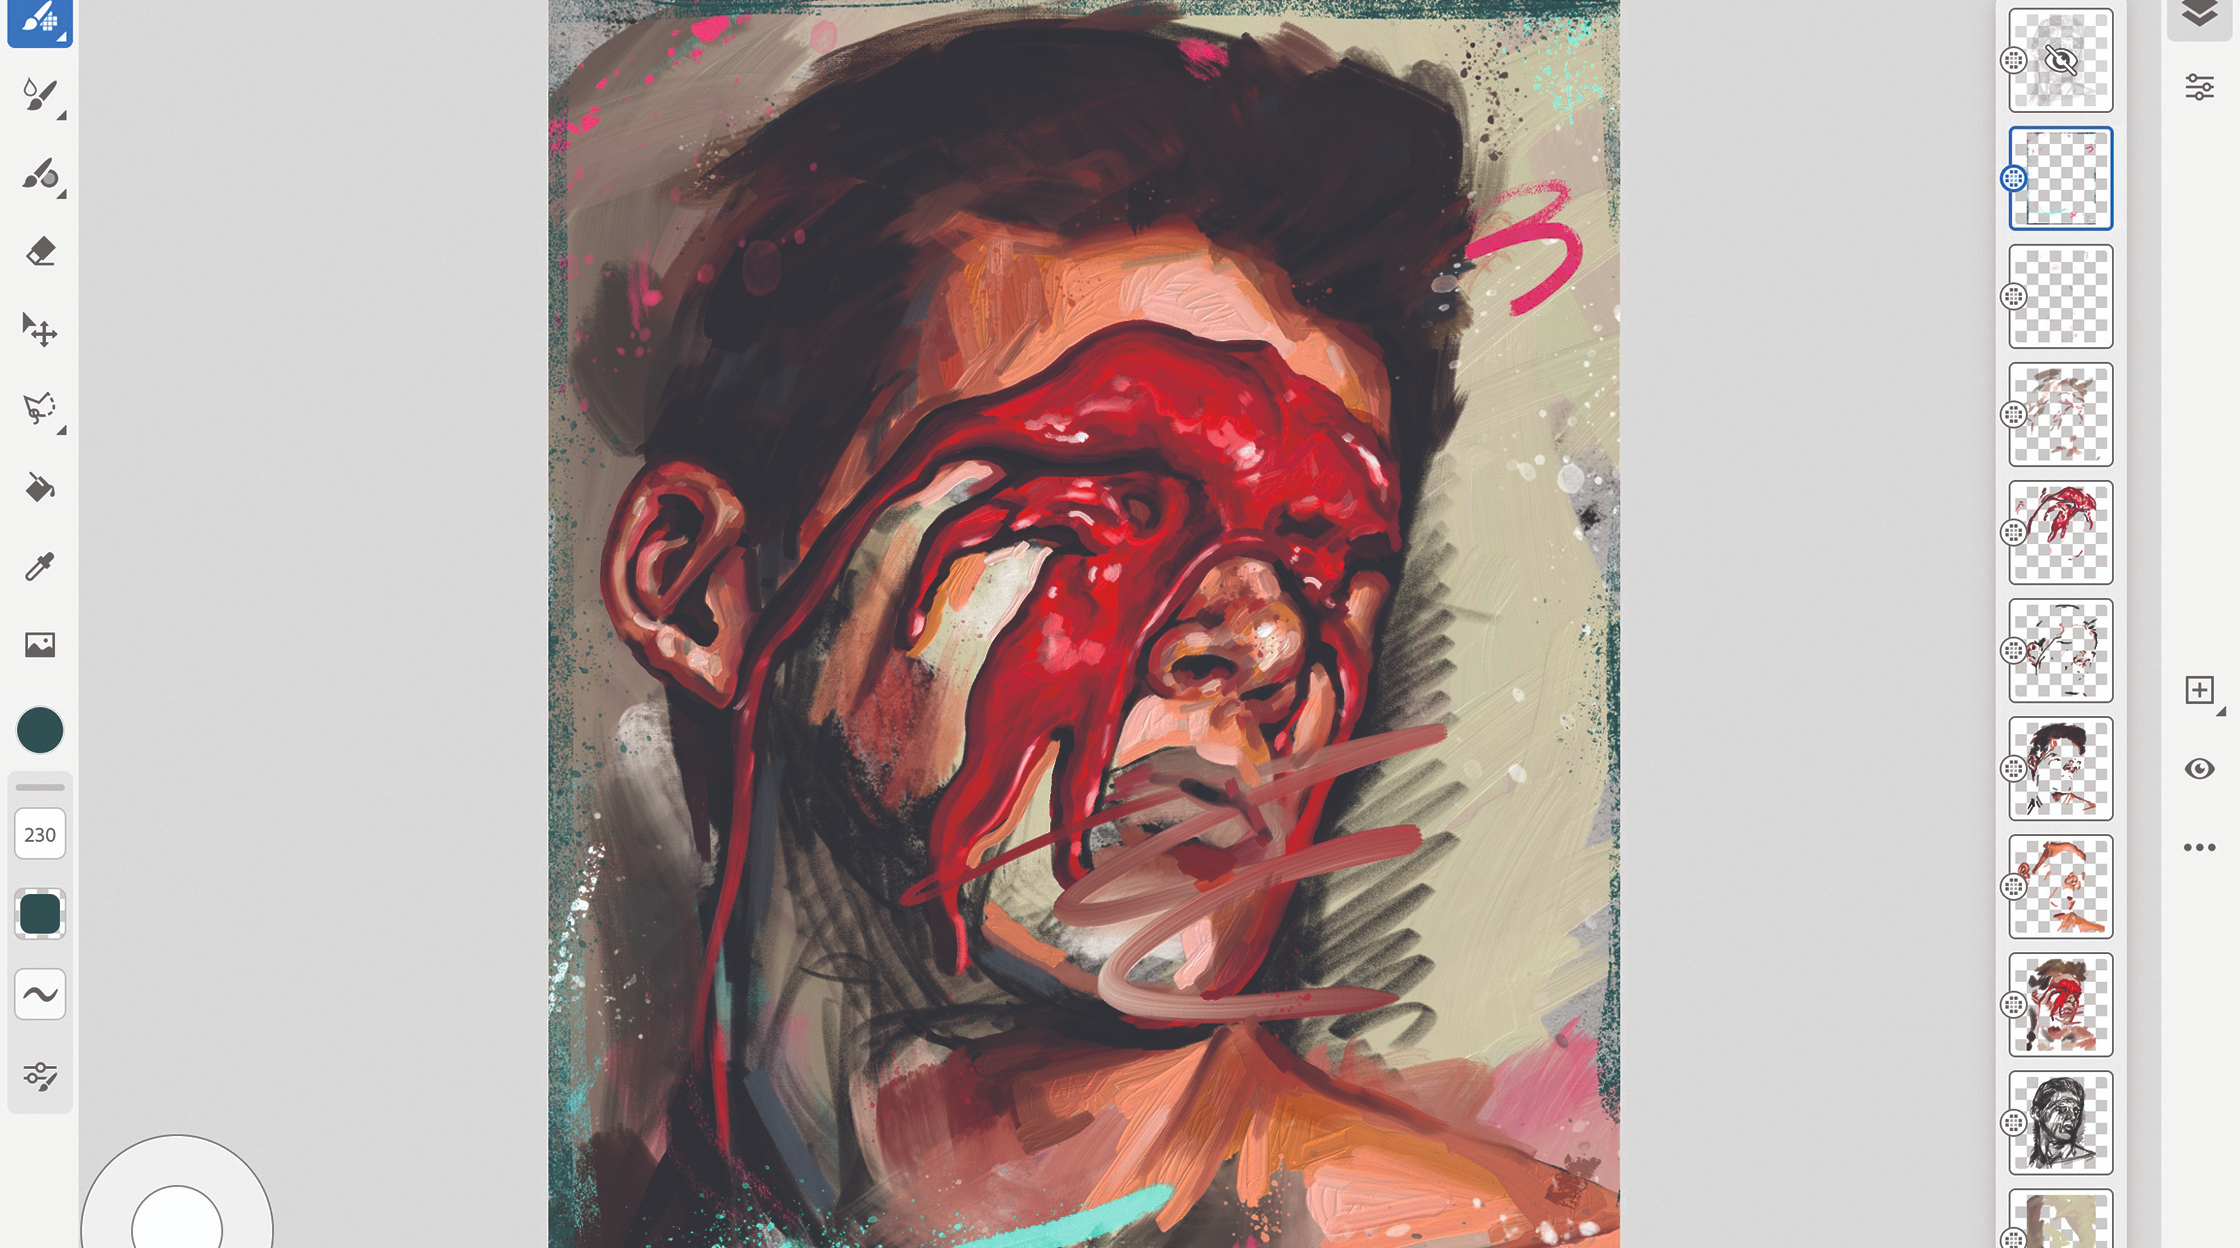
I select the Pixel Brushes tool and one of the rougher brushes and then, using the new Touch Shortcut tool, I press one finger on the floating button in the bottom left of the workspace and begin to erase areas. This button is contextual and does a different job depending on what tool you’re using. When I push and hold on the button it enables me to erase using whatever brush I’m painting with. I want to erase areas, but keep the texture and avoid creating a blunt-erased edge. The solution is to erase using textured brushes.
13. Export your work quickly
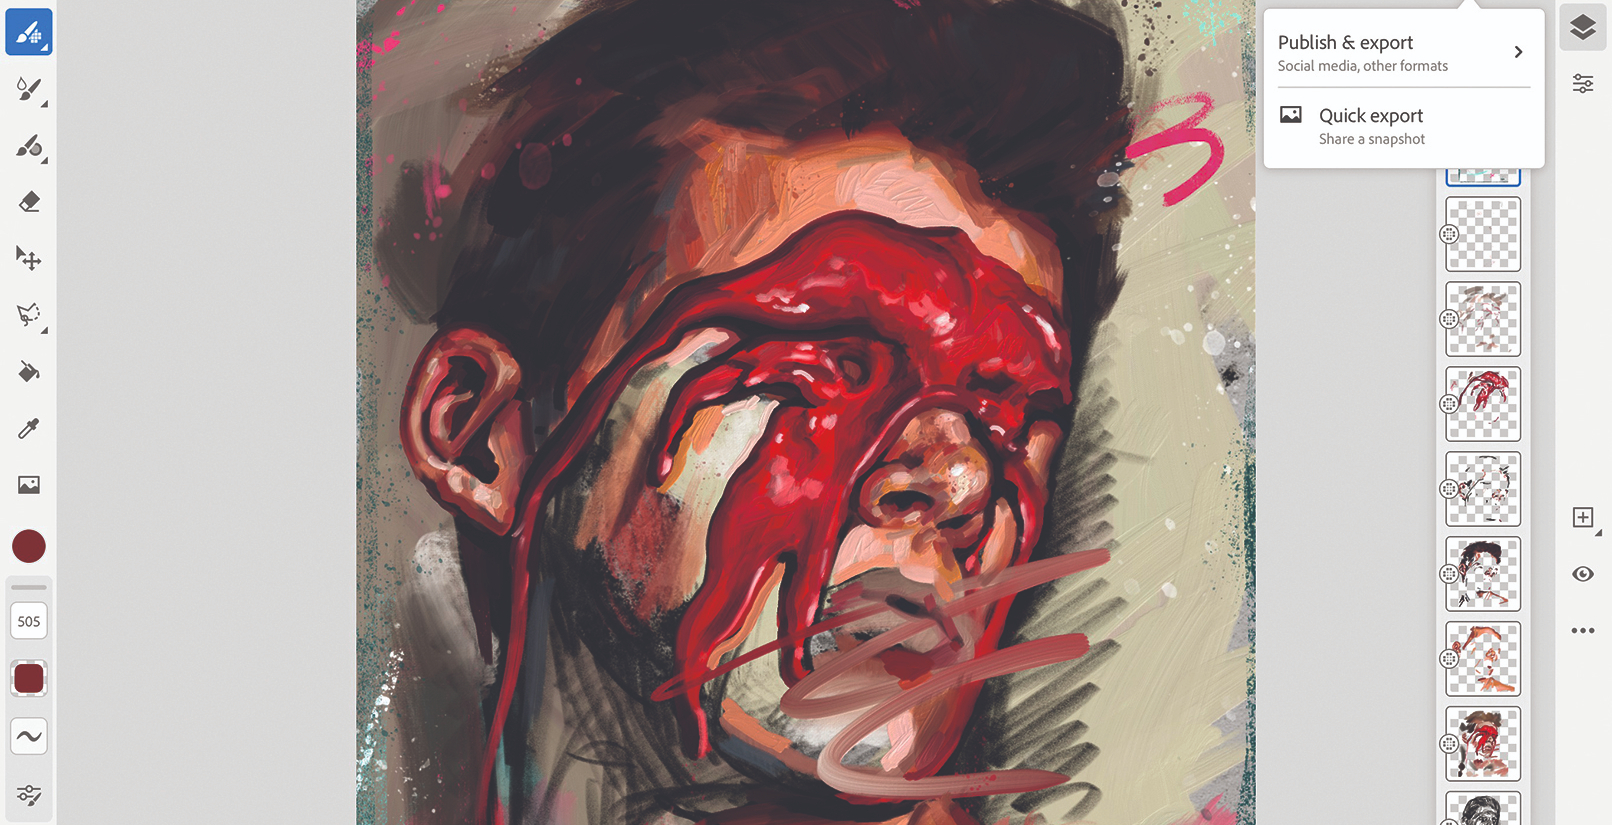
I’ve now completed my work so I need to share it. One new option in Fresco is the option to Quick Export and share a snapshot of your work. In the top bar, I select Quick Export. I’m offered a variety of options to save my image into my photos or share it quickly via messages, Mail, Twitter and so on. For updating clients quickly on commercial progress this tool will come in very handy.
14. Save your file, publish and export
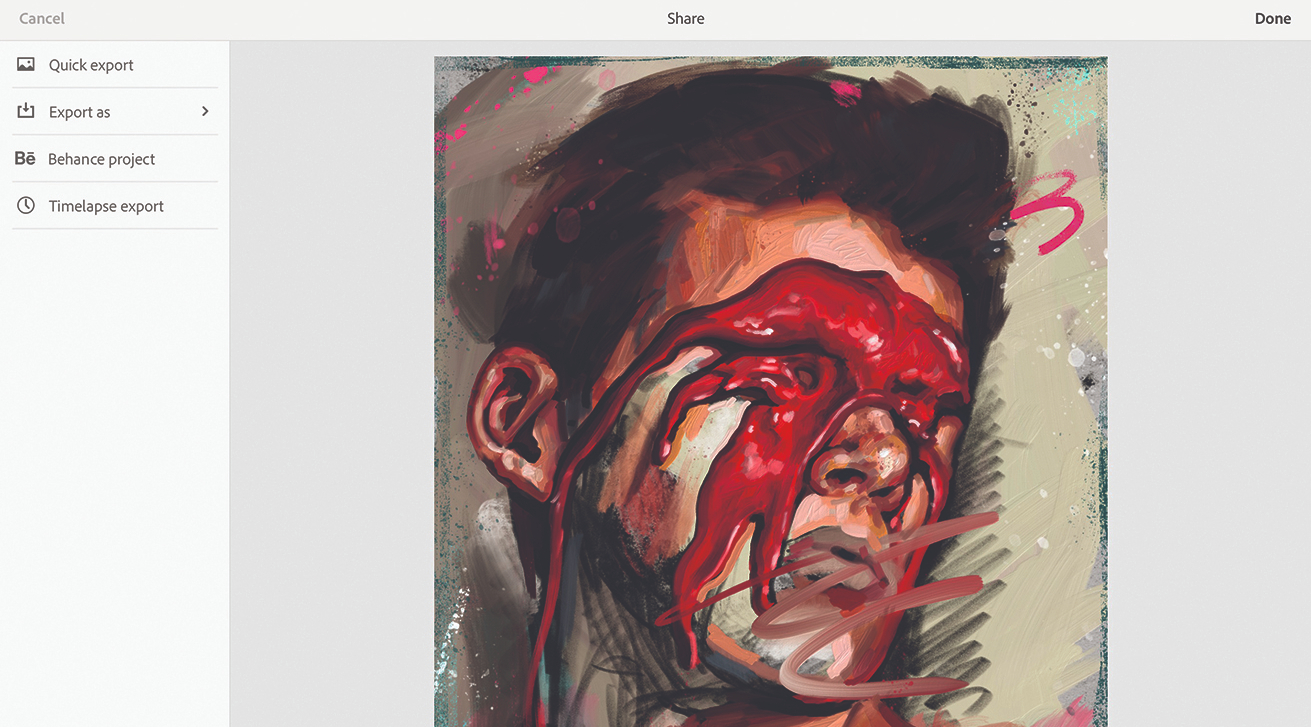
Again, clicking the Export button I select Publish and Export. Fresco offers me various options for my finished painting for exporting as a PNG, JPG, PSD or PDF. I can also export directly to a Behance project or export my Time-lapse showing my painting process from start to finish. It’s also worth mentioning that when I click the Home button all my documents are automatically saved in Fresco and in the cloud, ready to be worked on again if needed.
This article originally appeared in issue 184 of ImagineFX, the world's best-selling magazine for digital artists. Subscribe here.
Related articles:
- The new Adobe Fresco and Photoshop brushes you need to know about
- Adobe MAX: Conference will be online-only, and free
- The best digital art software for creatives
Get the Creative Bloq Newsletter
Daily design news, reviews, how-tos and more, as picked by the editors.

Thank you for reading 5 articles this month* Join now for unlimited access
Enjoy your first month for just £1 / $1 / €1
*Read 5 free articles per month without a subscription

Join now for unlimited access
Try first month for just £1 / $1 / €1
Phil is a fine and digital artist specialising in expressive portraiture. His MA in The History of Art has helped shape his artistic style. He's a proud father, an outdoors lover and a keen beard enthusiast!
